Register your product and get support at www.philips.
Contents 1 1 Please read the following instructions carefully, and retain them for future reference. It may be helpful to have the instructions for use for the PC at hand for reference. 2 3 4 5 6 7 8 9 Things you should know 2-4 Safety precautions 2 Copyright 3 Disclaimer 3 FCC compliance 3 Environmental information 3-4 System requirements 4 Disclaimer of warranty 4 Limitations of damages 4 Your WebCam 4 Welcome 4 What’s in the box? 5 Functional overview 5 Installation 6-7 5.
Copyright Copyright © 2008 by Philips Consumer Electronics B.V. All rights reserved. No part of this publication may be reproduced, transmitted, transcribed, stored in a retrieval system or translated into any language or computer language, in any form or by any means, electronic, mechanical, magnetic, optical, chemical, manual or otherwise, without prior written permission from Philips. Brands and product names are trademarks or registered trademarks of their respective companies.
Please inform yourself about the local separate collection system for electrical and electronic products. Please act according to your local rules and do not dispose of your old products with your normal household waste.The correct disposal of your old product will help prevent potential negative consequences for the environment and human health. Warning Plastic bags can be dangerous.To avoid danger of suffocation, keep this bag away from babies and small children.
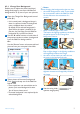
3 What’s in the box? 4 Please check that the following items are packed in the Philips SPC2050NC box. They are provided to help you set up and use your Philips SPC2050NC. Functional overview 1 6 5 2 Philips SPC2050NC WebCam 3 4 7 1 Installation CD-ROM including user manual 2 3 SPC2050NC Installation CD v.1.00 9082 100 03367 4 5 6 7 What’s in the box? / Functional overview Snapshot button Enables you to take photos without using your mouse.
5 Installation 5.1 Installing the WebCam software The software supplied only works on PCs with the operating systems Microsoft® Windows® XP (SP2) and Vista.Also refer to 1 ‘Things you should know’ - ‘System requirements’. • • • 1 3 4 Notes Unplug all your USB devices (except USB keyboard and USB mouse) before you start. Do not plug in your WebCam yet. Run the Installation CD-ROM first. Have your Windows® CD-ROM at hand. Click ‘Next’ to continue. • The ‘Manual’ screen appears.
Or: If there are certain items you do not wish to install, check the boxes before these items. Select at least ‘WebCam Driver SPC2050NC’ and ‘Philips CamSuite’. 6 5.2 Click the ‘Next’ button. • The following software license agreement appears. Click on ‘Yes’ to continue the installation. 1 7 • The following screen appears. Click ‘Next’ to continue. 2 3 4 5 8 9 Connecting the WebCam to your PC / laptop Be sure to run the installation CD first, before connecting the WebCam to the PC / laptop.
6 WebCam settings All SPC2050NC WebCam settings can be adjusted in the property pages.The Philips CamSuite application however, enables you to easily acces a number of the most used settings (properties).When activating instant messaging or VoIP service (Skype,Windows® Live Messenger,Yahoo! Messenger, etc.), the Philips CamSuite control panel appears automatically. The control panel can also be accessed by double clicking the Philips CamSuite icon ‘ ’ in the Windows taskbar (bottom right of your screen).
6.2.1 Change Your Background Enables you to replace the actual (real-time) background image by one from the WebCam background list or by one of your own pictures. 1 2 Open the Change Your Background control panel (‘2’). • In the control panel, a background image is shown in a preview window.The background name is displayed above the window. By default, the last selected background is shown.
6.2.2 Fun frame Enables you to place an overlay (frame) over the current video stream. 1 2 Or: Use the ‘Browse’ button to browse and load pictures from your computer’s hard disk. Open the Fun frame control panel (‘2’). • In the control panel, a frame image is shown in a preview window.The frame name is displayed above the window. By default, the last selected frame is shown.When this option is enabled for the first time, the first frame from the WebCam frame list is selected and shown.
6.3 Image settings menu Enables you to optimize image quality. • Click the ‘ ’ button in the Philips CamSuite control panel to open the Image settings menu. Use the slider to dynamically zoom in and out. • The frame shows the position to the overall image.The frame increases / decreases according to zoom factor. • Use the panning arrows (left / right / up / down) to move the frame. • Use the center button to position the frame in the center of the image.
6.3.3 Pixel Plus This option enables Philips patented Pixel Plus technology and helps you to enhance the image and video quality of the WebCam, giving you natural-looking, razor sharp pictures with incredible detail. Use the slider to adjust the level of Pixel Plus, added to the live video of your WebCam. 1 Use the slider to adjust the level of Pixel Plus, added to the live video of your WebCam. 6.4 Audio settings menu Enables you to optimize audio quality.
6.5 Property pages In the Property pages you can adjust all possible SPC2050NC WebCam settings (properties): General,Video,Audio and Features. Note! For easy access to the most used WebCam settings (Fun, Image,Audio), open the Philips CamSuite control panel and make settings as described in the previous chapters. • Click the ‘ ’ button in the Philips CamSuite control panel to open the Property pages. • The General settings screen appears.
5 Demo mode Select ‘Demo mode’ to see a 'live preview' video image on your monitor so you can see the effect of the adjustment on your screen.The lower part of the screen will be split in two halfs; on the left you see the current picture, on the right you see the enhanced picture. In order to see the ‘live preview’, you need to have an image beforehand (for instance created with WebCam Companion, refer to 6.1 ‘WebCam Companion’).
14 Contrast Contrast enables you to control the ratio between dark and light according to your own preference. Use the slider to find your preferred setting. 15 Gamma Gamma enables you to brighten dark areas within the displayed image or video and visualize more details without over-exposing already light areas. Use the slider to find your preferred setting.
6.5.4 Features settings • Click the Features tab. • The ‘Features settings’ screen appears. 23 24 25 27 Video Frames Refer to 6.2.2 ‘Fun frame’ for an explanation of the feature and information on how to activate it via the Philips CamSuite control panel. 28 Video Effects Refer to 6.2.4 ‘Fun effect’ for an explanation of the feature and information on how to activate it via the Philips CamSuite control panel.
8 Technical data Sensor 9 Frequently asked questions (FAQ) How can I adjust image quality? 2.0 MP CMOS Real video resolution (Max.) 2.0 MP 9.1 Real still image resolution (Max.) 2.0 MP The default settings of the Philips WebCam usually offer the best possible image quality. It might be possible that you are not completely satisfied with the current image quality. In this case, follow the steps below to adjust image quality according to you own personal preferences.
4 Click ‘OK’ to save your settings. 5 Click the Video tab. • The Video settings screen appears. 6 Adjust the gamma value of the displayed image or video.The gamma setting enables you to visualize more details. • Use the slider to find your preferred setting. Slide to the left to see more details; slide to the right to see less details. 7 Adjust the brightness of the displayed image or video. • Use the slider to find your preferred setting.
7 9.3 1 2 3 4 Click ‘OK’ to save your settings. 5 Check whether the following features are enabled (boxes checked): - Change Background; - Add logo; - Video Frames; - Video Effects. If enabled, disable these features by dischecking the boxes. 6 Click the Video tab. • The Video settings screen appears. Check whether Full automatic control is enabled (box checked). If enabled, disable Full automatic control by dischecking its box. Set Frame rate to a minimum of 5 fps.
Note! The maximum frame rate (frames per second (fps) produced by the WebCam) and the maximum image resolution depend on the specifications of your PC / laptop.The WebCam software will automatically adjust frame rate and resolution as good as possible for your particular situation. It might be possible that the specifications of your PC / laptop do not meet the requirements for maximum frame rate and resolution setting. 9.
© 2008 Koninklijke Philips Electronics N.V. All rights reserved. Reproduction in whole or in part is prohibited without the prior written consent of the copyright owner.The information presented in this document does not form part of any quotation or contract, is believed to be accurate and reliable and may be changed without notice. No liability will be accepted by the publisher for any consequence of its use.