For your safety Your receiver contains high-voltage components. DO NOT open the housing. Only qualified service personnel should make repairs. Before connecting the receiver to power mains, check that supplied voltage corresponds with the voltage specified on the label on the bottom of the receiver.
Prepare remote control unit for use Remove the remote control unit's rear cover. Insert two batteries {type ROJAS 1.5V). Position them as shown in the diagram embossed in the plastic. Replace the cover. The batteries supplied with your receiver's remote control unit contain no heavy meals such as Mercury or Nickel Cadmium. Nonetheless, many countries prohibit disposal of used batteries as domestic waste. Please be aware of local laws and regulations concerning used batteries.
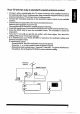
2 Making connections Note: «If necessary, for connection and installation, refer to the user manual of your TV set, video recorder of decoder, e-Donotconnect the satellite antenna yst. Your TV set has one Cart connector (= Euro connector) « Connect your TV to relevant SCARY connector, using a standard SCARY cable. This method of connection is recommended, as it gives the best picture quality.
Your TV set has only a standard coaxial antenna socket Connect, with a coaxial cable, the TV output connector of the satellite receiver to the antenna input of your Video recorder {see connection diagram below) or to the antenna input of your TV serif you have no video recorder, Connect the Terrestrial antenna ta the terrestrial antenna input of your satellite receiver, Connectable your equipment to the mains and switch them on.
3 Getting started Connect the satellite antenna « Disconnectyourreceiverfrom mains. » Connect the satellite antenna. + Plug your satellite receiver to mains. Locate the satellite + Switch your TV steno and select any terrestrial program. Select the program allocated to satellite program walking housewife the coaxial connection with your satellite receiver. + Press Standby key to wake up your satellite receiver.
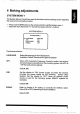
4 Making adjustments SYSTEM MENU 1 The System Menus (1 and 2) are used for the basic. receiver settings and for adjusting the receivership reception system, « Press once the SYS button on the remote contort o call the System menu 1. * Select the menu items with A v and settee values with the + buttons. SYSTEM MENU 1 SYSTEM MENU 1 > LANGUAGE ENGLISH AFC Of N BRAINPOWER ON DISSECT OFF The first menu item is: LANGUAGE AFC LNB Dissect Electable language for the OSD blend-in.
SYSTEM MENU 2 « Expressionistic SYS bunion to caliph System menu 2. » Select the menu items with A band settee values with the + buttons. You can lase use the numeral bunions to set frequencies. SYSTEM MENU 2 SYSTEM MENU INPUT HEAD 1 OFF TONE ORBIT POSITION NS TYPE 1 PROGRAM LOW BANDBOX. 2.7500Hz HIGH BAND L.O. e DECODER EXT AV LNB The system menu 2 is used for setting the necessary switching standards for the program selection. Eight menu windows (LNB 18)are available for setting the various standards.
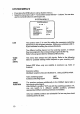
LNB 4 LNB types are available in this menu: a) Universal LNB b) Dual Band LNB ©) Programming d) C-Bandanna The Universal LNB is suitable for the frequency range from 10.7 12.75GHz whereby the LO 9.75GHz is per-programmed in the dower frequency range Ghz) and LO 10.6 Ghz in the upper frequency range The 22KHz switching signal is used to switch the LO {oscillator frequency or local oscillator).
EXT AV -when the video and audio signals are coded. EXT-V -when only the video signalized. only the audio signals coded. CANAL +-when a canal plus decoder is connected. Follow the operating Instructions forth decoder! Save the settings with STORE. PROGRAM MENU Note: Although your receiver is per-programmed, you may wish to re-program some channels. To help you do so, we suggest that refer to the table of satellite channels provided in a satellite magazine, which details all the parameters mentioned below.
FREQ. Use the numeral buttons to enter the 5 digit satellite frequency, e4g. 10984 (ZDF program on the Asia satellite. Use the + buttes for fine adjustment to clear interference when receiving weaker signals. 3 o) The receiver also has a frequency search function, Use this function when you do not know the exact frequency for a new program, Press one of the Aorta buttons for about 3 seconds to start the search up or down. The search runs and stops when a signals found.
AUDIO MENU « The Audio Menu enables you to change the 16 audio pairs. « To access the Audio Menu, press the Audio button on the remote control unit once to display the first 8 audio pairs on your TV screen (see below} and then once again to display the second 8. AUDIO MENU > 558576 558 Crass the Next button to access the required setting. Either use the or + keys to decrease or increase the frequency setting or key in the required frequency by using the numeric keys.
TIMER MENU If the current day/time has not been set and the Timer key is pressed, the Initial Timer menu shown below will be displayed on your TV screen. INITIAL TIMER MENU TIMER MENU TIMER MENU DAY START STOP OH OFF o008 Bomb 1 AL ores ozm 21 CURRENT TIME: MON 12:00 A TODAY 0100 0 Rot 2t CECAL WED 000 0201 120 Press the A or v keys to change the day setting. Press the Next key to access the dime sifting and then use the A or ¥ keys to change the time setting.
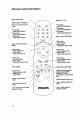
5 Advanced features FORCED MUTE Dis FAV RADIO ATAVIST SETUP LOCK PROGRAM LOCK 16 Crass the 0/AV key once in normal mode, the VCR mode will AV be entered whether the pin 8 of VCR is high or not. The VOR signal will be loop rough. The front pane) will display V1. Press the 0/AV key again, the DECODER mode is poof entered, the front display will shown A2, The decider signet is loop through, according to the selected LNB setting configuration.
RECORD The RECORD LOCK key locks the whole remote control unit LOCK {except the RECORD LOCK key) so that the channel! the user wants to record will not be interrupted by the remote. The record lock will autocratically be set while the event dimer is active. The user can press this key to unlock the remote. The message "RECORD ANTICLOCKWISE" will be displayed on your TV screen as thiskeyispressed. Mouthed MOD key is used to activate the UHF Modulator adjustment LATER mode.
7 Trouble shooting Problem No picture, no sound and no display. No picture, no sound; but displays correct. Possible cause Receiver off. If only the coaxial cable connection is being used, the TV set and receiver are dunned to different UHF channels. Action to take Check power mains, connection Checks equipment and refer to installation chapter, Replete correct. Poor sound porno sand. No picture. Sound quality correct, Picture quality poor, Remote control unit does not command satellite receiver.