Soundbar 6000 series TAB6305 Register your product and get support at www.philips.
1 Important 2 4 Use your Soundbar 12 Help and support 2 Turn ON and OFF 12 Safety 2 Select Modes 12 Care for your product 3 Select Equalizer (EQ) Effect 12 Care of the environment 3 Adjust the Volume 13 Bluetooth Operation 13 Caution FCC and IC statement for Users (USA and Canada only) 2 4 AUX / OPTICAL / HDMI ARC Operation 14 Compliance 4 USB Operation What’s in the Box 5 Your Soundbar 6 Main unit 6 Connectors 6 Wireless subwoofer 7 Remote control 7 Prepare the Rem
1 Important ͻ ͻ Read and understand all instructions before you use your product. If damage is caused by failure to follow instructions, the warranty does not apply. ͻ ͻ Help and support For extensive online support, visit www.philips.com/support to: ͻ download the user manual and the quick start guide ͻ watch video tutorials (available only for selected models) ͻ find answers to frequently answered questions (FAQs) ͻ email us a question ͻ chat with our support representative.
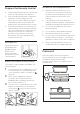
Care for your product Eng lis h Risk of overheating! ͻ Never install this product in a confined space. Always leave a space of at least four inches around the product for ventilation. Ensure curtains or other objects never cover the ventilation slots on the product. Use only microfiber cloth to clean the product. Risk of contamination! ͻ Do not mix batteries (old and new or carbon and alkaine, etc.). ͻ CAUTION: Danger of explosion if batteries are incorrectly replaced.
Caution FCC and IC statement for Users (USA and Canada only) This device contains licence-exempt transmitter(s)/receiver(s) that comply with Innovation, Science and Economic Development Canada’s licence-exempt RSS(s). Operation is subject to the following two conditions: 1. 2. FCC INFORMATION Warning: ͻ This equipment should be installed and operated with minimum distance 20cm between the radiator & your body.
Eng lis h What’s in the Box Check and identify the items in the package: ijŦ Soundbar x1 ijŦ Wireless Subwoofer x1 ijŦ Remote Control x1 ijŦ Power Cord (for Subwoofer) * x2 ijŦ DC Adapter (for Soundbar) * x2 ijŦ IR pass-through Cable x1 ijŦ IR Bracket x1 Wall Mount kit x1 ijŦ (Wall Brackets x2, Screws x2, Dowels x2) ijŦ Quick Start Guide / Warranty Card / Safety Sheet x1 Wireless Subwoofer Remote Control Power Cord * (for subwoofer) DC adapter * 2X 2X IR pass-through Cable IR Bracket
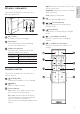
2 Your Soundbar Congratulations on your purchase, and welcome to Philips! To fully benefit from the support that Philips offers, register your Soundbar at www.philips.com/support. (Standby-On) Switch the Soundbar On or to Standby. (Source) Select an input source for the Soundbar. +/- (Volume) Increase or decrease volume. Main unit Connectors This section includes an overview of the main unit. This section includes an overview of the connectors available on your Soundbar. DC 24V Connect to adapter.
This section includes an overview of the Wireless subwoofer. Optical: Switch your audio source to the optical connection. HDMI ARC: Switch your source to HDMI ARC connection. USB: Switch to USB mode. EQ Select Equalizer (EQ) effect. / (Previous/Next) Skip to the previous or next track in USB/BT mode. (Play/Pause) Start, pause or resume play in USB/BT mode. AC~ Socket Connect to the power supply. Pair button Press and hold to enter the pairing mode for the subwoofer.
Prepare the Remote Control Precautions Concerning Batteries ͻ When the Remote Control is not to be used for a long time (more than a month), remove the battery from the Remote Control to prevent it from leaking. ͻ If the batteries leak, wipe away the leakage inside the battery compartment and replace the batteries with new ones. ͻ Do not use any batteries other than those specified. ͻ ͻ ͻ Do not heat or disassemble batteries.
3 Connect Eng lis h Note ͻ Your TV must support the HDMI-CEC and ARC function. HDMI-CEC and ARC must be set to On. This section helps you connect your Soundbar to a TV and other devices, and then set it up. For information about the basic connections of your Soundbar and accessories, see the quick start guide. ͻ The setting method of HDMI-CEC and ARC may differ ͻ depending on the TV. For details about ARC function, please refer to your TV owner’s manual. Only HDMI 1.
Connect to Power AUX L R ͻ Before connecting the AC power cord, ensure you have completed all other connections. ͻ Risk of product damage! Ensure that the power supply voltage corresponds to the voltage printed on the back or the underside of the unit. AUDIO OUT ͻ Use a RCA to 3.5mm audio cable to connect the TV’s audio output sockets to the AUX socket on the unit. Connect the IR pass-through cable Conversion plug Choose the adapter for your region.
Automatic Pairing Plug the Soundbar and the subwoofer into the mains sockets and then press on the unit or remote control to switch the unit to ON mode. The subwoofer and Soundbar will automatically pair. Manual Pairing If no audio from the wireless subwoofer can be heard, manually pair up the subwoofer. 1 2 3 4 Unplug both units from the mains sockets again, then plug them in again after 3 minutes. Press and hold the Pair button on the rear of the subwoofer for a few seconds.
4 Use your Soundbar Select Modes 1 This section helps you use the Soundbar to play audio from connected devices. Before you start ͻ Make the necessary connections described in the user manual. ͻ Switch the Soundbar to the correct source for other devices. Turn ON and OFF ͻ ͻ ͻ When you first connect the unit to the main socket, the unit will be in STANDBY mode. The Standby indicator will light up. Press the button on the remote control to switch the main unit ON or OFF.
When adjusting the volume of the soundbar and subwoofer, the status indicator will increase / decrease the amount of light. According to the corresponding light display / blinking (Fig), determine the current volume level of the soundbar and subwoofer. ͻ 1 2 3 Adjust the Soundbar’s Volume 1 Press +/- (Volume) to increase or decrease the soundbar’s volume level. ͻ To mute sound, press (Mute). ͻ To restore the sound, press (Mute) again or press Vol+/Vol(Volume).
Note USB Operation ͻ The music streaming may be interrupted by obstacles ͻ between the device and Soundbar, such as wall, metallic casing that covers the device, or other devices nearby that operate in the same frequency. If you want to connect your Soundbar with another Bluetooth device, press and hold BT/Pair on the remote control to disconnect the currently connected Bluetooth device. Enjoy audio on a USB storage device, such as an MP3 player and USB flash memory, etc. 1 Insert the USB device.
2 Remove the screws (x4) from the main unit. Attach the wall brackets (x2) to the main unit with the screws removed from the main unit. Note ͻ Improper wall mounting may result in accident, injury ͻ ͻ ͻ ͻ or damage. If you have any query, contact Consumer Care in your country. Before wall mounting, make sure the wall can support the weight of your Soundbar. Before wall mount, you need not remove the rubber feet at the bottom of the Soundbar, otherwise the rubber feet cannot be fixed back.
6 Product specifications Note • Subwoofer • • • • • • change without notice. • Amplifier Section • Power output (RMS): 140W @10% THD • Power output (max): 288W • Power Supply: 100-240 V~ 50-60 Hz Power Consumption: 20 W Standby Power Consumption: < 0.5 W Frequency Response: 40Hz - 180Hz Impedance: 4 Ω Dimensions (W x H x D): 120 x 402 x 300 mm Weight: 4.8 kg Operating Temperature: 0°C - 45°C Remote control Bluetooth • • • • • Supported Audio formats Bluetooth version: 4.
Warning ͻ Risk of electric shock. Never remove the casing ͻ ͻ of the product. Your TV may be set to variable audio output. Confirm that the audio output setting is set to FIXED or STANDARD, not VARIABLE. Consult your TV’s user manual for more detailed information. If using Bluetooth, ensure that the volume on your source device is turned up and that the device is not muted. To keep the warranty valid, never try to repair the product yourself.
The Bluetooth® word mark and logos are registered trademarks owned by Bluetooth SIG, Inc. The terms HDMI, HDMI High-Definition Multimedia Interface, and the HDMI Logo are trademarks or registered trademarks of HDMI Licensing Administrator, Inc. Manufactured under license from Dolby Laboratories. Dolby, Dolby Audio and the double-D symbol are trademarks of Dolby Laboratories. Specifications are subject to change without notice. Please visit www.philips.com/support for the latest updates and documents.