TD6626/BE Zenia 200 Voice
zenia_anglais.book Page 1 Lundi, 28. janvier 2002 2:20 14 Guarantee Dear Customer, Thank you for purchasing this Philips product which has been designed and manufactured to the highest quality standards. If, unfortunately, something should go wrong with this product Philips guarantees free of charge labour and replacement parts irrespective of the country where it is repaired during a period of 12 months from date of purchase.
zenia_anglais.book Page 2 Lundi, 28.
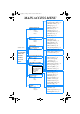
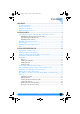
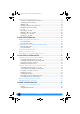
zenia_anglais.book Page 1 Lundi, 28. janvier 2002 2:20 14 Contents SECURITY .......................................................................................... 8 Security information..................................................................................8 Power connection ......................................................................................8 Telephone connection ...............................................................................8 Environmental protection ......
zenia_anglais.book Page 2 Lundi, 28. janvier 2002 2:20 14 Private and shared phonebooks ...............................................................22 Storing your callers telephone numbers........................................................ 22 Viewing a phonebook entry .......................................................................... 23 Making a call ................................................................................................ 23 Deleting an entry from a phonebook ......
zenia_anglais.book Page 3 Lundi, 28. janvier 2002 2:20 14 Handset sound settings ............................................................................37 1.1 Earpiece volume ..................................................................................... 37 1.2 Loudspeaker volume............................................................................... 37 1.3 Headset volume ...................................................................................... 38 1.4 Ringer type.............
zenia_anglais.book Page 4 Lundi, 28. janvier 2002 2:20 14 Security....................................................................................................47 6.1 Setting call barring.................................................................................. 47 6.2 Setting forbidden prefixes....................................................................... 47 6.3 Activating/ deactivating Pin code protection.......................................... 47 6.4 Changing the Pin code .......
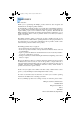
zenia_anglais.book Page 5 Lundi, 28. janvier 2002 2:20 14 Zenia 200 Voice base station Loudspeaker Answer phone indicator Message indicator Volume control keys Memo record key External call key Internal call key On/off and busy base station indicator Microphone Dial keys and answer phone controls Headset Zenia is now sold with a headset to be connected to the handset. The volume level can be adjusted via menu "SETTINGS", "Handset sounds" then "Headset volume" (shortcut #1.
zenia_anglais.book Page 6 Lundi, 28. janvier 2002 2:20 14 Handset overview KEYS DESCRIPTION • Carries out operation displayed on the last line of the screen. • Makes, accepts or ends a call. • Cancels a character during input. • Moves up one menu level. • Enables you to use the "recall" function during a call. • When pressed (for 2 seconds), returns to "standby mode", or during input, deletes all characters of the line. • Switches the handset or base station loudspeaker on or off.
zenia_anglais.book Page 7 Lundi, 28. janvier 2002 2:20 14 Handset on charging unit Earpiece Incoming call or new messages indicator Display 10 MAY 10:05 Philips 1 SHARED Alphanumeric keypad Microphone Overview of display screen l E t / A Displayed Indicates battery charge or discharge status. The blinking outline indicates that the contact between the base and the handset is correct and that the battery is charging. Displayed Answer phone is on.
zenia_anglais.book Page 8 Lundi, 28. janvier 2002 2:20 14 Security Your telephone features the most advanced technology for even greater ease and comfort of use. Security information For all countries, using this product is subject to approval by the authorities concerned. The wording of this approval appears on the label affixed to the back of the base station.
zenia_anglais.book Page 9 Lundi, 28. janvier 2002 2:20 14 Installation : "This equipment is not designed for making emergency telephony calls when the power fails. Alternative arrangements should be made for access to emergency services". Choosing the location of the charging unit and base station Place the charging unit near a 220 V/ 240 V - 50 Hz wall socket.
zenia_anglais.book Page 10 Lundi, 28. janvier 2002 2:20 14 Installing or replacing batteries Power supply Your telephone handset is powered by two rechargeable NiMh batteries, type AAA/ R03. When replacing the batteries, please use the following model: PHILIPS MULTILIFE R03NM, or PANASONIC 650 mAh. • Press the top of the battery compartment lid and slide it down. • Insert new batteries according to the marking. • Slide the lid back in place.
zenia_anglais.book Page 11 Lundi, 28. janvier 2002 2:20 14 Using the telephone Operating in "standby mode" • Standby display: 10 MAY 10:05 Philips 1 SHARED • "Standby mode" is the starting point for all other operations. To choose a function from this mode, press the appropriate scroll keys or , as many times as required, in order to view the various menus which you have access to.
zenia_anglais.book Page 12 Lundi, 28. janvier 2002 2:20 14 Making a call from the handset From "standby mode", dial the number on the keypad (up to 26 digits). The dialled number is displayed on two lines as you enter the digits. PREDIAL 012345 RECORD To correct an error: • move the cursor using the scroll arrows or , • use the key to delete a character in front of the cursor, • pressing this key for 2 seconds deletes the whole line. Press the key. The t symbol is displayed at the top of the screen.
zenia_anglais.book Page 13 Lundi, 28. janvier 2002 2:20 14 Making a call from the Zenia 200 Voice base station Press the key. The green light starts flashing and you hear the dial tone. Dial the number using keys to on the keypad. The number is dialled automatically. The loudspeaker and the microphone of the base station are switched on automatically. Speak in the direction of the microphone. You can adjust the loudspeaker volume using the (decrease) keys. (increase) or To hang up, press the key again.
zenia_anglais.book Page 14 Lundi, 28. janvier 2002 2:20 14 Redial list Purpose Your ZENIA telephone stores the telephone numbers of the last 10 external calls that you have made from the handset. You can view the list, call back your callers directly from the list, or you can modify it. You can also store the telephone number in the shared or private phonebook. Viewing the redial list You can view the list of outgoing calls when in "standby mode" or during an external call.
zenia_anglais.book Page 15 Lundi, 28. janvier 2002 2:20 14 Deleting an entry 10 MAY 10:50 Philips 1 From "standby mode", go to the redial list. Validate by pressing the key. The entry corresponding to the last call is displayed. REDIAL REDIAL LIST 06543210 OPTIONS REDIAL LIST Delete? SELECT REDIAL LIST Scroll through the list by pressing the scroll keys as many times as required. and The entry to be deleted is displayed. Press the key.
zenia_anglais.book Page 16 Lundi, 28. janvier 2002 2:20 14 Storing an entry From "standby mode", go to the redial list. The entry corresponding to the last outgoing call made is displayed. Scroll through the list by pressing the scroll keys as many times as required. REDIAL LIST 01712345678 The number to be stored is displayed. OPTIONS Press the key. REDIAL LIST Store SELECT ENTER NAME: Using the scroll keys and option. The selected option is displayed. Press the key.
zenia_anglais.book Page 17 Lundi, 28. janvier 2002 2:20 14 Answering a call from the base station The handsfree speakerphone allows calls to be made or accepted without using a handset . An incoming call is received. The green light starts flashing. To answer the call, press the key of the base station. The loudspeaker and the microphone of the base station are switched on automatically. Speak in the direction of the microphone. You can adjust the loudspeaker volume with the keys.
zenia_anglais.book Page 18 Lundi, 28. janvier 2002 2:20 14 Putting an incoming call on hold You can put a call on hold: The external caller either hears music, if music on hold is activated (see “5.7 Switching music on hold on/off”, page 46), or a waiting tone. 1) From handset During the conversation, select the "HOLD" function using the keys, then confirm with the key. or To switch back to the call, press the key again. 2) From base station Press the key to put the current call on hold.
zenia_anglais.book Page 19 Lundi, 28. janvier 2002 2:20 14 Call log Identifying the caller Your ZENIA 200 VOICE telephone can display the caller's number. Caller identification is dependant on network selection. When the telephone rings, your handset(s) display(s) the number and the name of the caller if they are supplied via the telephone network. If the number is associated with a name in one of the shared or private phonebooks, the name is displayed, too.
zenia_anglais.book Page 20 Lundi, 28. janvier 2002 2:20 14 : You can directly call the telephone number corresponding to the entry viewed by pressing the key (subject to network selection). • When viewing the list, if a voice message is associated with the call viewed, the E symbol is displayed, to listen to this message, select the "LISTEN" option and press the key. Deleting an entry from the call log CALL LOG 01/02 01:59 From "standby mode", go to the call log.
zenia_anglais.book Page 21 Lundi, 28. janvier 2002 2:20 14 Storing an entry from the call log : This function is subject to network selection. From "standby mode", go to the call log. Scroll through the list by pressing the scroll keys CALL LOG as many times as required. 01/02 01:59 0165346523 The number to be stored is displayed. OPTIONS Press the key. CALL LOG Store Using the scroll keys and option. The selected option is displayed.
zenia_anglais.book Page 22 Lundi, 28. janvier 2002 2:20 14 Private and shared phonebooks Your telephone comes with two phonebooks, a private one and a shared one: you therefore have the ability to store telephone numbers either in a private phonebook not accessible from other handsets, or in a shared common phonebook. In each phonebook, you can store the telephone number and name of 100 callers, either by transferring them from the call log or the redial list, or by entering them manually.
zenia_anglais.book Page 23 Lundi, 28. janvier 2002 2:20 14 Viewing a phonebook entry 10 MAY 10:05 Philips 1 SHARED From "standby mode", press the scroll keys or as many times as required to go to the "SHARED" or "Prv phonebk" menu. Confirm by pressing the key. The first entry in the selected phonebook is displayed. SHARED John Smith 01712345678 OPTIONS SEARCH FOR: Jo SEARCH To scroll through the list, press the scroll keys as many times as required.
zenia_anglais.book Page 24 Lundi, 28. janvier 2002 2:20 14 Modifying a phonebook entry Having selected the entry to be modified in the phonebook, the corresponding name and telephone number are displayed on the screen. Confirm by pressing . SHARED Change SELECT The validation prompt "Change" is displayed. Confirm by pressing the ENTER NUMBER: 01712345678 DONE key. Now you can change the telephone number. Press the key to delete a number, hold down the same key for 2 seconds to delete the whole line.
zenia_anglais.book Page 25 Lundi, 28. janvier 2002 2:20 14 VOICE DIAL Recording... VOICE DIAL Attempt no. 2 RECORD VOICE DIAL Stored SHARED John 01712345678 OPTIONS Press the key. After 2 seconds you will hear the recording. The handset suggests attempt no. 2. Press the key. Again, clearly say the name corresponding to the selected entry. Within 2 seconds, you will hear the recording. The confirmation prompt "Stored" is displayed; and the number is automatically dialled.
zenia_anglais.book Page 26 Lundi, 28. janvier 2002 2:20 14 PROBLEM Background noise ! Too long ! Too short ! Too similar ! Too different ! CAUSE There is too much background noise during the voice dial recording. The voice dial is too long or you spoke too late. The voice dial is too short or you spoke too early. There is not difference enough between this voice dial and the previous one. There is too much difference between both recording attempts.
zenia_anglais.book Page 27 Lundi, 28. janvier 2002 2:20 14 Using the intercom Up to 8 handsets can be registered to your base station. This feature offers the following possibilities: • to make internal calls between 2 handsets (or between handset and base station), • to transfer an external call to another handset, • to accept an internal call from the base station, • to have a conference call with several handsets, • to monitor another room.
zenia_anglais.book Page 28 Lundi, 28. janvier 2002 2:20 14 Transferring an external call to another handset From the base station During the call, press the key to put the external line on hold. The external caller will either hear music (if music on hold is activated, see “5.7 Switching music on hold on/off”, page 46) or a waiting tone. Press one of the direct dial keys to corresponding to the number of the handset to which you wish to transfer the call ( to call handset No. 1, to call handset No. 2, etc.
zenia_anglais.book Page 29 Lundi, 28. janvier 2002 2:20 14 Answering an internal call The handset rings. The symbol located on the handset screen flashes. RINGING Press the SILENCE or keys to answer this call. Starting a conference call EXTERNAL LINE Time 0’38 CONF CALL During an external call, you can start a conference call by transferring the call to another handset. Internally call the other handset with which you wish to share the call.
zenia_anglais.book Page 30 Lundi, 28. janvier 2002 2:20 14 Using the answer phone You can access the answer phone (listening to messages, call screening, message recording, configuration) either from a handset registered to the base station (see “Answer phone settings”, page 42) or via the base station. Your answer phone can operate in the following two answering modes: • Answer only: Your personal outgoing message will be played, but your callers cannot leave a message.
zenia_anglais.book Page 31 Lundi, 28. janvier 2002 2:20 14 Screening and intercepting incoming calls While the answer phone is recording a caller's message: • the E symbol on the screen flashes, • the t symbol on the screen is displayed. You can listen to the call before deciding to answer by pressing the key. / The icon on the screen is displayed. You can listen to your caller’s message via the handset loudspeaker, without being heard. The answer phone will still be in record mode.
zenia_anglais.book Page 32 Lundi, 28. janvier 2002 2:20 14 Deleting a message received CALL LOG John Smith 0171235678 OPTIONS CALL LOG Delete? SELECT You can delete one or more messages by viewing the call log. Scroll through the call log using the scroll keys and . When the message you wish to delete appears, press the key. Press the scroll keys or as many times as required in order to select the "Delete?" option. Confirm by pressing the key.
zenia_anglais.book Page 33 Lundi, 28. janvier 2002 2:20 14 Listening to messages received You have not read the first message. In that case, the red light flashes and the display shows the number of new messages received (messages and memos). Press the key to listen to the messages received. A voice indicates the number of new messages you have received. Then, the answer phone starts playing all the new messages, starting with the oldest one.
zenia_anglais.book Page 34 Lundi, 28. janvier 2002 2:20 14 Recording a memo (local message) With this function you can leave a memo for another person in your home. With the phone in "standby mode", press the key. "Please speak after the tone" is played, then a beep is heard. Speak clearly in the direction of and near the base station microphone. When your message is finished, press the key again to stop recording. A beep is heard confirming the memo has been recorded.
zenia_anglais.book Page 35 Lundi, 28. janvier 2002 2:20 14 System configuration Overview of the configuration menu You can customise and configure certain functions of the telephone by accessing "SETTINGS". This main menu is divided into six sub-menus, as follows: 1. Handset sounds, 2. Handset settings, 3. Base station settings, 4. Answer phone settings, 5. Line settings, 6. Security. These sub-menus are divided into functions each comprising several settings.
zenia_anglais.book Page 36 Lundi, 28. janvier 2002 2:20 14 FUNCTION Setting 1 X.X.X SELECT FUNCTION Setting 2 X.X.Y The empty " " box in front of this setting indicates that it is not currently selected. Press the SELECT FUNCTION Setting 2 The box currently in front of this setting indicates that it is currently selected. If you want to change it, press the scroll keys or as many times as required and select the desired setting. key to confirm this setting. X.X.
zenia_anglais.book Page 37 Lundi, 28. janvier 2002 2:20 14 Handset sound settings Select "SETTINGS", and by using the key as well as the keys, navigate through the menu to access the desired settings. Sub-menu 1 Handset sounds Functions 1.1 Earpiece volume 1.2 Loudspeaker volume 1.3 Headset volume 1.4 Ringer type 1.5 Ringer volume 1.6 Key tones 1.7 Earpiece tone 1.8 Loudspeaker tone 1.9 Headset tone 1.0 CLI ringer Shortcuts 1.1.1 1.1.2 1.1.3 1.2.1 1.2.2 1.2.3 1.3.1 1.3.2 1.3.3 1.4.1 1.4.2 1.4.
zenia_anglais.book Page 38 Lundi, 28. janvier 2002 2:20 14 1.3 Headset volume Go to the "SETTINGS" menu, then to the "Handset sounds" sub-menu and select "Headset volume". Select the desired volume level from the three options available. 1.4 Ringer type Go to the "SETTINGS" menu, then to the "Handset sounds" sub-menu and select "Ringer type". Select the desired melody from the six options available. 1.
zenia_anglais.book Page 39 Lundi, 28. janvier 2002 2:20 14 Handset settings Select "SETTINGS", and by using the key as well as the keys, navigate through the menu to access the desired settings. Sub-menu 2 Handset settings Functions 2.1 Language 2.2 Back light 2.3 Display contrast 2.4 Lock 2.5 Babysit mode 2.6 Base selection 2.7 Register and Shortcuts Settings 2.1.1 English 2.1.2 Deutsch 2.1.3 Français 2.2.1 Off 2.2.2 On 2.3.1 Low 2.3.2 Medium 2.3.3 High 2.4.1 Off 2.4.2 On 2.5.1 Off 2.5.2 On 2.6.
zenia_anglais.book Page 40 Lundi, 28. janvier 2002 2:20 14 2.4 Locking and unlocking the keypad You can lock the keypad in order to avoid the keys from being pressed inadvertently. E.g., when you keep the handset in your pocket. • to lock the keypad press the key for 2 seconds, • to unlock the keypad press the key for 2 seconds. • Or go to the "SETTINGS" menu, then to the "Handset settings" sub-menu and select "Keypad lock", in order to activate this function. 2.
zenia_anglais.book Page 41 Lundi, 28. janvier 2002 2:20 14 Base settings Select "SETTINGS", and by using the key as well as the keys, navigate through the menu to access the desired settings. Sub-menu 3 Base settings Functions 3.1 Base ringer (type) 3.2 Base ringer 3.3 Set date & time and Shortcuts Settings 3.1.1 Melody 1 3.1.2 Melody 2 3.1.3 Melody 3 3.1.4 Melody 4 3.1.5 Melody 5 3.1.6 Melody 6 3.1.7 Personal ringer 3.2.1 Silent 3.2.2 Low 3.2.3 Medium 3.2.4 High 3.2.
zenia_anglais.book Page 42 Lundi, 28. janvier 2002 2:20 14 Answer phone settings Select "SETTINGS", and by using the key and the navigate through the menu to access the desired settings. Sub-menu 4 Answer phone Functions 4.1 Answer mode 4.2 Record memo 4.3 Record pers. OGM 4.4 Record ringer 4.5 Rings before answer 4.6 Voice prompts 4.7 Record quality 4.8 Remote control and scroll keys, Shortcuts Settings Selection 4.1.1 Off 4.1.2 Answer only 4.1.
zenia_anglais.book Page 43 Lundi, 28. janvier 2002 2:20 14 4.4 Recording a personal ringer ANSWER Record ringer SELECT RECORD RINGER Press OK and speak... RECORD Go to the "SETTINGS" menu, then to the "Answer" submenu, and select "Record ringer". Press the key to access the selected function. Press the key again to record your personal ringer. The message "Recording..." is displayed. RECORD RINGER Recording... STOP RECORD RINGER Play ABORT RECORD RINGER Stored Record your personal ringer.
zenia_anglais.book Page 44 Lundi, 28. janvier 2002 2:20 14 4.5 Modifying the number of rings before answer You can modify the number of rings (Toll saver, 3, 4, 5) before the answer phone answers a call. Go to the "SETTINGS" menu, then to the "Answer" sub-menu, and select "Rings before answer". Select the option of your choice from the four possibilities available. : "Toll saver" is the default configuration for the answer phone. If you have received a message, the answer phone answers after 3 rings.
zenia_anglais.book Page 45 Lundi, 28. janvier 2002 2:20 14 Line settings Select "SETTINGS", and by using the key and the navigate through the menu to access the desired settings. and scroll keys, : Line default settings may vary according to the country. Sub-menu 5 Line settings Function 5.1 Dial mode Shortcuts Setting 5.1.1 Tone 5.2 Network type 5.2.1 5.2.2 5.2.3 5.2.4 5.2.5 Type 1 Type 2 Type 3 Type 4 Type 5 5.3 Operator type 5.3.1 5.3.2 5.3.3 5.3.4 5.3.5 Type 1 Type 2 Type 3 Type 4 Type 5 5.
zenia_anglais.book Page 46 Lundi, 28. janvier 2002 2:20 14 5.4 Selecting flash time You may need to change this when connected to a PABX. Go to the "SETTINGS" menu, then to the "Line settings" sub-menu, and select "Recall type". Select one of the two options "Short flash" or "Long flash". 5.6 Displaying/deleting total time for your calls Go to the "SETTINGS" menu, then to the "Line settings" sub-menu, and select "View total time". You can reset the total time of your calls by pressing the key.
zenia_anglais.book Page 47 Lundi, 28. janvier 2002 2:20 14 Security Select "SETTINGS", and by using the key and the and scroll keys, navigate through the menu to access the desired settings. This menu is secured by a Pin code (default is the RC code, printed on the back of the base station). ENTER PIN: *** ∆ DONE Sub-menu 6 Security Enter the Pin via the keypad. As you type it in, stars appear on the second line of the screen. : You can correct an error using the key. Confirm by pressing the key.
zenia_anglais.book Page 48 Lundi, 28. janvier 2002 2:20 14 6.4 Changing the Pin code This code will be requested for remote control of the answer phone or for telephone configuration. (see “6.3 Activating/ deactivating Pin code protection”, page 47). The default Pin is printed on the back of the base station (RC code). To change it, proceed as follows: Go to the "SETTINGS" menu, then to the "Security" sub-menu.
zenia_anglais.book Page 49 Lundi, 28. janvier 2002 2:20 14 List of network services Your telephone is programmed with a list of telephone services provided by your main national operator. The list of services is managed like a phonebook. However, to adapt the system to your needs, you can modify, delete or add services (up to 15). Each service consists of a name (up to 14 characters) and a number (up to 26 digits).
zenia_anglais.book Page 50 Lundi, 28. janvier 2002 2:20 14 M aintenance and troubleshooting Base station problems The table below lists the possible problems you may encounter with when using the base station. Zenia 200 Voice base station PROBLEM CAUSE SOLUTION Green light is off. The base station is not connected properly, or a power failure has occurred. Check the connections. No dial tone. The base station is not properly connected to the telephone socket. Check the connections.
zenia_anglais.book Page 51 Lundi, 28. janvier 2002 2:20 14 Zenia 200 Voice base station (continued) PROBLEM CAUSE SOLUTION The answer phone has stopped automatically. Answer phone memory is full. Delete messages to free sufficient memory. The answer phone's maximum memory has been reached. Delete messages to free sufficient memory. A power failure has occurred. Reset date and time (see “3.3 Setting date and time”, page 41). You did not enter the correct code.
zenia_anglais.book Page 52 Lundi, 28. janvier 2002 2:20 14 Problems with the handset (continued) PROBLEM CAUSE SOLUTION The charging unit is not properly connected to the electricity socket. Check the connection between charging unit and electricity socket. Charging contacts are dirty. Clean them with a clean and dry cloth. Key tones are deactivated. Refer to “1.6 Switching key tones on/off”, page 38. Batteries remain low although the handset has charged for 12 hours.
zenia_anglais.book Page 53 Lundi, 28. janvier 2002 2:20 14 Handset indicators Green light Flashing Briefly flashing Indicates an incoming call. Indicates one or more messages on the answerphone. Base station indicators Red light Off On Flashing Flashing rapidly Green light Off On Flashing Indicates answer phone is off. Indicates answer phone is on. Indicates new messages. Indicates maximum recording capacity (30 minutes) has been reached or a recording session is in progress.
zenia_anglais.book Page 54 Lundi, 28.
zenia_anglais.book Page 55 Lundi, 28.
zenia_anglais.book Page 56 Lundi, 28.
zenia_anglais.book Page 59 Lundi, 28. janvier 2002 2:20 14 Remote control Remote control (using a tone telephone) (using a tone telephone) 1 Dial your telephone number. 1 Dial your telephone number. 2 *After listening to the outgoing 2 message, press the * key, then enter your code (4 digits). 3 During message playback: *After listening to the outgoing message, press the * key, then enter your code (4 digits). 3 During message playback: Dial Dial • Stop message playback ......................
zenia_anglais.book Page 60 Lundi, 28. janvier 2002 2:20 14 Remote control (Cont.) Remote control (Cont.) (using a tone telephone) (using a tone telephone) You have just checked your answerphone You have just checked your answerphone 4 After listening to your messages, you have 20 seconds to: 4 After listening to your messages, you have 20 seconds to: Dial Dial • Start message playback ........................... 2 • Start message playback ........................... 2 • Check outgoing message .