
User Manual


HOW TO PROGRAM YOUR PHONE
9
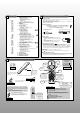
To access the programming icons, press the key.
5 icons are displayed on the screen.
- Answering machine settings
- Volume and melody settings
- To register the handset with another base
- Other programming option settings
- Earpiece volume settings
To select one of the icons, use the key and and then validate your choice by pressing the key.
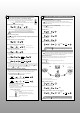
For instance: how to change the melody.
Press the key, press once then press .
Use level 1/4 to select the melody volume. Scroll
through the different volume settings using the and
keys. The default setting is "+++" (3).
Note: the screen will show the default or selected value. If registering an additional
handset, you will need to enter the RC code (4-figure access code) shown on the
bottom of the base station (see Page 10). Enter 4 figures when "0000" is displayed
(and the scroll arrows have disappeared).
To go to level 2/4: change melody type, press the key.
To select the “DISCO“ melody, press to validate.
If you wish to select the “RAIN“ melody, press
to choose the melody and press to vali-
date.
You can also select a melody specific to the Friends
phonebook from the 7 melodies available.
Press when you have selected the melody.
The melody will sound after the second ring. This func-
tion is only available if you have subscribed to the
operator’s Caller identification service.
You can select a specific melody for the Family phone-
book from the 7 available. Press then
once you have chosen the melody.
Melody programming options
Function Programmable Select Default
number functions value
1/4 Selects melody volume + (1) to ++++ (4) +++ (3)
1x 2/4 Selects melody of handset (general) 7 melodies proposed Disco
2x 3/4 Selects melody of handset 7 melodies proposed Birdy
(Friends phonebook)
3x 4/4 Selects melody of handset 7 melodies proposed Starry
(Family phonebook)
Note: the sound volume is the same for all melodies.
How to register the handset with another base station
This option allows you to register the handset with another base station. You will need to
switch the base station onto record mode before entering the code. To place a Kala 200
base station in record mode, simply disconnect and re-connect the mains supply. The RC
code is shown on the bottom of the base station.
Function Programmable Select Default
number function value
1/1 Registers the handset RC Code
(1)
Bottom of
the base
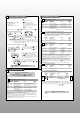
Settings programming options
Function Programmable Select Default
number functions value
1/5 Enters number of different CLI
(4)
List of CLI avalaible 1
1x 2/5 Enters the dial mode
(5)
TONE, PULSE Depends
2x 3/5 Enters network type
(6)
A (residential), A
B, C, D (PABX)
3x 4/5 Enters callback type
(7)
*** (short), Depends
(long/short flash) ****** (long)
4x 5/5 Inserts automatic pause
(8)
NO, YES NO
4. CLI or Caller identification service: the Caller identification service (Name and Number) is
available only if you have subscribed to the service with an operator (according to availablility).
5. Dial mode: this allows you to select either voice frequency dialling (faster dialling, access to opera-
tor services) or digital dialling. The availability of this function depends on the country
6. Network type: your telephone has a default configuration for public telephone lines (option A).
You can choose between 3 other network types to adjust the sound qualities for a PABX/ISDN set-up.
7. Flash type: the operation of some services accessed using the key (Call Waiting, Call
Forward, etc.) will depend on the flash setting (short/long) depending on your installaton type (ISDN,
Public, PAXB).
8. Automatic pause: this function allows you to insert a prefix before the telephone number.
Earpiece programming option
Function Programmable Select Default
number function value
1/1 Modifies earpiece volume 1 to 4 ++ (2)
Other indirect programming options
These options can be accessed using a combination of two keys, after pressing:
Sequence Programmable Select Default
of keys functions value
+ Unregisters RC code
(1)
Bottom of
the handset the base
+ Selects TAM
(9)
- - -> (answering - - -> + <- - -
and recording mode),
- --> + <- -- (answering only mode)
9. Answering only and Answering & Recording mode: answering only mode carries an outgo-
ing message but does not allow callers to leave messages. Answering & Recording mode allows callers to
leave messages after listening to the outgoing message. Use and to switch between modes.
PROGRAMMING OPTIONS (CONT’D)
PROGRAMMING OPTIONS
10
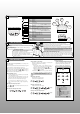
Answering machine programming options
Function Programmable Select Default
number functions value
1/5 Modifies the system day List: 1 (Monday) to 7 (Sunday) 1
1x 2/5 Modifies the system time Type value (00:00 to 23:59) 00:00
2x 3/5 Selects number of rings List: 2, 3, 4, 5, toll
(2)
Toll
(2)
before machine picks up
3x 4/5 Modifies remote control code
(1)
Type value (0000 to 9999) RC code
(1)
(to show a default)
4x 5/5 Modifies telephone answering List: ****A (top quality), A
machine recording quality
****
B (standard quality)
1. RC code: 4-figure access code found on the bottom the base station that allows you to register an
additional handset (see the user manual for the additional handset).
2. Toll Saver: the Toll Saver allows you to check to see if you have any messages remotely without activating
the telephone. If you have messages, the machine will activate after 3 rings. If not, the telephone will ring 5
times, giving you time to hang up before the connection is made.
3. Remote access code: you will be asked to give this code to access the answering machine remotely.
By default, this is the RC code, though you can personalise it.
Press to enter the programming options.
Enter the following functions by pressing once or several times.
Enter the programming options on page 9 for more details.
Programming icons:
• on: programming mode (consultation)
or during a modification
• off: normal mode
• flashing: options can be selected
4 choices
within this
menu
choice n°1
within the
melody menu
out of 4.
by default,
name of
the melody
Press to exit the programming options.
!
Press to exit the programming options.
!