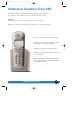
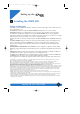
combine supp 19/04/01 14:26 Page I Additional handsets Onis 200 The ONIS 200 allows you to add up to 7 additional handsets to your base station. You can therefore have a handset in up to seven rooms of the house or office. L NOTE: These additional handsets do not need telephone sockets. Only one socket is required. Adding one or more handsets will enable you to again access to the following functions: • Intercom between two handsets (free of charge).
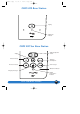
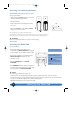
combine supp 19/04/01 14:26 Page II ONIS 200 & ONIS Vox 200 Handsets Soft keys Menu navigation keys Correction and “R” Intercom Operator services Obtaining a line Loudspeaker Earpiece Volume Microphone SCREEN ICONS: Battery charge status Answerphone activated Indicates message on the answerphone or Operator mail box Internal call in progress Handset ringer deactivated Loudspeaker activated Withheld identity actived Base/Handset link correct II Onis 200 Handsets
combine supp 19/04/01 14:26 Page III ONIS 200 Base Station Paging Mains/Line indicator ONIS 200 Vox Base Station Adjust loudspeaker volume Paging Delete message Start/stop answerphone Next message Previous message Mains/Line indicator Play/stop messages On/Off answerphone indicator Onis 200 Base Station III
tdm 19/04/01 14:27 Page IV Table of contents Setting up the ONIS 200 Installing the ONIS 200 Safety and Security Inserting and replacing batteries Installing the ONIS 200 Cleaning the ONIS 200 Getting to know your Onis 200 The ONIS 200 keys Handset display Menu overview Battery performance Recharging Range 1 1 2 2 3 3 3 4 5 8 8 8 Customising your ONIS 200 Changing the date and time Ringer settings Changing the handset ringer Adjusting the base ringer Adjusting screen contrast Activating/deactivating t
tdm 19/04/01 14:27 Page V Using the call log Using the Intercom Internal an internal call Using the babysit function 20 22 22 23 Operator prefix phonebook Storing prefixes Using the prefix phonebook 24 25 Using the services Operator services Caller identification Operator message service Call forward Call waiting Three-way conversation Call back Caller identification Operator message service Call forward Call waiting Three-way call Activating and deactivating call back Withheld identity default 26
tdm 19/04/01 14:27 Page VI Using the ONIS Vox 200 answerphone (remote use) Changing the secret access code Remote-accessing the answerphone During remote accessing Remote-activating the answerphone Remotely-changing the outgoing message 38 38 39 39 39 Settings Adding another ONIS 200 handset to the base station DECT peripheral without keypad Using the ONIS 200 handset with two base stations Selecting a base station Unregistering a handset Onis 200 Using GAP-standard compliance Configuring line setting
mettre en service 24/04/01 14:22 Page 1 Setting up the Installing the ONIS 200 Safety and Security Your DECT compliant ONIS 200 telephone draws on the latest technology to make it both easier and more comfortable to use. The ONIS 200 consists of 2 parts: the BASE STATION (immobile), and one or more cordless HANDSETS allowing you to call without the need to remain in close proximity to the base station.
mettre en service 19/04/01 14:34 Page 2 Inserting and replacing batteries R03/AAA NiMh rechargeable batteries should be used as replacements. • Slide open the HANDSET battery cover in the direction indicated by the arrow. • Remove batteries. • Insert new batteries as indicated and replace the cover. • Place the HANDSET on the BASE STATION. Charge for at least 12 hours. NOTE. Used batteries should not be disposed of with household waste.
mettre en service 19/04/01 14:34 Page 3 Cleaning the ONIS 200 Use a cloth dampened with soapy water to clean the ONIS 200.Then wipe with a dry cloth. • Never use a solvent or household product. Clean your telephone regularly to keep it looking brand new. L IMPORTANT: Do not place your telephone in a place where it may fall. Getting to know your Onis 200 The ONIS 200 keys HANDSET keys • The key is used to make and receive calls. • The key switches the HANDSET loudspeaker on and off.
mettre en service 19/04/01 14:34 Page 4 Handset display The display screen shows information using 3 lines of 16 characters and one line of 8 icons.The bottom line is used for function key wording. The date, time and handset name are displayed when in idle mode. Typical screen displays: 17 FEB 10:48 Philips 1 REDIAL u SHARED PHNBK The date, time and handset name are displayed when in idle mode. Call from: 0123456789 Call from: Alan SILENCE SILENCE Incoming call.
mettre en service 19/04/01 14:34 Page 5 Menu overview Menus are displayed on the fourth line, with headings and sub-headings shown on the second and third lines of your screen. General operating procedure MENUS: You can access the menus using the keys: • Use these keys to select menus shown at the bottom of the screen. E.g. On the idle screen, the available menus are |REDIAL and SHARED|. • Use the 17 FEB 17:48 Philips 1 u SHARED REDIAL The u icon indicates that other menus are available.
mettre en service 19/04/01 14:34 Page 6 Example of use Choosing the interphone ringer on the handset: 1 On the idle screen, scroll through the list of menus and select |SETTINGS. 17 FEB 11:48 Philips 1 u REDIAL The menu is not shown on the SHARED 17 FEB 11:48 Philips 1 SETTINGS ▼ SERVICES BACK menu. Press the left-hand key to select Settings. OK Select OK| by pressing the righthand key to access the Handset sounds option. OK Press to scroll through the menu to find the Int.
mettre en service 19/04/01 14:34 Page 7 Menu overview ANSWERPHONE SETTINGS - HANDSET SOUNDS - HANDSET SETTINGS - BASE SETTINGS - LINE SETTINGS - VIP SETTINGS - DECLARE SERVICE - SERVICES CODES SERVICES - CALL FORWARD - CANCEL CALL TRANS. - VOICE MAIL - CANCEL CALL BACK - CANCEL LAST CALL - WITHHELD IDENTITY. August 28 17:28 ANSWPHN - ANSWPHN MODE - REC. OUTG MSG - PLAY OUTG MSG - RINGS BEFOR ANSW - CHANGE CODE - VOICE PROMPTS - SCREEN CALLS - RECORD QUALITY HANDSET SOUNDS - EXT. RINGER TYPE - INT.
mettre en service 19/04/01 14:34 Page 8 Battery performance The telephone will work for approximately 200 hours on standby mode and around 15 hours when in use. During a call, beeps will provide a warning when only a few seconds of battery charge remain. Communication will automatically be cut off at this time. Recharging It takes at least 12 hours to fully recharge the empty batteries. When the icon shows a charge level below 5% (no bar), you should recharge the battery.
personnaliser 19/04/01 14:38 Page 9 Customising your Changing the date and time The ONIS 200 has a clock feature which displays the date and time on the idle screen and dates all call log entries. To set the clock: 1 Select |SETTINGS from the idle screen using the scroll feature. 2 Scroll to “Base settings” and select OK|. SETTINGS Handset sounds BACK OK Settings type 3 Scroll to “Date/time” and select OK|. Ringer type 4 Select |CORRECT * to delete the BACK information you wish to change.
personnaliser 19/04/01 14:38 Page 10 Ringer settings The handset has 9 ringer melodies.You can use these melodies for different calls.The base station has 5 melodies available. The handset and base station have 3 volume settings and a mute mode. Changing the handset ringer Handset ringer: Ext. ringer type: for all incoming calls. 1 Scroll to “Ext. ringer type”or “Int. ringer type” under the “Handset sounds” heading in the “Settings” menu and select OK|.
personnaliser 19/04/01 14:38 Page 11 Adjusting screen contrast 1 Scroll to “Contrast” under the “Handset Settings” heading in the “Settings” menu and select OK|. Contrast √ The screen contrast will immediately be adjusted. Medium BACK OK 2 Scroll to the chosen contrast and select OK|. Activating/deactivating the key tones Activating/deactivating the key tones HANDSET keys can be set to sound when pressed.
personnaliser 19/04/01 14:38 Page 12 Declaring/removing operators services Some operators services must be declared on your handset to enable guided operation on your ONIS 200 screen. 1 Scroll to “Declare services” in the “Settings” Declare service Caller id. menu and select OK|. BACK 2 Scroll to the required service OK Call forward √ “(e.g. Call forward)” and select OK|. Non declared BACK OK The screen shows whether or not the selected service has been declared.
personnaliser 19/04/01 14:38 Page 13 Configuring the call log You can set the call log to record: - all calls, including those answered, - only unanswered calls, - only message service information and messages from your answerphone (ONIS Vox 200 only), - no calls (Onis 200 only). The call log is described on page 20. 1 Scroll to “Call. log config.” under the “Base settings” heading in the “Settings” menu and select OK|. Call log config.
personnaliser 19/04/01 14:38 Page 14 VIP Function If you have registered with the caller identification service, your ONIS 200 can associate certain rings with certain callers.These rings tell you who is calling even when you cannot see the screen of the telephone. These VIP callers must be specified in your shared phonebook (see page 19, step 6 ). There are three groups of VIP callers (friends, family, work). In the shared phonebook, the VIP caller entries are marked , or .
utiliser votre tele 19/04/01 14:41 Page 15 Using the telephone Making a call Direct calling When you lift the HANDSET from the BASE STATION, the indicator should be highlighted. If this is not the case, refer to the section entitled: “Troubleshooting”. 1 Press The icon flashes if the line is busy . . 2 Check for a tone and dial the number you 0123456789 wish to call.
utiliser votre tele 19/04/01 14:41 Page 16 Predialling the number before calling To check the number and, where necessary, correct before calling: The number will be displayed on screen.The RECORD| function allows you to store the number in one of the phonebooks. 1 Enter the number on the keypad. • If you make a mistake, you can delete the last character using |CORRECT or press *. 2 Press * Press and hold or to make the call. Predial _ CORRECT RECORD to delete the number.
utiliser votre tele 26/04/01 10:43 Page 17 Using the loudspeakers Activating and deactivating the loudspeakers When using the telephone: • Press to activate or deactivate the HANDSET loudspeaker. • Press and hold to activate or deactivate the BASE STATION loudspeaker (ONIS Vox 200 only). The icon is highlighted when the handset loudspeaker is in use. The icon flashes when the base station loudspeaker is in use.
utiliser votre tele 19/04/01 14:41 Page 18 Redial list 1 Scroll to the menu on the idle screen and select |REDIAL. select CALL| or press The last number dialled is displayed. Alan 0123456789 2 Scroll to the number you want and . OPTIONS • Select |OPTIONS to: CALL The phonebook contains the last 5 numbers dialled from that handset. - save this number in one of the phonebooks; RECORD|. - delete the number from the “Redial list”; DELETE|. - delete all numbers from the “Redial list”; |DEL. ALL .
utiliser votre tele 19/04/01 14:41 Page 19 4 Use the keypad to enter the name: - Select the letter you want by pressing the corresponding key. - Wait (2 seconds) before entering another letter on the same key. Select |CORRECT to delete a Enter name: Alan CORRECT letter or press . OK Or, - Immediately press another key to enter the next letter using the same procedure. Select OK|. Enter number: _ CORRECT OK Press and hold (1.5 seconds) to include a pause in the .
utiliser votre tele 19/04/01 14:41 Page 20 Making a call from your phonebooks 1 Select SHARED| in the idle screen or PRV PHNBK| according to the phonebook you want 2 To select the person you wish to call: - Scroll through the entries marked . - Go straight to the first letter of the name by pressing the key which corresponds to that The first name is displayed (in alphabetical order). Alan 0123456789 OPTIONS CALL letter.
utiliser votre tele 19/04/01 14:41 Page 21 Entry with message on your answerphone ( only) 1 Select PLAY| if you have received new messages. 2 Your answerphone will automatically play back all new messages.The screen will display: 17 FEB 17:48 2 new msg - the caller's name and number* NEXT - the date and time they last called Julia 22/08 - the icon, which indicates a message is linked to the entry.
utiliser votre tele 19/04/01 14:41 Page 22 Using the Intercom This function may only be used with an additional ONIS 200 handset. Your base station may be used with 8 HANDSETS. Intercom allows you to communicate internally between two handsets. In addition, if you have three or more handsets, external communication may take place at the same time as the intercom function is being used (e.g. one handset is used to communicate externally while two other are used for an internal call).
utiliser votre tele 19/04/01 14:41 Page 23 Using the babysit function This function may only be used with an additional ONIS 200 handset. Acts as a silent intercom, while another handset is used as an intercom monitoring handset to listen to noise in the room where the former monitoring handset has been placed. If you receive a call, the intercom will remain silent and will not take the call.
repertoire prefixe 19/04/01 14:57 Page 24 Operators prefix phonebook If you have subscribed to several telephone operators, this phonebook allows you to store their prefixes. Each operator may offers competitive rates depending on the time, date and destination of the call. Once these prefixes have been stored, your telephone will automatically offer you the one which offers the best rate when you wish to call. Storing prefixes The phonebook contains 10 entries.
repertoire prefixe 19/04/01 14:57 Page 25 Using the prefix phonebook 1 Press on the idle screen. The telephone will show a “Day”, “Night” or “Weekend” entry, according to the date and time of the call. Weekend CHANGE OK 2 If you wish to use this operator press OK|. • If you wish to use another operator, use or to scroll and select OK|. Predial: XX_ CORRECT 3 Now enter the telephone number of the person you wish to call. RECORD You can also use your phonebooks.
utiliser les services 19/04/01 15:01 Page 26 Using the services Operator services Your telephone provides easy access to a number of services provided by telephone operators.These services are available using specific codes.These codes are pre-programmed into your telephone, however you may change them if they do not match those of your operator (see page p. 43). Caller identification Lets you know who is calling before you answer the phone and offers the VIP function described on page 14.
utiliser les services 19/04/01 15:02 Page 27 Caller identification Lets you know who is calling before you answer the phone and offers the VIP function described on page 14. 1 The ONIS 200 displays the caller's number when the phone rings*. If the caller has withheld their identity (service “Withheld identity” or registered with “witheld id. default”, see page 31), the display will show “Number withheld”.
utiliser les services 19/04/01 15:02 Page 28 Call forward Forwards your calls to a line of your choice. Declaring the service If you have registered with the call forward service, select it in the declare menu (see page 12) to enable guided use on your ONIS 200 screen. Forwarding calls 1 Select SERVICES| on the idle screen, “Call forward” will appear on screen. Services Call forward NEXT 2 Select DECLARE|.
utiliser les services 19/04/01 15:02 Page 29 Call waiting Tells you when a new call is received if you are already on the line. Declaring the service If you have registered with the caller identification and Call waiting services, select Call waiting (see page 12) for guided use on your ONIS 200 screen. While you are on the phone: Call from: 0123456789 - ONIS 200 displays the second caller's number*. IGNORE - ONIS 200 will first show the caller's name if listed in the phonebook.
utiliser les services 19/04/01 15:02 Page 30 Three-way call Allows you to speak externally to two people at the same time. For example, you are speaking to person A and you wish to introduce person B into the conversation. Declaring the service If you have registered with the “Three-way call” service, select it in the declare menu (see page 12) to receive guided use via your ONIS 200 screen.
utiliser les services 19/04/01 15:02 Page 31 Activating and deactivating call back The Call back service is offered by your operator when the line you are calling is busy. A voice message will tell you which key to press to activate the service.Your telephone will memorise the number and connect you to the person you wish to call automatically once the line is free. If you do not wish to wait any longer, you can cancel the Call back function using the Services menu.
utiliser le rep sur place 19/04/01 14:55 Page 32 Using the Setting up the Onis Vox 200 answerphone Your ONIS Vox 200 answerphone can store around 15 mins of messages and has four modes.
utiliser le rep sur place 19/04/01 14:55 Page 33 Recording the outgoing message To activate Answer Only with a personal outgoing message or Answer+Record with a personal outgoing message, you will need to record the outgoing messages you wish to use. Recording and playing the personal outgoing messages 1 Scroll to "Rec. outg msg" in the “Answerphone” menu and select OK|. 2 Scroll to the type of outgoing message you wish to record and select OK|. Rec.
utiliser le rep sur place 19/04/01 14:55 Page 34 Recording a conversation You can also record external calls using the handset.The recording is treated as an answerphone message. 1 When in-call, scroll through the list and select The will flash during recording. REC. CONV.|. Alan 2 Press |STOP to end recording. The will flash to indicate a new message. STOP L NOTE: You can record up to 2 minutes of conversation.
utiliser le rep sur place 19/04/01 14:56 Page 35 Screening your calls When your answerphone is in Answer+Record mode, you can listen to a message as it is being recorded and decide whether or not to take the call. For incoming external calls, the answerphone will be activated after the number of rings specified in the settings menu.The base station loudspeaker will activate automatically.
utiliser le rep sur place 19/04/01 14:56 Page 36 Memory full In Answer+Record mode, the answerphone automatically deactivates itself when there is no more storage space in the memory. The answerphone will automatically re-activate itself once you have created space by deleting messages. ● Your ONIS 200 Vox will show the message “Answerphone full” when the answerphone has reached capacity.
utiliser le rep sur place 19/04/01 14:56 Page 37 Using the toll saver function and selecting response time You can select the number of rings after which the answerphone will be activated (useful when you are by the phone). Toll saver mode is useful for remote access: the answerphone is activated after 2 rings if new messages have been received, and after 5 rings if there are no new messages (or the messages have already been read).This gives you time to hang up and helps you to save cost of the call.
utiliser le rep a distance 19/04/01 14:53 Page 38 Using the answerphone (remote use) Changing the secret access code You will need to enter a secret code to access and program the answerphone remotely from the ONIS 200 Vox.You can customise this code (intially 0000). 1 Scroll to “Change code” in the “Answphn” menu and select OK|. 2 Enter the new remote access code and Personnal code: _ CORRECT OK select OK|. L NOTE: If you have lost your remote access code, you can enter a new one using the above.
utiliser le rep a distance 19/04/01 14:53 Page 39 During remote accessing The following table shows the functions available during remote access. Press followed by the key which corresponds to the function you want. Keys Function Play messages or stop playback Record a new outgoing message Activate or deactivate the answerphone Delete the message being played Play the previous message Play the message again Play the next message.
Reglages 19/04/01 14:44 Page 40 Settings Adding another ONIS 200 handset to the base station You can use up to 8 handsets on the ONIS 200 base station. A handset must be registered with the base station before it can be used with that base station. To register a handset, use the following procedure: 1 Unplug and plug back the power adapter in the base station. After a few seconds, the base station will emit a double “tone”.
Reglages 23/04/01 10:07 Page 41 Using the ONIS 200 handset with two base stations Each ONIS 200 HANDSET can be used with up to four BASE STATIONS. A different external line corresponds to each base station. To use a handset with another base station, the handset must first be registered with that base station (see page 40). To do this, use the following procedure: Selecting a base station The handset will automatically operate with the last base station to which it was added.
Reglages 19/04/01 14:44 Page 42 Using GAP-standard compliance The GAP standard guarantees that all models of DECT GAP handsets and base stations comply with a minimum operating standard. Your ONIS 200 HANDSET and BASE STATION comply with this standard.
Reglages 19/04/01 14:44 Page 43 Network type 1 Under the “Line settings” heading in the “Settings” menu, select OK| to change the network type. Network type: √ Public BACK OK 2 Scroll to select the network you want and select OK|. Recall type This function is only available if you have chosen the PABX-type network (see above). 1 Go to “Recall type” under the “Line settings” heading in the “Settings”menu and select OK|. 2 Scroll to choose the flash length select OK|.
Reglages 26/04/01 13:18 Page 44 Telephone troubleshooting ... PROBLEMS REASONS SOLUTIONS The green led does not light up. The BASE STATION is not connected properly. Check mains power and connections. The HANDSET icon does not flash when the handset is placed on the BASE STATION. - Poor contact. - Dirty contacts. No tone. - No power. - The HANDSET is not sufficiently charged. - You are too far from the BASE STATION. - Move the HANDSET slightly.
Reglages 26/04/01 13:22 Page 45 Guarantee Dear Customer, Thank you for purchasing this Philips product which has been designed and manufactured to the highest quality standards. If, unfortunately, something should go wrong with this product Philips guarantees free of charge labour and replacement parts irrespective of the country where it is repaired during a period of 12 months from date of purchase (6 months for replaceable/rechargeable batteries).
index 19/04/01 15:05 Page 46 Index A Activating babysit mode 23 Activating key tones 11 Adding handset 40 Additional handset I, 22, 23, 40 Adjusting volume 15, 17 Alls calls 13 Answer 16 Answered calls 20 Answerphone 32 Answerphone full 36 Automatic reading 21 B Babysit function 23 Babysit mode 23 Base ringer 10 Base station III, 41 Base station indicators 3 Base station volume 17 Batteries 2 Battery performance 8 Configuring 13 Configuring call log 13 Contrast 11 Creating entry 18 D Date and time 9
index 19/04/01 15:05 Page 47 Memo 33 Memory 36 Memory full 36 Menu overview 7 Menus 5 Message 20, 34 Message service 27 Message service information 20 Monitoring handset 23 Mute 15 N Network type 43 New name 11 News messages 21 O Obtaining line 15 Operator message service 12, 26, 27 Operator prefix 24 Operator services 12, 26 Operator type 43 Outgoing message 39 P Pause 19 Permanently withhold identity 31 Phonebook 18 Predial 16, 25 Prefix phonebook 25 Press number 12 Private phonebook 18 Problems 44
card 23/04/01 10:14 Page 1 ✂ Remote control Remote control (using a tone telephone) (using a tone telephone) 1 Dial your telephone number. 1 Dial your telephone number. 2 *After listening to the outgoing 2 *After listening to the outgoing message, press the your code (4 digits). key, then enter 3 During message playback: message, press the your code (4 digits). key, then enter 3 During message playback: Dial Dial ● Stop message playback . . . . . . . ● Stop message playback . . . . . .
UK 23/04/01 10:14 Page 2 ✂ 4311 256 05703 card Remote control (cont.) Remote control (cont.) (using a tone telephone) (using a tone telephone) You have just checked your memo recorder. You have just checked your memo recorder. 4 After listening to your messages, you have 20 seconds to: 4 After listening to your messages, you have 20 seconds to: Dial Dial ● Start message playback . . . . . . . ● Start message playback . . . . . . . ● Switch off memo recorder . . . .