OPERATING INSTRUCTIONS PHILIPS VR 665 Congratulations! You are now the owner of one of the most sophisticated and simple-to-use video recorders {VCR) on the market. With this VCR you can record and play VHS-standard cassettes. Naturally, you can’t wait to use it. But before you do, it's worthwhile taking the time to read through the whole of this operating manual. 1t will show you how to make the best use of your equipment.
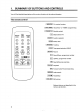
1. SUMMARY OF BUTTONS AND CONTROLS You will find detailed descriptions of the various functions in the relevant chapters.
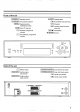
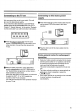
Front of the set Standby switch Cassette eject ATS Channel search (3] Rewind/Reverse scanning Supplementary Playback installation button [BE1 Forward wind/ Forward Store TV channel scanning Up/Plus, programmer Pause/Stop number Record =T diminutions, programmer number ‘ @ wear fl o) Googly moonstones ms Tat STORE Back of the set Mains socket Cart {AV-Euro) socket Audio output, Cart {AV-Euro} socket left channel Aerial input socket [ABUTTED] Audi y output, Aerial output socket right channel () & 2 EXTERNAL.
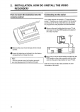
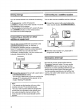
2. INSTALLATION. HOW DO I INSTALL THE VIDEO RECORDER? How to insert the batteries into the Connecting to the aerial remote control Your video recorder is actually a "TV set without a serene. Therefore, you must connect it to the aerial as well as to the TV set. Only then you can record TV programmed and playback recorded cassettes.
Connecting to the TV set Connecting to the mains power supply We recommend the use of a scary cable. This will give you the best picture quality. if your television does not have a scary (AV-Euro) socket please do not read further here, but turn to Chapter 7, ‘Special features’, In the section "Playback via the aerial cable’ you will find further information.
Saving energy Connecting to a satellite receiver You can choose between two methods of switching You can also connect a satellite receiver to this set. off. 1. To save energy switch off using the @ Connect the receiver with a scary cable to the button on the video recorder. The clock . video recorder {socket b time disappears off the display. 2. Normal method of switching off switch off using : the button on the remote control. The clock time remains displayed.
Setting display language You gan select from several languages for the display on the video recorder. @ Freshet button and then hold the INSTALL | button several seconds. © Use the button to select the required display language, e.g.: 'ENGLISH’ . € Terminate using the and then the button. Setting the clock and date on the video recorder In order to be able to programmer recordings, you must first ensure that the video recorder clock is correctly set.
3. STORING TV CHANNELS To be able to watch and record TV programmed you must first store ali the TV channels T} in the set, You can store channels, Your video recorder has its own receiver. This means that it can be used independently of the TV set. ATS the automatic channel search The video recorder searches for all TV channels simultaneously. They are sorted and stored in its memory. @) Switch on the TV set. Many TV sets switch automatically to the programmer number for the video recorder at step €.
€) Confirm using the button on the video recorder-remote control, The video recorder compares the TV channels on the TV set and the video recorder. If the video recorder has the same TV channel 'P 01’} as the TV set, then it stores it. Wait until, e.g., "SELECT TV P02’ appears in the o display. P2 @ Select, either on the TV set or with the remote control for the TV set, the next programmer number, e.g.: ‘2", @ Confirm with the [(SLEET] mutton on the remote control for the video recorder.
Note: * If you want to delete an unwanted TV channel, press the button for a few seconds until 'CLEARED’ appears in the display. * Have you used a scary cable to connect the video recorder to your TV set and does your TV set respond to the switch-over with the button on the remote control? If s0, you can switch to and fro between TV reception and video recorder reception. This is the easiest way for you to allocate the same TV channels to the same programmer numbers on both appliances.
How you switch between the display for ‘channel number’ or ‘frequency’ , you can read in section ‘Special features on your video recorder’. To enter a overspecialized channel, first enter the channel digit ‘9. The indication changes from 'CH’ to 'CA’. For example, for special channel 'S 30, enter ‘9 30", I a TV station broadcasts encoded programmed and your video recorder is connected to a decoder, press the button on the remote control several seconds until 'DEC’ appears in the display.
4. PLAYING A RECORDED CASSETTE in Chapter 2 you connected the video recorder to the TV set. Playing a cassette is now very simple. if you want to record something straight away, first read Chapter 5. @ Switch on the TV set. Many TV sets automatically switch to the programmer number for the video recorder when a cassette is played back. However, this only works if the video recorder is connected to the TV set with a scary cable.
Picture scanning You can select from various speeds for scanning backwards or forwards. €) Press the T8 button. © Now press the (5] or [FE] button once or several times. The display will show: 'REVERSE’ , 'FAST REV’, ‘SCAN REV’ or 'FAST FORWARD, "SCAN FORE’ . FEST FORE 1234 © Press the % button once you have found the desired position on the tape. Special note: * If the still picture vibrates vertically, hold the button until the vibration is minimal.
Tape position. How do | know where l am on the tape? The tape position is shown in the display as a continually changing numeric indication during Wind, Rewind, Record, Playback and Pause/Stop. if you want to set the indicator to press the button on the remote control. H Lad oo oo When you rewind a cassette to the start of the tape, the indicator is automatically set to e.g. '0008". Note: * When you press any tape transport button the or button) this search function will be stopped.
How do | eliminate picture interference? Every time a cassette is loaded the video recorder will automatically set the correct tracking position. For recordings made on another sef you may be able to improve on the automatic setting as follows: @ Press the [FLAY | button on your remote control. © Press the [TRACKING ] button on your remote control, © Cross the or button until the playback quality is at its best. O Press the button. This setting will remain until you remove the cassette.
5. HOW DO | RECORD DIRECTLY? The easiest way to record is to record g TV programmer that is currently being transmitted. @ Insert a cassette or switch the video recorder on with the | STOMP | mutton. ©) Use the or L= button to select the programming number from which you wish to record, 8.g. P01, LHD KALE When you wish to start recording, press the button on your set. 'REC’ appears in the video recorder display.
Auto-assembling Hi-F stereo reception You san use the auto-assembling function to join individual recordings without any major picture disturbance between the recordings. @ Press the button. Search for the correct position on the tape and then stop the playback by pressing the button. "PAYS’ will appear in the display. P 0l PURL 0020 9 Now start recording as usual by pressing the button. Long play function You can refuge the recording speed by half.
6. HOW DO | PROGRAMMER A RECORDING? In this chapter you will learn how to programmer your set. It switches itself on automatically, records the TV programmer you want and then automatically switches to standby.
Programming with Show View With this method the programming will be as easy as dialing a telephone number. You only have to enter the ‘Show View code’ (3 to 9 digits) printed in your TV guide next te the start time of a TV programmer, Make sure that a cassette without erase protection has been loaded. TOW VIEW @ Cross the (VW= RIVET | button on the remote control. SURVIVE TIMER Ob YO E 60 ire The video recorder display shows a series of dashes. © Mentor the entire "Show View code’ with the digit buttons .
Note: * Do you want to use programmer number 'E2” in order to record from an external source {e.g. satellite tuner)? Confirm the "E2’ programmer number displayed in step With the button, # codeine ERROR' appears in the display, the code was incorrect or incorrectly entered. Repeat the entry or end with the button. * CLOCK’ appears in the display, the internal clock is not set. Set the clock. * if 'DAILY ERROR’ appears in the display, the date was incorrectly entered.
Please note: * it is possible to programmer a recording 31 days {one month) in advance. if, for example, today is the 02nd of March and you programmer the date as ‘017, the recording will be made on the 01st of April. For a TV programmer starting at midnight, i.e. at 00:00, enter the date of the following day as the recording date. € Press the button. ‘PROGRAMMER' will appear in the video recorder display. Now enter the programmer number of the TV channel from which you wish to record.
How do I record from a satellite tuner? How do | stop a TIMER recording? You can also programmer recordings from an external satellite wren. @ Connect the tuner to the socket. Make sure that the satellite tuner is switched on and that the correct SAT channel has been selected. Use one of the available programming methods to programmer a TIMER block. Use programmer number 'E2” in the programming procedure for this external recording source.
How do | clear a TIMER block? @ Press the butter on the remote control twice. @) Press the [Fervor button as often as necessary until the TIMER block you want to clear appears in the video recorder display. € Press the button. The TIMER block will be cleared. 'DAT-P-- will appear in the video recorder display.
7. SPECIAL FEATURES ON YOUR VIDEO RECORDER Apart from the functions that have already hen described, your set has other special functions and extras designed to make the use of your seats convenient as possible. in this chapter you will find out more about them, Tuner mode. Your video recorder as an extension of your TV set You can also use your video recorders e TV receiver {tuner).
TV monitor function Switch your TV set to the ‘AV’ programmer number {Audio/Video input} by pressing the button. This enables you to see the picture from the video recorder on the TV screen. Your video recorder must be switched on, ‘VCR MONITOR' will appear in the display for a few seconds. Press the button again to switch the monitor function off.
44 S T—— Playback via the aerial cable If you do not wish to use a scary cable, the aerial cable which is already connected will act as the connection between your TV set and the video recorder. o Switch on your TV set and select the programs number that you have earmarked for video playback. {(You will find the instructions to do this in the operating manual for your TV set).
The frequency can be adjusted with the or the =] button. To end press the and then the button. © Re-tune the TV set to the video recorder (steps @to until the test picture re-appears. Check all the TV channels on your TV set again. Repeat the channel adjustment (step @) until the picture quality is the same whether the video recorder is on or off.
8. BEFORE YOU CALL AN ENGINEER Problem The set does not respond to any button being pressed Cassette jammed Remote control does not operate No playback on video recorder Poor playback from video recorder No recording possible Programmed recording does not function Picture or sound interference on TV reception 28 Possible cause * No power supply * A programmed recording is currently being made * Technical disturbance: disconnect from the mains for 30 seconds, then re-connect.
9. NOTES Precautions/Notes * The set should not be used immediately after transportation from a cold to & hot area or vice versa, or in conditions of extreme humidity. After unpacking the set, it should be allowed to acclimatize for at least three hours before installation, * Do not use the set in dusty places, near strong magnetic fields or where it may be subject to vibration, * We recommend disconnecting the appliance from both the mains and the serial during heavy thunderstorms.