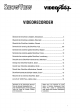
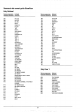
{Bibersicht der Showdown Leitzahlen Deutschland Lebhaft Sendeanstalt Tausenderlei Sendeanstalt SenderKurzbezeichnung " Genrezeichnung 1 ARD ARD 048 SLOWENIEN 802 ZDF ZDF 049 SLOWENIEN 103 ARD (RADIO BREMEN) 678 T8A 004 RTL PLUS RTL 088 LEDERLAND 1 L1 05 SATT SAT LEDERLAND 2 HL2 008 PRO PRO 640 LEDERLAND 3 NL3 w7 NTV N1V 691 DÄNEMARK 1 DK1 ong KABELKANAL KAB 092 DÄNEMARK 2 DK2 09 RTL RT2 493 TRANCE 1 TR g1a ARTE ART 044 TRANCE 2 FR2 am VOX VOX 295 FRANKEN 3 FR3 gi2 DEUTSCHES SPORT FERN DSF 048 BELGIUM/FLAMIS
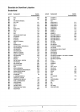
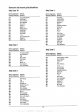
Bibersicht der Showdown Leitzahlen Osterreich Leitzahl Sendeanstalt Tausenderlei Sendeastall SenderKurzbezsishnung Kurzbezeichnung o ARD ARD 102 SKY NEWS 02 2DF ZDF 103 SKY MOLIERES 003 ARD {RADIO BREMEN) 104 THE SOVIEL CHANEL 084 PLUSWERT RIL 185 SKY SPORT 85 SATT SAT 108 KARNICKELN / NICKE AT NICHT 086 PRO? PRO 187 EUROSPORT 7 NTY NIV 108 GALAVISION 088 KABELKANAL KAB 108 MTV EUROPA 009 RTL RT2 110 SCHILDERN CHANEL / THE FAMILIE CHANEL o1e ARTE ART M SKY MOLIERES GOLD o1 VOX YOX 112 BBC WORD SERVICE 012 D
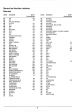
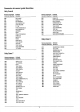
Bibersicht der Showdown Leitzahlen Schweiz Leitzahl Sendeanstalt Sendeöleilzahl Sendeanstalt SenderKurzhezeichnung Genrezeichnung o ARD ARD 101 SKY GNE agz IDF ZDF 02 SKY NEWS 083 ARD (RADIO BREMEN) 18 SKY MOLIERES e RTL PLUS RTL 104 THE SOVIEL HANGEL 005 SATT SAT 105 SKY SPORT a8 PRO PRO 186 KLEINIGKEIT / NICKE AT MITGEHT 7 NV NTV 197 EUROSPORT 008 KABELKANAL KAB 108 GALAVISION 209 RTL RT2 169 MTV EUROPA 810 ARTE ART 18 SCHILDERN HANGEL / THE FAMILIE CHANEL M VOX VOX "1 SKY MOLIERES GOLD 012 DEUTSCHES SPOR
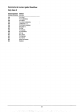
List of U.K.
OPERATING MANUAL VR 948 Congratulations! You now own one of the most sophisticated yet simple-to-use video recorders on the market. Naturally, you can’t wait to use your new video recorder, but before you start, it’s worthwhile taking the time to read through this operating manual. Acquainting yourself with the video recorder’s features is the best way to guarantee trouble-free operation.
44000 3. PLAYING A RECORDED CASSETTE 19 How do | correct pictures interference? 20 Quick winding and rewinding 21 Picture search (scanning) 21 The shutting functions 22 How do | know where | am on the tape? 24 How do | find a particular position on the tape? 26 Searching for a tape position 26 VHS Index Search System (» VIZ «} 27 VIZ search 28 Manually setting and deleting VIZ-marks 29 Picture sharpness control 30 Selecting the audio track, audio mix 30 4.
7. ADDITIONAL RECORDING FUNCTIONS 62 Simulcast recording 62 Recording audio only 63 Audio-dubbing with integrated audio mixer function 64 Insert-Function 66 Synchrony-Edit-Insert 68 Synchrony-Edit 72 Externally controlled recording 75 Recording from another video recorder 76 8. PARTICULAR FUNCTIONS AND EXTRAS 78 ON YOUR VIDEO RECORDER TXT decoder.
1. BUTTONS, CONTROLS AND SOCKETS Here are all the buttons and sockets which you will find on your video recorder and remote control. Explanations of the individual functions of these buttons and sockets are given in the corresponding chapters.
i i ENGLISH Additional TV functions {only for TV sets with the same remote control code}: Note: * If you press the and buttons simultaneously, you can directly call up the chant nel number » AV« (EXT 1).
The front of the video recorder Standard/Long play time Recording mode Audio selection Recording TIMER programming TODAY programming VCR programmer minus/plus Function selection Clear/Delete Installation Automatic station search Allocating TV stations Confirm button LOGON P Single picture/Picture search nonfood Cassette eject Switch off Single picture/Picture search button {Jog/Shuttle) Wind/Picture search forwards Stop/Pause Playback Rewind Picture search reverse Q QO e MOE Abe second e Topsy OB AUTO STORE
Recording sound level control Audio input sockets Video input socket Synchronization edit socket Synchronization edit socket Video input socket W] Microphone socket Microphone recording level control Headphones socket Headphones volume adjustment Eco R TRAVERSE TN §TROD.
® Safety instructions and safety measures The manufacturer cannot be held responsible for any damage which is incurred by not using the video recorder in compliance with the national guarantee conditions or safety instruction. First check if your supply voltage is the same as that written on the type plate on the rear of your video recorder. Danger — high voltage in this appliance! Do not open The video recorder does not contain any parts that can be repaired by the user.
Do not place the video recorder near appliances which generate strong magnetic fields motors, loudspeakers and transformers}, Do not use the video recorder in dusty places or where it may be subject to vibration. During severe thunderstorms {with lightning), we recommend disconnecting the video recorder from the mains and the aerial B3], Ensure that there is a vertical distance of at least 20 cm between the video recorder and your TV set.
2. INSTALLATION: HOW DO | INSTALL THE VIDEO RECORDER ? Si St Warning | This appliance is supplied with a Safety Standard Unproved mains lead fitted with a non-rewire able 13 Amp mains plug which, if unsuitable for your casket, should be cut off and an appropriate plug fitted by a qualified electrician. The fuse and fuse holder must be removed from the plug as accidental insertion of the redundant plug into a 13 Amp socket is finely to cause an electrical hazard.
How do | put the batteries into the remote control? @ Remove the cover from the back of the remote control. O Insert the batteries as indicated into the battery compartment and close the cover. Note: * Do not use rechargeable batteries in this remote control. How do | set the clock on the remote control? if the clock is not correctly adjusted, {after having changed the batteries, for example), the data will flash on the remote control display. @ Press the button on the remote contra.
Connecting to the mains O Insert the fern ale plug of the mains cable into the mains socket] at the rear of the video recorder. © Insert the plug at the other end of the mains cable into the wall socket. A few important notes for operation: * The video recorder should remain connected to the mains at all times to ensure that programmed intended for recording can be made and that the television works. The power consumption is very low. * No special button is required to switch on the video recorder.
Connecting to the TV set In order for the picture/sound signal to reach the television from the idea recorder, you must connect the video recorder and the television using the delivered Euro Av-cable or the (S-VHS) and cinch cable {refer to figure below). Connecting to the Euro-AV socket @ Insert the plug of one of the AV-Euro cables into the orange AV-Euro connector on the back of the video recorder. Connect the other plug to the TV set.
Connecting to another video recorder Connecting to the Euro-AV-socket This video recorder has two Euro-AV sockets. A second external unit, such as a second video recorder, a satellite receiver or a CD video player, can be connected to the AV, socket. @ Use an Av-Euro cable to connect this recorder (socket [EXTERNAL) and a second unit.
Connecting a decoder Some TV stations transmit encoded signals which you can only see with a purchased or hired decoder. You can connect such a decoder (scrambler} to this video recorder. @ Use an Av-Euro cable to connect the decoder to the video recorder {socket (EXTERNAL 271}, You will find a description of how to store TV channels with the decoder in Chapter 4, “Storing TV Channels”.
o flagstone Q03 Cole Il D &= choosy © Q Ret Hod PICTURE i m 3 ENGLISH SIMMER = 16 @ Emergency interrupt Your video recorder and its remote control have an emergency interrupt function. You can interrupt any function by pressing button STANDBY & Whenever you have any problems while aerating the video recorder, you can simply interrupt any function and start again. You can practice using the video recorder without worrying. No matter which bunions you press, you won't damage the video recorder.
O In this step you can specify the screen format of your TV set, If you have a TV set with a normal screen format, use button 1o confirm the format specification »4:3 ., If you have one of the new wide screen TV sets, use button to switch to the format » 16:9«. To conclude the selection, press button [OE 1.
R @ In this step, select the signal output of the Eur-AV SHEBELI socket [ EXTERNAL 1. moon s With a TV set whose Euro-AV-socket is not suitable for S-VHS-playback, then confirm entry » CABS « with the [GK.] button, T 1f you own a TV set whose Eur-Av-socket is suitable for Playback, enter » Y/C « using the (="l or button (Y/C stands for S-VHS). Then press button to confirm, @ In this step, select the signal input of the Euro-AV socket and (EXTERNAL 2 J. » AUTO « is set at the factory.
3. PLAYING A RECORDED CASSETTE ENGLISH In Chapter 2 you connected your TV set to the video recorder, thus enabling you to play a cassette. You will find that it is very simple to play back a cassette. If you want to record something immediately, read Chapters 4 and 5, @ Switch on the TV set. Many modern TV sets automatically switch over to the programmer number for the video recorder when a cassette is being played.
TOFF nmE you wish to interrupt playback, press button [(STOPPER. » STOP « appears in the display. © If you wish to remove the cassette, press button [REJECT. Note: * Each time a cassette is loaded or removed, the video recorder automatically cleans the video heads. In this way the best playback quality is maintained. * When playing a long play recording, the video recorder automatically switches over to this speed. The display will show » LP «.
] Fast winding and rewinding @ Press button [TOPMOST, Press button {rewind) or button {wind} on the video recorder. The tape will wind or rewind at high speed. O Press button if you want to stop winding. WITHDREW s use h " =:EH IME Picture search {scanning)} WIDOW use D e With the buttons on the remote control or on the video recorder, you can choose between various speeds for searching forwards or backwards for a picture, @ Press the button [PLATE: 1.
0L 22 PHILIPS Videodisc firer cassettes set clock OO6 ®ee rerecord programmer fv volume G (o) CI» vor programmer sped CIo standby om jostle stop play The Jog / Shuttle functions On the video recorder and remote control you will find & large rotary knob. Still picture/Single frame selection: @ First activate the rotary knob function with button [J0G GNASH. The green light comes on.
Slow motion @ First activate the rotary knob function with button (306G ON The green light comes on. The video recorder switches to still picture. @ in order to switch to slow motion, continue to turn the outer ring to the left or right until » SLOW REV « or » SLOW MOTION « appears in the display. Super slow motion: @ First activate the rotary knob function by pressing button The green light corms on, The video recorder switches to the still picture.
use e VCR o) £ 180 CASSETTE Tape position. How do | know where | am on the tape? list handy to know for how long a cassette has been playing. When you insert some cassettes into the video recorder and select one of the tape transport functions {for example, » PLAYBACK the tape’s length is automatically measured. The tape’s length (for example, » E 180 «) and the elapsed playing time {for example, » 1:20 USED TIME «) appear in the video recorder’s display.
ENGLISH O You can use the button o select from among the following three display possibilities: elapsed playing time : display » USED TIME « remaining playing time : display » TIME LEFT « Counter . display of tape position You can read this display while winding and rewinding, while recording, or during playback and stop.
. How do | find a particular position on the tape? Sometimes you may have recorded two or even more TV programmed on one cassette. In this case, it is worthwhile making a note of the tape position at which the recordings start and end. 8o that you do not have to search for a long time, your video recorder offers you two methods for automatic searching: » TAPE POSITION SEARCH « and » VIZ «.
The VHS Index Search System (» VIZ The video recorder writes VIZ code marks on the tape vary time the record button is pressed. Using the button you can search for these VIZ code marks on the tape. You cannot use the VIZ function with recordings made on another video recorder that does not have the VIZ function. Intro-scan: The VIZ function provides you with a survey of all the TV programmed recorded on the tape.
revs TILT DLt PHILIPS Videotapes + merchant cassette lockstep DO ®@®6 magi tor trekking QOO safest clear index write OO revels doth recorder menu E@@fi@ O38TO e tv programmer tv volume ver programmer speed standby aw eject stop play jog on speed @ VIZ search: Select this function if you are looking for a particular VIZ code mark.
Manually setting and deleting VIZ-marks To find certain positions on the tape quickly, you can set and erase code marks by yourself. This only works with cassettes which are not protects against recording. If you want to set a code mark, proceed as follows: @ During playback, search for the position on the tape to be marked. O At the right position, press button WHITE 1. This sets a code mark, INDEX MATE s use B o 1 SHE If you want to erase a code mark, proceed as follows: o 7 © Press button [INDEX].
30 Picture sharpness control You can adjust the picture sharpness in playback in seven steps. @ Press button (PLATE ], @ Press button or =71 The current setting is shown in the display: from maximum sharpness). You can change the current setting by pressing button or again within five seconds. The number » 0 « indicates medium setting. Selecting the audio track and audio mix © Use button on the video recorder to select the audio track you want to hear.
4. STORING TV CHANNELS ENGLISH In order to be able to record TV programmed, you first have to store each TV channel {in the video recorder). You can store channels. Your video recorder has its own receiver. Because of this, it can be used independently of the TV set. If you wish fo use the advantages of the Video Plus + system with TIMER programming, you must allocate a specific ‘aerial code’ to each TV channel (BRC 1, BBC 2, 1TV, CH 4, etc.}.
TS @ identify the TV channel to which you are tuned by allocating the correct 'serial code’ to it. For your convenience, with the first four programmer numbers we have stored the correct ‘aerial code': P1=BBC1=001 P2=BBC2=002 P4=CH4=004 For programmer numbers from 5 inwards, use the digit buttons 1o enter the correct 'aerial code’ as three digits {see list,page 29). If necessary, clear with button .
Assigning TV channels You can allocate any desired programmer number to the TV channels stored by the Automatic Channel Search. This is useful, for example, it you want to have the same sequence of channels as that on your TV set. Switch on the video recorder with button [STOP ], © Press button on the video recorder, “STORE ON P 01" appears in the display. You can now follow the instructions on the on-screen display {OSD) using the remote control or buttons on the video recorder.
(identify the TV channel to which you are tuned allocating the correct "aerial code' to it 1} For your convenience, with the first four programmer numbers we have stored the correct ‘aerial code': P1=BBC1=001 P2=BBC2=002 P3=ITV=003 P4=CH4=004 For programmer numbers from 5 inwards, use the digit / HERE buttons to enter the correct ‘aerie code’ as n three digits (see list, page 29). 036 i necessary, clear with button .
Manual search In certain cases the Automatic Channel Search may not be able to find all of the TV channels {e.g. coded TV channels). You can then use this manual method to set the channels. @ Press button on the remote control. With tha red or blue button select the menu fine "TUNER MODE". Press the green button You can now follow the instructions on the on-screen display {OSD) using the remote control or buttons on the video recorder.
HARE con 7 SET I AHEM coy STORED 36 2 @ identify the TV channel to which you are tuned by allocating the correct ‘aerial code’ to it. For your convenience, with the first four programmer numbers we have stored the correct ‘aerial code’: P1=BBC1=001 P2=BBC2 =002 P3=ITV=003 P4=CH4=004 For programmer numbers from 5 inwards, use the digit buttons to enter the correct ‘aerial code' as three digits (see list, page 289}. If necessary, clear with button . © Press button [OKJ.
Direct channel selection If you know the TV channel numbers in your region, you can directly enter these channel numbers in the video recorder’s display. @ Switch on the TV set and select the programmer number for the video recorder. © Switch on the video recorder with button [STOP . © Use button T= or to select the programmer number under which you wish to store the TV channel. O Press button on the remote contra. With the red or blue button select the menu line » TUNER MODE «.
R —— Note: * If the TV channel is encoded and the video recorder is connected to a decoder, press button {remote control). » DECODER « appears in the display. Attention: The following adjustment is only necessary and useful in special cases, for example in case of stripes in the picture for cable TV systems. The picture and sound quality may become worse. Press button {remote control). 2 FIE TUHIHEG » FINE TUNING « appears in the display on the recorder.
R e ® Use button =T or 10 select the desired digit or letter. @ With button [ELECT, you select the position at which the character is to be placed (5 characters are possible). ® Button can be used for a blank space or for deleting the character in that position. @ Store these settings with the button. The indication » STORED « will briefly appear in the display.
Cable TV with special channel numbers If you possess cable TV equipment with special channel numbers, you must enter the channel numbers already defined for the special channels. Proceed as described in the section “Direct channel selection”. In step @, enter the kennel numbers {e.g. channel » 080 « for special channel » 81 «) according to the following table. Further information about the special channel numbers of your TV channels is available from your cable TV company.
5. HOW CAN | RECORD DIRECTLY? ENGLISH The easiest way of recording is to directly record a TV programmer that is currently being broadcast. And this is how it is done: © Insert a cassette. The video recorder switches on automatically, Otherwise, you can also switch it on with the button [TOPMOST, © Using button = or {video recorder) or the digit buttons {remote control) select the number of the TV channel from which you wish to record.
@ Note: *If you only want to record VHS on a 8-VHS-cassette, press button on the remote-control, Select the » VHS/SVHS « line with the blue or red button and confirm with the green button[® 1. Select the fine » VHS « with the button and confirm this with the green button [& 1. »VHS« appears in the video recorders display. * |f you do not want to record to the end of the cassette, press button again {remote control), The display shows the end time of the recording (also know as the OTR time).
Long play function You can reduce the recording speed by half. This makes it possible 1o record, for example, 8 hours instead of 4 hours with a » E240 « cassette. © Before recording, select the recording speed » LONG PLAY « with the menu button on the video recorder. 0o During playback, the video recorder automatically selects the right speed (» STANDARD PLAY « or » LONG PLAY Note: * During picture scanning, still picture, slow motion and super slow motion the picture is not in color.
1 EEC ] ETON g: Ién' e Erase protection So that you don’t accidentally delete an important recording, you can remove the special tab (erase protection} on the front of the cassette with & screwdriver, Later, if you no longer want the erase protection, you can seal the gap once more with adhesive tape. Auto-assembling You can use the auto-assembling function to link up individual recordings without any disturbing picture transitions {flickering).
6. HOW DO | PROGRAMMER A RECORDING? in this chapter you will learn how to programmer the video recorder.
46 © What is » Programmer Delivery Control « {PD? With PDC, the TV station controls when the video recorder is switched on and off. This means that the video recorder switches itself on and off at the right time even if a TV programmer you have programmed begins earlier or finishes after than expected provided that the TV station is actually transmitting PD, Not all TV stations transmit a PDC time code.
TODAY programming on the video recorder 1t is very easy to programmer a recording for TODAY. You only need to enter the programmer number and the start time. Please note that only one TODAY programming is possible per day. The recording will be made until the end of the loaded cassette. Note: * You cannot use the PDC function with TODAY programming. * The tape speed {standard play or long play} can be selected before programming with button on the video recorder.
000440 TODAY READY APE 34 S:00 Topiary FREER Have you entered all the data correctly? if so, press button [TODAY 1, The data are recorded in the video recorder. » TODAY READY « appears in the video recorder’s display. © To finish programming, press button BASTARDY &, TABBY appears in the video recorder’s display. This concludes the programming procedure, Please also note the "General notes on programming” on page §9.
Programming with the Video Plus + number This method for TIMER programming is as simple as using a telephone. You will find the Video Plus + code (3 to 9 digits) for the desired TV programmer in an appropriate TV programmer guide. Enter this number with the remote control into the video recorder’s display. © Switch the video recorder off with the button, © Check the time and the date on the video recorder’s display, © Press the button on the remote control.
WLY-0E F-Zzz FEEBLE TOFF h " * grep R ™ CUE ERROR Have you entered the data correctly? If yes, press the button on the remote control. One of the opposite indications will appear in the recorder’s display. An important hint to PDC: * With Video Plus + programming, the PDC function is automatically activated. Otis possible to switch the PDC function off and on again with the button. o you wish to alter or clear programming, press the button.
If the indication 'VP UNKNOWN' appears for approx. five seconds in the video recorder’s display, the recorder could not find the Video Plus + guide number for the selected TV programmer, The indication 'P E2' {programmer position for socket EXTERNAL. 2) appears in the video recorder’s display. The picture/sound signal of this external programmer source a satellite receiver) will be recorded if you confirm the data with the button, If you do not wish that, press the button twice.
4SS [ C C rerecord @@ manor tracking e 6cC O CHRONOLOGICAL) wove hood Mann 1@ wolverine i e tv programmer tv ] ver programmer Programming with TXT:VPT Programming is much easier if you use the colored TXT buttons [, the user guide on the screen and the page memory. Details of the general operation of the TXT decoder can be found in Chapter 8 “Particular functions and extras”, @ Switch on the TV set and select the programmer number for the video recorder. © insert a cassette.
© Press button [VELA. The example shown here to the right appears on the screen. You can now see a little square position marker, also called the cursor {l), on the survey page. You can move the cursor up and down with the blue or red button [&7. Position the cursor at the start time of the TV programmer that you want to record, © Press button [VF, PHILIPS TEXT PROGRAMMING T c4 1230M Business Dally 13.00 ‘Asama Street 1400 Rankin the RAF film 1550 Un Point C'est Tout 16.00 Great British Isles.
TIMER OVERVIEW TIMER suB TITLE 4 150 85 MAY 22:30 P01 2 50 A7 MAY 2350 Po1 Title on/off i To clear timer press CLEAR To edit timer press THIEVERY To complete programming VPT DOWN | TIMER Here, an example of what appears on the screen. © Switch off the video recorder with button [_STANDEE &1, Special notes: * In step @ there are additional functions for TIMER programming: Cal up the TIMER block with the green {8 Button. Each tire you press the green [® button, you jump one field further.
@ Press the green button several times until you reach the line » TITLE RECORDING «. Use the yellow button 1o switch to » TITLE RECORDING ON « if this has not already been done. © Press the blue button [E]. You are now in the » TITLE EDITING « screen. When programming TXT you see the text line, taken automatically from TXT, which you can change.
e e hii40 VCR DATE PRIG b1z VCR 1 DATE FROG VCR DATE PRIG VeR 20:15 15 START END 56 o Programming on the remote control You can enter and store data for one recording in the remote control. The remote control display shows you all the programming steps. Use the digit buttons or button or to enter the data, With the last press of the button, you transmit the programmed data to the video recorder. The data are stored in the next free TIMER block of the video recorder.
Note on PDC: * The PDC function cannot be switched on during "Programming on the remote control”. If » VPS« (= PDC function} appears in the remote control's display, you should switch off » VPS « with the button [SELECT 1, @ Press button [TIMER RES . The word » END « and the symbol » 0) « appear in the display. Now enter the end time of the recording as four digits. O Transmit the data to the video recorder. To do this, point the remote contra at the video recorder and press button CENTIMETER 1.
TIMER 5 DATE ML 5w DATE DAILY ERROR 58 D Programming a regular daily or weekly TV programmer You don’t have to repeat the programming procedures each time a TV programmer from a series is broadcast. When you enter the recording date, you can programmer a daily or weekly repeat at the same time. Programmer the TIMER block as usual. Press button when you are entering the recording date in step @.
General notes on programming: * The TIMER switches on the video recorder automatically only if the video recorder is switched off at the start time of the programmed recording. * |f you do not press a button for one minute during 2 programming procedure, the remote control automatically interrupts the process. You then have to start the programming procedure from the beginning.
S — How do | stop a TIMER recording? i you want to stop a programmed recording, simply press button [STANDEE% &) How can I check or correct a TIMER block? @ Press the menu button (MENUHIN T3 ] on the remote control. Confirm the first menu line » TIMER « with the green button © Use the red or blue button 1o select the TIMER block you want to check or correct. © Now press the green button several times.
How can I cancel a TIMER block? @ Press button [(MENUHIN T ] on the remote control. Confirm the first menu line » TIMER « with the green button (&7, @ Use the red or blue button on the remote control to select the TIMER block you want to cancel. © Cancel the TIMER block with button [CLEAR J. The display of the video recorder will show, for example, »1 CLEARED «. / CLEARHEADED Press the button to conclude this function.
7. ADDITIONAL RECORDING FUNCTIONS Simulcast recording The stereo sound of some TV programmed is broadcast simultaneously on FM radio. In order to get the best stereo sound quality you can record the picture from the TV channel and simultaneously record the stereo sound from the radio. To do this, connect the radio to the socket {ack of the recorder). @ Tune your radio and the video recorder to the desired programmer.
Recording audio only This video recorder allows you to make “audio only” recordings. To do this, connect the video recorder to an audio system (socket back of the video recorder). @ Insert a cassette. © Press button on the recorder several times until » AUDIO ONLY « appears in the display. © Use the controllers to adjust the sound until the indicator until the comes on during the loudest passages. O Pres button [(RECORD @ ], The video recorder begins recording the sound input.
Audio dubbing with integrated audio mixer function L AUDIT DUNE This function enables you to replace (subj the mono sound track of a previously made recording with another sound recording {for example, with a microphone in socket MIC | on the front of the video recorder). Only the normal ({linear) mono sound track is changed. The stereo sound track and the video image remain unchanged. © Press button [PLATE Jto locate the position at which the audio dubbing is to stet.
O Press button [ FECORD® ). After step @, you can add the whiff original sound to the inserted video cassette. Using the right controller, adjust the original whiff sound until comes on during the Loudest passages. if this is not desired, simply move the right [CORRECTIVE ® ] controller all the way down (). The video recorder starts to record the sound input from the audio source, replacing the mono {linear} sound track. The recording can be heard by connecting headphones to one of the sockets.
e E SOFT pzs e THEE RT 025 00 Insert-Function You can insert a recording scene later into an already existing track without a disturbing transition using this function. @ Search for the place where you would like to make the insert with button [DELAY, @ Press button [ STOP M1, © Select the programmer number from which you would like to record with the button or or with the number button {remote control). @ Press button on the video recorder several times until » INSERT « appears on the display.
@ Press button [RECORD @ |, © Stop recording with button [STOP 1. @ Switch the video recorder off using button [(STANDBY & 1. Note: * If you want 1o stop insert-recording automatically, search for the desired end of the cassette according to step @. Select playback position display » counter « and set this with the button on the video recorder. Return to the beginning of the recording with the forward/reverse picture search and start recording.
044400V Synchrony-Edit Insert You can synchronously insert a new recording scene later into an already existing recording without a disturbing transition using this function, Depending on type and equipment of the camcorder being used, certain connecting cables are necessary . Both units are started at the same time with help of a synchronized impulse and the adjustable per-roll time. Two different operational methods are possible. Connect both units when switched off.
O Select the desired insert function with button [SELECT ], » EDIT INS VIDEO «: The picture and the WiFi-sound {helical track) are re-recorded, the monotone {linear track) remains. » EDIT INS DUB «: The picture, the WiFi-sound (helical track) and the monotone {linear track) are re-recorded. » EDIT INS COPY «: The picture is re-recorded. The monotone {longitudinal track) remains and and is transferred onto thither-soundtrack (helical track).
70 @ In accordance with the following cable system, there are two methods to begin recording Method 1 ® Activate recording with button on the video recorder. The cassette in the camcorder is rewound briefly after which the camcorder switches to » PLAYBACK «. Once the beginning scene has been reached, the » RECORD « function on the video recorder is started synchronously. ® At the end scene, interrupt synchronous recording using button on the video recorder. The camcorder switches to playback pause.
ENGLISH Method 2 @ Activate the editing process, for example with EDIT or QUICK REVIEW, on the camcorder. The cassette in the camcorder is briefly rewound, and the camcorder then switches to » PLAYBACK «. When the beginning of the scene is reached, the function » RECORD « on the viced recorder is simultaneously started. AV Synchrony @ At the end of the scene, interrupt recording with the PAUSE or STILL button on the camcorder. ® For additional recordings, repeat steps @ through ®.
e — Synchrony-Edit Synchronous editing is possible between an appropriately equipped camcorder and you video recorder. Depending on the type of camcorder you have, certain cable are required. Both devices are started simultaneously by means of a synchronous pulse and a delectable per-roll time. Two different operation procedures are possible. Connect both units; they must both be switched off. Use only the supplied 3-pin edit cable for controlling a camcorder {Variant 1).
@O On your video recorder, search for the correct tape position for recording. Press ["STOP 1. © Search for the correct tape position on your camcorder. © Use the controllers to adjust the sound until the indicator comes on during the loudest passages. @ Press PAUSE or STILL on the camcorder. @ Depending on the cable connections shown at the right, there are two ways to start recording. Method 1 © Activate the recording procedure with on the video recorder.
Method 2 © Activate the editing process, for example with EDIT or QUICK REVIEW, on the camcorder. The cassette in the camcorder is briefly rewound, and the camcorder then switches to » PLAYBACK «. When the beginning of the scene is reached, the function » RECORD « on the video recorder is simultaneously started. @ At the end of the scene, interrupt recording with the PAUSE or STILL button on the camcorder, ® Stop synchronous recording with on the video recorder.
Externally controlled recording Do you have another device, such as a satellites receiver, equipped with an integrated clock which can be used for controlling other devices? If so, you can control a recording from such an external device via the socket EXTERNAL 2 1, Insert a cassette which is not protected against recording into the video recorder. @ With the video recorder switched off (mutton [STANDBYS ), press button (remote control} for five seconds.
Iy EEL 7% @ Recording from another video recorder Your video recorder allows you to make recordings from an external recording source, which means you can transfer onto this video recorder from a second video recorder. This feature requires an AV-Euro cable (scary-cable). @ Connect this video recorder to the second video recorder.
O begin recording, press the recording button ["RECORD @ ] on VCR B and the playback button [CPLAY®] on VCR A, © When you are ready to stop transferring, press button [SOFT W] on both video recorders. Note: * In exceptional cases [non-standard CABS or S-VHS signal for example) the color may not be correct when playing back a recording.
8. PARTICULAR FUNCTIONS AND EXTRAS ON YOUR VIDEO RECORDER TXT decoder. Reading TXT with the video recorder In addition to the functions already described, your video recorder has other particular functions and extras designed to make operating it as convenient as possible. You will find out more about these features in the following chapters. This video recorder allows you 1o receive the TXT programmed broadcast in your own country efface, even if your TV set does not have TXT.
O Now you can call up the TXT pages that you want to read. Use the digit buttons to enter the number of the desired TXT page. You must always enter this number as three digits. The page number you enter appears in the information line at the top of the TV screen. After a few seconds, the page appears.
000 How can | store my favorite TXT pages? For each TV channel you can store up to four TXT page numbers, e.g., the news headlines, or the daily TV programmer survey. If you store the programmer survey page here, programming with TXT will be much easier for you. @ Switch on TXT as usual with button and select the page you want to have as a “favorite” TXT page. @ As soon a this page appears, press button [SECT ), A list of your favorite TXT pages appears on the TV screen.
The automatic correction of the TXT clock by the video recorder Store a TV channel that transmits TXT on programmer number From now on, every time you call up the TXT tha video recorder takes the exact time from TXT. Note: * The date is not automatically corrected. How can | record TXT subtitles? @ Switch on TXT with button {on the remote control) and select the page number of the subtitles page.
Enlarging character size You can use button 1o double the character size on the TXT screen. This means that you can read the information on the screen from further away. © Press button [ENLARGE ¥ 1 ~ the upper half of the page appears enlarged on the TV screen. @ Cross button again to switch to the enlarged lower half of the page. © Press button once more the view the whole TXT page with normal character height.
TXT turns pages automatically If a TXT page takes up more space than is available on the TV screen, this page is divided into sub-pages, which are automatically turned after a preset time. Qi you wish to take your time reading, you can stop the pages from being turned by pressing button on the remote control. @ This sub-page remains on the TV screen until you press button again. The automatic page turning function then resumes.
S — Tune mode. Your video recorder as an extension of your TV set You can also use your video recorder as a TV receiver (tuner). This is handy if your TV set does not have remote control or if it has fewer channel buttons than the number of channels it could actually receive. Proceed as follows: @ Switch on the TV set. Select the programmer number reserved for video playback. @ Press the menu button on the remote control. Use the red or blue button to select the menu line » TUNER MODE «.
View mode You can make use of extra functions if a second unit is connected to socket [EXTERNAL Z 1. This unit could be another video recorder, a decoder, 2 satellite receiver, or a video CD player. 1f your second unit transmits a control signal during playback, for example, your video recorder recognizes this {when it is switched on) and autocratically switches over to »View mode «. You can switch the » View mode « on and off with button (MONITOR ).
LS Automatic switch-off If the video recorder is not operated for more than eight minutes during one of the following functions, the function is switched off. This protects your cassette and prevents unnecessary power consumption, if the video recorder is: in STOP it switches off in EJECT it switches off in STILL PICTURE it switches to PLAYBACK in PICTURE SEARCH it switches to PLAYBACK Child lock This function prevents the unauthorized operation of your video recorder. All button functions are blocked.
Display of TV station name For TV stations which broadcast PDC signals, the name of the station is visible for the operating modes Eject, Stop, Record, Assigning TV stations, and Tuner, / CHH SOFT R " s USED gong ™ VCR 1/VCR 2 switch-over This is an important function if you have two video recorders which accept the same remote control code.
88 The new 16:9 wide screen standard This video recorder can be used for wide serene TV sets. If a wide screen » 16:9 « identification is received during a video recording from an textual source MAC decoder} via the [EXTERNAL 2 l-socket, this identification is recorded also. During playback, this identification is routed from the [EXTERNAL 1 l-socket via an AV-Eurodollar to the TV set.The TV set automatically switches to the wide screen format.
S An extra feature of this remote control If you have a TV set that can accept the remote control code of this remote control, you can also use the remote control for some TV functions. * Switch TV on and off & * TV volume * TV channel number This remote control is equipped with a number of remote control codes per-defined for specific TV manufacturers. You can select the TV volume or channel number on your TV set as well as switch it on and off.
90 Note: *} For code numbers » 6 « and » 7 «: When you are selecting TV channels, hold down button and use the digit buttons to select the programmer number. Enter the desired code number into the video recorder as folios: © Press button and at the same time. The display shows, for example, » Code O«. © Use the digit buttons ‘o select the code number.
9. BEFORE YOU CALL AN ENGINEER Problem Possible cause The video recorder does not respond * No power supply. when a button is pressed * Programmed recording is in progress. * Technical disturbance: disconnect from the mains for 30 seconds, then reconnect. If this has no effect, you can: 1. Disconnect from the mains. 2. While holding down buttons and [EJECT ] reconnect to the mains. All data are reset {deleted). Remote control does not work * Batteries are weak.
ENGLISH 10. TECHNICAL DATA, ACCESSORIES Technical data * Mains voltage 18010 240V 10 % * Mains frequency Power consumption, 24 W typical {9 W typical in stand by) * Wind/rewind time, 96 s typical for E-180 * Ambient temperature during operation +10°Cto +35°C * Relative humidity Dimensions 435 x 386 x 107 mm {incl. feet) * Weight approx. 5.7 kg . Position for use max.