USER MANUAL QUATTRO 3 CONFERENCE SPEAKERPHONE MODEL 303
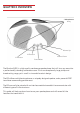
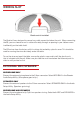
QUATTRO3 OVERVIEW 4 Microphone Array Volume Up L2 Function Volume Down L1 Function Power/Mute The Quattro3 (Q3) is a high-quality conference speakerphone that will turn any room into a professionally sounding conference room. It has an exceptionally large pickup and broadcasting range, yet is small in size and discrete in design. The Q3 utilizes multiple microphones, a uniquely designed speaker, and a powerful DSP to achieve commanding performance.
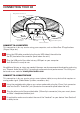
CONNECTING YOUR Q3 Daisy Chain Connectors Down (right) Up (left) Connector Panel DC Power Connector 2.5mm Analog Audio Out 3.5mm External Speaker/Microphone Mini USB Interface Module CONNECT TO A COMPUTER This connection is for any session using your computer, such as Voice Over IP applications (Skype, Vidyo, etc.) 1 Using the USB cable provided, plug the mini USB side of the cable into the Q3 (located on the connector panel below the unit).
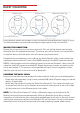
USING THE QUATTRO3 The Quattro3’s control panel has 5 buttons: • Power / Mute button (in the middle) – see details of operation below. • Volume Up and Volume Down. control panel • Interface Control buttons (noted as L1 and L2) - These 2 buttons serve different functions depending on the Quattro3 model you have LIGHT INDICATIONS: Interface Controls Volume Up L1 L2 Power/ Mute Volume Down • Power / Mute button light off – unit is off. • Solid Power / Mute light – unit is on.
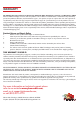
DAISY CHAINING Satellite Unit 2 Satellite Unit 3 Interface Module DOWN Connect to next unit Master Unit (Unit 1) Interface Module UP DOWN Connector Panel Interface Module UP DOWN UP Daisy Chain Cable Every Quattro3 comes with the built-in ability to connect to other Quattro3s (up to 15 units). This feature enables you to provide coverage for larger spaces using a chain of Q3s. MAKING THE CONNECTION: Choose the unit you wish to act as the master unit.
WIRING SLOT Plastic arch is installed The Quattro3 was designed to conceal any cable connection below the unit. When connecting the Q3, you can choose to run its cables discretely through an opening in your table or more traditionally, on the table itself. The Q3 arrives from the factory with its wiring slot sealed by a plastic cover. This should be used for running the wires discretely under the table.
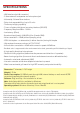
SPECIFICATIONS • UBS interface (mini B connector) • 3.
WARRANTY The following warranty statement is effective for all Phoenix Audio Technologies’ products as of October 1st, 2007: Phoenix Audio Technologies warrants that this product is free of defects in both materials and workmanship. Should any part of this product be defective, the Manufacturer agrees, at its option, to repair or replace with a like new replacement any defective part(s) free of charge (except transportation charges) for a period of two years for all products.