ProFire Grills Perfection by Design Owner’s Manual Assembly and Maintenance Instructions THIS GAS APPLIANCE IS DESIGNED FOR OUTDOOR USE ONLY. www.newphoenixgrills.com FOR YOUR SAFETY If you smell gas: 1. Shut off gas to appliance. 2. Extinguish any open flame. 3. Open Lid. 4. If odor continues, immediately call your gas supplier or your fire department. MODEL: SDBOPN, SDBOPP FOR YOUR SAFETY 1.
Note To Customer: We recommend after each use, you turn the control knobs to HIGH (with the lid closed) and run the grill for approximately 10 minutes. This will allow the accumulated fats and greases to cook off, and avoid a possible flare up on the next use. HINT: The fats and greases are cooked off when no more smoke is flowing from the grill vents. Owner’s READ this book first! SAVE this manual for future reference! Your new gas grill is a safe, convenient appliance when assembled and used properly.
SAFETY IMPORTANT! Check for compliance to these safety rules before each use! -Maintain a minimum clearance of 24 inches (61 cm) from sides and back of the grill to any combustible construction. -Do not use this appliance under overhead combustible surfaces. -Always keep the area around the grill clear from any combustible materials, gasoline, and other flammable gas and liquids. -Do not block air to the appliance. -Do not block ventilation openings.
Well ventilated space, NOT in a building, garage, or any other enclosed area. It must be out of reach of children. A dust cap MUST be used whenever the tank is disconnected from the grill. When grill is not in use, close propane tank cylinder valve. When the propane tank is connected, the grill must be stored outdoors in a well ventilated space, not in a building, garage or any other enclosed area. Always close the propane tank before disconnecting it from the grill or when the grill is not in use.
Phoenix Grill WARRANTY LIMITED LIFETIME WARRANTY ON THE FOLLOWING: • Cast Aluminum End Caps • Stainless Steel Top Insert • Stainless Steel Bottom Insert • Control Panel • Stainless Steel or Aluminum Column • Deck/Patio Base • Portable Base • Stainless Steel Cooking Grid • Stainless Steel Fasteners 10-YEAR WARRANTY ON THE FOLLOWING: • Stainless Steel Burner • Cast Aluminum Drip Pan • Stainless Steel Shelf 5-YEAR WARRANTY ON THE FOLLOWING: Black Aluminized Steel Top Insert • Black Aluminized Steel Botto
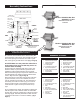
GETTING TO KNOW YOUR PHOENIX GAS GRILL Heat Indicator Right Side Shelf Grill Lid Sta-Kool Stainless Steel Handle Left Side of Burner Control Utensil Hooks Electronic Igniter Right Side of Burner Control Drip Pan Drain Valve Column Stainless or Black Aluminum Grease Collector Bucket Deck/Patio Base Gas Valve Access Panel 2010 Models Come Standard With Right and Left Side Shelf.
MHP PHOENIX GRILL SERIES PARTS INFORMATION ITEM QUANTITY PART NO. DESCRIPTION 1 1 GGEIB Electronic Ignitor (AAA Battery Required) 2 1 GGIB Ignitor Box Assembly 3 2 GGK10SD Valve Knob 4 1 GGTG4 Temperature Gauge 5 1 HHVLV28SD LP Gas Valve #60 Orifice 6 1 HHVLV32SD Nat.
Assembly Instructions Rec. Washers Only For Aluminum Column Tools Required For Assembly: 7/16" Wrench, 7/16" Socket Wrench With Extension, 3/8" Wrench. CAUTION: Edges of grill may be sharp, use care when assembling grill. CAUTION: While handling the grill head be very careful not to damage the Venturi Tubes or the Ceramic Ignitor Insulator which protrudes from below the grill. 2-Piece Gasket For Stainless Column Only Fig. 2 Attach in this order– Bolt, Rec.
PHOENIX Assembly Instructions CONNECTING GRILL TO COLUMN 4 BOLTS 3/4" 4 KEP NUTS Models: SDSSOPN Nat. Gas SDSSOPP LP Gas Back of Grill Stainless Steel Column with Fixed Base BOLT GRILL INSTALL BOTH ENDS COLUMN NUT HEAT SHIELD CONNECTING COLUMN TO BASE TANK LOCKING BAR IN THIS ORDER RECT WASHERS Note: Rect. Washers Only For Aluminum Column BASE 6 BOLTS 3/4" 4 RECTANGULAR WASHERS 6 1/4 FLAT WASHERS 6 KEP NUTS NYLON SPACER ACCESS FOR GAS LIN ABOVE DECK OR PATIO Models: SDSSOCN Nat.
Step 2. At this point you have assembled the Pedestal/ Column and Base Assembly, and will now proceed to the grill head itself, (carton 1.) With the grill head still in its box, cut down all (4) corners of the box to expose the grill head. Remove and set the grill Lid aside. Remove the Control Panel inter pack, side shelf, grease bucket, and cooking grid which are packed inside the grill head. Last, remove the “V” shaped stainless drip pan from the bottom of the grill head.
Step 7. Reinstall Drip Pan and Drain Valve Lower the “V” shaped drip pan into the pit with the drain pipe to the right side, as it will go through the hole at the bottom of the pit. Lightly coat the exposed threads with pipe sealant and thread on the drain valve. Make sure it is in the open position. Hang the grease bucket from the valve. Install the stainless steel cooking grid. Step 9.
First Time After Storage Checklist An obstructed venture tube is not the only cause of “Flashback”, it is the most common cause. There, to avoid this problem, frequent inspection and cleaning of the venture tubes is necessary, even before the first operation of the grill. Failure to do so may result in a fire beneath your grill. See (Care and Maintenance Section” for proper procedure to ensure clean venture tubes. SAFETY Prior To Use Listed below are steps to follow each time you use your grill.
BURNER FLAME APPEARANCE 1. Remove the burner assembly from the grill bottom. See step 25 in the assembly instruction section on how to remove. 2. Bend a stiff wire, (a lightweight coat hanger works well) into a small hook. Run the hook up through each venture tube past bend and into the burner several times. 3. Use a bottle brush with a flexible handle. Run the brush up through each venture tube past bend and into the burner several times.
Please Note: as long as the grease can flow into the grease bucket it is not necessary to clean the drip pan after each use. Clean as needed or approximately every 10 uses. Section. -Replace all damaged or worn parts. Do not attempt to use your grill with damaged or worn parts. -Replace all parts as shown in the assembly instructions. -Check for proper burner and venture placement. -Do not operate with any loose or missing bolts. Tighten or replace. -Check hose for deterioration or damage.
Controls on the high setting. Remember for best results, cook all your foods with lid closed. If you are cooking chicken, turkey, roasts, hot dogs or sausages we recommend that after pre heating your grill on high you then turn both controls on the medium settings (half way between the high and low setting). To Keep food warm, or to further slow the cooking process, you may try running only one side of the grill and warming or cooking on the opposite side.
TROUBLE SHOOTING GUIDE If you are having difficulty with your grill, follow this guide to solve some common problems. Problem #1: BURNER(S) WILL NOT LIGHT OR THE GRILL DOES NOT GET HOT ENOUGH. PROBABLE CAUSE SOLUTION A. Propane Cylinder Almost Empty. Have Propane Cylinder Filled. B. Propane Cylinder Valve Not On. Turn Valve On. Turn Counter-Clockwise to Open. C. Kink In The Gas Hose. Reposition The Propane Cylinder To Straighten The Hose. D. Burner Holes Clogged.
NOTES: 17
ACCESSORIES FOR ADDED VERSATILITY, CONVENIENCE AND OUTDOOR COOKING ENJOYMENT. www.newphoenixgrills.com Stainless Steel Smoker Box #SDSSST Stainless steel smoker box with cover. For use with all grills. Insert moistened wood chips for your favorite smoke flavor. 8-3/4" L x 3-1/2" W x 1-1/2" D SearMagic Cooking Grid #SDGRIDS Rust free anodized aluminum grid for searing on your Phoenix Grill. Wundersmoke Chips #SDBP5 (1 lb. Mesquite) #SDBP6 (1 lb. Hickory) #SDBP7 (1 lb.
Heavy Aluminum Griddle #SDAG Heavy-duty griddle perfect for breakfast French toast, eggs, bacon, etc. 16" L x 12" W Roast Holder #SDRR3 Holds roasts, ham, fowl so heat circulates evenly around meat for thorough balanced cooking. Made of nickel-plated steel. 15-1/4" L x 10-1/2" W Rib/Potato Rack #SDRR2 Chrome plated accommodates 6 racks of ribs and 6 poatatoes. 12" L x 7-1/4" W Shish Kabob Tray #SDSK1 Deluxe chrome plated folding kabob tray and 6-14" skewers.
5565 North 124th Street • Butler, Wisconsin 53007 Phone: (888) 781-4657 • (262) 781-4657 Fax: (888) 781-3965 • (262) 781-3965 Website: www.newphoenixgrills.com Email: info@profiregrills.com Other Quality Products From Modern Home Products Outdoor Lighting First in Outdoor Gas Grills Grill Accessories and Replacement Grill Parts MHP configuration and ProFire are trademarks of Modern Home Products Corp.