
User's Manual


Contents
Your hearing aid
1. Quick guide
2. Parts of the hearing aid
Using the hearing aid
3. Left & right hearing aid markings
4. On/O
5. Batteries
6. Putting on the hearing aid
7. Removing the hearing aid
8. Push button
9. Phone calls
10. Flight mode
Further Information
11. Care and maintenance
12. Exchanging the earwax protection
13. Connectivity overview
14. Service and warranty
15. Compliance information
16. Information and description of symbols
17. Troubleshooting
18. Important safety information
6
8
9
10
11
13
14
15
16
23
25
28
33
34
36
41
46
48
6
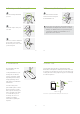
1. Quick guide
Left & right hearing aid markings
Changing batteries
1
2 3
Blue marking for left
hearing aid.
Red marking for right
hearing aid.
Remove the
sticker from the new
battery and wait two
minutes.
Open the
battery door.
Place battery in
the battery door with
the “+” symbol facing
upwards.
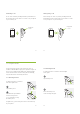
7
On/O
Push button
Flight mode
The push button has two main functions:
1. The push button on your hearing aid
can either be volume or program change
depending on the hearing aid
programming. This is indicated in your
individual instructions.
2. If the hearing aid is paired with a
phone a short push (less then 2 seconds)
will accept an incoming call and a long
push (more than 2 seconds) will reject an
incoming call.
To enter ight mode hold down the push
button for 10 seconds whilst closing the
battery door.
To exit ight mode simply open and close
battery door again.
OOn
8
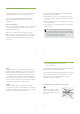
Battery door
Anchor (optional)
Speaker (without earpiece attached)
Push button
Audéo B-Direct
Tube
2. Parts of the hearing aid
The pictures below show the model described in this user
guide.
Possible earpieces
cShell
SlimTipDome