
User Manual

2 JUBI 12A LITE / JUBI 15A LITE
English
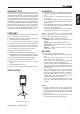
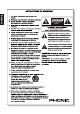
SYSTEM OVERVIEW
1. Play/Pause Button
Push this button to start and stop playback and recording
of the currently displayed track. Starting a track after it
is paused will resume the track from the point at which
it was paused (in both record and playback mode). This
button also doubles as the “select” button when navigating
menus.
2. Return/Skip Buttons
Pushing these buttons will allow users to skip ahead and
back between tracks in sequence. They’re also used for
navigating menus.
3. Stop/Menu Button
Push this button to stop the currently playing or recording
track. When pushed and hold, this button will allow
access to the recording module’s menu. The menu allows
users to select playback and recording modes, a number
of different repeat modes, the ability to delete les from
USB ash discs, and a level control for playback signals.
4. Display
This small LCD display will show the track number
currently being played or details on your current recording.
It also offers play, pause and record indicators to the left
of the display. When in playback mode, the screen will
indicate the type of le type the unit is currently playing:
wav or mp3.
5. USB Port
Connect your USB ash drive to this input. Once a drive
is connected, the les will initiate and you will be able to
play or record les.
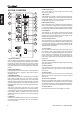
1 2
3
6
5
4
14
13
12
10
8
7
9
11
15
16
MADE IN CHINA
6. USB Level Control
This control adjust the nal signal level from the USB
player to the main mix.
7. Mic Inputs
Jubi speakers are design to accept microphone level sig-
nals through XLR and 1/4” phone jacks (for balanced or
unbalanced signals). The level of these inputs’ signal can
be adjusted using the mic volume control.
8. Mic Volume Control
This control allows you to adjust the incoming signal from
the mic input jacks. Setting them to the left-most position
(-∞ dB) will completely cut the incoming signal, whereas
the right-most position will add 10dB of boost to the signal.
9. Line Inputs
This balanced ¼” phone jack accepts line-level signals
from external devices. Stereo RCA connectors are also
included. The incoming signals from these inputs can be
adjusted using the line volume control.
10. Line Volume Control
This control allows you to adjust the incoming signal from
the both the line input and RCA input jacks. Setting them
to the left-most position (-∞ dB) will completely cut the
incoming signals, whereas the right-most position will add
10dB of boost to the signals.
11. Line Output
The 1/4” phone jack line output will send the nal mix of
the channel 1 and 2 input signals, allowing the signals
to be employed by additional speakers or other devices.
Do not under any circumstances connect this output con-
nector to the input of the same unit. This will cause an
audio loop at frequencies and levels that will be extremely
unpleasant.
12. Main Level Control
This rotary control will adjust the nal output mix for the
Jubi Lite speakers.
13. Treble Control
This control gives the user control of high frequencies
(12kHz) in their audio. This allows for a total of 10 dB of
boost or cut.
14. Bass Control
This control gives the user control of low frequencies
(80Hz) in their audio. This allows for a total of 10 dB of
boost or cut.
15. AC Power Connector
The Jubi Lite speakers offer a built-in power cable. Phonic
advises that users do not attempt to remove or replace
this cable for any reason. We also advise that the ground-
ing pin of the cable should not be defeated for any reason.
16. Power Switch
This switch will turn the Jubi Lite speaker on and off.