
Installation Instructions

IMPORTANT:
• ALLINSTALLATIONWORKSHOULDBEDONEBYACCREDITEDPROFESSIONAL.
• SHUTOFFPOWERSUPPLYATFUSEORCIRCUITBREAKER!
• USEONLYTHESPECIFIEDBULBS.DONOTEXCEEDTHEMAXIMUMWATTAGE!
PREPARING FOR INSTALLATION
notesabove.Shutoffthepoweratthecircuitbreakerand
completelyremovetheoldxturefromtheceiling,includingthe
oldmountingstrap.
Fromthepartsbagremovethemountingstrapassembly.One
endofnipple(F)shouldbeattachedtomountingstrap(A)with
hexnuts(C,D)inplace.Theotherendshouldhavecanopyloop
(H)attached.Findthepairofholesonmountingstrap(A)that
matchesthespacingoftheholesonthejunctionbox.Attach
mountingstrap(A)tothejunctionboxusingmountingscrews
(B)andascrewdriver.Tightensecurely.Unscrewcanopyloop
collar(I)fromcanopyloop(H).Passcanopy(D)overthemounted
canopylooptotesttheheight.Approximatelyhalfofthecanopy
loop’sexteriorthreadsshouldbeexposed,andthecanopyloop
collarshouldtsnuglyontothecanopyloop.Removecanopy(D)
andadjusttheheightofnipple(F)andcanopyloop(H)untilthe
desiredheightisreached.
ASSEMBLING THE FIXTURE
Placethexture’ssocketcluster(R)ontoaatsurface.Rod
(N)isonthexture’swires,butnotattachedtothebodyofthe
xture.Passthexture’swiresthroughrod(N)andpullthewires
untiltaut.Twistrod(N)ontothepostatthecenterofthexture’s
socketcluster(R)untilsecure.Bymeasuring,determinethe
correctnumberofchainlinksneededforproperhangingheight.
Ifnecessary,useapairofplierstoopenandremoveanyexcess
chain.Attachonechainconnector(K)toeachendofchain(J).
Useoneofchainconnectors(K)toattachchain(J)totoploop(L)
andclosethechainconnector.Haveanassistantattachrods(M)
tothehooksonthexturebodythenattachthehooksofrods
(M)totoploop(L).Hooktheendofrod(N)ontotoploop(L).Pull
thewiresthroughtoploop(L).Feedthexture’swiresupthrough
thechain(everythreelinksorso),pullingthewiresuntiltaut.
Slidecanopyloopcollar(H)andcanopy(G)ontothechain/wires.
Usethefreechainconnector(K)toattachchain(J)tocanopy
loop(H).
CONNECTING THE WIRES
Haveanassistantsupportthexture’sweightwhilecompleting
thewiring.Cutawaytheexcesswires.Threadthexture’swires
throughcanopyloop(H)andnipple(F).Attachthexture’swires
tothepowersupplywiresfromthejunctionbox.Connectblack
toblack(orsmooth);whitetowhite(orribbed);groundtoground
(greenorcopper).Twisttheendsofthewirepairstogether,then
twistonawireconnector.Makesurealltwistsareinthesame
direction.Ifthereisnogroundwire(greenorcopper)fromthe
junctionbox,locategroundscrew(E)onmountingstrap(A)and
wrapthexture’sgroundwirearoundthegreengroundscrew(F).
Useascrewdrivertosecuregroundscrew(E)ontothemounting
bracket.Tuckallwiresneatlyintothejunctionbox.
FINISHING THE INSTALLATION
Raisecanopy(G)totheceilingandslidecanopyloopcollar(I)
upbeneaththecanopy.Tightlythreadcanopyloopcollar(I)onto
canopyloop(H)tosecurecanopy(G)inplace.
Slidecandlesleeves(Q)overthesockets.Installlightbulbs(O)
(notincluded)inaccordancewiththexture’sspecications.
Carefullyslideglassshades(S)overcandlesleeves(Q)and
securetheglassinplacebypushingtheglassdownontothe
sockettters.
Yourinstallationiscomplete.Turnonthepowerandtestthe
xture.
CLEANING TIPS
Treat the xture gently! Regular cleaning will reduce the need for deep cleaning. For regular cleaning, turn off the light and wipe down the
xture with a clean lint-free cotton or microber cloth. Never spray cleaner directly onto the xture. For deep cleaning, turn off the light
and remove the glass prior to cleaning. Hand wash glass with warm water and mild detergent. Dry with a lint-free or microber cloth.
AssemblyInstructions:2073-3P
For Customer Service, contact the
place of purchase to arrange for
replacement parts.
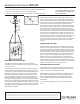
A
B
C
H
I
G
J
K
E
D
F
L
M
P
R
O
N
S
Q