
Installation Instructions

Assembly Instructions: 2073-M1L
IMPORTANT:
• ALL INSTALLATION WORK SHOULD BE DONE BY ACCREDITED PROFESSIONAL.
• SHUT OFF POWER SUPPLY AT FUSE OR CIRCUIT BREAKER!
• USE ONLY THE SPECIFIED BULBS. DO NOT EXCEED THE MAXIMUM WATTAGE!
PREPARING FOR INSTALLATION
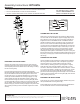
Carefully remove all of the contents from the carton. See the
important notes above. Shut off the power at the circuit breaker
andcompletelyremovetheoldxturefromtheceiling,including
theoldmountingstrap.
Fromthepartsbagremovethemountingstrapassembly.
Mountingstrap(B)containsseveralpairsofthreadedholes.Find
thepairofholesthatmatchesthespacingoftheholesonthe
junctionboxandonyourxture’sbackplate.Twoofmounting
screws(A)shouldbeattachedtomountingstrap(B).Youmay
needtotightenthenutsthatholdthesescrewsinplace.Pull
thehousewiresthroughthecenterofmountingstrap(B).Place
mountingstrap(B)overthejunctionboxsothatmountingscrews
(A)arevertical,andinalignmentwiththeholelocationsonthe
xture’scanopy(F).Securemountingstrap(B)tothejunctionbox
withmountingscrews(D)andascrewdriver.Tightenthescrews
securely.
ASSEMBLING THE FIXTURE
Rods(L)areonthexture’swires.Bymeasuring,determinethe
correctnumberofrodsneededforproperhangingheight.There
are3optional12inchrods(L)anda6inchrod(K)included.To
lengthenthexture,addadditionalrods.Ifadditionalrodsare
needed,contacttheplaceofpurchasetoorder.Toshortenthe
xture,trimthewirestothedesiredlengthaddingatleast8to
10inchesofwiretothedesiredlengthandslideanyexcessrods
offthexture’swirestodiscard.Keepinmindthatyoumustuse
atleasttheprovided6inchrod(L)tohangthexture.Thread
thewiresthroughtherodsandpullthewiresuntiltautbefore
threadingtherodstogether.Threadbottomrod(KorL)ontopost
(M)ofthexture’sbody.Threadthethreadednippleofthetoprod
intopost(I)ofcanopy(G).Pullthexturewiresthroughthetopof
the canopy.
CONNECTING THE WIRES
Haveanassistantsupportthexture’sweightwhilecompleting
thewiring.Attachthexture’swirestothepowersupplywires
fromthejunctionbox.Connectblacktoblack(orsmooth);
whitetowhite(orribbed);groundtoground(greenorcopper).
Twisttheendsofthewirepairstogether,thentwistonawire
connector. Make sure all twists are in the same direction. If there
isnogroundwire(greenorcopper)fromthejunctionbox,locate
groundscrew(E)onmountingstrap(B)andwrapthexture’s
groundwirearoundthegreengroundscrew(E).Useascrewdriver
tosecuregroundscrew(E)ontomountingstrap(B).Tuckallwires
neatlyintothejunctionbox.
FINISHING THE INSTALLATION
Pushcanopy(F)uptotheceilingandtightlythreadnuts(H)onto
theexposedthreadsmountingscrews(A).
Installalightbulbinaccordancewiththexture’sspecications.
Donotexceedthemaximumrecommendedwattage.
CLEANING TIPS
Treat the xture gently! Regular cleaning will reduce the need for deep cleaning. For regular cleaning, turn off the light and wipe down the
xture with a clean lint-free cotton or microber cloth. Never spray cleaner directly onto the xture.
BLACK
(Hot)
WHITE
(Neutral)
GREEN
(Ground)
HOUSE WIRES
SMOOTH
(Or Black)
FIXTURE WIRES
RIBBED
(Or White)
BARE COPPER
(Or Green)
For Customer Service, contact
Toll Free: 800.277.0979 Ext. 0 or
Email: service@laureldesigns.biz
D
C
B
A
E
F
G
H
I
J
K
L
N
O
M