
Installation Instructions
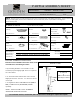

Canopy Hex Nut
Canopy loop
and Canopy
loop collar
1ea Φ153*32Hmm 1ea Φ19mm*4mm 1ea Φ25*45Hmm
Chain
Threaded rod
Wire connectors
1ea 1ft 1ea Φ12*55mm 3ea Orange
Chain
connector
Mounting Strap
Mounting
Screws
2ea 23.8*59mm 1ea 100mm*20mm , 1ea Φ9*10mm 2ea 8/32T*1-1/4"L
Part Needed Quantity
Part Needed
Quantity
Reason why
( missing, scratched, broken glass, bent, bad finish)
Comments
PARTS & ASSEMBLY SHEET
This fixture assembled PO:__________ Date: ________
Fixture Name: Torbellino 8106-M1L CDB
Notice:
Please review the parts listing and check for all parts before assembling the fixture. If any parts are
missing or damaged, please note onthis sheet and contact the place of purchase to arrange for
replacement parts.
PARTS LIST
Company Name:_______________________Co. Account #:_____________
to be filled out by retailer
8106-M1L CDB
Read and review installation instruction sheet, but do
not install before assembling the fixture.
F
IXTURE
A
SSEMBLY
I
NSTRUCTIONS
For Customer Service, contact the place of purchase to arrange for replacement parts.
NOTE: I
NSTALL THE GLASS ASSEMBLY
AFTER THE FIXTURE IS HUNG.
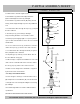
1. By measuring determine correct number of rods
needed for proper hanging height. There are 2 optional
12" rods included.
2. To shorten the fixture trim the wires to the desired
length plus at least 8~10 inches. You must use at least
one Rod (K).
3. To lengthen the fixture add additional rods (ROD-12
CDB) or additional chain (CHAIN-CDB) available
separately.
Fig 1
These two Rods may
be removed
or
additional Rods and/or
Chain may be added.