
User Manual


Receiver
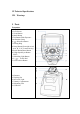
1. Power Button
2. Channel Button/Select Button+
3. Group Button/Select Button-
4. Hot Shoe
5. LED Indicator
6. Test Button
7. ID Button/Digit select Button
8. Exit Button
9. LCD Display
10. Carrying Strap Slog
11. Locking Ring
12. Cold Shoe/ ¼” Tripod Lug
13. 3.5mm Output Port
14. USB Port
15. 5V DC Power Port
16. Battery Compartment
II. Preparation Before Use
Installing the Batteries
1. Press the battery compartment cover on Phottix Odin II transmitter and
receiver, slide it down as directed to open the battery cover.
2. Insert the batteries. Make sure the “+” and“-”battery contacts are correctly
oriented as shown. (Note: Please use 2 pieces of AA alkaline batteries or AA
type NI-MH batteries.
3. Replace the battery cover and push back into the locked position.
4. When (transmitter) and (receiver) are displayed, please replace the
batteries with new ones.
Attaching and Detaching the Odin II
Attaching the Odin II transmitter to the camera hot shoe:
1. Turn off the camera and transmitter
2. Align the transmitter hot shoe with camera’s hot shoe mount.
3. Slide the transmitter all the way into the camera’s hot shoe mount.
4. Lock release: press the lock-release button while slide the lock lever all the
way back to the left.