
User Guide


6
En
INSTRUCTION MANUAL
To Set:
1. In TTL/M mixed mode :
1) Press
button and enter to the Flash Exposure Compensation
Adjustment Screen.
2) Turn
to set the Flash Exposure Compensation.
3) Press
button to exit.
2. In Ratio mode:
1) Press the corresponding ash group button
under the
symbol on the LCD Screen.
2) Turn
to set the the Flash Exposure Compensation.
3) Press
Conrm button to exit.
FP High Speed Sync
The Odin II is capable of FP High Speed Sync Functions, shutter speeds up to
1/8000s, when used with cameras and ashes that support this function.
FP high speed sync cannot be set on Odin II. FP mode must be set on the
camera. Consult your camera manual for more information.
Second Curtain Sync (Rear Curtain Sync)
Second Curtain Sync will re the ash at the end of an exposure, not at the
beginning. This can be combined with longer exposures for creative eects.
Second curtain sync cannot be set on Odin II. Second Curtain Sync must be set
on the camera. Consult your camera manual for more information.
High Speed Burst Function
When using Odin II, ash burst speed (with a remote ash) might be slower
than with a ash on the camera’s hot shoe. Please set this function in your
camera. For setting details, please consult the your camera manual.
Built-in AF assist illuminator
The Odin II TCU features a built-in AF Assist illuminator for use in low
light / low contrast conditions. The AF Assist will project a focusing
target allowing for easier focus in many situations. This Illuminator
can be set to ON or OFF in the Odin II Menu (see below). The default
setting of the AF Assist Illuminator is being set to OFF.
Note:The Odin II TCU uses an eye-safe laser light with beam power less
than 5mW. For safety, use precautions when using the AF Assist Illuminator,
and avoid shining directly into subjects’ eyes.
ODS Function
The Odin II TCU is capable of adjusting ash triggering times to enable
shooting at higher sync speeds with some studio ashes (especially those with
IGBT circuitry). The ODS (OverDrive Sync) mode allows delaying and advancing
the ash trigger point to optimized ash exposure for high shutter speeds with
various ash and camera combinations. The ODS setting is set in the Odin II’s
Menu.
The actual success of ODS is dependent on the specications and capabilities
of the ash and camera systems beijng used. Camera with shutters that have
a slower traverse speeds may achieve little or no improvement. Studio ashes
with short burst durations or used at lower than maximum power level could
produce uneven or incomplete illumination. ODS is strictly a trial and error
process by the user. Phottix oers no tech support for this function.
Please Note:
1.Reset the ODS value to default when not being used.
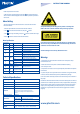
Compatibility with Phottix Series ashes / triggers
Phottix Odin TTL Receiver(Nikon Version)
Phottix Strato Receiver (Canon, Nikon, Sony Versions)
Phottix Strato II Multi Receiver(Canon, Nikon, Sony Versions)
Phottix Mitros+ Transceiver Flash(Nikon Version)
ODIN RX mode
Phottix Indra500 TTL Studio Light Odin-N mode
Phottix Indra360 TTL Studio Light Odin-N Mode
Phottix Indra500 TTL Studio Light Strato II Mode
Phottix Indra360 TTL Studio Light Strato II Mode
Odin II Receiver
Odin II Receiver
TTL&
M Control
Yes
No
No
Yes
Yes
Yes
No
No
Yes
Yes
ReceiverTransmitter
Odin II TCU
Phottix Odin TTL
TCU(Nikon Version)
Phottix Mitros+
Transceiver Flash(Nikon
Version) ODIN TX Mode
Note:
1. The channel and group on the receiver should match that set on the TCU.
2. The Strato Receiver can be triggered by Odin II TCU on the same channel.
Group settings cannot be used.
3. When using Odin II TCU and Strato / Strato II Multi receiver, the ash
mounted on the remote receiver needs to be set in Manual mode.
4. Using the Odin II TCU in high speed sync mode with Strato / Strato II Multi
receiver may cause the ashes to be out of sync.
5. Strato and Strato II Multi Transmitters can not trigger Odin II or Odin I
receivers.
6. High speed sync is not supported while using the Odin II TCU with Strato/
Strato II receivers
Upgrading rmware by USB
The rmware of the TCU and receivers can be upgraded using the included
USB cable. Any upgrades and full instructions will be announced on the Phottix
Blog (journal.phottix.com).
Viewing Hardware/Software Version Data on TCU:
1. Press
button to enter ratio mode interface.
2. Press the corresponding ash group button
under the
symbol
on the LCD Screen.
3. Version details will be shown.
Viewing Hardware/Software Version on the Receiver:
1. With the reciver is powred o, press and hold
button and power button
for 2s. The Hardware/Software versions will be displayed on the LCD. Press any