
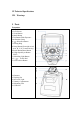
User Manual

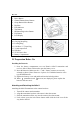
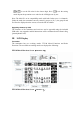


Test Button/Flash Exposure Confirmation Lamp( )
1. Pressing the test button will cause to A/B/C/D/E group to fire simultaneously,
conditioned that the flash attached to receivers are set to the corresponding
channel and group and ID.
2. The flash exposure confirmation lamp will light red when the transmitter is left
un-operated. While the camera is focusing, the lamp will turn out and after
pressing the shutter, the lamp will light green.
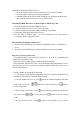
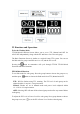
To Adjust the Flash Zoom
Phottix Odin II allows the zoom level of flashes to be set wirelessly as Auto or
Manual:
Auto Zoom: Flash zoom setting will change dynamically as a camera zoom ring is
adjusted.
Manual Zoom: Flash zoom can be set to a fixed value on the transmitter. Any
changes made to camera zoom will not affect this setting.
1. When adjusting the flash zoom wirelessly, set the flash on receiver to Azoom.
2. Set the Odin II transmitter as following:
1) Press the zoom button to display zoom setting screen.
2) Press group button to select to group to set, turn to set the zoom mode to
Auto or simply adjust the zoom manually from(20-200mm). Repeat the
operation to set zoom value for each group one by one.
3) Press button to exit the zoom setting screen.
Flash Exposure Compensation(EV)
You can adjust the EV for all the groups altogether within ±3 in 1/3-stop increments
on Odin II transmitter. See below:
1. TTL/M Mixed Functions Screen:
Press button to display the EV setting screen, turn to set the EV and then
press
to exit the screen.
2. Ration Function Screen
Press corresponding to , turn to set the EV and then press button to exit
the setting mode.
HSS Function( )
HSS will allow shutter speeds longer than a compatible camera specified shutter
speed to be used. Shutter speed up to 1/8000 sec. can be achieved with compatible
cameras and flashes.