
User Manual

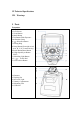


Attaching the flash to the Odin II receiver
1. Insert the flash hot shoe all the way into the receiver’s hot shoe mount
2. Lock the flash with the flash’s locking mechanism.
3. Detaching: Release the lock of flash according to its locking mechanism, and
then slide the flash out of the receiver’s hot shoe mount.
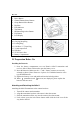
Attaching the Odin II Receiver to Studio Lights or Flashes by Cable
1. Turn off the flash/strobe and the Odin II receiver.
2. Connect a cable to the receiver’s 3.5 mm output port.
3. Connect the opposite end of the cable to a flash or studio strobe
4. Turn on the flash/strobe and Odin II receiver
5. Set the flash to Manual mode – no ETTL functions can be used when a
compatible flash is triggered by cable.
Turn on/off the Transmitter and Receiver
1. Turn On: Press and hold the power button until MENU interface is displayed on
screen.
2. Turn off: Press and hold the power button until the LCD screen goes blank.
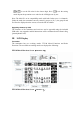
Firing Group, Channel and ID Setting
1. The Phottix Odin II system has up to 5 groups: A, B, C, D, E, 32 channels and
settable IDs from 0000 to 9999.
2. Receivers can be assigned group, channels and ID designation.
3. The transmitter will allow EV, Power level and Zoom setting adjustments to be set
for each group of receivers set the same channel and ID (unless the group is set to
OFF on the transmitter.
4. Set the channel, group and ID as following
1)The channel, group and ID of transmitter can be set in the custom function. For
operations, please refer to Custom Function setting.
2)Set the channel for receiver: press button; the channel parameter will flash
on the LCD screen; Press or button to set the channel; press button to
exit the setting mode.
3)Set the group for receiver: Press
button; the group parameter will flash on
the screen; press
or to set the group; press button to exit the setting
mode.
4)Set the ID for receiver: Press to choose the ID digit to be set; press