LCD TV A Wide Array of Screen Settings You can choose different screen settings depending on the type of program you are watching or the surrounding conditions (the lighting or the outside weather conditions). You can switch among the Sport, Movie, Music and Normal options , or you can configure the screen settings yourself. A Wide Array of Sound Settings You can choose an optimal sound setting for the type of program you are watching.
ENGLISH FCC Compliance Statements Note : This equipment has been tested and found to comply with the limits for a Class B digital device, pursuant to part 15 of the FCC Rules. These limits are designed to provide reasonable protection against harmful interference in a residential installation. This equipment generates, uses and can radiate radio frequency energy and, if not installed and used in accordance with the instructions, may cause harmful interference to radio communications.
Important Safety Instructions The unit should not be placed in a built-in installation such as a book-case, limited space rack unless proper ventilation is provided. - This may cause fire by overheating or damage the unit by falling. Do not use the unit near water, oil or inflammables. - This may cause a fire. 4 Do not use the unit in direct sunlight and keep it away from heaters, stoves, and other sources of heat. - This may cause a fire.
ENGLISH Important Safety Instructions Do not use or store inflammable substances near the unit - This may cause an explosion or fire. Place the unit away from the wall for well ventilation. - This may cause a fire. Place the antenna away from the electric wire, not to touch even though it falls down by wind. - This may cause an electric shock. Do not touch the plug with wet hands. - This may cause an electric shock.
Table of Contents Important Safety Instructions . . . . . . . . . . . . . . . . . . . . . . . . . . . . . . . . . . . . . . . . 3 Unpacking your TV . . . . . . . . . . . . . . . . . . . . . . . . . . . . . . . . . . . . . . . . . . . . . . 6 Viewing the Control Panels (Front View) . . . . . . . . . . . . . . . . . . . . . . . . . . . . . . . . . . 7 Viewing the Control Panels (Rear View) . . . . . . . . . . . . . . . . . . . . . . . . . . . . . . . . . . 8 Remote Control . . . . . . . . . . . . . . . . . .
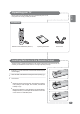
Unpacking your TV ENGLISH Please make sure the following items are included with your TV set. If any items are missing, contact your dealer. Accessories Remote Control & Batteries (AAA x 2) Operating Instructions Power Cord Inserting Batteries in the Remote Control You must insert or replace the batteries in the remote control when you purchase the TV or when you find that the remote control is no longer operating correctly.
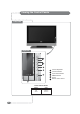
Viewing the Control Panels Front View Right Side 1 2 3 4 1 2 3 4 5 6 5 6 Power Indicator Status Indicator 8 Status Red Stand-by Green Power on Volume adjustment Channel selection Input TV/AV selection MENU selection Power Remote control sensor
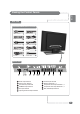
ENGLISH Viewing the Control Panels Rear View Connection Cables (Optional : not included) HDMI Connector 4 DVI/PC Sound Cable 3 HDMI/DVI Connector 4 Component Signal Cable 10 Digital Sound Connector 6 Sound Cable 9 S-Video Connector 7 AV Cable 8 PC Cable 5 Coaxial Cable 11 Bottom Side 1 2 3 4 5 6 Power Input Terminal Service Cord Terminal DVI Sound Input Terminal HDMI/DVI Input Terminal PC Input Terminal Optic Digital Sound Output terminal 7 8 9 10 11 S-video Input Terminal Externa
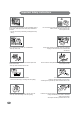
Remote Control - Makes sure there are no objects between the remote control and its sensor. - Don't place the remote control near a heater or in damp place. 1 INPUT 12 POWER - Displays a menu of all available input sources. - Also used to confirm your choice in the on-screen menu. 13 CH-LIST - Press to see the channel list 14 AIR/CABLE 2 S.MODE - Press to select AIR/CABLE channels - Press to change to a preset sound mode 15 FAV 3 P.
Connecting an Antenna ENGLISH There are internal and external types of antennae. Rear of the TV Cable Television Network or Air Connecting an Antenna 1 Caution Use a coaxial cable to connect the rear panel of the TV's [AIR] or [CABLE] terminals and the wall mount or external antenna. ☛ lIf the signal is too weak to be received by the TV, purchase an additional wavelength amplifier for better reception. 2 When an Air signal is required, connect to the [AIR] terminal.
Connecting a VCR External devices may have different terminals for the same functions. VCR Rear of the TV Audio Cable Video Cable or S-Video Connector Useful Tips ☛ If there is a terminal called [S-Video Output], connect the TV [S-Video Input] terminal to the VCR [S-video output] terminal. Connect the sound cable to the [Video2 / S-Video Input left / right] (white / red). VIDEO1 Connecting the video / sound cables 1 Connect the antenna to the Antenna input of the rear panel of the VCR.
ENGLISH Connecting a HDMI Connection DVD (Home Theater) Rear of the TV HDMI Connector What is HDMI ? Connecting via HDMI 1 Connect the [HDMI/DVI input] terminal at the back of the TV and the [HDMI] terminal of the external device. 2 Connect the TV and the external device after all other connections are done. Watching HDMI 1 ☛ HDMI (High-Definition Multimedia Interface) : A next generation interface that connects the digital audio and video signals using only one cable without compression.
Connecting a PC PC Rear of the TV PC Sound Cable PC Cable Useful Tips ☛ Audio output is only available for PCs with a sound output terminal Connecting a PC 1 Connect the [PC input] and the PC monitor output using a PC video cable. 2 Connect the [PC audio input] and the PC audio output using a PC audio cable. 3 After this is completed, turn on the power of the TV and the PC. Watching a PC screen on a TV 1 PC Turn on the PC and check if your PC settings are correct.
Automatic Channel Settings 1 ENGLISH Any receivable channels can be memorized automatically. Press [MENU]. -The menu will appear. 2 Press [] and move to , then press [OK]. -The menu will appear. 3 Press [] and move to , then Press [OK]. -The menu will appear. 4 Press [] to move to the type of Antenna connection, and press [OK]. -The menu will appear. 5 Press [] to check the status, then press [OK].
Antenna Settings 1 Press [MENU]. -The menu will appear. 2 Press [] and move to , then press [OK]. -The menu will appear. 3 Press [] to move to , then press [OK]. -The menu will appear. 4 Press [] to select Air or Cable. 5 Press [EXIT] to exit the menu. Useful Tips ☛ A n a i r s i g n a l i s t r a n s m i t t e d v i a V H F / U H F o v e r t h e a i r , a n a l o g i s N T S C , a nd d i g i t a l is ATSC with a VSB modulated signal.
Adding favorite channels ENGLISH This function is to help users to select their favorite channels as quickly as possible from amongst multiple channels. Press [FAV]. Go to Menu-Favorite channels and press the [FAV] button to check your favorite channels in the list. Selecting a special channel as a favorite channel 1 Press [MENU]. -The menu will appear. 2 Press [] and move to , then press [OK]. -The menu will appear.
Current Program Information You can check the current time and channel information. (This is only available for digital broadcasts) Press [GUIDE]. Press [GUIDE] to view the program guide for the current channel. The default for the basic broadcasting guide should be set to . (The Program Guide may change without notice by the broadcast station.) Selecting a special channel as a favorite channel 1 Press [MENU]. -The menu will appear. 2 Press [] to move to , then press [OK].
Checking the strength of the digital signal ENGLISH This shows the current digital signal strength as a picture. Before Starting ☛ Keep the digital TV receiving mode as is. 1 Press [MENU]. -The menu will appear. 2 Press [] to move to , then press [OK]. -The menu will appear. 3 Press [] to move to , then press [OK]. -The reception sensitivity will be shown in the menu. 4 Press the [EXIT] button to exit the menu.
Screen Mode Settings Press [P.MODE] to recall a pre-set screen type Press [P.MODE]. Each press of the button changes the picture mode from ➔ ➔ ➔ . 1 Press [MENU]. -The menu will appear. 2 Press [] to move to , then press [OK]. -The Menu will appear. 3 Press [] to move to , then press [OK]. -The Menu will appear. 4 Press [] to select a screen mode.