LCD Display & TV A Wide Array of Screen Settings ou can choose different screen slings depending on the hype of program you are watching or the surrounding conditions (he lighting Or the outside weather conditions).
Safety Instructions The unit should not be placed Ina builtin installation such as & bookcase emitted space rack unless proper ventilation is provided This may cause fire by overheating or damage the unit by falling. D0 hot use the Unit nest water oll or estimable This may cause a fire Lio nol use a damaged plug and do no lal the power cog uch 8 heat source. Whig may pause an elect shock or fire Place the union a fal and stable surface Tha Uni an cause nun of damage the ind By falling.
Salty Instructions Do not Use or sore inflammable substances near he ind This may cause an explosion of fire Place the antenna away from the electric wire not 0 touch ven though 1 all down by wing. This may cause an solecism shock Bie sure 10 lug In timothy and hod Be plug. not the cons when disconnecting the plug fom fhe wal outlier “Ins may cause a fre Lin plug the Unit from the wall outlet before cleaning Use a smooth cloth. Uo not use industrial chemicals.
Table of Contents Satiety instructions Unpacking your TV rs Viewing the Control Panels (Front View) Viewing the Control Panels (Rear View) Remote Control Inserting Brailles 11 the Remote Control Connecting dn Antenna or Cable E Connecting lo the HCA or 5-0 deo Snout (AV! 0 or AV2) Connecting (0 a DVD or DTV Set-Top Box Input Connecting 1o the RCA Input lava) Connecting a Second VOR to Record from the CATILINE-OUT) = 30 Speaker installation Speaker Accessories a AU Speaker stand install nationalization) Wall
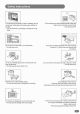
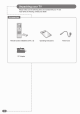
won MTT ET TNR : Flasher make sure the following miles are included with your TV sel : if any meddler are missing contact your dealer EE ee * Accessories .
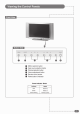
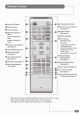
VLE ge ell LLL fen € MENU selection bunion © Snout source selection bunion @ Channel selection button Volume adjustment button @ ooo con sen @ Power bunion & Indicator Power indicator Status Indicator Status Red Standby Green Rawer on Green blinking Naturals trial
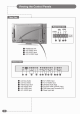
CR ee alc e Ted ge] LE gl Silas dee Audio DIVED SIDED I #8 headphone Jack & 22 DIVED Input 8 Av AUDIO input 8 AVE SIDED Input So 2000 6 gee 6606 @ Line-Out (Audio) @ AVI VIDEO Input @ Line-Oil Video) © 0 SVE Input € Antenna input Jack @ Dvn Auden put 8 Av audio nut © OUTVOTED Video YPRES Input @ AV DIVED input 8 AGE video Input Connector (POY @ avi AUDIO Input 0 Power Input Jack
€ Poe Oni bunion 8 Numeric bunions 8) Previous Channel €8 ON Sores Display ang MENU 4 200 channelize Up / Down Band (Volume ln! Down 4 Favorite Shanna! Selection {See page 21) @ Epicure SU (See page 31 & Picture Size Selection {Bee page 31} © Picture Mode Selection {Sea page 19) £0 Bleep Timer (See page 24) 0 Sound Mode Selection {See page Temporary Sound Mule © Abdominal Ours Input Selection {See page 13) iB Closed Captions {See pane 25) 1 MERE Acclimation 8 PIP Functions: {See page 29-30) BIE Oni Position
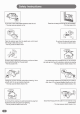
freer i Inserting Batteries in the Remote Control You must insert of replace the batteries in the remote control when you purchase the TV or when you find halt the remote control 18 no longer operating correctly, inset two AAA-size batteries (supplied) by matching the + and on the batteries to the diagram inside he battery compartment. ® Handle the remote control with care.
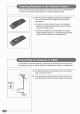
Connecting to the RCA or S-Video Input (Avior AV2) BE rr IRE SERER IRE EE RARER Re a Rear of the TV 14) For RUA Input (A) For BCA Input 1. Connect the HOA cable to [he input jacks (Videos Audio LIB ol BVI ar V2 on the TV and Bulbous [cask on the external equipment such as a VOR, camcorder and some Video game devices (8) For S-Video Input 1 Connect the SVdeo/ROA (audio cable 10 the input jacks on the TV and applaud jacks on he external equipment such as a VOR camcorder and some video game devices 2.
poe lon EE TTT EE TR Antihero Tv 1 Connect the BOA cape to the Input jacks [Videos Audio UR of AV3) on the TV and output jacks on the VOR 2 i the external equipment has omen audio output connect it only to loll jack of the Audio putout poor (JESUIT IE REE SER CR SE RCT ACCRA RL 28 TRY IRE IRE RRR RICE RE EE Ee Rear ol the TV B® your TV can send oul signals of its picture and sound fo be recorded by a second VOR Ta do nis, connect your second VOR as follows {The VOB input jacks might be either on the front o
30 Speaker Installation * Mach red lo red. black 1o back terminal of speaker / TV = Caution » Be sure Display Unit power is turned off before making any connection. Place the speaker in the position pou want install the speaker wires on the Display unit and speaker Be sure locomotion epee + withe + undercoating wielder pd Connect inl lel speaker and tight uni input fo right speaker. Any extra speaker wie length remaining can be birched inp the wire holders provided.
sere Base nn Tenn enn en Demeans enn Model : VMD30SPK Umbriel Era =< Caution Ways It the Display Uni TV] lifeline the speakers) when handling of moving the Unit after speakers have been installed Assemble the Unit Io speaker with using Be portiere Drake! anv boll As shown above A, assemble the b and cof supporter hanger to the Unit with using the bola 1 8), Assemble the a fo the speaker with using the Screw bollix > 4) i the bolts are tightened too much, the product cooed be damaged & a pre Speaker Accessor
30 Speaker stand Institutionalization) Model : VMDI0SPK-ST k Connected the speaker stand from the speaker Unit as the following ; spi in the pole) to the speaker stand base(c) -put in the speaker unt slew in the bolt to the hole Cae ee ou Sneaker slang Sang Hebe sand fol
Wall mount Institutionalization) Base nn Tenn enn en Agamemnon enn * Model : VMD30FWB Display Unit Display Unit » Detach the Display Unit bracket Hook from the wall mounting bracket Pull the Unit brackets in the direction shown by arrow 1 Lift the Unit brackets in the direction shown by arrow 2. Lift the Unit brackets off the mounting make in the direction shown by arrow 3.
Wall mount Installation(Optional) Bracket Hook ¥ AS shown above, carefully place the Display Unit screen side down on a cushioned surface that will protect the Unit and screen from damage. insert the Unit brackets on the Display Unit as shown above Install the 4 bolts securely, stickleback Unsmiling the hoes provided Be sure the bracken hooks are a he top side of the Unt.
» Bolt the Display Uni mountable make lo he wall as shown dove using holes 6-Bolts for Wall mounting bracket 6-Wall Anchor Bolt leaves » Notice : Be fired the wall bracket with using these kinds of parts depending on user s install conditions.
Wall mount Installation(Optional) B See A above, wo people who are capable of Sifting the wallow of the Display Unit should do the following Carefully i up the Unit and place i in position on the well mousing tracked securely as shown by arc 4 Push the bottom of the Uni toward He wall 4s show roar tow 2 5 tan ihe Display Unit wil dick’ inn potion onl he wal mounting bracket, « Caution Be sure to it a Display Unit / speakers assembly by the Unit only do not it using only the speakers.
Connecting the Power Cord and Switching the TVOn/0ff = Connect the il cord fo the gay DOC adapter Convict the nc adapter for ve Your fv 0 the power ¢ input © on nth back of our TV.
§ Storing Channels in Memory ERA REESE EER ER ERR EEE EE i: 1 Press the MENU bunion 2 Press ihe (a ambition to select Install group and press the {4 Bo OK bunion. 3 To Select the ype of signal source that is connected Io the TV. Picture : Move to Select by pressing (4 ¥) button and select TV or Clock : can by pressing + » ) bison.
Ree tors Press the MENU bunion. Press th e cla "no bunion to select the ¢ Install group He pies the or OK button. Press the (4% bunion fo select the Parental Lock and Enter your 4-digit password = The default password for new TV set is ong, Cross the (4B bullion 0 set Parental Lock You can select these options in the following order, Qf Child + Youth Young Dull « Custom OH Parental lock is disabled. All programs are unblocked from viewing.
Settling the Parental Lock Hefting up restrictions using the TV guidelines [Age-Based) 1 Press the MENU baton 2 Pros " (A glutton 5 select Install group and press button.
Setting the Parental Lock Transitiveness Setting up restrictions using the TV guidelines (Content Based) 1 Prosthesis MENU bunion : 4 Pressie (ay) button Wo select Install group and press the (4p) OK bunion Press (4%) bullion fo select the Parental Lock and Enter your d-digit password. Cross the (a ¥) bullion 10 select! he Content Block and press ihe (4p) button Block. Press the (4p bunion Sci Hating .