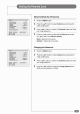
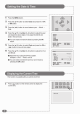
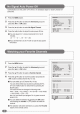
Block/ Unblock the AV Sources ewe 1 © 1 Press the MENU bunion. Patagonia Look . Movie Rave 5 { 2 Press the (4 ¥) button to select Install group and press the a ak : (major OK bunion. Chars Password ee : 3 press (a donation 0 sect e parental Lock and Enter your 4d lg it password, MENU Proving : To BL Bas a &% Potion frees theist) bunion © select the AV Sources and pr press { 4» bunion Io set Block Unblock.
Customizing the Picture LL You can select an appropriate picture mode by pressing the (pk) bullion in Picture mode Press the MENU button prose the a v button 3 Sel let the Pi clue: gop ap press Ihe (4p or OK bullion B Preset mode wilt be dispel ayes The picture mods w wi charge whenever tout press the (4 > button Standers : Select when ts bright around tha TV. Sports: Elect when you want fo get a clearer picture or walk spores. Natural : Select when viewing movies of live music.
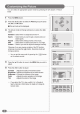
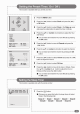
Frees the (a ¥ | Dalton to select the Sound group and press the ( brook bunion. Press te n v) button 0 select Balance and press the a > bunion 10 dust re Sound balance. Press ve a v ton! fo select St Qualifier and press s the {4 ¥) bullion, Crass the (4%) button to select the sound mode according bn the type of image being walked Sound mode will be change in the following order.
Adjusting the Speaker Volume & Selecting the Speaker Sound Source press the deny button Press the a v union io select Cline Sound group panda press he (4 Plo OK bunion. Press the a v son os 56 sect Volume (petite. Press button lo o acutest he speaker hone Press the a v bunion to select he Input Source of Te Stirrer Press the (4% button to select the sound source of the Speaker Main «PIP TV J 0 AVS. TY + You will have solid only through the headphones, not the speakers, if you connect headphones.
Listening to Stereo Sound / SAP Depending on the particular program being broadcast you can listen bo stereo, mono, Ur a Secondary Audio Program [SAP audio Is dual a foreleg language satiation Sometimes SAF has unrelated information lke news or weather Listening to Stereo Sound / Secondary Audio Program 1 You can select sound options (Mono, Stereo, SAP.
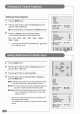
Setting the Date & Time “rr proms Xe New be Press the a button io select t Lock dp press the button Press the (4 » pin on move bat weer year + Month Date.
Settling the Preset Time ( On/Off ) This function Is available after vou sel the clock hist Frags tha MENU button. Press the (4%) bunion to select Clock and press the (4 or DK bunion.
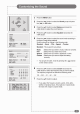
Viewing the Closed Captions “rr Selling the Closed Captions 1 Press the MENU bu ten, 2 press the “ v button io » select the. Advanced ¢ group i : press the button. : oe Advanced group are misplayed with Caption se sel acted Press the (4p bunion to sel the Closed Captions. You can select these options in the fallowing order Ho Dentition Tim ea OH C01 C02 003 CCA Tew! Text? : tio Signal i Timeout Text Texts : | MENU | Fractious 4% Sent ELI tae A¥ Fund ion Press the MENU bunion.
Press the ven button Press the u v bunion to select the Advanced group and press the (4 Bor OK bunion Favorite Charcoal NE Press he (a vy) button lo select Osd Timeout MENU Previous 4p Sol act a HEL Ean Av Boston : Press the (4p) poi dust the di splay tim im B Whenever vou press this button you can institution second retirements from Slog seconds.
No Signal Auto Power Off Automatically tums the power off if there is no broadcast signal or button pressed for Scene ine Frees the MENU button reds the (4p) or OK bunion : Sin Bit Estonian a Lavonne Colonel L MENU Previous INPUT Exit AY Post ion Press (he (4%) button lo select No Signal Timeout BW You can stadium tin minute increments from 0 to 20 minutes. L000 Bl you sel the ime do Ute TV will nol use the all power off function i & Ee Tse Be FI le giggle : Press the MENU bunion.
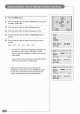
Reducing Picture Noise Lie this unction when vou have a bad image with the picture holes. Crass the MENU button) Press the (a %) button 1o select the Advanced group and press the bunion. Prose the (4%) bunion io select NR INPUT Exit : Tress the (4B) bunion to select On. A¥ Post ion Moe cues te Ae bun He selection wil switch between Freshet button on the remote control Io display he current channel time audio, and sleep timer selling.
Display the Picture in Picture { PIP ) Fit 1 Press the PIP» button You will see the PIP in the at upper fight comer. 2 Crass the (es button to select the external signal source for the BR B The external signal source will display whenever you press the (0 | button. [TV = AVI DIVED + AVY B.
Display the Picture in Picture (PIP } Changing the PIP Size 1 Press the (gy) button on the remote control. EB The PIF will change among 6 different sizes whenever you press this bunion. Changing the PIP Mode 1 Press the (gi) button on the remote control B The PIP mode wil change whenever vou press this button. Standard -Sports Natural -Mild + Custom Swapping the Main & Sub-Picture 1 Press the (a) button on the remote controller.
Changing the Picture Size 1 Precise 1 button on the remote control. MB When vou are viewing walk the Main image. The mage will change as shown below whenever you press is button (188 + 43 Zoom Panorama) BW Ven you are viewing the main and PIE mages late same ime The PIP mage will change only om A430 169 16:8 O 0 Q Displaying a Still image Press ihe SHILL button on the remote control MW [he picture does not move but the sound plays normally. MW Poss his button again | you want Io oo back lo a normal picture.
Connecting to the PC Rear of the PC Healthcare TV pippin [Bub Cable # Connect the 1580 D-Sub Cable to the RGB INPUT port on the TV and output port on the Ear of the PL. To use the Display Tum ie PC on Press the PC or (ees) bullion on the remote control io select the PC.
Setting the PC Software rein First, click on Settings on the Windows start menu and cock on Control Panel’ Bounce click on the Display icon. Adjust the resolution to 12800788 pixels. Click the Advanced button and click the Monitor tab on the dialog-box. Sel the surrealistically to 80Hz and then click the OK bunion. © Maximum resolution depends on the Video Lard, » Maximum supported resolution bs 1024 X 768 © eH | You can get the best picture at 1024 X 7680 Foch, There are 16,770,000 supported colors.
INPUT Exit 4% Position 8 Posit V. Position Phase Factory Preset MENU Previous MEU Ea AY Position H. Boston V Po son Phase foo bee QUEENLY Paw INPUT : Emil AY Position Adjusting the Screen Position Adjusting the horizontal position Press the MENU bunion. Press fhe (4%) bunion to select the Geometry group and grass the button. Press the (4 ¥) button to select H.
Ill Bg factoid goof Bel [a] Ce Selecting the mode 1 Pros sine (dp button 1 select the mode. The modes will change in the following order Standard Sports Natural + Mild» Custom Adjusting Contrast 1 Press ihe MENU button i Press the a v Patton! in 0 select the Picture group p and press button.
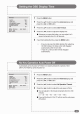
Standard Display Mode § IRE i RRR the signal from the system equals the standard signal mode, the screen will adjust automatically. i the signal from the system does not equal he standard signal. adjust the display mode as shown below referring © your video card inclinations. Otherwise there Wik be rio picture or onl power may lim an. Resolution Horizontal (KHz Vertical (Hz) Clock Frequency (Miz) Polarity (HV) VGA, B40. 350 31.469 T0086 25.175 +f VGA 720x400 41.469 70.087 enter VA, G40 «480 31.
Troubleshooting . For TV No picture or sound. Make sure the TV is plighted In. Wake sure the power cord Is connected Io he consent correctly. Check the power failure. Screen is black, Make sure the external signal source mode 5 selected Press the INPUT button Io change to TV. Picture is OK but there is no sound, © Press the Mute bunion.
For Monitor "Check the signal cable” message © Check | the signal cable 1580 D-sub) is properly connected fo the compiler (See page 32) "Sync. out of range” message This message may appear when the resolution and frequency of the video card in the computer are oul the range ol the TV. Select the proper resolution and frequency for the TV {See page 36) Picture rolls down vertically.
cee EVERETTE RRR RRR ARM RR Fee Statement This momentous has been weed and found fo comply with the limits for a Class A digital device pursuant to part 15 ol the FOC rules. These lintels are designed 10 provide reasonable protection against harmful interference when the equipment is operated mn a commercial environment This equipment generates, Uses ang can radiate radio frequency energy and | not installed and used in accordance with (he instructions, may cause hamlet erectile io radio communications.