
User manual


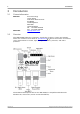
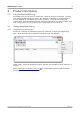
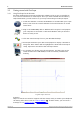
Table Of Contents

Product information6
Copyright © 2011 Pico Technology Ltd. All rights reserved.usbdrdaq.en
3.3
Getting started with PicoScope
3.3.1
Using PicoScope for the first time
We have designed the PicoScope oscilloscope software to be as easy as possible to
use, even for newcomers to oscilloscopes. Once you have followed the introductory
steps listed below, you will soon be on your way to becoming a PicoScope expert.
1. Install the software. Load the CD-ROM that is included with your scope
device, then click the "Install Software" link and follow the on-screen
instructions.
2. Plug in the USB DrDAQ device. Windows will recognise it and prepare
your computer to work with it. Wait until Windows tells you that the
device is ready to use.
3. Click the new PicoScope icon on your Windows desktop.
4. PicoScope will detect your device and prepare to display a waveform.
The green 'Start' button will be highlighted to show that PicoScope is
ready, adjacent to this will be the red 'Stop' button.
5. Try clicking your fingers over the microphone, and the trace on the
screen should react. USB DrDAQ is now successfully installed and
working.
A typical 'finger click' trace
Problems?
Help is at hand! Our technical support staff are always ready to answer your telephone
call during office hours (see our Contact Details ). At other times, you can leave a
message on our support forum or send us an email.
2