
User manual


PicoScope 6 User's Guide 17
Copyright © 2007-2013 Pico Technology Ltd. All rights reserved. psw.en r32
5.8
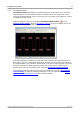
Trigger marker
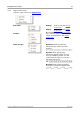
The trigger marker shows the level and timing of the trigger point.
The height of the marker on the vertical axis shows the level at which the trigger is
set, and its position on the time axis shows the time at which it occurs.
You can move the trigger marker by dragging it with the mouse or, for more accurate
control, by using the buttons on the Triggering toolbar.
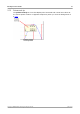
Other forms of trigger marker
If the scope view is zoomed and panned so that the trigger point is off the screen, the
off-screen trigger marker (shown above) appears at the side of the graticule to
indicate the trigger level.
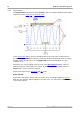
In post-trigger delay mode, the trigger marker is temporarily replaced by the post-
trigger arrow while you adjust the post-trigger delay.
When some advanced trigger types are in use, the trigger marker changes to a
window marker, which shows the upper and lower trigger thresholds.
For more information, see the section on Trigger timing.
5.9
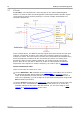
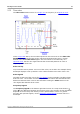
Post-trigger arrow
The post-trigger arrow is a modified form of the trigger marker that appears
temporarily on a scope view while you are setting up a post-trigger delay, or dragging
the trigger marker after setting up a post-trigger delay. (What is a post-trigger
delay?)
The left-hand end of the arrow indicates the trigger point,
and is aligned with zero on the time axis. If zero on the
time axis is outside the scope view, then the left-hand
end of the post-trigger arrow appears like this:
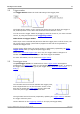
The right-hand end of the arrow (temporarily replacing the trigger marker) indicates
the trigger reference point.
Use the buttons on the Triggering toolbar to set up a post-trigger delay.