
User guide


User Guide 7Fast Track Ultra 8R
8 Using Fast Track Ultra 8R
Setting Your Recording Levels
Using the Mic, Line or Instrument Inputs
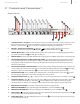
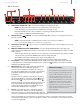
Connect your microphone, instrument or line level source to the Mic/Line - Instrument inputs
1
,
20
. Make sure the
associated channel’s Mic/Line - Instrument switch
2
is set to the correct position for your chosen inputs, and that
the input gain is turned fully counter-clockwise to the lowest level. If you are using a condenser microphone, be
certain to activate the Phantom Power switch
6
forthecorrespondinggroupofinputchannels(afterconnecting
themicrophonetotheXLRinput).IfyouareusingtheMicrophoneorInstrumentinputs,slowlyraisetheinputlevel
until the Input Signal LED
4
shows input with a fairly steady green signal while audibly testing your input levels
(i.e.,strummingtheguitar,orspeakingintothemic).Ifyourmicrophonesignalcausesaninputtoclipevenatthe
minimum gain setting, pull the Mic Input Gain knob
5
toactivatethe20dBpad.Thiswillfurtherattenuate(reduce)
signal levels to prevent distortion at the input.
➜ IMPORTANT: When recording from a microphone and monitoring in the same room,
it is recommended that you turn off your speakers and monitor with headphones. This
will greatly reduce the possibility of creating loud feedback loops that may damage
your equipment (or hearing).
Using the Coaxial S/PDIF Inputs
Connect the S/PDIF output of your external audio device to the S/PDIF Input, located on the rear-panel breakout
cable
18
. The signal level you receive at the S/PDIF In will be the signal level that you record. Any adjustments to
that signal level must be made at the source. If you have an output level control on the device that you’ve connected
to the S/PDIF inputs, adjust that output level control to change the recording level. Most recording software will
allow you to add gain to a recorded track that was made at a level that is initially too low, but be careful that the
recordinglevelisnotreachingdigitalclipping(signalgoingintothered)whilerecording.
Note: To use the S/PDIF input, you will need configure the sync source of
Fast Track Ultra 8R to “External.” Refer to the section below on the Control Panel and
your software’s documentation for more information.
Setting the Sample Rate
ThedefaultsamplerateforFastTrackUltra8Ris44.1kHz.Supportedsampleratesare44.1,48,88.2and96kHz.Most
applications allow you to change the sample rate from within your audio software. You can also change the sample rate
in the Control Panel. It is recommended that you do not change the sample rate from the Control Panel while your DAW
application is running, as this can cause some applications to exhibit unexpected behavior.
In order to receive a digital signal via the S/PDIF input, you will need to change the Control Panel’s Sync Source setting
(intheSettingstab)to“External,”afterwhichFastTrackUltra8Rwillautomaticallydetectanincomingdigitalsignaland
receive its sample rate from that incoming S/PDIF source.