
User manual
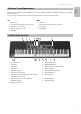
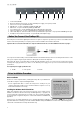
Table Of Contents
- English
- Introduction
- What’s in the Box
- ProKeys 88 Overview
- Terminology
- Performance Tips
- Feature List:
- Minimum System Requirements
- Controls and Connectors
- Before You Connect Your ProKeys 88...
- Driver Installation Procedure
- Using the ProKeys 88 with Your Software
- Hardware Connections
- How to Make Use of the Controls
- MIDI Control Section
- Examples
- Program/Bank Changes Explained
- MIDI Clock Explained
- Troubleshooting
- Contact
- Technical Info
- Specifications
- Appendices
- Warranty

10
Split Button
The Split Button will split the keyboard to allow 2 different instruments to be assigned to
two non-overlapping adjacent regions and played at the same time. When this button is
pressed, the LED above it will light up. The default left hand instrument will be Acoustic Bass
(Sound 13). When Split Mode is engaged, the LED above the A Bass Sound button will fl ash
for three seconds to indicate that it is the Split Instrument, and the LED above the Instrument
Button that is the Main instrument will remain lit, but will not fl ash.
Once the three-second time-out period has passed, the Split Instrument’s sound button will
stop fl ashing, and you will see that two Instrument Buttons have their LEDs lit, representing
the active instruments.
Pressing a subsequent Instrument Button will select that instrument as the Split Instrument and leave the Main Instrument
unchanged.
While Split Mode is engaged, it is not possible to edit the Main Instrument. To change the Main Instrument it is necessary to disable
Split Mode, by pressing the Split Button again. Once Split Mode is re-enabled, the last instrument selected for the Split Instrument
is recalled.
How to Change the Split Point - It is possible to alter the Split Point by holding down the Split Button. The LED will then fl ash
to indicate the current Split Point. The user can then alter the Split Point by pressing the desired key on the keyboard. The Split
Instrument keyboard region will include the note pressed when setting the Split Point.
Layer Button
The Layer Button engages Layer Mode. It works in the same way as the Split Button, in that the keyboard controls two Instruments
that reside across the entire keyboard region if Layer Mode is active. All keys across the keyboard will now control both the Main
Instrument and the Layer Instrument.
It is possible to have both Layer and Split Mode active at the same time. The Split Instrument will be assigned from the bottom left
key to and including the Split Point, and the layered programs (Layer and Main Instruments) will be assigned across the rest of the
keyboard starting from the key to the right of the Split Point.
Grand Piano Button
The Grand Piano Button will override any splits and layers that may be present and selects the default Grand Piano (Piano 1)
Program.
It is possible to assign and store reverb and chorus parameters to the Grand Piano button the same way as with any of the
Instruments. Effect settings are remembered across power cycles. This feature allows you to set up your ultimate piano sound and
always be able to access it with a single button press.
If you are using your ProKeys 88 as a MIDI controller, Program 0, Bank LSB 0 and Bank MSB 0 are sent out when this button is
pressed. This would access Grand Piano on any GM-compatible synth or module.
Demo Button
When the demo button is pressed, the LEDs above all the sound buttons will fl ash to indicate that the user should select a sound.
Once selected, the demo will play for that instrument.
For example, there are 14 demos in total. Pressing DEMO followed by Sound button 3 will trigger demo 3 with the sound that is
selected by Sound button 3.
You must manually press the demo button again after hearing the demo you’ve selected to exit the demo mode or the next demo
will begin approximately 4 seconds later. The demos will continue to play consecutively until all 14 demos have played through
once.
Jazz Ride Button
The Jazz Ride Button will add a Ride Cymbal Layer over the top of Sounds 13 and 14 if they are active. This adds a jazzy feel to the
overall sound. Effectively, this is a 15th instrument. However, this instrument is “dry” in that no effects can be assigned to it.
Velocity Curve Button
There are four velocity curves – Hard, Medium, Soft, and Fixed. This button toggles between the four types. Unlike the digital effect
buttons there is no ‘off.’ The Fixed Velocity setting will have a constant velocity of 100 when a key is pressed.
The default curve selected is Medium.
Performance Tip #5
Octave Synth Harpsichord – Layer
the Clav with itself and transpose
one of the parts up one octave and
add effects if you like. Try this
with other instruments such as
Pianos or Strings.