
Operation Manual


Chapter 3: The Movie Editor
93
Pinnacle Studio offers a wide variety of transitions for softening,
dressing up or dramatizing the change from one clip to another.
Creating a transition
The most straightforward method of creating a transition is to click
in the top left corner of the clip on the timeline and ‘fold back’ the
corner. This creates a dissolve from the previous clip, if there is one,
or a fade-in if there is not. The wider you make the fold, the longer it
will take the transition to complete. Folding back the top right corner
of the clip results in either a dissolve to the following clip or a fade-
out.
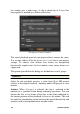
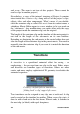
More elaborate transitions can be added to the timeline from their
section of the Library (under Creative Elements). When you find one
you want, drag it onto one end or the other of a timeline clip. The
length of the transition will be determined by the default duration
defined in the Pinnacle Studio Control Panel Project settings (one
second by default). If the clip already has a transition at the chosen
end, the new one replaces it. See “Project settings” on page 303 for
details.
If you are trying to add the transition to a clip which is shorter than
the default transition length, the transition will not be applied. One
way to avoid this problem is by making sure the dynamic length
transitions button on the timeline toolbar is active. While it is, you
can control the length of a new transition by dragging to the left or
right as you place it on the clip. You will see the corner of the clip
fold back as you drag. If the time-ruler is zoomed out enough, you
will see the duration of the transition numerically displayed; clicking
in this readout lets you edit it directly.
A transition dragged to a project’s timeline.