
Operation Manual


Chapter 1: Using Pinnacle Studio
7
Both project editors include embedded versions of the Library and
the Player in addition to the timeline display. To build a project, drag
assets from the Compact Library onto the timeline tracks or
Storyboard area of the project editor, where they are known as
‘clips’. Both the Movie Editor and the Disc Editor can be used with
stereoscopic 3D as well as 2D material.
The preview type control above the Player lets you switch between
viewing the current Library asset (‘source’) and the current timeline
clip. In the Disc Editor, an additional preview type (‘menu’) lets you
use the Player as an editor for linking disc menus to points on the
timeline.
Timeline editing, a central activity in project authoring, is covered in
detail in Chapter 3: The Movie Editor.
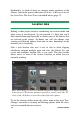
The media editors
Additional windows are often needed for working with particular
types of media. In general, you can open an editor window
appropriate to any asset or clip by double-clicking the item.
Corrections from the Library: The editors for the standard media
types of video, photo and audio are particularly important. When
invoked from the Library (by double-clicking an asset), each of these
editors provides a suite of correction tools appropriate to its media
type. These tools can be applied directly to Library assets in order to
remove camera shake from video, trim unwanted material from a
photo, or suppress audio hiss, to give just a few examples.
When a correction is applied to a Library asset, the media file is not
modified. Instead the correction parameters are saved in the Library
database. They can be altered at any time, or removed, as your needs
dictate. The corrections you make in the Library are brought with the
asset when you add it to your timeline as a clip.
Corrections from the timeline: When you open one of the standard
media editors by double-clicking a timeline clip, the correction tools