
Operation Manual


Chapter 8: Sound and music
207
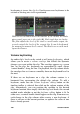
Editing volume keyframes with the mouse
To allow keyframe editing with the mouse, activate the volume
keyframe editing button in the group of buttons at the right-hand end
of the timeline toolbar. Now when you position the mouse pointer
over the green volume contour on an audio clip, you will see that the
contour responds by highlighting in white.
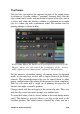
To activate clip volume keyframe editing, click the button
in the right-hand group on the timeline toolbar.
A number of mouse-based keyframe editing functions are now
available. Before taking on any serious keyframe editing, take a few
minutes to familiarize yourself with the commands in this set. They
enable you to manipulate keyframes quickly without having to
repetitiously move to a chosen keyframe and operate the clip level
knob.
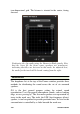
The default style of editing operations for volume keyframes favors
maintaining sections of constant clip level rather than continuously
wandering up and down along ‘ramps’ in the contour line. In cases
where this does not produce the editing result you desire, try again
while holding the Alt key. This turns off any automatic adjustments
that might otherwise be made.
Insert a new keyframe by clicking the contour line.
Instantly create a keyframed fade by Ctrl-clicking the contour
line. This inserts both a new keyframe at the point you clicked and a
second one with the volume set to zero. If you clicked in the first
half of the clip, the second keyframe is added at the start to create a
fade-in; if you clicked in the second half of the clip, a fade-out is
created by placing the second keyframe at the end.
Create abrupt level changes by dragging horizontal sections
between neighboring keyframes up or down. This produces vertical
steps in the volume contour.