
Operation Manual


268
Pinnacle Studio
Before starting the capture, make sure that your destination folder,
options and file name are set up in the other panels the way you want
them. (See “Importer panels”, page 240.)
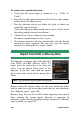
If your source equipment is functioning correctly, you should have a
live preview in the central area of the Importer window. Click the
full-screen button at the right-hand end of the transport bar to
preview on the full monitor screen.
When you are ready to capture an image, click the Capture Frame
button. A thumbnail of the grabbed frame is added to the Image Tray
at the bottom of the window. (See “Using the Image Tray” on page
271 for more information.)
Since this is a stop motion sequence, after each image is grabbed you
will generally make small changes to the scene you are shooting in
order to create the illusion of motion from frame to frame.
To make your task of visualization easier, the Stop Motion preview
includes an “onion skin” effect, whereby successive frames are
shown simultaneously in translucent layers so that the differences
can be clearly seen. This feature can be configured on the control
bar.
The number of images shot so far and the duration of the film (based
on the number of images, rounded off) are displayed to the right
below the control bar.
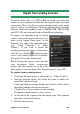
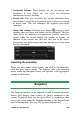
The Stop Motion control bar
This bar provides transport and other functions for Stop Motion
import. From left to right:
•
Video and Frames indicators: These let you switch between
previewing the live video feed and previewing the captured
frames in the Image Tray. You can review – and if necessary
replace – particular frames without having to undo other work.
•
Counter: This readout shows your current position within the
animation in hour, minutes, seconds and frames. The counter
value depends on the number of frames you have grabbed and the
animation speed in frames per second. The up and down arrow
buttons to the left of the counter provide single stepping when
previewing your animation.