
Operation Manual


60
Pinnacle Studio
proper placement. The new clip must be the same type as the old. A
video clip cannot be replaced by a photo or audio clip, for example.
Selecting clips: To select a clip, click on its icon; an orange frame
around the clip indicates selection. The timeline scrubber will jump
to the beginning of the selected clip, and a connecting band of color
will link the Storyboard clip with its timeline counterpart. If the
timeline position of the selected clip is currently off-screen, it will be
brought into view.
You can select multiple clips using the Shift and Ctrl keys according
to the usual Windows conventions.
Reordering clips: To pick up a clip and move it, click on it until it
is selected, and then drag it to its new location. If necessary, the
Storyboard will scroll until you reach the desired position.
Resizing
The height of the timeline, along with the relative proportions of the
Library and the Player, can be adjusted with the sizing grip in the
form of an inverted T in the middle of the screen.
To adjust the height of individual timeline tracks, grab and adjust the
separator lines between the track headers on the left. If the vertical
size of all tracks exceeds the available viewing area, a scroll bar at
the right will allow you to select which tracks are in view.
Set the height of the Storyboard (when it is visible – see “Navigation
tool selector” on page 62) by vertically dragging the horizontal
separator along the Storyboard’s bottom edge.
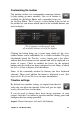
The timeline toolbar
The toolbar above the Movie Editor timeline offers various settings,
tools and functions that apply to the timeline and timeline editing.
These are described in order from left to right.