
Operation Manual


62
Pinnacle Studio
Imaging: Choose between Regular (2D) and Stereoscopic (3D).
Size: Choose amongst the HD and SD pixel resolutions available for
the given aspect ratio.
Frame rate: Choose from a selection of frame rates consistent with
the other settings.
These settings can be changed at any time during the development of
your movie, but you should be aware that a change of the frame rate
can cause a slight shifting of clips on the timeline as they adjust to
new frame boundaries.
Timeline settings
Video material that is not in compliance with the chosen project
settings will be converted automatically on being added to the
timeline. If you are making a stereoscopic movie, 2D material may
be used but it will still look two dimensional, as both the right eye
and left eye views will be the same. 3D material can be used on a 2D
timeline, but only the left eye channel will be shown.
If you want to choose a video standard for your projects explicitly,
rather than relying on inheriting the format from the first clip added,
open the Project settings page of the application settings. See
“Project settings” on page 303.
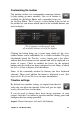
Navigation tool selector
The space just under the toolbar can be occupied by the
Navigator or the Storyboard, or by neither. (In the Disc
Editor there is a third possibility – the Menu List.) The
Navigation tool selector includes a dropdown that lets
you select which tool you want displayed in that area.