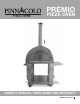
PREMIO PIZZA OVEN OWNER’S MANUAL, USER GUIDE AND WARRANTY MODEL NO: PPO-1-00
CONGRATULATIONS! ON BECOMING A NEW MEMBER OF THE PINNACOLO FAMILY! WARNING • D O NOT OVERHEAT OVEN: Extreme heat can permanently damage the Outdoor Oven. Bring the Outdoor Oven up to temp slowly. Start with a small fire located in the center of the oven. Once the fire has been established, carefully reposition the fire to the side of the oven. Continue to feed the fire with small amounts of wood until the oven reaches an even high heat.
PREMIO PIZZA OVEN FEATURES 1 NO.
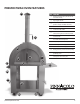
EXPLOSIVE VIEW 8 38 37 7 10 9 4 5 36 3 6 17 13 35 19 14 15 18 20 12 16 21 31 33 32 34 11 25 24 26 28 27 1 30 23 2 22 4 29 PINNACOLO PREMIO PIZZA OVEN
PART LIST NO.
PREPARATIONS Carefully unpack your PINNACOLO PIZZA OVEN. FUEL THE FLAME A minimum of two (2) people should work in coordination to lift FOR BEST RESULTS… Using dry hardwoods, such as oak, are the oven. best suited for use in your oven. Oak will burn slower and help The Dome Section must be lifted evenly (level) to prevent the cordierite pizza stones from shifting and being damaged. We suggest you position all the components within reach in order to make your assembly easier.
PREPARATIONS To achieve the desired temperature within the cooking dome of It should be noted that breads, rolls, desserts and pies should be the oven, position the door so there is enough air flow to keep baked with the oven maintaining a temperature in the range of the flame burning. Add wood as needed to keep the fire going. 160°C – 220°C (320°F – 428°F).
ASSEMBLY Follow these steps in the order shown to assemble your PINNACOLO PIZZA OVEN. A minimum of two (2) people should work in coordination to complete the assembly and position the oven for use. STEP 1 Begin by securing the bottom shelf to the legs using the 16pcs of 1/4” 15mm bolts provided. NOTE 1: The swivel casters with built-in brakes must be positioned on either the right or left side of the unit.
ASSEMBLY STEP 3 Secure the wooden handle to the door itself using the necessary in the order as follows; – Position 1 x 1/4” 15mm bolt through handle. – Place an insulation mat (Part No. 15 or 16) behind the handle. – Position the handle against the door with the nut through the pre-drilled hole on the face of the door. NOTE: the outside of door has the edge surround towards the handle. – Once the bolt is through the hole, position the second insulation mat in the inside of the door.
ASSEMBLY STEP 5 Position and secure one (1) handle (Part No. 24) and one (1) shelf (Part No. 25) on side of the pizza oven using the 8pcs of 1/4” 15mm bolts supplied. Shelf and handle can be positioned to your choice of side. Determine which side you prefer to have your tools on and secure the 3pcs of predrilled hooks using the 8pcs of 1/4” x 15mm bolts.
LIMITED WARRANTY Fire One Up Sales Inc., the importer and distributor of the PINNACOLO PIZZA OVENS brand of Outdoor Ovens, warranties the Stainless Steel ovens and their components, including the body, floor, venting system, factory finish, stand and door (hereinafter referred to as the Product) to be free of defects in materials and workmanship for a period of one (1) year from time of purchase. Qualifications of the Warranty The complete Product Warranty does not apply to the following: 1.
By following the information within you can expect to ENJOY your Pinnacolo Pizza Oven and great tasting food, for many years to come! Don’t forget to share posts and stories on PINNACOLOPIZZAOVENS.COM FIREONEUP.COM © Copyright 2021 PINNACOLO Pizza Ovens are a trademark of Fire One Up Sales Inc.