DJ Controller DDJ-1000 pioneerdj.com/support/ rekordbox.com For FAQs and other support information for this product, visit the above site.
Cautions on copyrights............................................................................. 33 Contents How to read this manual ! Thank you for purchasing this Pioneer DJ product. Be sure to read this manual and the “Operating Instructions (Quick Start Guide)” included with the unit. Both documents include important information that you should understand before using this product. ! In this manual, names of buttons and terminals, menus of this product and your computer, etc.
Before start Before start Features rekordbox This unit is an all-in-one DJ controller designed specifically for rekordbox dj. Its interfaces incorporating various controls such as “BIG JOG”, “PERFORMANCE PADS”, and “4-CHANNEL MIXER” are positioned with room to spare to allow for more individualistic DJ performances using rekordbox dj.
Installing rekordbox Preparing rekordbox Install the software by following the procedure below when you use rekordbox for the first time or if you are using rekordbox 4.x or an earlier version. If you have already installed rekordbox Ver. 5.x, update it to the latest version from rekordbox Update Manager. In this case, the following installation procedure is not required. For details on the update procedure, access the site below and see “ rekordbox Introduction”. rekordbox.
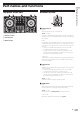
Part names and functions Part names and functions Top panel of the unit Browser section 1 2 3 1 Rotary selector Rotate: Moves the selection cursor in rekordbox dj. 1 Browser section 2 Deck sections 3 Mixer section [SHIFT] + Rotate: Enlarges or reduces the enlarged waveform display of rekordbox dj. Rotate to the right to enlarge the waveform display, and rotate to the left to reduce. Press: If this selector is pressed when the cursor is on a track, that track is loaded to the deck.
4 SLIP button Deck sections The deck sections are used to control the four decks. The buttons and controls for operating decks 1 and 3 are located on the left side of the controller, and those for operating decks 2 and 4 are located on the right side of the controller. Press: Turns slip mode on and off. = Using slip mode (p.20) [SHIFT] + Press: Turns VINYL mode on and off. 5 JOG FEELING ADJUST control 4 Adjusts the load applied when the jog dial is rotated.
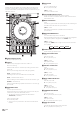
[SHIFT] + Press: Switches the sampler bank. Shifts the key of the track playing on the selected deck to the same key as the source track, to a dominant key (5 degrees higher), or to a subdominant key (4 degrees higher). f KEY RESET button Resets the key of the track playing on the selected deck to its original key. g Performance pads Achieves various performances. = Using the performance pads (p.17) h PLAY/PAUSE f button Plays or pauses the track. i CUE button Sets, calls out, and plays cue points.
setting in [Preferences] of rekordbox. For details on the procedure for changing the setting, see the rekordbox Manual. Jog dial display section c Cue/loop/hot cue point memory display When a track from rekordbox is loaded, the following information is displayed on the jog dial display section. Displays with indicator marks the cue points, loop points, and hot cue points set in the loaded track. 1 d Playback position display Displays the current playback position.
4 USB A, LINE, USB B selector switch Selects the input source for each channel from the components connected to this unit. ! [USB A]: Uses the track loaded in the rekordbox dj deck. ! [LINE]: Uses a line level output device (DJ player, etc.) connected to the [LINE] input terminals. = Using external inputs (p.25) ! [USB B]: Uses the track loaded in the rekordbox dj deck. 5 MASTER LEVEL control Adjusts the level of sound output to the master channel.
Rear panel 1 2 3 4 5 6 7 1 Kensington security slot 2 MASTER 1 output terminal Connect a powered speaker, a power amp, etc. ! Compatible with XLR connector type balanced outputs. Be sure to use these as balanced outputs. ! Be careful not to accidentally insert the power cord of another unit. ! Do not connect a terminal that can supply phantom power. 3 MASTER 2 output terminal Connect a powered speaker, a power amp, etc. ! Compatible with RCA pin-jack type unbalanced outputs.
Front panel Part names and functions 1 1 PHONES output terminals Connect headphones. Stereo phone plugs (ø 6.3 mm) and stereo mini phone plugs (ø 3.5 mm) can be used.
Basic operation ! ! ! ! Connect the power cord to a power outlet after all the connections are completed. Turn off this unit and disconnect the power cord from the power outlet before connecting components or changing the connections. Refer to the operating instructions for the components to be connected. Be sure to use the included power cord and AC adapter. Be sure to use the USB cable included with this product or one that conforms to USB 2.0. A USB hub cannot be used.
Connecting output terminals Rear panel R Basic operation Component, amplifier, powered speaker, etc. L Power amplifier, powered speakers, etc. Power amplifier (for booth monitor), powered speakers, etc. Front panel Headphones 1 Be sure to use the [MASTER 1] output terminals for a balanced output. If they are connected to an unbalanced input (such as RCA) using an XLR to RCA converter cable (or converter adapter), etc., the sound quality may be lowered or noise may occur.
Connections 1 Connect headphones to the [PHONES] output terminals. 6 Press the [u] switch on the rear panel of this unit to turn this unit on. 2 Connect devices such as powered speakers, a power amplifier, and components to the [MASTER 1] or [MASTER 2] output terminals. This unit turns on. ! For Windows [Installing device driver software] may appear when this unit is connected to the computer for the first time or connected to a different USB port on the computer.
Starting the system Loading tracks into a deck The following describes the procedure for loading tracks into deck 1 (left side) as an example. Launching rekordbox Basic operation 1 Account registration and activation work for rekordbox dj are required at first startup. For details on each work procedure, access the site below and see “rekordbox Introduction”. rekordbox.com/manual For Mac Open the [Applications] folder in Finder, and double-click the [rekordbox] icon.
2 Press the [PLAY/PAUSE f] button to play the track. Playing a music file The following describes the procedure for outputting the sound of deck 1 (left side) as an example. 3 Rotate the [TRIM] control. Adjust the [TRIM] control to confirm that the channel level indicator lights up in orange at the highest volume. 4 Move the channel fader forward. 5 Rotate the [MASTER LEVEL] control to adjust the sound level of the speakers.
Advanced operation Using 4 beat loops A 4 beat loop automatically starts from the point where the button is pressed, and loop playback starts. ! When the quantize function is on, there may be a slight delay in operation of this function to synchronize the beat. % Press the [OUT•2X] button while pressing the [SHIFT] button, and rotate the jog dial. Moves the position of the loop-out point. Using the performance pads Canceling loop playback % Press the [4 BEAT LOOP/EXIT] button again.
2 During loop playback, press the [4 BEAT LOOP/EXIT] button. Sets a 4 beat loop at the point where the button is pressed, and loop playback starts. 3 During loop playback, press a performance pad to set a loop during loop playback. the rekordbox dj deck screen can also be switched by performing the same operation.
1 Press the [HOT CUE] mode button while pressing the [SHIFT] button. You can play the tracks loaded in the sampler slots of the sampler using the performance buttons. This unit enters keyboard mode. ! Press the [PAGE c] button or the [PAGE d] button to switch the pitch of the sound assigned to the performance pad. Preparing to use the sampler 2 Press a performance pad. Select the [SAMPLER] check box at the upper part of the rekordbox dj screen. Select the hot cue to use in keyboard mode.
2 Press the [CUE] button in the pause mode. 3 Press [MEMORY]. The cue point set in step 2 is stored. Press the [MEMORY] button while looping to store the loop point. Calling out cue points Set cue points or loop points can be called out. % While pressing the [SHIFT] button, press the [SEARCH m] button or the [SEARCH n] button. Calls out the set cue points or loop points. Deleting cue points Set cue points or loop points can be deleted.
3 Press the [4 BEAT LOOP/EXIT] button. Loop playback is canceled and playback starts from the current position playing in the background playback. ! Press the [SLIP] button again to cancel slip mode. Using the fader start function Using the BEAT FX function You can set various effects according to the tempo (BPM = Beats Per Minute) of the track currently playing using the BEAT FX function. Main display 1 Using the channel fader start function 1 Set a cue point.
SPIRAL1 Types of BEAT FX A reverberation effect is applied to the input sound. The pitch changes simultaneously if the delay time is changed. ! Lowering the channel faders and cutting the input volume leaves an effect sound. LOW CUT ECHO1 A delayed sound with the low frequency range reduced is output several times and gradually attenuated according to the beat fraction set with the [BEAT c, d] buttons.
FLANGER ROLL A 1-cycle flanger effect is produced according to the beat fraction set with the [BEAT c, d] buttons. The sound being input at the point when the [ON/OFF] button is pressed is recorded, and the recorded sound is output repeatedly according to the beat fraction set with the [BEAT c, d] buttons.
Using the SOUND COLOR FX function These effects change in association with the [COLOR] controls for the different channels. When the unit is connected with rekordbox dj, the SOUND COLOR FX function of rekordbox dj can be used. The SOUND COLOR FX function of the unit can be used with external input. 1 Press a [SOUND COLOR FX SELECT] button. Selects the type of effect. The pressed button flashes.
Using external inputs This unit is equipped with four sets of external inputs for connecting CD players, analog turntables, etc. The 4-channel mixer of this unit can be used to mix input sound without passing through a computer. Notes Advanced operation ! For details on the respective items, see Connections (p.14) and Part names and functions (p.5). ! The functions of rekordbox dj cannot be used for external input.
Changing the settings Launching utilities mode If utilities mode is launched while the unit and a computer are connected by a USB cable, the set status may not be displayed properly. The “MIDI Controller Settings” can be set in the utilities mode. This unit automatically switches operation as shown below depending on whether or not rekordbox dj is running. ! When rekordbox is running, controller operation depends on the rekordbox dj functions.
Output setting of the microphone to the booth monitor Changes whether or not the microphone sound is output from the booth channel. When the [Mic Output On Booth] check box is unselected, the microphone sound is output from the booth channel. When the check box is selected, the microphone sound is not output from the booth channel. Mixer > Brightness of the display setting Lessens sudden, unpleasant digital clipping of the master output. — Enable: Enables the peak limiter for master output.
Setting utility software % Click the [About] tab. The setting utility can be used to perform the checks and settings described below. — Adjusting the buffer size (when ASIO is used) — Checking the version of the driver software Displaying the setting utility For Mac Click [Macintosh HD] icon > [Application] > [Pioneer] > [DDJ-1000] > [DDJ-1000 driver version display utility]. For Windows 10 Click [Pioneer] > [DDJ-1000 Settings Utility] from the [Start] menu. For Windows 8.
Additional information Troubleshooting ! If you think that there is something wrong with this unit, access the Pioneer DJ support site and check [FAQ]. pioneerdj.com/support/ Some problems occur due to the connected components. If the problem cannot be resolved after checking the connected components, contact the service center or your dealer for repairs. ! The player may not operate properly due to static electricity or other external influences.
Problem Check Remedy The indicator flashes and operation is strange. — Normal operation can be restored by disconnecting the AC adapter, waiting at least 1 minute, and then reconnecting the AC adapter. If the same symptom persists, disconnect the AC adapter, and then make a request for repairs. Operation of rekordbox dj becomes unstable. Are you using the latest version of the software? Free updates of rekordbox can be downloaded from the website. Use the most recent version.
Signal flow CH1-4 Common USB CHx Control Tone Detect CHx BPM PHONO CHx Input Select LINE USB A LEVEL METER CHx TRIM CH FADER SOUND COLOR FX CHx BEAT FX CHx SOUND COLOR FX CHx EQ CHx BEAT FX CHx USB SEND/RETURN USB B CUE Monitor CHx USB SEND/RETURN Thru A B CROSS FADER USB FX SEND CHx SOUND COLOR FX CHx CUE CHx BEAT FX CHx USB FX RETURN CHx CROSS FADER CURVE switch USB : CUE CHx USB SEND/RETURN CROSS FADER ASSIGN switch MIC to BOOTH ON/OFF BOOTH LEVEL BOOTH MONO/ STEREO Detect MASTER
4 Click [DDJ-1000] in the [DJ CONTROLLER] category. 5 After clicking [Drivers], download the latest driver software from the download page. Download the driver software for either Mac or Windows from the download page. Installation (Mac) Do not connect this unit and the computer until the installation is completed. ! Close all the applications running on the computer before installing the software. 1 Unzip the driver software for Mac (DDJ1000MXXXdmg.zip) downloaded in Obtaining the driver software.
design, manufacture, or production of nuclear, missile, or chemical or biological weapons. 5 U.S. GOVERNMENT RESTRICTED RIGHTS 6 DAMAGES AND REMEDIES FOR BREACH You agree that any breach of this Agreement’s restrictions would cause Pioneer DJ irreparable harm for which money damages alone would be inadequate.