
User Manual


En
12
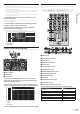
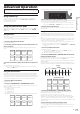
6 FILTER control
Applies the filter effect for the respective channel.
The original sound is output when the control is at the center position.
Turn counterclockwise: Gradually decreases the low-pass filter’s cutoff
frequency.
Turn clockwise: Gradually increases the high-pass filter’s cutoff frequency.
7 Headphones CUE/MIC TALK OVER button
Press:
The sound of channels for which the headphones [CUE] button is pressed is
output to the headphones.
! When the headphones [CUE] button is pressed again, monitoring is
canceled.
When the [INPUT SELECT] switch for channel 3 or 4 is set to [MIC1] or [MIC2],
the talkover function can be turned on or off.
When the talkover function is on, the headphones [CUE/MIC TALK OVER] but-
ton flashes. When a sound of over –15 dB is input to the microphone, the sound
other than that of the microphone is attenuated by approximately 20 dB.
! The talkover function for both the microphone connected to the [MIC1] ter-
minal and the microphone connected to the [MIC2] terminal can be turned
on and off by pressing the headphones [CUE/MIC TALK OVER] button for
either channel 3 or channel 4.
[SHIFT] + press:
The track’s tempo can be set by tapping the button. (Tap function)
! When the tap function is used, the deck section’s display on the computer’s
screen switches to the [Beatgrid Editer] display. To switch the deck sec-
tion’s display back to how it was before, click [Edit Grid] on the computer’s
screen.
8 Headphones CUE button
Press:
The sound of channels for which the headphones [CUE] button is pressed is
output to the headphones.
! When the headphones [CUE] button is pressed again, monitoring is
canceled.
[SHIFT] + press:
The track’s tempo can be set by tapping the button. (Tap function)
! When the tap function is used, the deck section’s display on the computer’s
screen switches to the [Beatgrid Editer] display. To switch the deck sec-
tion’s display back to how it was before, click [Edit Grid] on the computer’s
screen.
9 Channel fader
Move:
Adjusts the level of audio signals output in each channel.
[SHIFT] + move:
Use the channel fader start function.
= Using the channel fader start function (p. 20 )
a Crossfader Assign Switch
Assigns the channel output to the crossfader.
[A]: Assigns to [A] (left) of the crossfader.
[B]: Assigns to [B] (right) of the crossfader.
[THRU]: Selects this when you do not want to use the crossfader. (The signals do
not pass through the crossfader.)
! If microphone sound is selected using the [INPUT SELECT] switch of chan-
nel 3 or channel 4, even through the crossfader assign switch is switched,
the sound of that channel cannot be assigned to the crossfader.
b Crossfader
Outputs the sound assigned with the crossfader assign switch.
[SHIFT] + move:
Uses the crossfader start function.
= Using the crossfader start function (p. 20 )
c MASTER LEVEL control
Adjusts the master sound level output.
d Master level indicator
Displays the master output’s audio level.
e BOOTH MONITOR LEVEL control
Adjusts the level of audio signals output from the [BOOTH OUT] terminal.
f HEADPHONES MIX control
Adjusts the balance of the monitor volume between the sound of the channels
for which the headphones [CUE] button is pressed and the sound of the master
channel.
g MASTER CUE button
Turns monitoring of the master output’s sound on and off.
h SAMPLER VOLUME fader
Adjusts the sampler’s overall sound level.
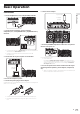
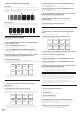
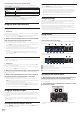
Effect section
This section is used to control the two effect units (FX1 and FX2). Controls and but-
tons used to operate the FX1 unit are located on the left side of the controller, those
used to operate the FX2 unit are located on the right side of the controller. The chan-
nels to which the effect is to be applied are set using the effect assign buttons on
the mixer.
1 1 1 2
3 3 3 4
1 Effect parameter controls
These adjust the effects’ parameters.
2 FX BEATS control
Adjusts the effect time.
3 Effect parameter buttons
Press:
Turns the effect on and off or switches the parameter.
[SHIFT] + press:
Switches the effect type.
4 TAP button
Press:
The BPM used as the base value for the effect is calculated by the interval at
which the button is tapped with a finger.
When the button is pressed and held, the effect time is reset.
= Switching the effect’s tempo mode (p. 21 )
[SHIFT] + press:
Switches the effect mode.
To monitor the effect sounds
When the [HEADPHONES MIX] control is turned to the [CUE] side, the Serato DJ
software’s effect sounds are not output in the sound of channels whose headphones
[CUE] button is pressed. To monitor the Serato DJ software’s effect sounds, turn
the [HEADPHONES MIX] control to the [MASTER] side, turn on the [MASTER CUE]
button and monitor the effect sound with the master output’s sound.
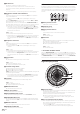
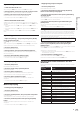
Jog dial display section
1
2
1 Operation display
Operates synchronously with the Serato DJ platter position indicator. One rota-
tion equals one rotation of the platter.
For display, separate patterns can be stored for decks 1 or 2, and decks 3 or 4,
respectively, and one of five patterns can be selected.
=
Switching illumination mode in the white area of the jog dial (p. 24 )
! During sensitivity adjustment of the touch sensor of the jog dial, the set
sensitivity is indicated.
2 Hot cue point display/slip play display
When the playback position is on a hot cue point, all indicators light. The num-
ber of indicators lighted changes depending on the distance from the hot cue
point to the playback position.
!
As with the [SLIP] button, it is possible to display the slip status.
= Switching the illumination mode in the red area of the jog dial (p. 25 )