TURNTABLE PLX-1000 http://pioneerdj.com/support/ The Pioneer DJ support site shown above offers FAQs, information on software and various other types of information and services to allow you to use your product in greater comfort.
Thank you for buying this Pioneer product. Please read through these operating instructions so you will know how to operate your model properly. After you have finished reading the instructions, put them away in a safe place for future reference. In some countries or regions, the shape of the power plug and power outlet may sometimes differ from that shown in the explanatory drawings. However the method of connecting and operating the unit is the same.
POWER-CORD CAUTION WARNING Store small parts out of the reach of children and infants. If accidentally swallowed, contact a doctor immediately. D41-6-4_A1_En WARNING To prevent a fire hazard, do not place any naked flame sources (such as a lighted candle) on the equipment. D3-4-2-1-7a_A1_En Handle the power cord by the plug. Do not pull out the plug by tugging the cord and never touch the power cord when your hands are wet as this could cause a short circuit or electric shock.
1) 2) 3) 4) 5) 6) 7) Read these instructions. Keep these instructions. Heed all warnings. Follow all instructions. Do not use this apparatus near water. Clean only with dry cloth. Do not block any ventilation openings. Install in accordance with the manufacturer’s instructions. 8) Do not install near any heat sources such as radiators, heat registers, stoves, or other apparatus (including amplifiers) that produce heat. 9) Do not defeat the safety purpose of the polarized or grounding-type plug.
REMARQUE L’AVERTISSEMENT DE PIÈCES NON RÉPARABLES PAR L’UTILISATEUR SE TROUVE SUR LE DESSOUS DE L’APPAREIL. D3-7-13-68_A1_Fr AVERTISSEMENT Cet appareil n’est pas étanche. Pour éviter les risques d’incendie et de décharge électrique, ne placez près de lui un récipient rempli d’eau, tel qu’un vase ou un pot de fleurs, et ne l’exposez pas à des gouttes d’eau, des éclaboussures, de la pluie ou de l’humidité.
Contents Before start How to read this manual In this booklet, the names of the buttons and terminals of the main unit appear in square brackets ([ ]). Examples: — Press the [START/STOP] button. — If this product is connected to a pre-main amplifier or component that does not have a [PHONO] terminal, sufficient volume and sound quality cannot be obtained. In this case, use the PHONO equalizer. Before start Features...........................................................................................
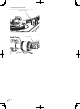
Before you start ! ! The cartridge is not provided. Refer to the instruction manual for your cartridge. Attach the cartridge on the headshell. The lead wires of the headshell part are color-coded. Use tweezers or a similar tool to correctly connect the wires to the corresponding cartridge terminal per the indication on the cartridge. 1 Attach the turntable and turntable sheet. Set the turntable on the center spindle and place the turntable sheet on top of the turntable.
4 Attach the balance weight. Attach the balance weight to the rear shaft of the tone arm. Balance weight ! When using a cartridge between 9.5 g and 13 g, attach the sub weight on the rear shaft of the tone arm.
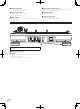
Part names and functions Top panel m l Part names and functions n k j i h g f c e d b a 9 1 8 2 3 1 POWER switch When turning the switch to the [ON] side, the power is turned on and the strobe illuminator on the side lights. = Playback (p.15) 2 START/STOP button Pressing the button starts or stops rotation of the turntable. = Playback (p.15) 3 Speed change button Changes the speed according to the record to be played. ! For a 33 1/3 rpm record, press the [33] button.
i HEIGHT ADJUST lock l Stylus pressure adjustment ring Locks the adjusted height of the arm. = Adjusting the arm height (p.12) Used to match to the appropriate stylus pressure of the cartridge. = Adjusting the stylus pressure (p.11) j HEIGHT ADJUST dial m Headshell stand Used to adjust the height of the tone arm. = Adjusting the arm height (p.12) Used to stand the shell up. n Adapter for EP record k Balance weight Used to play standard EP records. = To play a standard EP record (p.
2 Adjust the stylus pressure. Adjustment Adjusting the tone arm balance Turn the balance weight to adjust to the appropriate stylus pressure value for your cartridge. ! When turning the balance weight, the stylus pressure adjustment ring turns together. While observing the adjustment ring, adjust the stylus pressure to the appropriate value. ! Adjustment Because the cartridge and headshell weights differ depending on the product, the balance of the tone arm is adjusted. Prepare as follows.
Adjusting the arm lifter height Adjusting the arm height If necessary, perform adjustment to match the cartridge being used. Prepare as follows. ! Place a record on the turntable sheet. ! Remove the stylus cover and arm clamper while paying attention not to touch the stylus tip. ! Pull up the lifter lever and move the tone arm onto the record. 1 Turn the [HEIGHT ADJUST] lock to unlock the lock. Unlock Adjust the height by turning the screw while the arm lifter is pushed down.
Connections ! ! ! Be sure to turn off the power and unplug the power cord from the power outlet whenever making or changing connections. Refer to the operating instructions for the component to be connected. Connect the power cord after all the connections between devices have been completed. Descriptions of terminals Connections 1 2 1 PHONO OUT terminals 3 3 AC IN Connect the audio cables (included) here. 2 SIGNAL GND terminal Connect the ground wire (accessory).
Connecting to a DJ mixer Ground wire Ground wire Audio cable Audio cable Rear panel R Analog player L DJ mixer Power cord To power outlet 1 Connect the audio cable and ground wire to the [PHONO] input terminal of the DJ mixer. ! ! If this product is connected to a DJ mixer that does not have a [PHONO] input terminal, sufficient volume and sound quality cannot be obtained. Make sure to connect the ground wire. If the unit is not properly grounded, a power hum (humming sound) occurs.
Operation Turning the power on 1 Make all the connections, then plug the power cord into a power outlet. About the slip mat and slip sheet Slip mat If you use the mat instead of the turntable sheet, you can stop the record by hand during playing, or turn the turntable in reverse. Slip sheet When the slip sheet is used under the slip mat, sliding of scratch becomes smooth. = Connections (p.13) 2 Change the [POWER] switch to the [ON] side to turn on the power of the unit.
Adjusting the pitch 1 Press the [RESET] button to turn off the [RESET] indicator. 2 Move the [TEMPO] slider forward or backward. Moving the slider forward increases the rotation speed and moving it backward decreases the rotation speed. ! The scale of the [TEMPO] slider is a rough value. Please use it as a guide. 3 Press the [TEMPO RANGE] button. The [TEMPO] slider’s adjustment range switches each time the button is pressed. The adjustment range indicator lights. Setting value Units of adjustment ±8 0.
Additional information Troubleshooting ! ! Incorrect operation is often mistaken for trouble or malfunction. If you think that there is something wrong with this component, check the points below and the [FAQ] for the [PLX-1000] on the Pioneer DJ support site. http://pioneerdj.com/support/ Sometimes the problem may lie in another component. Inspect the other components and electrical appliances being used.
About trademarks and registered trademarks ! Pioneer is a registered trademark of PIONEER CORPORATION. The names of companies and products mentioned herein are the trademarks of their respective owners. Specifications Power requirements.........AC 110 V to 120 V or 220 V to 240 V, 50 Hz/60 Hz Power consumption.................................................................................. 9 W Main unit weight....................................................................14.6 kg (32.2 lb) Max.
PIONEER ELECTRONICS (USA) INC. LIMITED WARRANTY WARRANTY VALID ONLY IN THE U.S.A. AND CANADA WARRANTY Pioneer Electronics (USA) Inc. (PUSA) warrants that products distributed by PUSA in the U.S.A. and Canada that fail to function properly under normal use due to a manufacturing defect when installed and operated according to the owner ’s manual enclosed with the unit will be repaired or replaced with a unit of comparable value, at the option of PUSA, without charge to you for parts or actual repair work.
To register your product, find the nearest authorized service location, to purchase replacement parts, operating instructions, or accessories, please go to one of following URLs : Pour enregistrer votre produit, trouver le service après-vente agréé le plus proche et pour acheter des pièces de rechange, des modes d’emploi ou des accessoires, reportez-vous aux URL suivantes : In the USA & Canada/Aux Etats-Unis & Canada http://www.pioneerelectronics.com S018_B1_EnFr_PSV © 2014 PIONEER CORPORATION.