English Français Deutsch PLX-1000 Italiano TURNTABLE PLATINE VINYLE PLATTENSPIELER GIRADISCHI DRAAITAFEL GIRADISCOS GIRADISCOS ПРОИГРЫВАТЕЛЬ ВИНИЛОВЫХ ДИСКОВ Nederlands http://pioneerdj.com/support/ Le site de support DJ de Pioneer indiqué ci-dessus propose une FAQ, des informations sur le logiciel et divers types d’informations et de services qui permettent une utilisation plus confortable de ce produit.
Thank you for buying this Pioneer product. Please read through these operating instructions so you will know how to operate your model properly. After you have finished reading the instructions, put them away in a safe place for future reference. In some countries or regions, the shape of the power plug and power outlet may sometimes differ from that shown in the explanatory drawings. However the method of connecting and operating the unit is the same.
English Contents Before start How to read this manual In this booklet, the names of the buttons and terminals of the main unit appear in square brackets ([ ]). Examples: — Press the [START/STOP] button. — If this product is connected to a pre-main amplifier or component that does not have a [PHONO] terminal, sufficient volume and sound quality cannot be obtained. In this case, use the PHONO equalizer. Before start Features .................................................................................
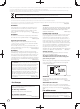
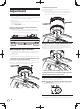
Before you start About the cartridge The cartridge is not provided. Refer to the instruction manual for your cartridge. Attach the cartridge on the headshell. The lead wires of the headshell part are color-coded. Use tweezers or a similar tool to correctly connect the wires to the corresponding cartridge terminal per the indication on the cartridge. Assembly 1 Attach the turntable and turntable sheet. Set the turntable on the center spindle and place the turntable sheet on top of the turntable.
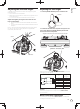
English 4 Attach the balance weight. Attach the balance weight to the rear shaft of the tone arm. Balance weight When using a cartridge between 9.5 g and 13 g, attach the sub weight on the rear shaft of the tone arm.
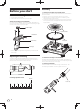
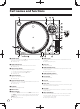
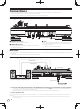
Part names and functions Top panel n m l k j i h g f c e d b a 9 1 8 2 3 1 POWER switch When turning the switch to the [ON] side, the power is turned on and the strobe illuminator on the side lights. Playback (p.12) 2 START/STOP button Pressing the button starts or stops rotation of the turntable. Playback (p.12) 3 Speed change button Changes the speed according to the record to be played. For a 33 1/3 rpm record, press the [33] button. For a 45 rpm record, press the [45] button.
i HEIGHT ADJUST lock l Stylus pressure adjustment ring Used to match to the appropriate stylus pressure of the cartridge. Adjusting the stylus pressure (p.8) j HEIGHT ADJUST dial m Headshell stand Used to adjust the height of the tone arm. Adjusting the arm height (p.9) English Locks the adjusted height of the arm. Adjusting the arm height (p.9) Used to stand the shell up. n Adapter for EP record k Balance weight Used to play standard EP records. To play a standard EP record (p.
2 Adjust the stylus pressure. Adjustment Adjusting the tone arm balance Turn the balance weight to adjust to the appropriate stylus pressure value for your cartridge. When turning the balance weight, the stylus pressure adjustment ring turns together. While observing the adjustment ring, adjust the stylus pressure to the appropriate value. Because the cartridge and headshell weights differ depending on the product, the balance of the tone arm is adjusted. Prepare as follows.
If necessary, perform adjustment to match the cartridge being used. Prepare as follows. Place a record on the turntable sheet. Remove the stylus cover and arm clamper while paying attention not to touch the stylus tip. Pull up the lifter lever and move the tone arm onto the record. Adjusting the arm height 1 Turn the [HEIGHT ADJUST] lock to unlock the lock. English Adjusting the arm lifter height Unlock Adjust the height by turning the screw while the arm lifter is pushed down.
Connections Be sure to turn off the power and unplug the power cord from the power outlet whenever making or changing connections. Refer to the operating instructions for the component to be connected. Connect the power cord after all the connections between devices have been completed. Descriptions of terminals 1 2 1 PHONO OUT terminals 3 3 AC IN Connect the audio cables (included) here. 2 SIGNAL GND terminal Connect the ground wire (accessory).
Ground wire English Connecting to a DJ mixer Ground wire Audio cable Audio cable R Analog player L Rear panel DJ mixer Power cord To power outlet 1 Connect the audio cable and ground wire to the [PHONO] input terminal of the DJ mixer. If this product is connected to a DJ mixer that does not have a [PHONO] input terminal, sufficient volume and sound quality cannot be obtained. Make sure to connect the ground wire. If the unit is not properly grounded, a power hum (humming sound) occurs.
Operation Turning the power on 1 Make all the connections, then plug the power cord into a power outlet. About the slip mat and slip sheet Slip mat If you use the mat instead of the turntable sheet, you can stop the record by hand during playing, or turn the turntable in reverse. Slip sheet When the slip sheet is used under the slip mat, sliding of scratch becomes smooth. Connections (p.10) 2 Change the [POWER] switch to the [ON] side to turn on the power of the unit.
English Adjusting the pitch 1 Press the [RESET] button to turn off the [RESET] indicator. 2 Move the [TEMPO] slider forward or backward. Moving the slider forward increases the rotation speed and moving it backward decreases the rotation speed. The scale of the [TEMPO] slider is a rough value. Please use it as a guide. 3 Press the [TEMPO RANGE] button. The [TEMPO] slider’s adjustment range switches each time the button is pressed. The adjustment range indicator lights.
Additional information Troubleshooting Incorrect operation is often mistaken for trouble or malfunction. If you think that there is something wrong with this component, check the points below and the [FAQ] for the [PLX-1000] on the Pioneer DJ support site. http://pioneerdj.com/support/ Sometimes the problem may lie in another component. Inspect the other components and electrical appliances being used.
English Specifications Power requirements ........AC 110 V to 120 V or 220 V to 240 V, 50 Hz/60 Hz Power consumption................................................................................. 9 W Main unit weight ................................................................................. 13.1 kg Max. external dimensions ........ 453 mm (W) × 159 mm (H) × 353 mm (D) Tolerable operating temperature ........................................ +5 °C to +35 °C Tolerable operating humidity .............
Nous vous remercions d’avoir acquis un produit Pioneer. Veuillez lire attentivement ce mode d’emploi afin de connaître la manière d’utiliser l’appareil comme il convient. Cela fait, conservez le mode d’emploi de façon à pouvoir vous y référer en cas de nécessité. Dans certains pays ou certaines régions, la forme de la fiche et de la prise d’alimentation est un peu différente de ce qui est montré dans les illustrations. Toutefois, l’appareil se raccorde et fonctionne de la même façon.
Sommaire Comment lire ce manuel Caractéristiques Cet appareil est une platine professionnelle qui dispose de fonctions, durabilité, maniabilité et qualité sonore adaptées à une grande variété d’occasions allant de l’écoute chez soi à l’utilisation en discothèques ou clubs. Français Dans ce manuel, les noms des touches et des prises de l’appareil principal apparaissent entre crochets ([ ]). Exemples : — Appuyez sur la touche [START/STOP].
Avant de commencer À propos de la cellule La cellule n’est pas fournie. Reportez-vous au mode d’emploi de votre cellule. Fixez la cellule sur le porte-cellule. Les fils conducteurs du porte-cellule sont codés par couleur. Utilisez des pinces ou un outil similaire pour connecter correctement les fils à la borne correspondante de la cellule conformément à l’indication sur la cellule. Montage 1 IInstallez le plateau et le couvre-plateau.
4 Fixez le contrepoids d’équilibrage. Fixez le contrepoids d’équilibrage sur l’arbre arrière du bras de lecture. Contrepoids d’équilibrage Français Lors de l’utilisation d’une cellule entre 9,5 g et 13 g, fixez le contrepoids supplémentaire sur l’arbre arrière du bras de lecture.
Noms et fonctions des éléments Panneau supérieur n m l k j i h g f c e d b a 9 1 8 2 3 1 Commutateur POWER En tournant l’interrupteur sur [ON], l’appareil est mis sous tension et l’éclairage stroboscopique sur le côté s’allume. Lecture (p.12) 2 Touche START/STOP L’appui sur cette touche démarre ou arrête la rotation du plateau. Lecture (p.12) 3 Touche de changement de vitesse Change la vitesse en fonction du disque à lire. Pour un disque 33 1/3 tours, appuyez sur la touche [33].
g Système de levage du bras k Contrepoids d’équilibrage Ce dispositif est utilisé pour déplacer le bras de lecture de haut en bas. Il est commandé par le levier de levage. Permet d’équilibrer le bras de lecture et de régler la pression de la pointe de lecture. Réglage (p.8) h Molette ANTI SKATING l Bague de réglage de la pression de la pointe de lecture Quand un disque est lu, une force attire l’extrémité de la pointe de lecture vers l’intérieur du disque.
2 Réglez la pression de la pointe de lecture. Réglage Réglage de l’équilibre du bras de lecture Tournez le contrepoids d’équilibrage pour faire le réglage sur la valeur de la pression de la pointe de lecture appropriée pour votre cellule. Lorsque vous tournez le contrepoids d’équilibrage, la bague de réglage de la pression de la pointe de lecture tourne en même temps. Tout en observant la bague de réglage, réglez la pression de la pointe de lecture à la valeur appropriée.
Réglage de l’antipatinage Réglage de la hauteur du bras Ce réglage permet d’empêcher la pointe de lecture de sauter. 1 Tournez le verrouillage [HEIGHT ADJUST] pour le déverrouiller. Déverrouiller Faites correspondre à la même position de la graduation que la valeur de la pression de la pointe de lecture. Français Tournez la molette [ANTI SKATING] pour faire correspondre la ligne de référence avec la même valeur de la pression de la pointe de lecture de la cellule.
Raccordements Veillez à toujours éteindre les appareils et à débrancher le cordon d’alimentation de la prise secteur avant de raccorder un appareil ou de changer les liaisons. Reportez-vous au mode d’emploi de l’appareil devant être raccordé. Lorsque tous les appareils ont été raccordés, vous pouvez brancher le cordon d’alimentation. Descriptions des prises 1 2 1 Prises PHONO OUT 3 3 AC IN Pour raccorder les câbles audio (fournis). 2 Prise SIGNAL GND Raccordez le fil de terre (accessoire).
Raccordement à une table de mixage DJ Fil de terre Câble audio Fil de terre Câble audio L Français R Panneau arrière Lecteur analogique Table de mixage DJ Cordon d’alimentation À une prise d’alimentation 1 Raccordez le câble audio et le fil de terre à la prise d’entrée [PHONO] de la table de mixage DJ. Si ce produit est raccordé à une table de mixage DJ qui ne possède pas de prise d’entrée [PHONO], il n’est pas possible d’obtenir un volume et une qualité sonore suffisants.
Fonctionnement À propos de la feutrine et de la sous-feutrine Feutrine Mise sous tension 1 Après avoir effectué tous les raccordements, branchez le cordon d’alimentation sur une prise murale. Raccordements (p.10) Si vous utilisez la feutrine au lieu du couvre-plateau, vous pouvez arrêter le disque à la main pendant la lecture ou faire tourner le plateau en sens inverse. Sous-feutrine L’utilisation de la sous-feutrine sous la feutrine permet de scratcher plus en douceur.
Réglage du pitch 1 Appuyez sur la touche [RESET] pour désactiver l’indicateur [RESET]. 2 Déplacez le curseur [TEMPO] vers l’avant ou l’arrière. Français Déplacer le curseur vers l’avant augmente la vitesse de rotation et le déplacer vers l’arrière diminue la vitesse de rotation. La graduation du curseur [TEMPO] est une valeur approximative. Veuillez l’utiliser à titre de référence. 3 Appuyez sur la touche [TEMPO RANGE]. La plage de réglage du curseur [TEMPO] change à chaque appui sur la touche.
Informations supplémentaires En cas de panne Une erreur de commande est souvent prise pour une anomalie de fonctionnement ou une panne. S’il vous semble que quelque chose est anormal avec cet appareil, vérifiez les points suivants et les [FAQ] du [PLX-1000] sur le site de support DJ de Pioneer. http://pioneerdj.com/support/ Parfois, le problème peut provenir d’un autre composant. Examinez les autres composants et les appareils électriques utilisés.
Entretien de chaque élément Français Lors du montage et du démontage du porte-cellule, éteignez l’amplificateur. Tenter d’effectuer une telle opération alors que le volume est fort pourrait provoquer l’endommagement du haut-parleur. Retirez le porte-cellule avec la cellule installée et utilisez une petite brosse souple ou un pinceau pour enlever soigneusement la poussière, etc. de l’extrémité de la pointe de lecture. Utilisez un nettoyant pour disque de bonne qualité pour nettoyer les disques.
Vielen Dank, dass Sie sich für dieses Pioneer-Produkt entschieden haben. Bitte lesen Sie diese Bedienungsanleitung gründlich durch, um sich mit der Bedienung des Geräts vertraut zu machen. Nachdem Sie die Bedienungsanleitung gelesen haben, legen Sie sie griffbereit zum Nachschlagen ab. In manchen Ländern oder Regionen können sich die Formen von Netzstecker und Netzsteckdose von denen in den Erklärungszeichnungen unterscheiden. Das Verfahren zum Anschließen und Bedienen des Geräts sind aber gleich.
Inhalt Zum Lesen dieser Anleitung In dieser Broschüre werden die Namen der Tasten und Anschlüsse des Hauptgeräts in eckigen Klammern ([ ]) angegeben. Beispiele: — Drücken Sie die Taste [START/STOP]. — Wenn das Produkt an einen Vor-/Hauptverstärker oder eine Komponente ohne [PHONO]-Buchse angeschlossen ist, kann keine ausreichende Lautstärke- und Tonqualität erzielt werden. Verwenden Sie in diesem Fall den PHONO-Equalizer.
Bevor Sie beginnen Über den Tonabnehmer Die Tonabnehmer ist nicht mitgeliefert. Weitere Einzelheiten zum Tonabnehmer finden Sie in dessen Bedienungsanleitung. Befestigen Sie den Tonabnehmer am Tonabnehmerkopf. Die Führungsdrähte des Tonabnehmerkopfs sind farbkodiert. Verwenden Sie eine Zange oder ähnliches Werkzeug, um die Drähte an die entsprechenden Klemmen des Tonabnehmers, wie darauf angezeigt, ordnungsgemäß zu verbinden. Montage 1 Setzen Sie den Plattenteller und die Plattentellerauflage auf.
4 Bringen Sie das Gegengewicht an. Befestigen Sie das Gegengewicht am hinteren Schaft des Tonarms. Gegengewicht Deutsch Befestigen Sie beim Gebrauch eines Tonabnehmers von 9,5 bis 13 g ein Nebengewicht am hinteren Schaft des Tonarms.
Bezeichnungen und Funktionen der Komponenten Oberseite n m l k j i h g f c e d b a 9 1 8 2 3 1 POWER Schalter Wenn dieser Schalter in die [ON]-Position gestellt wird, wird das Gerät eingeschaltet und die Stroboskop-Beleuchtung an der Seite leuchtet. Wiedergabe (S.12) 2 START/STOP-Taste Durch Drücken auf die Taste wird die Drehung des Plattentellers gestartet oder gestoppt. Wiedergabe (S.12) 3 Drehzahländerungstaste Ändert die Drehzahl entsprechend der abzuspielenden Schallplatte.
f Anhebehebel j HEIGHT ADJUST-Drehrad Wenn der Hebel nach oben gezogen wird, geht der Tonarm nach oben. Wenn der Hebel nach unten gedrückt wird, geht der Tonarm nach unten. Passt die Höhe des Tonarms an. Anpassen der Armhöhe (S.9) k Gegengewicht g Armheber Gleicht das Gewicht des Tonarms aus, und passt den Nadeldruck an. Anpassung (S.8) Diese Vorrichtung wird verwendet, um den Tonarm nach oben und unten zu heben. Er wird über den Anhebehebel bedient.
2 Passen Sie den Nadeldruck an. Drehen Sie das Gegengewicht, um den geeigneten Nadeldruckwert für Ihren Tonabnehmer einzustellen. Gemeinsam mit dem Gegengewicht dreht sich auch der Nadeldruckanpassungsring. Stellen Sie den Nadeldruck auf den geeigneten Wert unter Beobachtung des Anpassungsrings ein. Anpassung Anpassen des Tonarmgleichgewichts Da sich das Gewicht des Tonabnehmers und Tonabnehmerkopfes je nach Produkt unterscheiden, muss das Gleichgewicht des Tonarms angepasst werden.
Anti-Skating-Anpassung Anpassen der Armhöhe Diese Anpassung soll Nadelsprünge verhindern. 1 Drehen Sie die [HEIGHT ADJUST]-Verriegelung zur Entriegelung. Stellen Sie die gleiche Position auf der Skala wie für den Nadeldruckwert ein. Entsperren Drehen Sie das [ANTI SKATING]-Drehrad, bis die Referenzlinie auf den gleichen Wert wie für den Nadeldruckwert des Tonabnehmers eingestellt ist. Bei der Scratch-Wiedergabe Passen Sie die Skalenposition an den Wiedergabevorgang an, um Nadelsprünge zu verhindern.
Anschlüsse Schalten Sie die Stromversorgung aus und ziehen Sie das Netzkabel aus der Netzsteckdose, bevor Sie Geräte anschließen oder die Anschlüsse ändern. Beachten Sie die Bedienungsanleitung der angeschlossenen Komponente. Schließen Sie das Netzkabel an, nachdem alle Anschlüsse zwischen den Geräten vorgenommen wurden. Beschreibung der Buchsen 1 2 1 PHONO OUT-Buchsen 3 3 AC IN Schließen Sie die Audiokabel (mitgeliefert) hier an. 2 SIGNAL GND-Buchse Verbinden Sie das Massekabel (Zubehör).
Anschluss an einen DJ-Mixer Massekabel Massekabel Audiokabel Audiokabel R Rückseite Deutsch Plattenspieler L DJ-Mixer Netzkabel Zur Netzsteckdose 1 Verbinden Sie das Audio- und Massekabel mit der [PHONO]-Eingangsbuchse des DJ-Mixers. Wenn das Produkt an einen DJ-Mixer ohne [PHONO]-Eingangsbuchse angeschlossen ist, kann keine ausreichende Lautstärke- und Tonqualität erzielt werden. Verbinden Sie unbedingt das Massekabel.
Bedienung Einschalten der Stromversorgung 1 Stellen Sie alle Verbindungen her und stecken Sie dann den Netzstecker in eine Steckdose. Anschlüsse (S.10) Informationen zu Slipmat und Slipsheet Slipmat Wenn Sie anstatt der Plattentellerauflage die Slipmat verwenden, können Sie die Schallplatte während der Wiedergabe von Hand anhalten oder die Schallplatte entgegen der Plattentellerdrehung wirbeln. Slipsheet Wenn unter der Slipmat ein Slipsheet verwendet wird, wird das Scratchen reibungsloser.
Anpassen der Tonhöhe 1 Drücken Sie auf die [RESET]-Taste, um die [RESET]Anzeige auszuschalten. 2 Bewegen Sie den Schieber [TEMPO] vorwärts oder rückwärts. Wenn der Schieber nach vorn bewegt wird, erhöht sich die Drehzahl. Wenn der Schieber nach hinten bewegt wird, verringert sich die Drehzahl. Die Skala des [TEMPO]-Schiebers ist nur ein ungefährer Wert. Nutzen Sie ihn als Referenz. 3 Drücken Sie die Taste [TEMPO RANGE].
Zusätzliche Informationen Störungssuche Bedienungsfehler werden oft irrtümlich für Störungen oder Ausfälle gehalten. Wenn Sie den Eindruck haben, dass diese Komponente nicht ordnungsgemäß funktioniert, überprüfen Sie bitte die Punkte unten und [FAQ] für [PLX-1000] auf der Pioneer DJ-Support-Website. http://pioneerdj.com/support/ Manchmal wird das Problem auch durch ein externes Gerät verursacht. Überprüfen Sie die anderen verwendeten Komponenten und elektrischen Geräte.
Wartung der einzelnen Teile Schalten Sie den Verstärker beim Anbringen und Abnehmen des Tonabnehmerkopfs aus. Wenn Sie diesen Vorgang bei hoher Lautstärke vornehmen, könnte der Lautsprecher beschädigt werden. Nehmen Sie den Kopf mit Tonabnehmer ab, und entfernen Sie mit einer weichen Bürste oder einem Pinsel vorsichtig jeglichen Staub usw. von der Nadelspitze. Reinigen Sie Schallplatten mit einem geeigneten und hochwertigen Schallplattenreiniger.
Vi ringraziamo per avere acquistato questo prodotto Pioneer. Vi preghiamo di leggere queste queste istruzioni per l’uso in modo da sapere usare correttamente il proprio modello. Dopo aver letto queste istruzioni, riporle in un luogo sicuro per poterle consultare di nuovo al momento del bisogno. In alcuni paesi o regioni, la forma della spina di alimentazione e della presa di corrente possono non essere quelle delle illustrazioni. Il metodo di collegamento e di uso dell’unità però non cambia.
Indice Prima di cominciare Come leggere questo manuale In questo libretto, i nomi dei pulsanti e dei terminali dell’unità principale sono indicati fra parentesi quadre ([ ]). Esempi: — Premere il pulsante [START/STOP]. — Se questo prodotto è collegato a un preamplificatore o a un componente che non dispone di terminale [PHONO], non sarà possibile ottenere un volume e una qualità sonora adeguati. In questo caso, utilizzare l’equalizzatore PHONO. Prima di cominciare Caratteristiche.........................
Prima di iniziare Informazioni sulla testina La testina non è in dotazione. Fare riferimento al manuale di istruzioni della testina da utilizzare. Montaggio la testina nel portatestina. I cavi elettrici del portatestina sono identificati da colori specifici. Utilizzare delle pinzette o un utensile simile per collegare i cavi al terminale corrispondente della testina in base all’indicazione su quest’ultima. Montaggio 1 Montaggio il piatto e la piastra del piatto.
4 Montaggio il contrappeso. Fissare il contrappeso sul retro del braccio. Contrappeso Se si usa una testina con un peso tra 9,5 g e 13 g, fissare il peso secondario sul retro del braccio.
Nome delle varie parti e funzioni Pannello superiore n m k l j i h g f c e d b a 9 1 8 2 3 1 Interruttore POWER Quando si porta l’interruttore in posizione [ON], l’unità si accende e la luce stroboscopica laterale si illumina. Riproduzione (p.12) 2 Pulsante START/STOP Premere il pulsante per avviare o arrestare la rotazione del piatto. Riproduzione (p.12) 3 Pulsante di modifica della velocità Cambia la velocità in base al disco da riprodurre.
i Blocco HEIGHT ADJUST l Anello di regolazione della pressione della puntina Blocca il braccio all’altezza regolata. Regolazione dell’altezza del braccio (p.9) Consente di impostare la pressione adeguata della puntina della testina. Regolazione della pressione della puntina (p.8) j Manopola HEIGHT ADJUST m Sostegno per portatestina Consente di regolare l’altezza del braccio. Regolazione dell’altezza del braccio (p.9) Collocare qui il portatestina.
2 Regolare la pressione della puntina. Regolazione Regolazione del bilanciamento del braccio Ruotare il contrappeso per impostare il valore adeguato per la pressione della puntina a seconda della testina in uso. Quando si ruota il contrappeso, ruota anche l’anello di regolazione per la pressione della puntina. Mentre si osserva l’anello di regolazione, impostare la pressione della puntina sul valore appropriato.
Regolazione dell’antiskating Regolazione dell’altezza del braccio Questa regolazione consente di impedire i salti della puntina. 1 Ruotare il blocco [HEIGHT ADJUST] per sbloccarlo. Sbloccare Far corrispondere la posizione della scala con il valore della pressione della puntina. Ruotare la manopola [ANTI SKATING] in modo da far corrispondere la linea di riferimento con lo stesso valore della pressione della testina.
Collegamenti Prima di fare o modificare collegamenti, non mancare di spegnere l’apparecchio e di scollegare il cavo di alimentazione. Consultare le istruzioni per l’uso del componente da collegare. Collegare il cavo di alimentazione dopo che tutti i collegamenti fra dispositivi sono stati fatti. Descrizione dei terminali 1 1 Terminali PHONO OUT 2 3 3 AC IN Collegare qui i cavi audio (acclusi).
Collegamento a un mixer DJ Filo di terra Filo di terra Cavo audio Cavo audio R Lettore analogico L Pannello posteriore Mixer DJ Cavo di alimentazione Ad una presa Italiano 1 Collegare il cavo audio e quello di messa a terra al terminale di ingresso [PHONO] del mixer DJ. Se questo prodotto è collegato a un mixer DJ che non dispone di terminale [PHONO], non sarà possibile ottenere un volume e una qualità sonora adeguati. Assicurarsi collegare il cavo di messa a terra.
Impiego Informazioni su tappetino e tappetino in feltro Tappetino Accensione 1 Stabilire tutti i collegamenti e inserire il cavo di alimentazione a una presa di corrente. Collegamenti (p.10) Se si usa un tappetino invece della piastra del piatto, è possibile fermare il disco con la mano mentre viene riprodotto o anche far girare il piatto al contrario. Tappetino in feltro Se si usa un tappetino in feltro sotto il tappetino, è più facile utilizzare la tecnica scratch.
Regolazione del pitch 1 Premere il pulsante [RESET] per spegnere l’indicatore [RESET]. 2 Muovere [TEMPO] in avanti o indietro. Spostare il cursore in avanti per aumentare la velocità di rotazione oppure indietro per diminuirla. La scala del cursore [TEMPO] è indica un valore approssimativo, che va usato solo come riferimento. 3 Premere il pulsante [TEMPO RANGE]. La gamma di regolazione del cursore [TEMPO] cambia ogni volta che si preme il pulsante e l’indicatore della gamma di regolazione si accende.
Informazioni aggiuntive Diagnostica L’uso scorretto dell’apparecchio viene spesso scambiato per un guasto. Se si ritiene che questa unità abbia qualche guasto, controllare i punti seguenti e le [FAQ] del [PLX-1000] sul sito di supporto DJ di Pioneer. http://pioneerdj.com/support/ A volte il problema risiede in un altro componente. Controllare tutti i componenti ed apparecchi elettronici usati.
A proposito del marchi di fabbrica o marchi di fabbrica depositati Pioneer è un marchio di fabbrica depositato della PIONEER CORPORATION. I nomi delle aziende e dei prodotti menzionati sono marchi di fabbrica dei rispettivi proprietari. Dati tecnici Requisiti di alimentazione ........................................... CA da 110 V a 120 V o da 220 V a 240 V, 50 Hz/60 Hz Consumo di corrente ............................................................................... 9 W Peso unità principale .........
Hartelijk dank voor uw aankoop van dit Pioneer product. Lees deze gebruiksaanwijzing aandachtig door om bekend te raken met de juiste bediening van uw apparaat. Na het doorlezen van de gebruiksaanwijzing dient u deze te bewaren op een veilige plaats, voor latere naslag. In bepaalde landen of gebieden kan de vorm van de netsnoerstekker en het stopcontact verschillen van de afbeeldingen bij de onderstaande uitleg. De aansluitmethode blijft overigens gelijk, evenals de bediening van het apparaat.
Inhoud Alvorens te beginnen Opmerkingen over deze handleiding Ik dit boekje staan de namen van de toetsen en aansluitingen van het hoofdtoestel tussen vierkante haakjes ([ ]). Voorbeelden: — Druk op de [START/STOP] knop. — Als dit product wordt aangesloten op een pre-hoofdversterker of component zonder een [PHONO]-aansluiting, kunnen niet voldoende volume en geluidskwaliteit worden verkregen. Gebruik in dat geval de PHONO-equalizer. Alvorens te beginnen Kenmerken .........................................
Voordat u begint Het element Het element wordt niet meegeleverd. Raadpleeg de instructiehandleiding van het element. Bevestig het element aan de kopshell. De draden van de kopshell zijn met kleuren gecodeerd. Verbind de draden met de juiste aansluiting op het element. Volg de aanwijzingen op het element en gebruik een pincet of gelijksoortig gereedschap. Montage 1 Bevestig de draaitafel en het draaitafelblad. Plaats de draaitafel op de middenas, en het draaitafelblad op de draaitafel.
4 Bevestig het contragewicht. Bevestig het contragewicht aan de achterkant van de arm. Contragewicht Als je een element tussen 9,5 g en 13 g gebruikt, moet je het subgewicht monteren op het achterste gedeelte van de arm.
Overzicht van de bedieningstoetsen Bovenpaneel n m l k j i h g f c e d b a 9 1 8 2 3 1 POWER-schakelaar Als je de schakelaar naar de positie [ON] draait, wordt het toestel ingeschakeld en licht de stroboscoopverlichting aan de zijkant op. Afspelen (blz.12) 2 START/STOP-toets Als je op de knop drukt, gaat de draaitafel draaien of stopt hij. Afspelen (blz.12) 3 Knop voor snelheidswijziging Hiermee wijzig je de snelheid voor de afgespeelde plaat. 33 1/3 toerenplaat: druk op de knop [33].
i Vergrendelknop HEIGHT ADJUST l Afstelring voor de naalddruk Vergrendelt de aangepaste hoogte van de arm. De hoogte van de arm aanpassen (blz.9) Wordt gebruikt om de juiste naalddruk in te stellen voor het element. De naalddruk aanpassen (blz.8) j Instelknop HEIGHT ADJUST m Standaard voor kopshell Wordt gebruikt om de hoogte van de arm aan te passen. De hoogte van de arm aanpassen (blz.9) Wordt gebruikt als standaard voor de shell.
2 Pas de naalddruk aan. Draai het contragewicht om de juiste naalddruk in te stellen voor het gebruikte element. Als je contragewicht draait, draait de afstelring voor de naalddruk mee. Houd de afstelring in het oog en stel de juiste naalddruk in. Aanpassingen De balans van de arm aanpassen Omdat het gewicht van het element en de kopshell verschilt naargelang het product, moet de balans van de arm wellicht worden aangepast. Doe het volgende als voorbereiding. Verwijder de naaldkap en de armklem.
De hoogte van de armlift aanpassen De hoogte van de arm aanpassen Pas deze zo nodig aan voor het gebruikte element. Doe het volgende als voorbereiding. Plaats een plaat op het draaitafelblad. Verwijder de naaldkap en de armklem. Let daarbij op dat je de naaldpunt niet aanraakt. Duw de lifthendel omhoog en beweeg de arm naar de plaat. 1 Draai de vergrendelknop [HEIGHT ADJUST] los om de vergrendeling op te heffen.
Aansluitingen Schakel altijd eerst de stroom uit en trek de stekker uit het stopcontact alvorens u enige aansluiting maakt of verbreekt. Zie tevens de gebruiksaanwijzingen van de aan te sluiten apparatuur. Sluit het netnoer pas aan nadat alle aansluitingen tussen de apparatuur volledig zijn gemaakt. Beschrijving van de aansluitingen 1 2 1 PHONO OUT-aansluitingen 3 3 AC IN Sluit de audiosnoeren (bijgeleverd) hierop aan. 2 SIGNAL GND aansluiting Sluit de aardkabel (accessoire) aan.
Verbinding maken met een DJ-mengpaneel Aardingsdraad Audiokabel Aardingsdraad Audiokabel R Analoge speler L Achterpaneel DJ-mengpaneel Stroomsnoer Naar stopcontact 1 Sluit de audiokabel en de aardkabel aan op de ingang [PHONO] van het DJ-mengpaneel. Als dit product wordt aangesloten op een DJ-mengpaneel zonder een [PHONO]-aansluiting, kunnen niet voldoende volume en geluidskwaliteit worden verkregen. Vergeet niet om de aardkabel aan te sluiten.
Bediening Inschakelen van de stroom 1 Maak alle verbindingen en steek vervolgens de stekker in het stopcontact. De slipmat en het slipblad Slipmat Als je de mat gebruikt in plaats van het draaitafelblad, kun je de plaat tijdens het spelen met de hand stoppen of de draaitafel achteruit draaien. Slipblad Als je het slipblad onder de slipmat gebruikt, kun je gemakkelijker scratchen. Aansluitingen (blz.10) 2 Zet de schakelaar [POWER] in de positie [ON] om het toestel in te schakelen.
De toonhoogte aanpassen 1 Druk op de knop [RESET] om de indicator [RESET] uit te zetten. 2 Beweeg de [TEMPO] schuifregelaar naar voren of naar achteren. Als je de schuifregelaar naar voren schuift, wordt de draaisnelheid verhoogt. Als je hem naar achteren schuift, wordt de draaisnelheid verlaagd. De schaal van de schuifregelaar [TEMPO] is een ruwe waarde. Gebruik deze als richtlijn. 3 Druk op de [TEMPO RANGE] knop.
Aanvullende informatie Verhelpen van storingen Verkeerde bediening kan vaak de oorzaak zijn van een schijnbare storing of foutieve werking. Als u denkt dat er iets mis is met deze apparatuur, moet u de punten hieronder controleren en de [FAQ] voor de [PLX-1000] op de Pioneer DJ-ondersteuningssite. http://pioneerdj.com/support/ Soms ligt de oorzaak van het probleem bij een ander apparaat. Controleer daarom ook de andere componenten en elektrische apparatuur die gebruikt wordt.
Over handelsmerken en gedeponeerde handelsmerken Pioneer is een gedeponeerd handelsmerk van PIONEER CORPORATION. De hierin vermelde namen van bedrijven en hun producten zijn de handelsmerken van hun respectieve eigenaars. Specificaties Voeding ......... 110 V tot 120 V of 220 V tot 240 V wisselstroom, 50 Hz/60 Hz Stroomverbruik ........................................................................................ 9 W Gewicht hoofdapparaat ...............................................................
Le damos las gracias por la adquisición de este producto Pioneer. Lea a fondo estas instrucciones de utilización para que aprenda a utilizar correctamente su modelo. Después de haber terminado de leer estas instrucciones, guárdelas en un lugar seguro para, en caso de ser necesario, consultarlas en el futuro. En algunos países o regiones, la forma de la clavija de alimentación y de la toma de corriente pueden ser algunas veces diferentes de la mostrada en las ilustraciones explicativas.
Contenido Cómo leer este manual En este folleto, los nombres de los botones y los terminales de la unidad principal aparecen entre corchetes ([ ]). Ejemplos: — Pulse el botón [START/STOP]. — Si este producto se conecta a un preamplificador o a un componente que no tenga un terminal [PHONO], no se puede alcanzar el volumen suficiente ni la calidad de sonido necesaria. En tal caso, utilice el ecualizador fonográfico.
Antes de comenzar Acerca del cartucho El cartucho no se incluye. Consulte el manual de instrucciones para el cartucho requerido. Coloque el cartucho en el portacápsula. Los conductores de la pieza portacápsula tienen marcas de color. Utilice unas pinzas o una herramienta similar para conectar correctamente los cables al terminal correspondiente del cartucho según la indicación en el cartucho. Montaje 1 Monte el giradiscos y el plato giradiscos.
4 Monte el contrapeso. Fije el contrapeso al eje trasero del brazo fonocaptor. Contrapeso Si se utiliza un cartucho entre 9,5 g y 13 g, fije el peso auxiliar en el eje trasero del brazo fonocaptor.
Nombres y funciones de los controles Panel superior n m l k j i h g f c e d b a 9 1 8 2 3 1 Conmutador POWER Si se gira el conmutador hacia el lado [ON], se conecta la alimentación y se ilumina la iluminación estroboscópica de al lado. Reproducción (pág.12) 2 Botón START/STOP Al pulsar el botón se inicia o se detiene la rotación del giradiscos. Reproducción (pág.12) 3 Botón de cambio de velocidad Cambia la velocidad de acuerdo con el disco que se vaya a reproducir.
i Bloqueo HEIGHT ADJUST l Anillo de ajuste de presión de la aguja Bloquea la altura ajustada del brazo. Ajuste de la altura del brazo (pág.9) Se utiliza para hacer coincidir con la presión adecuada de aguja del cartucho. Ajuste de la presión de la aguja (pág.8) j Dial HEIGHT ADJUST m Soporte del portacápsula Se utiliza para ajustar la altura del brazo fonocaptor. Ajuste de la altura del brazo (pág.9) Se utiliza para levantar el portacápsula.
2 Ajuste de la presión de la aguja. Ajuste Ajuste del equilibrio del brazo fonocaptor Gire el contrapeso para ajustarlo al valor apropiado de la presión de la aguja para su cartucho. Al girar el contrapeso, se gira conjuntamente el anillo de ajuste de presión de la aguja. Mientras observa el anillo de ajuste, ajuste la presión de la aguja al valor adecuado.
Ajuste de la altura del elevador del brazo Ajuste de la altura del brazo 1 Gire el bloqueo [HEIGHT ADJUST] para desbloquearlo. Si fuera necesario, realice el ajuste para que coincida con el cartucho utilizado. Realice la preparación del siguiente modo. Coloque un disco en el plato del giradiscos. Retire la cubierta de la aguja y el agarre del brazo teniendo cuidado de no tocar la punta de la aguja. Tire hacia arriba de la palanca elevadora y desplace el brazo fonocaptor hasta el disco.
Conexiones Asegúrese de desconectar la alimentación y desenchufar el cable de alimentación de la toma de corriente siempre que haga o cambie conexiones. Consulte el manual de instrucciones del componente que va a ser conectado. Conecte el cable de alimentación después de terminar las conexiones entre los aparatos. Descripciones de los terminales 1 2 1 Terminales PHONO OUT 3 3 AC IN Conecte los cables de audio (incluidos) aquí. 2 Terminal SIGNAL GND Conecte el cable de tierra (accesorio).
Conexión a un mezclador DJ Cable de tierra Cable de audio Cable de tierra Cable de audio R Reproductor analógico L Panel trasero Mezclador DJ Cable de alimentación A la toma de corriente 1 Conecte el cable de audio y el cable de tierra al terminal de entrada [PHONO] del mezclador DJ. Si este producto se conecta a un mezclador DJ que no tenga un terminal de entrada [PHONO], no se puede alcanzar el volumen suficiente ni la calidad de sonido debida. Asegúrese de conectar el cable de tierra.
Operación Conexión de la alimentación 1 Haga todas las conexiones y luego conecte el cable de alimentación en una toma de corriente. Conexiones (pág.10) Acerca del slip mat y el slip sheet Slip mat Si utiliza el patinador (slip mat) en vez del plato del giradiscos, puede detener el disco a mano durante la reproducción o girar el giradiscos al revés. Slip sheet Cuando se utiliza el slip sheet debajo del slip mat, el deslizamiento de scratch se vuelve suave.
Ajuste del tono 1 Pulse el botón [RESET] para apagar el indicador [RESET]. 2 Mueva la barra deslizante [TEMPO] hacia delante o hacia atrás. Si mueve la barra deslizante hacia adelante, se incrementa la velocidad de rotación y, si la mueve hacia atrás, disminuye la velocidad de rotación. La escala de la barra deslizante [TEMPO] es un valor aproximado. Utilícela como guía. 3 Pulse el botón [TEMPO RANGE]. El margen de ajuste de la barra deslizante [TEMPO] cambia cada vez que se pulsa el botón.
Información adicional Solución de problemas La operación incorrecta se confunde a menudo con un problema o un fallo de funcionamiento. Si piensa que algo no funciona bien con este componente, verifique los puntos de abajo y las [FAQ] para el [PLX-1000] en el sitio de asistencia Pioneer DJ. http://pioneerdj.com/support/ Algunas veces, el problema puede estar en otro componente. Inspeccione los otros componentes y los aparatos eléctricos que esté utilizando.
Acerca de las marcas de fábrica y marcas registradas Pioneer es una marca registrada de PIONEER CORPORATION. Los nombres de compañías y productos mencionados aquí son marcas de fábrica de sus respectivos propietarios. Especificaciones Requisitos de potencia ...... CA 110 V a 120 V, o 220 V a 240 V, 50 Hz/60 Hz Consumo de energía................................................................................ 9 W Peso de la unidad principal ...............................................................
Obrigado por adquirir este produto da Pioneer. Leia atentamente estas instruções de funcionamento de modo a saber como utilizar correctamente o seu modelo. Após terminar de ler as instruções, coloque-as num local seguro para futura referência. Em alguns países ou regiões, a forma da ficha de alimentação e da tomada por vezes podem diferir das apresentadas nos desenhos explicativos. Contudo, o método para ligar e utilizar a unidade é o mesmo.
índice Antes de começar Como ler este manual Neste folheto, os nomes dos botões e dos terminais da unidade principal são indicados entre parêntesis rectos ([ ]). Exemplos: — Prima o botão [START/STOP]. — Se ligar o produto a um componente ou amplificador integrado que não tenha um terminal [PHONO], pode não obter o volume e a qualidade de som adequados. Nesse caso, utilize o equalizador PHONO. Antes de começar Características ...............................................................................
Antes de começar Acerca da célula A célula não é fornecida. Consulte o manual de instruções da célula. Instale a célula na cabeça. Os fios condutores da parte da cabeça têm um código de cores. Utilize um alicate ou uma ferramenta semelhante para ligar correctamente os fios ao terminal correspondente da célula de acordo com as indicações existentes nesta última. Montagem 1 Monte o prato e o tapete. Coloque o prato no eixo central e coloque o tapete em cima do prato.
4 Monte o contrapeso. Monte o contrapeso no eixo traseiro do braço de leitura. Contrapeso Se utilizar uma célula com 9,5 g a 13 g, instale o peso secundário no eixo traseiro do braço de leitura.
Nomes de peças e funções Painel superior n m k l j i h g f c e d b a 9 1 8 2 3 1 Interruptor POWER Quando roda o interruptor para o lado [ON], liga o gira-discos e o iluminador estroboscópico lateral acende-se. Reprodução (pág.12) 2 Botão START/STOP Se premir o botão inicia ou pára a rotação do prato. Reprodução (pág.12) 3 Botão de mudança de velocidade Muda a velocidade de acordo com o disco que vai reproduzir. No caso de um disco de 33 1/3 rpm, prima o botão [33].
i Lingueta de bloqueio de HEIGHT ADJUST l Anel de regulação da pressão da agulha Bloqueia a altura para que o braço foi regulado. Regular a altura do braço (pág.9) Utiliza-se para acertar a pressão adequada da agulha da célula. Regular a pressão da agulha (pág.8) j Botão rotativo HEIGHT ADJUST m Suporte para a cabeça Utilizado para regular a altura do braço de leitura. Regular a altura do braço (pág.9) Utiliza-se para pôr a cabeça na vertical.
2 Regule a pressão da agulha. Regulação Regular o balanço do braço de leitura Rode o contrapeso para regular o valor da pressão da agulha adequada à célula. Quando roda o contrapeso, o anel de regulação da pressão também roda. Olhando para o anel de regulação, regule a pressão da agulha para o valor adequado. Como os pesos da célula e da cabeça diferem com o produto, o balanço do braço de leitura tem de ser regulado. Faça o seguinte.
Regular o anti-skating Regular a altura do braço Esta regulação é feita para evitar que a agulha salte. 1 Rode a lingueta de bloqueio [HEIGHT ADJUST] para desbloquear. Acerte-a para a posição da régua correspondente ao valor da pressão da agulha. Desbloqueie Rode o botão rotativo [ANTI SKATING] de maneira a que a linha de referência coincida com o valor da pressão da agulha da célula.
Ligações Certifique-se de desligar a energia e desligar o fio da tomada sempre que fizer ou mudar as conexões. Consulte as instruções de funcionamento do componente a ligar. Ligue o fio eléctrico depois de terminar de fazer todas as conexões entre os dispositivos. Descrição dos terminais 1 2 1 Terminais PHONO OUT 3 3 AC IN Ligue aqui os cabos de áudio (incluídos). 2 Terminal SIGNAL GND Ligue o cabo de terra (acessório). Isto ajuda a reduzir o ruído quando liga um leitor analógico.
Ligar a uma mesa de mistura de DJ Fio de ligação à terra Cabo de áudio Fio de ligação à terra Cabo de áudio R Leitor analógico L Painel posterior Misturador de DJ Cabo de alimentação Para a saída de alimentação 1 Ligue o cabo de áudio e o cabo de ligação a terra ao terminal de entrada [PHONO] da mesa de mistura de DJ. Se ligar este produto a uma mesa de mistura de DJ que não tenha um terminal de entrada [PHONO], não consegue obter o volume e a qualidade de som necessários.
Funcionamento Acerca do tapete anti estático e da folha anti estática Tapete anti estático Ligar a alimentação 1 Efectue todas as ligações e, em seguida, ligue o cabo de alimentação a uma tomada. Ligações (pág.10) Se utilizar o tapete anti estático em vez do tapete do prato, pode parar o disco com a mão durante a reprodução ou rodar o prato no sentido inverso. Folha anti estática Se utilizar a folha anti estática por baixo do tapete anti estático, os efeitos de scratch são mais suaves.
Regular o pitch 1 Prima o botão [RESET] para desligar o indicador [RESET]. 2 Mova o deslizador [TEMPO] para a frente ou para trás. Se mover o cursor para a frente aumenta a velocidade de rotação e se o mover para trás diminui a velocidade de rotação. A escala do cursor de [TEMPO] é um valor aproximado. Utilize-a como guia. 3 Prima o botão [TEMPO RANGE]. O intervalo de regulação do cursor [TEMPO] muda sempre que premir o botão. O indicador do intervalo de regulação acende-se.
Informações adicionais Resolução de problemas Geralmente confunde-se uma operação incorrecta com um problema ou mau funcionamento. Caso ache que existe algo de errado com este componente, consulte os pontos abaixo e as [FAQ] para o [PLX-1000] no site de suporte da Pioneer DJ. http://pioneerdj.com/support/ Algumas vezes o problema está relacionado com outro componente. Inspeccione os outros componentes e os aparelhos eléctricos que estão a ser utilizados.
Acerca de marcas comerciais e marcas comerciais registadas Pioneer é uma marca comercial registada da PIONEER CORPORATION. Os nomes de empresas e produtos aqui mencionados são marcas comerciais dos seus respectivos proprietários. Especificações Requisitos de energia ....... AC 110 V a 120 V ou 220 V a 240 V, 50 Hz/60 Hz Consumo de energia................................................................................ 9 W Peso da unidade principal..........................................................
Ȼɥɚɝɨɞɚɪɢɦ ɜɚɫ ɡɚ ɩɨɤɭɩɤɭ ɞɚɧɧɨɝɨ ɢɡɞɟɥɢɹ 3LRQHHU ɉɨɠɚɥɭɣɫɬɚ ɜɧɢɦɚɬɟɥɶɧɨ ɢɡɭɱɢɬɟ ɞɚɧɧɵɟ ɢɧɫɬɪɭɤɰɢɢ ɩɨ ɷɤɫɩɥɭɚɬɚɰɢɢ ɞɥɹ ɧɚɞɥɟɠɚɳɟɝɨ ɢɫɩɨɥɶɡɨɜɚɧɢɹ ɞɚɧɧɨɣ ɦɨɞɟɥɢ ɉɨ ɡɚɜɟɪɲɟɧɢɸ ɢɡɭɱɟɧɢɹ ɢɧɫɬɪɭɤɰɢɣ ɯɪɚɧɢɬɟ ɢɯ ɜ ɧɚɞɟɠɧɨɦ ɦɟɫɬɟ ɞɥɹ ɫɩɪɚɜɨɤ ɜ ɛɭɞɭɳɟɦ ȼ ɧɟɤɨɬɨɪɵɯ ɫɬɪɚɧɚɯ ɢɥɢ ɪɟɝɢɨɧɚɯ ɮɨɪɦɚ ɜɢɥɤɢ ɩɢɬɚɧɢɹ ɢ ɪɨɡɟɬɤɢ ɦɨɠɟɬ ɢɧɨɝɞɚ ɨɬɥɢɱɚɬɶɫɹ ɨɬ ɬɨɝɨ ɱɬɨ ɨɬɨɛɪɚɠɟɧɨ ɧɚ ɢɥɥɸɫɬɪɚɰɢɹɯ Ɉɞɧɚɤɨ ɫɩɨɫɨɛ ɩɨɞɤɥɸɱɟɧɢɹ ɢ ɪɚɛɨɬɵ ɚɩɩɚɪɚɬɚ ɨɫɬɚɟɬɫɹ ɧɟɢɡɦɟɧɧɵɦ Если вы желаете утилизировать данное изделие, не выбрасывайте его вмес
ǹȖȌȍȘȎȈȕȐȍ ǬȖ ȕȈȟȈȓȈ Ʉɚɤ ɫɥɟɞɭɟɬ ɱɢɬɚɬɶ ɞɚɧɧɨɟ ɪɭɤɨɜɨɞɫɬɜɨ ȼ ɞɚɧɧɨɣ ɛɪɨɲɸɪɟ ɧɚɡɜɚɧɢɹ ɤɧɨɩɨɤ ɢ ɪɚɡɴɟɦɨɜ ɨɫɧɨɜɧɨɝɨ ɛɥɨɤɚ ɭɤɚɡɵɜɚɸɬɫɹ ɜ ɤɜɚɞɪɚɬɧɵɯ ɫɤɨɛɤɚɯ > @ ɉɪɢɦɟɪɵ — ɇɚɠɦɢɬɟ ɤɧɨɩɤɭ >START/STOP@ — ȿɫɥɢ ɞɚɧɧɨɟ ɢɡɞɟɥɢɟ ɩɨɞɤɥɸɱɟɧɨ ɤ ɢɧɬɟɝɪɚɥɶɧɨɦɭ ɭɫɢɥɢɬɟɥɸ ɢɥɢ ɤɨɦɩɨɧɟɧɬɭ ɛɟɡ ɪɚɡɴɟɦɚ >PHONO@ ɩɨɥɭɱɟɧɢɟ ɡɜɭɱɚɧɢɹ ɞɨɫɬɚɬɨɱɧɨɝɨ ɭɪɨɜɧɹ ɢ ɤɚɱɟɫɬɜɚ ɛɭɞɟɬ ɧɟɜɨɡɦɨɠɧɨ ȼ ɷɬɨɦ ɫɥɭɱɚɟ ɢɫɩɨɥɶɡɭɣɬɟ ɷɤɜɚɥɚɣɡɟɪ 3+212 Ⱦɨ ɧɚɱɚɥɚ ɋɜɨɣɫɬɜɚ
ǷȍȘȍȌ ȕȈȟȈȓȖȔ ȘȈȉȖȚȣ DzȈȘȚȘȐȌȎ Ʉɚɪɬɪɢɞɠ ɧɟ ɜɯɨɞɢɬ ɜ ɤɨɦɩɥɟɤɬ ɩɨɫɬɚɜɤɢ ɋɦ ɪɭɤɨɜɨɞɫɬɜɨ ɩɨ ɷɤɫɩɥɭɚɬɚɰɢɢ ɤɚɪɬɪɢɞɠɚ ɍɫɬɚɧɨɜɢɬɟ ɤɚɪɬɪɢɞɠ ɧɚ ɞɟɪɠɚɬɟɥɶ ɤɚɪɬɪɢɞɠɚ ǹȉȖȘȒȈ ɍɫɬɚɧɨɜɢɬɟ ɨɩɨɪɧɵɣ ɞɢɫɤ ɢ ɩɨɞɥɨɠɤɭ ɍɫɬɚɧɨɜɢɬɟ ɨɩɨɪɧɵɣ ɞɢɫɤ ɧɚ ɰɟɧɬɪɚɥɶɧɵɣ ɲɩɢɧɞɟɥɶ ɢ ɩɨɥɨɠɢɬɟ ɩɨɞɥɨɠɤɭ ɧɚ ɞɢɫɤ Ȼɭɞɶɬɟ ɨɫɬɨɪɨɠɧɵ ɧɟ ɩɨɞɜɟɪɝɚɣɬɟ ɨɩɨɪɧɵɣ ɞɢɫɤ ɧɚ ɨɫɧɨɜɧɨɦ ɛɥɨɤɟ ɭɞɚɪɚɦ ɢ ɧɟ ɪɨɧɹɣɬɟ ɟɝɨ ɍɛɟɞɢɬɟɫɶ ɜ ɬɨɦ ɱɬɨ ɤ ɦɚɝɧɢɬɭ ɧɚ ɨɛɪɚɬɧɨɣ ɫɬɨɪɨɧɟ ɨɩɨɪɧɨɝɨ ɞɢɫɤɚ ɧɟ ɩɪɢɥɢɩ ɠɟɥɟɡɧɵɣ ɩɨɪɨɲɨɤ ɢɥɢ ɞɪɭɝɚɹ ɩɵɥɶ ɇɟ ɩɪɢɤɚɫɚɣɬ
ɍɫɬɚɧɨɜɢɬɟ ɩɪɨɬɢɜɨɜɟɫ ɍɫɬɚɧɨɜɢɬɟ ɩɪɨɬɢɜɨɜɟɫ ɧɚ ɡɚɞɧɸɸ ɱɚɫɬɶ ɬɪɭɛɤɢ ɬɨɧɚɪɦɚ Противовес ɉɪɢ ɢɫɩɨɥɶɡɨɜɚɧɢɢ ɤɚɪɬɪɢɞɠɚ ɦɚɫɫɨɣ ɨɬ ɝ ɞɨ ɝ ɧɚ ɡɚɞɧɸɸ ɱɚɫɬɶ ɬɪɭɛɤɢ ɬɨɧɚɪɦɚ ɭɫɬɚɧɨɜɢɬɟ ɞɨɩɨɥɧɢɬɟɥɶɧɵɣ ɩɪɨɬɢɜɨɜɟɫ Дополнительный противовес Ɋɭɫɫɤɢɣ Ru 5
ǵȈȏȊȈȕȐȧ ȌȍȚȈȓȍȑ Ȑ ȜțȕȒȞȐȐ ǪȍȘȝȕȧȧ ȗȈȕȍȓȤ n m l k j i h g f c e d b a 9 1 8 2 3 1 ɉɟɪɟɤɥɸɱɚɬɟɥɶ POWER ɉɪɢ ɩɨɜɨɪɨɬɟ ɩɟɪɟɤɥɸɱɚɬɟɥɹ ɜ ɫɬɨɪɨɧɭ >ON@ ɩɢɬɚɧɢɟ ɜɤɥɸɱɚɟɬɫɹ ɢ ɡɚɝɨɪɚɟɬɫɹ ɫɬɪɨɛɢɪɭɸɳɚɹ ɩɨɞɫɜɟɬɤɚ ɧɚ ɛɨɤɨɜɨɣ ɩɚɧɟɥɢ ȼɨɫɩɪɨɢɡɜɟɞɟɧɢɟ ɫɬɪ 2 Ʉɧɨɩɤɚ START/STOP ɇɚɠɚɬɢɟ ɤɧɨɩɤɢ ɡɚɩɭɫɤɚɟɬ ɢɥɢ ɨɫɬɚɧɚɜɥɢɜɚɟɬ ɜɪɚɳɟɧɢɟ ɨɩɨɪɧɨɝɨ ɞɢɫɤɚ ȼɨɫɩɪɨɢɡɜɟɞɟɧɢɟ ɫɬɪ 3 Ʉɧɨɩɤɚ ɢɡɦɟɧɟɧɢɹ ɫɤɨɪɨɫɬɢ ɉɨɡɜɨɥɹɟɬ ɭɫɬɚɧɚɜɥɢɜɚɬɶ ɫɤɨɪɨɫɬɶ ɜ ɫɨɨɬɜɟɬɫɬɜɢɢ ɫ ɜɨɫɩɪɨɢɡɜɨɞɢɦɨɣ ɩɥɚɫɬɢɧɤɨɣ Ⱦɥɹ ɩɥɚɫɬɢɧɨɤ ɫɨ ɫɤɨɪɨɫɬɶ
g Ɇɢɤɪɨɥɢɮɬ ɬɨɧɚɪɦɚ k ɉɪɨɬɢɜɨɜɟɫ ɗɬɨ ɭɫɬɪɨɣɫɬɜɨ ɩɪɟɞɧɚɡɧɚɱɟɧɨ ɞɥɹ ɩɟɪɟɦɟɳɟɧɢɹ ɬɨɧɚɪɦɚ ɜɜɟɪɯ ɢ ɜɧɢɡ ɍɩɪɚɜɥɟɧɢɟ ɢɦ ɨɫɭɳɟɫɬɜɥɹɟɬɫɹ ɪɵɱɚɝɨɦ ɦɢɤɪɨɥɢɮɬɚ ɂɫɩɨɥɶɡɭɟɬɫɹ ɞɥɹ ɛɚɥɚɧɫɢɪɨɜɤɢ ɬɨɧɚɪɦɚ ɢ ɪɟɝɭɥɢɪɨɜɤɢ ɩɪɢɠɢɦɧɨɣ ɫɢɥɵ ɢɝɥɵ Ɋɟɝɭɥɢɪɨɜɤɚ ɫɬɪ h Ɋɭɱɤɚ ANTI SKATING l Ʉɨɥɶɰɨ ɪɟɝɭɥɢɪɨɜɤɢ ɩɪɢɠɢɦɧɨɣ ɫɢɥɵ ɢɝɥɵ ɉɪɢ ɜɨɫɩɪɨɢɡɜɟɞɟɧɢɢ ɩɥɚɫɬɢɧɤɢ ɧɚ ɤɨɧɱɢɤ ɢɝɥɵ ɞɟɣɫɬɜɭɟɬ ɫɢɥɚ ɧɚɩɪɚɜɥɟɧɧɚɹ ɤ ɰɟɧɬɪɭ ɜɪɚɳɟɧɢɹ Ɂɚ ɫɱɟɬ ɭɫɬɚɧɨɜɤɢ ɫ ɩɨɦɨɳɶɸ ɷɬɨɣ ɪɭɱɤɢ ɞɚɜɥɟɧɢɹ ɪɚɜɧɨɝɨ ɫɢɥɟ ɜɨɡɞɟɣɫɬɜɭɸɳɟɣ ɧɚ ɢɝɥɭ ɜɥɢɹɧɢɟ ɷɬɨɣ ɫ
Ɉɬɪɟɝɭɥɢɪɭɣɬɟ ɩɪɢɠɢɦɧɭɸ ɫɢɥɭ ɢɝɥɵ ǸȍȋțȓȐȘȖȊȒȈ ǸȍȋțȓȐȘȖȊȒȈ ȉȈȓȈȕșȈ ȚȖȕȈȘȔȈ ɉɨɜɟɪɧɢɬɟ ɩɪɨɬɢɜɨɜɟɫ ɱɬɨɛɵ ɭɫɬɚɧɨɜɢɬɶ ɩɪɢɠɢɦɧɭɸ ɫɢɥɭ ɢɝɥɵ ɫɨɨɬɜɟɬɫɬɜɭɸɳɭɸ ɢɫɩɨɥɶɡɭɟɦɨɦɭ ɤɚɪɬɪɢɞɠɭ ɉɪɢ ɜɪɚɳɟɧɢɢ ɩɪɨɬɢɜɨɜɟɫɚ ɜɪɚɳɚɟɬɫɹ ɢ ɤɨɥɶɰɨ ɪɟɝɭɥɢɪɨɜɤɢ ɩɪɢɠɢɦɧɨɣ ɫɢɥɵ ɋɥɟɞɹ ɡɚ ɤɨɥɶɰɨɦ ɪɟɝɭɥɢɪɨɜɤɢ ɭɫɬɚɧɨɜɢɬɟ ɧɟɨɛɯɨɞɢɦɭɸ ɩɪɢɠɢɦɧɭɸ ɫɢɥɭ ɢɝɥɵ ɉɨɫɤɨɥɶɤɭ ɜ ɡɚɜɢɫɢɦɨɫɬɢ ɨɬ ɢɡɞɟɥɢɹ ɦɚɫɫɵ ɤɚɪɬɪɢɞɠɚ ɢ ɞɟɪɠɚɬɟɥɹ ɤɚɪɬɪɢɞɠɚ ɨɬɥɢɱɚɸɬɫɹ ɩɪɟɞɭɫɦɨɬɪɟɧɚ ɪɟɝɭɥɢɪɨɜɤɚ ɛɚɥɚɧɫɚ ɬɨɧɚɪɦɚ ȼɵɩɨɥɧɢɬɟ ɫɥɟɞɭɸɳɢɟ ɩɨɞɝɨɬɨɜɢɬɟɥɶɧɵɟ ɨɩɟɪɚɰɢɢ
ǸȍȋțȓȐȘȖȊȒȈ ȒȖȔȗȍȕșȈȞȐȐ șȒȈȚȣȊȈȦȡȍȑ șȐȓȣ ɗɬɚ ɪɟɝɭɥɢɪɨɜɤɚ ɜɵɩɨɥɧɹɟɬɫɹ ɞɥɹ ɩɪɟɞɨɬɜɪɚɳɟɧɢɹ ɩɟɪɟɫɤɨɤɚ ɢɝɥɵ ǸȍȋțȓȐȘȖȊȒȈ ȊȣșȖȚȣ ȚȖȕȈȘȔȈ ɉɨɜɟɪɧɢɬɟ ɮɢɤɫɚɬɨɪ >HEIGHT ADJUST@ ɱɬɨɛɵ ɟɝɨ ɪɚɡɛɥɨɤɢɪɨɜɚɬɶ Разблокировать ɍɫɬɚɧɨɜɢɬɟ ɬɨ ɠɟ ɡɧɚɱɟɧɢɟ ɧɚ ɲɤɚɥɟ ɱɬɨ ɢ ɞɥɹ ɩɪɢɠɢɦɧɨɣ ɫɢɥɵ ɢɝɥɵ ɉɨɜɟɪɧɢɬɟ ɪɭɱɤɭ >ANTI SKATING@ ɬɚɤɢɦ ɨɛɪɚɡɨɦ ɱɬɨɛɵ ɦɟɬɤɚ ɡɧɚɱɟɧɢɹ ɭɫɬɚɧɨɜɥɟɧɧɨɝɨ ɞɥɹ ɩɪɢɠɢɦɧɨɣ ɫɢɥɵ ɢɝɥɵ ɤɚɪɬɪɢɞɠɚ ɫɨɜɩɚɞɚɥɚ ɫ ɛɚɡɨɜɨɣ ɥɢɧɢɟɣ Ɉɩɭɫɬɢɬɟ ɪɵɱɚɝ ɦɢɤɪɨɥɢɮɬɚ ɢ ɭɫɬɚɧɨɜɢɬɟ ɢɝɥɭ ɧɚ ɩɥɚɫɬɢɧɤɭ ɚ ɡɚɬɟɦ ɫ ɩɨɦɨɳɶ
ǷȖȌȒȓȦȟȍȕȐȧ ɉɪɢ ɜɵɩɨɥɧɟɧɢɢ ɢɥɢ ɢɡɦɟɧɟɧɢɢ ɩɨɞɤɥɸɱɟɧɢɣ ɨɛɹɡɚɬɟɥɶɧɨ ɨɬɤɥɸɱɢɬɟ ɩɢɬɚɧɢɟ ɢ ɨɬɫɨɟɞɢɧɢɬɟ ɫɢɥɨɜɨɣ ɤɚɛɟɥɶ ɨɬ ɪɨɡɟɬɤɢ ɋɦɨɬɪɢɬɟ ɢɧɫɬɪɭɤɰɢɢ ɩɨ ɷɤɫɩɥɭɚɬɚɰɢɢ ɤ ɩɨɞɤɥɸɱɚɟɦɨɦɭ ɤɨɦɩɨɧɟɧɬɭ ɉɨɫɥɟ ɡɚɜɟɪɲɟɧɢɹ ɜɫɟɯ ɩɨɞɤɥɸɱɟɧɢɣ ɦɟɠɞɭ ɭɫɬɪɨɣɫɬɜɚɦɢ ɩɨɞɤɥɸɱɢɬɟ ɫɢɥɨɜɨɣ ɤɚɛɟɥɶ ǶȗȐșȈȕȐȧ ȚȍȘȔȐȕȈȓȖȊ 1 2 1 Ɍɟɪɦɢɧɚɥɵ PHONO OUT 3 3 AC IN ɉɨɞɤɥɸɱɢɬɟ ɫɸɞɚ ɚɭɞɢɨɤɚɛɟɥɢ ɩɨɫɬɚɜɥɹɸɬɫɹ 2 Ɍɟɪɦɢɧɚɥ SIGNAL GND ɉɨɞɤɥɸɱɢɬɟ ɩɪɨɜɨɞ ɡɚɡɟɦɥɟɧɢɹ ɞɨɩɨɥɧɢɬɟɥɶɧɨɟ ɨɛɨɪɭɞɨɜɚɧɢɟ ɗɬɨ ɩɨɡɜɨɥɹɟɬ ɭɦɟɧɶɲɢɬɶ ɲɭɦ ɤɨɝɞɚ ɩɨɞɤɥɸɱɟɧ
ǷȖȌȒȓȦȟȍȕȐȍ Ȓ '- ȔȐȒȠȍȘț Провод заземления Аудиокабель Провод заземления Аудиокабель R Аналоговый проигрыватель L Задняя панель DJ микшер Силовой кабель К розетке ɉɨɞɤɥɸɱɢɬɟ ɚɭɞɢɨɤɚɛɟɥɶ ɢ ɩɪɨɜɨɞ ɡɚɡɟɦɥɟɧɢɹ ɤ ɜɯɨɞɧɨɦɭ ɬɟɪɦɢɧɚɥɭ >PHONO@ '- ɦɢɤɲɟɪɚ ȿɫɥɢ ɞɚɧɧɨɟ ɢɡɞɟɥɢɟ ɩɨɞɤɥɸɱɟɧɨ ɤ '- ɦɢɤɲɟɪɭ ɛɟɡ ɪɚɡɴɟɦɚ >PHONO@ ɩɨɥɭɱɟɧɢɟ ɡɜɭɱɚɧɢɹ ɞɨɫɬɚɬɨɱɧɨɝɨ ɭɪɨɜɧɹ ɢ ɤɚɱɟɫɬɜɚ ɛɭɞɟɬ ɧɟɜɨɡɦɨɠɧɨ Ɉɛɹɡɚɬɟɥɶɧɨ ɩɨɞɤɥɸɱɢɬɟ ɩɪɨɜɨɞ ɡɚɡɟɦɥɟɧɢɹ ȿɫɥɢ ɭɫɬɪɨɣɫɬɜɨ ɧɟ ɡɚɡɟɦɥɟɧɨ ɧɚɞɥɟɠɚɳɢɦ ɨɛɪɚɡɨɦ ɛɭɞɟɬ ɫɥɵɲɧɨ ɝɭɞɟɧɢɟ
ǻȗȘȈȊȓȍȕȐȍ ǪȒȓȦȟȍȕȐȍ ȗȐȚȈȕȐȧ ȼɵɩɨɥɧɢɬɟ ɜɫɟ ɩɨɞɤɥɸɱɟɧɢɹ ɡɚɬɟɦ ɩɨɞɤɥɸɱɢɬɟ ɫɢɥɨɜɨɣ ɤɚɛɟɥɶ ɤ ɪɨɡɟɬɤɟ ɉɨɞɤɥɸɱɟɧɢɹ ɫɬɪ ǹȓȐȗ ȔȈȚ Ȑ șȓȐȗ ȠȐȚ ɋɥɢɩ ɦɚɬ ȿɫɥɢ ɜɦɟɫɬɨ ɩɨɞɥɨɠɤɢ ɨɩɨɪɧɨɝɨ ɞɢɫɤɚ ɩɨɥɨɠɢɬɶ ɦɚɬ ɩɥɚɫɬɢɧɤɭ ɦɨɠɧɨ ɨɫɬɚɧɚɜɥɢɜɚɬɶ ɜɨ ɜɪɟɦɹ ɜɨɫɩɪɨɢɡɜɟɞɟɧɢɹ ɢɥɢ ɜɪɚɳɚɬɶ ɜ ɩɪɨɬɢɜɨɩɨɥɨɠɧɭɸ ɫɬɨɪɨɧɭ ɋɥɢɩ ɲɢɬ ɉɪɢ ɢɫɩɨɥɶɡɨɜɚɧɢɢ ɫɥɢɩ ɲɢɬɚ ɩɨɞ ɫɥɢɩ ɦɚɬɨɦ ɫɤɨɥɶɠɟɧɢɟ ɢ ɫɤɪɷɬɱ ɛɭɞɭɬ ɛɨɥɟɟ ɩɥɚɜɧɵɦɢ ɉɟɪɟɜɟɞɢɬɟ ɩɟɪɟɤɥɸɱɚɬɟɥɶ >POWER@ ɜ ɩɨɥɨɠɟɧɢɟ >ON@ ɱɬɨɛɵ ɜɤɥɸɱɢɬɶ ɩɢɬɚɧɢɟ ɭɫɬɪɨɣɫɬɜɚ ȼɵɫɜɟɱɢɜɚɸɬɫɹ ɢɧɞɢɤɚɬ
ǸȍȋțȓȐȘȖȊȒȈ ȊȣșȖȚȣ ȚȖȕȈ ɇɚɠɦɢɬɟ ɤɧɨɩɤɭ >RESET@ ɱɬɨɛɵ ɜɵɤɥɸɱɢɬɶ ɢɧɞɢɤɚɬɨɪ >RESET@ ɉɟɪɟɞɜɢɝɚɣɬɟ ɩɨɥɡɭɧɨɤ >TEMPO@ ɜɩɟɪɟɞ ɢɥɢ ɧɚɡɚɞ ɉɪɢ ɩɟɪɟɦɟɳɟɧɢɢ ɩɨɥɡɭɧɤɚ ɜɩɟɪɟɞ ɱɚɫɬɨɬɚ ɜɪɚɳɟɧɢɹ ɭɜɟɥɢɱɢɜɚɟɬɫɹ ɚ ɩɪɢ ɩɟɪɟɦɟɳɟɧɢɢ ɧɚɡɚɞ ² ɭɦɟɧɶɲɚɟɬɫɹ ɒɤɚɥɚ ɩɨɥɡɭɧɤɚ >TEMPO@ ɩɨɤɚɡɵɜɚɟɬ ɩɪɢɛɥɢɡɢɬɟɥɶɧɨɟ ɡɧɚɱɟɧɢɟ ɂɫɩɨɥɶɡɭɣɬɟ ɟɝɨ ɜ ɤɚɱɟɫɬɜɟ ɨɪɢɟɧɬɢɪɚ ɇɚɠɦɢɬɟ ɤɧɨɩɤɭ >TEMPO RANGE@ Ⱦɢɚɩɚɡɨɧ ɪɟɝɭɥɢɪɨɜɤɢ ɩɨɥɡɭɧɤɚ >TEMPO@ ɩɟɪɟɤɥɸɱɚɟɬɫɹ ɩɪɢ ɤɚɠɞɨɦ ɧɚɠɚɬɢɢ ɤɧɨɩɤɢ Ɂɚɝɨɪɚɟɬɫɹ ɢɧɞɢɤɚɬɨɪ ɞɢɚɩɚɡɨɧɚ ɧɚɫɬɪɨɣɤɢ Ɂɧɚɱɟɧɢɟ ɧɚɫ
ǬȖȗȖȓȕȐȚȍȓȤȕȈȧ ȐȕȜȖȘȔȈȞȐȧ ǪȖȏȔȖȎȕȣȍ ȕȍȐșȗȘȈȊȕȖșȚȐ Ȑ șȗȖșȖȉȣ Ȑȝ țșȚȘȈȕȍȕȐȧ Ɂɚɱɚɫɬɭɸ ɧɟɩɪɚɜɢɥɶɧɨɟ ɫɪɚɛɚɬɵɜɚɧɢɟ ɨɲɢɛɨɱɧɨ ɜɨɫɩɪɢɧɢɦɚɟɬɫɹ ɡɚ ɧɟɩɨɥɚɞɤɭ ɢɥɢ ɧɟɢɫɩɪɚɜɧɨɫɬɶ ȿɫɥɢ ɜɵ ɞɭɦɚɟɬɟ ɱɬɨ ɫ ɞɚɧɧɵɦ ɤɨɦɩɨɧɟɧɬɨɦ ɱɬɨ ɬɨ ɧɟ ɬɚɤ ɩɪɨɜɟɪɶɬɟ ɩɭɧɤɬɵ ɧɢɠɟ ɚ ɬɚɤɠɟ >FAQ@ ɞɥɹ >PLX-1000@ ɧɚ ɫɚɣɬɟ ɩɨɞɞɟɪɠɤɢ 3LRQHHU '- KWWS SLRQHHUGM FRP VXSSRUW ȼ ɧɟɤɨɬɨɪɵɯ ɫɥɭɱɚɹɯ ɧɟɩɨɥɚɞɤɚ ɦɨɠɟɬ ɡɚɤɥɸɱɚɬɶɫɹ ɧɚ ɞɪɭɝɨɦ ɤɨɦɩɨɧɟɧɬɟ ɉɪɨɜɟɪɶɬɟ ɞɪɭɝɢɟ ɤɨɦɩɨɧɟɧɬɵ ɚ ɬɚɤɠɟ ɢɫɩɨɥɶɡɭɟɦɵɟ ɷɥɟɤɬɪɨɩɪɢɛɨɪɵ ȿɫɥɢ ɩɪɨɛɥɟɦɭ ɧɟɜɨɡɦɨɠɧɨ ɪɟɲɢɬɶ
ǺȍȝȕȐȟȍșȒȖȍ ȖȉșȓțȎȐȊȈȕȐȍ ȒȈȎȌȖȋȖ țȏȓȈ ɉɪɢ ɭɫɬɚɧɨɜɤɟ ɢ ɫɧɹɬɢɢ ɞɟɪɠɚɬɟɥɹ ɤɚɪɬɪɢɞɠɚ ɨɬɤɥɸɱɚɣɬɟ ɩɢɬɚɧɢɟ ɭɫɢɥɢɬɟɥɹ ȼɵɩɨɥɧɟɧɢɟ ɷɬɢɯ ɨɩɟɪɚɰɢɢ ɩɪɢ ɭɫɬɚɧɨɜɥɟɧɧɨɣ ɜɵɫɨɤɨɣ ɝɪɨɦɤɨɫɬɢ ɦɨɠɟɬ ɜɵɡɜɚɬɶ ɩɨɜɪɟɠɞɟɧɢɟ ɝɪɨɦɤɨɝɨɜɨɪɢɬɟɥɹ ɋɧɢɦɢɬɟ ɞɟɪɠɚɬɟɥɶ ɫ ɤɚɪɬɪɢɞɠɟɦ ɢ ɨɫɬɨɪɨɠɧɨ ɭɞɚɥɢɬɟ ɩɵɥɶ ɢɥɢ ɞɪɭɝɢɟ ɡɚɝɪɹɡɧɟɧɢɹ ɫ ɤɨɧɱɢɤɚ ɢɝɥɵ ɦɹɝɤɨɣ ɳɟɬɤɨɣ ɢɥɢ ɤɢɫɬɨɱɤɨɣ Ⱦɥɹ ɨɱɢɫɬɤɢ ɩɥɚɫɬɢɧɨɤ ɢɫɩɨɥɶɡɭɣɬɟ ɜɵɫɨɤɨɤɚɱɟɫɬɜɟɧɧɨɟ ɫɪɟɞɫɬɜɨ ɞɥɹ ɱɢɫɬɤɢ ɩɥɚɫɬɢɧɨɤ ɉɪɢ ɩɨɦɨɳɢ ɦɹɝɤɨɣ ɬɤɚɧɢ ɢɥɢ ɚɧɚɥɨɝɢɱɧɨɝɨ ɦɚɬɟɪɢɚɥɚ ɨɱɢɫɬɢɬɟ ɜɵɜɨɞɵ ɞɟɪɠɚɬɟɥɹ
Дату изготовления оборудования можно определить по серийному номеру, который содержит информацию о месяце и годе производства.
Примечание: В соответствии со статьей 5 Закона Российской Федерации “О защите прав потребителя” и Указанием Правительства Российской Федерации № 720 от 16 июня 1997 года корпорация Pioneer Europe NV устанавливает условие на следующую продолжительность срока службы официально поставляемых на Российский рынок товаров. Аудио и видеооборудование: 7 лет Переносное аудиооборудование: 6 лет Другое оборудование (наушники, микрофон и т.д.