TURNTABLE PLX-500-K PLX-500-W http://pioneerdj.com/support/ The Pioneer DJ site shown above offers FAQs, information on software, and various other types of information and services to allow you to use your product in greater comfort. http://rekordbox.com/ For various types of information and services regarding rekordbox™, see the Pioneer DJ website above.
IMPORTANT CAUTION RISK OF ELECTRIC SHOCK DO NOT OPEN The lightning flash with arrowhead symbol, within an equilateral triangle, is intended to alert the user to the presence of uninsulated “dangerous voltage” within the product’s enclosure that may be of sufficient magnitude to constitute a risk of electric shock to persons. CAUTION: TO PREVENT THE RISK OF ELECTRIC SHOCK, DO NOT REMOVE COVER (OR BACK). NO USER-SERVICEABLE PARTS INSIDE. REFER SERVICING TO QUALIFIED SERVICE PERSONNEL.
CAUTION TO PREVENT THE RISK OF ELECTRIC SHOCK, DO NOT REMOVE COVER (OR BACK). NO USER-SERVICEABLE PARTS INSIDE. REFER SERVICING TO QUALIFIED SERVICE PERSONNEL. D3-4-2-1-1_B1_En WARNING This equipment is not waterproof. To prevent a fire or shock hazard, do not place any container filled with liquid near this equipment (such as a vase or flower pot) or expose it to dripping, splashing, rain or moisture.
NOTE: This equipment has been tested and found to comply with the limits for a Class B digital device, pursuant to Part 15 of the FCC Rules. These limits are designed to provide reasonable protection against harmful interference in a residential installation. This equipment generates, uses, and can radiate radio frequency energy and, if not installed and used in accordance with the instructions, may cause harmful interference to radio communications.
Contents How to read this manual ! Thank you for buying this Pioneer DJ product. Be sure to read this booklet, which includes important information that you must understand before using this product. After you have finished reading the instructions, put them away in a safe place for future reference. ! In this booklet, the names of the buttons and terminals of the main unit appear in square brackets ([ ]). Examples: Press the [START/STOP] button. Before start Features..............................
Before start Features What’s in the box This unit is a high-torque direct drive turntable that can be enjoyed in a variety of applications ranging from home listening to DJing.
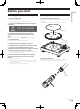
Before you start Assembly 1 Access rekordbox.com. 1 Attach the turntable and slip mat. https://rekordbox.com/en/store/ ! The page content is subject to change without notice. Set the turntable on the center spindle and place the slip mat on top of the turntable. ! Be careful not to hit the turntable on the main unit or drop it. 2 Check the Get Started guide and then click [Free to Download].
! Before use, remove the stylus cover without touching the stylus tip. Stylus cover 3 Attach the balance weight. Attach the balance weight to the rear shaft of the tone arm. Balance weight Attach the dust cover. Insert the hinges of the dust cover into the holders at the rear panel of this unit. When removing the dust cover, pull the hinges up outward while the dust cover is in an open state.
Part names and functions j i Part names and functions Top panel h g f e d c b 8 a9 7 1 2 3 1 POWER switch When turning the switch to the [ON] side, the power is turned on and the strobe illuminator on the side lights. = Turning the power on (p.15) Turning the power off (p.15) 2 START/STOP button Pressing the button starts or stops rotation of the turntable. = Playback (p.15) 3 Speed change button Changes the speed according to the record to be played.
Rear panel 1 2 1 PHONO/LINE switch Switches the level of the sound output from the unit. — [PHONO]: Select this when the unit is connected with a device that supports phono level input, such as a pre-main amplifier or component. — [LINE]: Select this when the unit is connected with a device that supports line level input, such as a powered speakers. CAUTION Do not connect the unit with a device that supports phono level input while the PHONO/LINE switch is in the [LINE] state.
Adjustment Adjusting the stylus pressure Because the cartridge and headshell weights differ depending on the product, the balance of the tone arm is adjusted. Prepare as follows. ! Remove the stylus cover and arm clamper while paying attention not to touch the stylus tip. ! Push down the lifter lever. ! Set the [ANTI SKATING] dial to “0”. To prevent stylus jumping or sound distortion, the stylus pressure is adjusted to the appropriate stylus pressure value determined for each cartridge.
Adjusting anti-skating Adjusting the arm height This adjustment is made to prevent stylus jumping. When using the included cartridge, the “0” position is appropriate. When using other than the included cartridge, adjust this to match the cartridge to be used. Match to the same scale position as the stylus pressure value. Turn the [ANTI SKATING] dial to match the reference line to the same value as the cartridge stylus pressure value.
Connections ! Be sure to turn off the power and unplug the power cord from the power outlet whenever making or changing connections. ! Refer to the operating instructions for the component to be connected. ! Connect the power cord after all the connections between devices have been completed. Connecting to powered speakers Powered speakers Audio cable Connections Rear panel Power cord To power outlet 1 Set the [PHONO/LINE] switch to [LINE].
Connecting to a DJ mixer Audio cable Rear panel Turntable DJ Mixer Power cord Audio cable To power outlet 1 Set the [PHONO/LINE] switch to [PHONO]. 2 Connect the audio cable to the [PHONO] input terminal of the DJ mixer. ! If this product is connected to a DJ mixer that does not have a [PHONO] input terminal, sufficient volume and sound quality cannot be obtained. In that case, set the [PHONO/LINE] switch of this unit to [LINE] and then connect the unit to the [LINE] input terminal of the DJ mixer.
Operation Turning the power on 1 Make all the connections, then plug the power cord into a power outlet. Adjusting the pitch Move the [TEMPO] slider forward or backward. Change the [POWER] switch to the [OFF] side to turn off the power of the unit. Strobe pattern = Connections (p.13) 2 Change the [POWER] switch to the [ON] side to turn on the power of the unit. This unit’s indicators light and the power turns on. This unit’s power turns off.
To play a standard EP record Removing the cartridge Attach the EP record adapter to the center spindle and press the [45] button. 1 Remove the screws, nuts, and washers attached to the headshell. Illuminating the stylus tip When the stylus illuminator switch is pressed, the stylus illuminator lights in white and ascends to the position at which the stylus tip is illuminated. ! If it is not needed, press the stylus illuminator switch to lower it. The stylus illuminator switch goes off.
Additional information Troubleshooting ! Incorrect operation is often mistaken for trouble or malfunction. If you think that there is something wrong with this component, check the points below and the [FAQ] for the [PLX-500] on the Pioneer DJ support site. http://pioneerdj.com/support/ Sometimes the problem may lie in another component. Inspect the other components and electrical appliances being used.
Cleaning the dust cover, etc. Use a soft cloth to clean the dust cover and cabinet ! Do not clean the dust cover while playing. Static electricity could cause the tone arm to be pulled by the dust cover. About trademarks and registered trademarks ! "Pioneer DJ" is a trademark of PIONEER CORPORATION, and is used under license. ! rekordbox is a trademark or registered trademark of the Pioneer DJ Corporation.
Pioneer DJ Americas, Inc. LIMITED WARRANTY WARRANTY VALID ONLY IN THE U.S.A. AND CANADA WARRANTY Pioneer DJ Americas, Inc. (PDJA) warrants that products distributed by PDJA in the U.S.A. and Canada that fail to function properly under normal use due to a manufacturing defect when installed and operated according to the owner’s manual enclosed with the unit will be repaired or replaced with a unit of comparable value, at the option of PDJA, without charge to you for parts or actual repair work.
To register your product, find the nearest authorized service location, to purchase replacement parts, operating instructions, or accessories, please go to one of following URLs : Pour enregistrer votre produit, trouver le service après-vente agréé le plus proche et pour acheter des pièces de rechange, des modes d’emploi ou des accessoires, reportez-vous aux URL suivantes : In the USA/Aux Etats-Unis or In Canada/Aux Canada http://www.pioneerelectronics.com S018_C1_EnFr_PSV © 2016 Pioneer DJ Corporation.