VSX_AX4AVi.book.fm 1 ページ 2005年6月20日 月曜日 午後6時27分 VSX-AX4AVi-S VSX-AX2AV-S AUDIO/VIDEO MULTI-CHANNEL RECEIVER Discover the benefits of registering your product online at www.pioneer.co.uk (www.pioneer-eur.com).
VSX_AX4AVi.book.fm 2 ページ 2005年6月20日 月曜日 午後6時27分 IMPORTANT CAUTION RISK OF ELECTRIC SHOCK DO NOT OPEN The lightning flash with arrowhead symbol, within an equilateral triangle, is intended to alert the user to the presence of uninsulated "dangerous voltage" within the product's enclosure that may be of sufficient magnitude to constitute a risk of electric shock to persons. CAUTION: TO PREVENT THE RISK OF ELECTRIC SHOCK, DO NOT REMOVE COVER (OR BACK). NO USER-SERVICEABLE PARTS INSIDE.
VSX_AX4AVi.book.fm 3 ページ 2005年6月20日 月曜日 If the AC plug of this unit does not match the AC outlet you want to use, the plug must be removed and appropriate one fitted. Replacement and mounting of an AC plug on the power supply cord of this unit should be performed only by qualified service personnel. If connected to an AC outlet, the cut-off plug can cause severe electrical shock. Make sure it is properly disposed of after removal.
VSX_AX4AVi.book.fm 4 ページ 2005年6月20日 月曜日 午後6時27分 Contents 01 Before you start 05 Listening to your system Checking what’s in the box . . . . . . . . . . . . . . . . . . . . . . . 6 Installing the receiver . . . . . . . . . . . . . . . . . . . . . . . . . . . 6 Loading the batteries. . . . . . . . . . . . . . . . . . . . . . . . . . . . 6 Auto playback . . . . . . . . . . . . . . . . . . . . . . . . . . . . . . . . Listening in surround sound . . . . . . . . . . . . . . . . . . . .
VSX_AX4AVi.book.fm 5 ページ 2005年6月20日 月曜日 午後6時27分 Using the i.LINK interface. . . . . . . . . . . . . . . . . . . . . . . 48 Checking the i.LINK inputs . . . . . . . . . . . . . . . . . . . . 49 About i.LINK . . . . . . . . . . . . . . . . . . . . . . . . . . . . . . . . . . 49 About PQLS rate control . . . . . . . . . . . . . . . . . . . . . . 50 Creating an i.LINK network . . . . . . . . . . . . . . . . . . . . 50 Connecting the multichannel analog inputs . . . . . . .
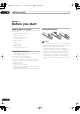
VSX_AX4AVi.book.fm 6 ページ 2005年6月20日 01 月曜日 午後6時27分 Before you start Chapter 1: Before you start Checking what’s in the box Loading the batteries Please check that you've received the following supplied accessories: • Setup microphone (cable: 5m.
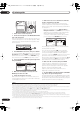
VSX_AX4AVi.book.fm 7 ページ 2005年6月20日 月曜日 午後6時27分 5 minute guide 02 Chapter 2: 5 minute guide Introduction to home theater Home theater refers to the use of multiple audio tracks to create a surround sound effect, making you feel like you're in the middle of the action or concert. The surround sound you get from a home theater system depends not only on your speaker setup, but also on the source and the sound settings of the receiver.
VSX_AX4AVi.book.fm 8 ページ 2005年6月20日 月曜日 午後6時27分 5 minute guide 02 SYSTEM OFF RECEIVER INPUT SELECT SOURCE D.ACCESS +10 CLASS DISC ENTER AV PARAMETER TOP MENU CH LEVEL MENU T.EDIT ENTER SETUP GUIDE 1 CD TV VIDEO 2 DVD SAT VIDEO 1 RETURN PTY SEARCH BAND TV CONTROL TV CONT DVR2 CD-R MULTI IN ROOM2/3 DVR1 i Pod TUNER RECEIVER TV VOL INPUT SELECT TV CH VOL Switch on the receiver and your TV. 2 Connect the microphone to the MCACC SETUP MIC jack on the front panel.
VSX_AX4AVi.book.fm 9 ページ 2005年6月20日 月曜日 午後6時27分 5 minute guide 02 Problems when using the Auto MCACC Setup If the room environment is not optimal for the Auto MCACC Setup (too much background noise, echo off the walls, obstacles blocking the speakers from the microphone) the final settings may be incorrect. Check for household appliances (air conditioner, fridge, fan, etc.), that may be affecting the environment and switch them off if necessary.
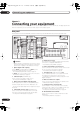
03_connecting_up.fm 10 ページ 2005年11月22日 03 火曜日 午後2時40分 Connecting your equipment Chapter 3 Connecting your equipment This receiver provides you with many connection possibilities, but it doesn’t have to be difficult. This page explains the kinds of components you can connect to make up your home theater system. Rear panel This illustration shows the VSX-AX4AVi, however connections for the VSX-AX2AV are the same except where noted.
03_connecting_up.fm 11 ページ 2005年9月20日 火曜日 午前11時50分 Connecting your equipment 11 Composite and S-video monitor outputs Use to connect monitors and TVs. Connecting your TV and DVD player on page 12. 12 Audio/video source inputs/(outputs) (x6) Use for connection to audio/visual sources, such as DVD players/recorders, VCRs, etc. Each set of inputs has jacks for composite video, S-video1 and stereo analog audio.
VSX_AX4AVi.book.fm 12 ページ 2005年6月20日 03 月曜日 午後6時27分 Connecting your equipment component video jacks on page 14 if your TV and/or DVD player has component video inputs/outputs. If your DVD player offers multichannel analog audio outputs, see Connecting the multichannel analog inputs on page 51. Connecting your TV and DVD player 1 Connect the MONITOR OUT video jack to a video input on your TV.
VSX_AX4AVi.book.fm 13 ページ 2005年6月20日 月曜日 午後6時27分 Connecting your equipment 03 Connecting a satellite/cable receiver or other set-top box Connecting a DVD/HDD recorder, VCR and other video sources Satellite and cable receivers, and terrestrial digital TV tuners are all examples of so-called ‘set-top boxes’. This receiver has two sets of audio/video inputs and outputs suitable for connecting analog or digital video devices, including DVD/HDD recorders and VCRs.
VSX_AX4AVi.book.fm 14 ページ 2005年6月20日 03 月曜日 午後6時27分 Connecting your equipment • For a second recorder, use the DVR/VCR2 outputs. 3 If the device can output digital audio, connect an optical-type1 digital audio output from the recorder to the DIGITAL 2 (DVR/VCR1) input. Use an optical cable for the connection.2 • For a second recorder, use the DIGITAL 3 (DVR/ VCR2) inputs. Using the component video jacks Component video should give superior picture quality when compared to composite or S-video.
03_connecting_up.fm 15 ページ 2005年7月6日 水曜日 午後1時50分 Connecting your equipment 03 Connecting digital audio sources This receiver has both digital inputs and outputs, allowing you to connect digital audio components for playback and for making digital recordings. Most digital components also have analog connections. See Connecting analog audio sources on the following page if you want to connect these too.
VSX_AX4AVi.book.fm 16 ページ 2005年6月20日 03 月曜日 午後6時27分 Connecting your equipment Connecting analog audio sources This receiver features three stereo audio-only inputs. Two of these inputs have corresponding outputs for use with audio recorders. One of the audio inputs (PHONO) is a dedicated turntable input which should not be used for any other type of component. This input also has a grounding terminal that most turntables require.
03_connecting_up.fm 17 ページ 2005年11月22日 火曜日 午後2時42分 Connecting your equipment 03 Installing your speaker system main surround speakers should always be connected as a pair, but you can connect just one surround back speaker if you like (it must be connected to the left surround back terminal). You can use speakers with a nominal impedance between 6–16Ω (please see Switching the speaker impedance on page 65 if you plan to use speakers with an impedance of less than 8Ω).
VSX_AX4AVi.book.fm 18 ページ 2005年6月20日 03 月曜日 午後6時27分 Connecting your equipment Bare wire connections Make sure that the speaker cable you’re going to use is properly prepared with about 10 mm of insulator stripped from each wire, and the exposed wire strands twisted together (fig. A). To connect a terminal, unscrew the terminal a few turns until there is enough space to insert the exposed wire (fig. B). Once the wire is in position, tighten the terminal until the wire is firmly clamped (fig. C). fig.
03_connecting_up.fm 19 ページ 2005年7月6日 水曜日 午後1時59分 Connecting your equipment 03 The diagrams below show suggested surround and surround back speaker orientation. The first diagram (fig. A) shows orientation with one surround back speaker (or none) connected. The second (fig. B) shows orientation with two surround back speakers connected. 90~120 The supplied antennas provide a simple way to listen to AM and FM radio.
VSX_AX4AVi.book.fm 20 ページ 2005年6月20日 03 月曜日 午後6時27分 Connecting your equipment Important • The signal ground ( ) is designed to reduce noise that occurs when an antenna is connected. It is not an electrical safety ground. Plugging in the receiver Only plug in after you have connected all your components to this receiver, including the speakers. Caution FM wire antenna • Handle the power cord by the plug part.
VSX_AX4AVi.book.
VSX_AX4AVi.book.fm 22 ページ 2005年6月20日 04 月曜日 午後6時27分 Controls and displays 9 HDMI indicator Blinks when connecting an HDMI-equipped component; lights when the component is connected (page 47). 10 i.LINK indicator (VSX-AX4AVi only) Lights when an i.LINK-Audio-equipped component is selected (page 48). DIGITAL VIDEO CONVERSION indicator (VSX-AX2AV only) Lights when digital video conversion is enabled (page 63). 11 Listening mode buttons HOME THX – Press to select a Home THX listening mode (page 27).
VSX_AX4AVi.book.fm 23 ページ 2005年6月20日 月曜日 午後6時27分 Controls and displays 04 Display 1 2 3 SIGNAL L C R 2DIGITAL WMA9 Pro SL S SR DSD HDMI SBL SB SBR DIGITAL CD LFE ANALOG CD-R STREAM DIRECT Neo : 6 2PRO LOGIC THX ADV.SURROUND STEREO STANDARD SLEEP SP AB AUTO 13 14 15 16 4 5 6 7 8 9 10 11 DTS VIDEO CONV. V.
04_controls_displays.fm 24 ページ 2005年7月6日 04 水曜日 午後2時2分 Controls and displays 3 Input source buttons Press to select control of other components (see Controlling the rest of your system on page 67). Remote control 12 4 Number buttons and other receiver/component controls Use the number buttons to directly select a radio frequency (page 30) or the tracks on a CD, DVD, etc. 13 DISC (ENTER) can be used to enter commands for TV or DTV, and also to select a disc in a multi-CD player.
VSX_AX4AVi.book.fm 25 ページ 2005年6月20日 月曜日 午後6時27分 Controls and displays TV – Use to turn on/off the power of the TV. TV VOL +/– – Use to adjust the volume on your TV. INPUT SELECT – Use to select the TV input signal. TV CH +/– – Use to select channels. 8 Component control buttons The main buttons ( , , etc.) are used to control a component after you have selected it using the input source buttons.
VSX_AX4AVi.book.fm 26 ページ 2005年6月20日 05 月曜日 午後6時27分 Listening to your system Chapter 5: Listening to your system Important • The listening modes and many features described in this section may not be available depending on the current source, settings and status of the receiver. See Listening modes with different input signal formats on page 82 for more on this. • While listening to a source, press STANDARD (STANDARD SURROUND). If necessary, press repeatedly to select a listening mode.
VSX_AX4AVi.book.fm 27 ページ 2005年6月20日 月曜日 午後6時27分 Listening to your system 05 Using the Home THX modes Using the Advanced surround effects THX and Home THX are technical standards created by Lucasfilm Ltd. for cinema and home theater sound. Home THX is designed to make home theater audio sound more like what you hear in a cinema. The Advanced surround effects can be used for a variety of additional surround sound effects.
VSX_AX4AVi.book.fm 28 ページ 2005年6月20日 05 月曜日 午後6時27分 Listening to your system Listening in stereo Selecting MCACC presets When you select STEREO, you will hear the source through just the front left and right speakers (and possibly your subwoofer depending on your speaker settings). Dolby Digital and DTS multichannel sources are downmixed to stereo.
VSX_AX4AVi.book.fm 29 ページ 2005年6月20日 月曜日 午後6時27分 Listening to your system 05 • PCM – Only PCM signals are output.1 The receiver selects the first available signal in the following order: ; HDMI; DIGITAL. When set to DIGITAL or AUTO, 2 DIGITAL lights with Dolby Digital decoding, DTS lights with DTS decoding, and WMA9 Pro lights to indicate decoding of a WMA9 Pro signal. • SBch ON – 6.1 or 7.1 decoding is always used (for example, a surround back channel will be generated for 5.
VSX_AX4AVi.book.fm 30 ページ 2005年6月20日 月曜日 午後6時27分 Using the tuner 06 Chapter 6: Using the tuner Tuning directly to a station Listening to the radio The following steps show you how to tune in to FM and AM radio broadcasts using the automatic (search) and manual (step) tuning functions. If you already know the frequency of the station you want, see Tuning directly to a station below.
VSX_AX4AVi.book.fm 31 ページ 2005年6月20日 月曜日 午後6時27分 Using the tuner 06 Naming station presets For easier identification, you can name your station presets. 1 Choose the station preset you want to name. See Listening to station presets below for how to do this. 2 Press T.EDIT (TUNER EDIT). The display shows STATION NAME, then a blinking cursor at the first character position. 3 Input the name you want. Choose from the following characters for a name up to four characters long.
VSX_AX4AVi.book.fm 32 ページ 2005年6月20日 06 月曜日 午後6時27分 Using the tuner 4 Press ENTER to search for the program type. The system starts searching through the station presets for a match. When it finds one, the search stops and the station plays for five seconds. 5 If you want to keep listening to the station, press ENTER within the 5 seconds. If you don’t press ENTER, searching resumes. If NO PTY is displayed it means the tuner couldn’t find that program type at the time of the search.
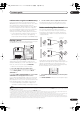
VSX_AX4AVi.book.fm 33 ページ 2005年6月20日 月曜日 午後6時27分 The System Setup menu 07 Chapter 7: The System Setup menu Making receiver settings from the System Setup menu The following section shows you how to make detailed settings to specify how you’re using the receiver (for example, if you want to set up two speaker systems in separate rooms), and also explains how to fine-tune individual speaker system settings to your liking. SYSTEM OFF RECEIVER INPUT SELECT SOURCE D.
VSX_AX4AVi.book.fm 34 ページ 2005年6月20日 07 月曜日 午後6時27分 The System Setup menu 1 Connect the microphone to the MCACC SETUP MIC jack on the front panel. Make sure there are no obstacles between the speakers and the microphone. (TUNE +) SPEAKERS AV PARAMETER BAND MULTI – ROOM & SOURCE/REC SEL CONTROL ON/OFF VIDEO SELECT SIGNAL SELECT SBch PROCESSING weighting is given to any one channel.
VSX_AX4AVi.book.fm 35 ページ 2005年6月20日 月曜日 午後6時27分 The System Setup menu 07 • With error messages (such as Ambient Noise or Microphone Check) select RETRY after checking for ambient noise (see Problems when using the Auto MCACC Setup on page 9) and verifying the mic connection. If there doesn’t seem to be a problem, you can simply select GO NEXT and continue. 6 If necessary, confirm the speaker configuration in the OSD.1 The configuration shown on-screen should reflect the actual speakers you have. 1.
VSX_AX4AVi.book.fm 36 ページ 2005年6月20日 月曜日 午後6時27分 The System Setup menu 07 1 Select ‘Surr Back System’ from the System Setup menu. See Making receiver settings from the System Setup menu above if you’re not already at this screen. System Setup 2.Surround Back System 1.Auto MCACC 2.Surr Back System 3.Manual MCACC 4.Data Management 5.Manual SP Setup 6.Input Setup 7.Other Setup Surround Back System Normal (SB) : Exit 2 :Return Select the surround back speaker setting.
VSX_AX4AVi.book.fm 37 ページ 2005年6月20日 月曜日 午後6時27分 The System Setup menu 07 The volume increases to the 0dB reference level. 3.Manual MCACC 1 Select ‘Fine SP Distance’ from the Manual MCACC setup menu. 3a.Fine Channel Level a.Fine Ch Level b.Fine SP Distance c.Standing Wave d.EQ Adjust e.EQ Professional 3.Manual MCACC Please Wait... 20 Caution! Loud test tones will be output. 3b.Fine SP Distance a.Fine Ch Level b.Fine SP Distance c.Standing Wave d.EQ Adjust e.EQ Professional MCACC:M1.
VSX_AX4AVi.book.fm 38 ページ 2005年6月20日 午後6時27分 The System Setup menu frequencies. Depending on speaker placement, your listening position, and ultimately the shape of your room, it results in an overly resonant (‘boomy’) sound. The Standing Wave Control uses filters to reduce the effect of overly resonant sounds in your listening area. During playback of a source, you can customize the filters used for Standing Wave Control for each of your MCACC presets.
VSX_AX4AVi.book.fm 39 ページ 2005年6月20日 月曜日 午後6時27分 The System Setup menu 07 How to use Professional Acoustic Calibration EQ If you find that lower frequencies seem overly reverberant in your listening room (i.e. it sounds `boomy'), or that different channels seem to exhibit different reverb characteristics, select Aco Cal EQ Pro. (or ALL) for the Auto Mode setting in Automatic MCACC (Expert) on page 33 to calibrate the room automatically.
VSX_AX4AVi.book.fm 40 ページ 2005年6月20日 月曜日 午後6時27分 The System Setup menu 07 Using Professional Acoustic Calibration EQ 1 Select ‘EQ Professional’ then press ENTER. 3.Manual MCACC 3e.EQ Professional a.Fine Ch Level b.Fine SP Distance c.Standing Wave d.EQ Adjust e.EQ Professional 1.Reverb Measurement 2.Reverb View 3.Reverb Output PC 4.Advanced EQ Setup :Return ENTER:Next When the reverb measurement is finished, you can select Reverb View to see the results on-screen.
VSX_AX4AVi.book.fm 41 ページ 2005年6月20日 月曜日 午後6時27分 The System Setup menu 07 After the Acoustic Calibration Equalization is set, you are given the option to check the settings on-screen. 1 Select ‘MCACC Data Check’ from the Data Management setup menu. 4a.MCACC Data Check 4.Data Management a.MCACC b.MCACC c.Memory d.Memory Data Management From this menu you can check your current settings, copy from one preset to another, name presets for easier identification and clear any ones you don’t need.
VSX_AX4AVi.book.fm 42 ページ 2005年6月20日 07 月曜日 午後6時27分 The System Setup menu 2 Select the MCACC preset you’ll be copying the settings ‘From’ then specify where you want to copy them (‘To’). Make sure you don’t overwrite an MCACC preset you’re currently using (this can’t be undone). 3 Select ‘Copy’ to confirm and copy the settings. Copy Complete! shows in the OSD to confirm the MCACC preset has been copied, then you automatically return to the Data Management setup menu.
VSX_AX4AVi.book.fm 43 ページ 2005年6月20日 月曜日 午後6時27分 The System Setup menu 07 1 Select ‘Speaker Setting’ from the Manual SP Setup menu. 5.Manual SP Setup front and center speakers are also routed to the subwoofer).3 If you did not connect a subwoofer choose NO (the bass frequencies are output from other speakers). 5a.Speaker Setting a.Speaker Setting b.Channel Level c.Speaker Distance d.Bass Peak Level e.X-Curve f.THX Audio Setting Front Center Surr SB [ SUB W. SMALL [ SMALL [ SMALL SMALL x2 [ YES X.
VSX_AX4AVi.book.fm 44 ページ 2005年6月20日 07 月曜日 午後6時27分 The System Setup menu 4 Adjust the level of each channel using the / buttons. If you selected Manual, use / to switch speakers. The Auto setup will output test tones in the order shown onscreen: 5b.Channel Level L C R SR SBR SBL SL SW [ [ [ [ [ [ [ 0.0dB 0.0dB 0.0dB 0.0dB 0.0dB 0.0dB 0.0dB 0.0dB ] ] ] ] ] ] ] Bass Peak Level Some audio sources (for example, Dolby Digital and DTS) include ultra-low bass tones.
06_System_setup.fm 45 ページ 2005年7月6日 水曜日 午後2時5分 The System Setup menu 07 Set the bass peak level gradually, then press ENTER at the point just before the tone starts to distort.1 The display on the receiver shows RESUME while the volume returns to its original position, then you automatically return to the main Bass Peak Level menu. 4 When you're finished, press RETURN. You will return to the Manual SP Setup menu.
VSX_AX4AVi.book.fm 46 ページ 2005年6月20日 08 月曜日 午後6時27分 Other connections Chapter 8: Other connections Caution • Make sure the power is switched off before making or changing the connections. Connecting an iPod This receiver has a dedicated iPod terminal that will allow you to control playback of your iPod using the controls of this receiver.
VSX_AX4AVi.book.fm 47 ページ 2005年6月20日 月曜日 午後6時27分 Other connections Genre Artist Album Song Composer Album Song Shuffle Songs Tip • You can play all of the songs in a particular category by selecting the All item at the top of each category list. For example, you can play all the songs by a particular artist.
10_Other_connections.fm 48 ページ 2005年9月20日 08 火曜日 午後12時17分 Other connections 2 Use an HDMI cable to connect the HDMI OUT interconnect on this receiver to an HDMI interconnect on a HDMI-compatible monitor.1 • The arrow on the cable connector body should be facing right for correct alignment with the connector on the player. 3 Use the INPUT SELECT button to select HDMI 1 or 2 (depending on which input you’ve connected to). You can also use the front panel INPUT SELECTOR dial.
VSX_AX4AVi.book.fm 49 ページ 2005年6月20日 月曜日 午後6時27分 Other connections 08 1 Use an i.LINK cable to connect one of the i.LINK connectors on this receiver to an i.LINK connector on your i.LINK component. MULTI-ROOM &SOURCE /REC SEL ANTENNA OUT1 ROOM3(ZONE3) FM UNBAL 75Ω MULTI-ROOM & SOURCE IN ROOM2(ZONE2) OUT OUT2 S400 USB AUDIO IN AUDIO PRE OUT R L F PHONO MULTI-ROOM & SOURCE R ROOM2(ZONE2) OUT L IN SUB W.
VSX_AX4AVi.book.fm 50 ページ 2005年6月20日 08 月曜日 午後6時27分 Other connections About PQLS rate control Pioneer's PQLS (Precision Quartz Lock System) technology provides high-precision digital audio from DVD-A, SACD and audio CD sources when you use the i.LINK interface. A precision quartz controller in this receiver eliminates distortion caused by timing errors (jitter), giving you the best possible digital-to-analog conversion from the digital source.
VSX_AX4AVi.book.fm 51 ページ 2005年6月20日 月曜日 午後6時27分 Other connections 08 • Depending on the DVD player you’re using, the analog output level of the subwoofer channel may be too low. In this case switch the receiver into standby, then press STANDBY/ON while holding down VIDEO SELECT on the front panel. This switches between SW IN +10dB (increase of 10 decibels) and SW IN 0dB (default) in the subwoofer channel.
VSX_AX4AVi.book.fm 52 ページ 2005年6月20日 月曜日 午後6時27分 Other connections 08 3 If you’re connecting for the first time, wait for the USB driver installation to finish. The installation may take a minute or two to complete. Make sure you leave the USB cable connected until the dialog box indicates that the USB setup is finished. Note that some older operating systems may require a disc for installation.1 4 Use the INPUT SELECT button to select USB. You can also use the INPUT SELECTOR dial on the front panel.
VSX_AX4AVi.book.fm 53 ページ 2005年6月20日 月曜日 午後6時27分 Other connections 08 • SP A – Sound is output from speaker system A and the same signal is output from the pre-out terminals. • SP B – Sound is output from the two speakers connected to speaker system B. Multichannel sources will not be heard. The same signal is output from the surround back channel pre-out terminals.
VSX_AX4AVi.book.fm 54 ページ 2005年6月20日 月曜日 午後6時27分 Other connections 08 Connecting additional amplifiers Multi-room listening This receiver has more than enough power for any home use, but it’s possible to add additional amplifiers to every channel of your system using the pre-outs. Make the connections shown below to add amplifiers to power your speakers. This receiver can power up to three independent systems in separate rooms after you have made the proper multiroom connections.
10_Other_connections.fm 55 ページ 2005年11月22日 火曜日 午後2時44分 Other connections 08 Multi-room listening options The following table shows what you can listen to in each sub room: Sub room Input sources available • Connect a TV monitor to the MULTI-ROOM & SOURCE MONITOR OUT jacks on the rear of this receiver. You should have a pair of speakers attached to the surround back speaker terminals as shown below. ROOM2 (ZONE2) iPod, the built-in tuner and other analog audio sources (except MULTI CH IN).
VSX_AX4AVi.book.fm 56 ページ 2005年6月20日 08 月曜日 午後6時27分 Other connections Using the multi-room controls The following steps use the front panel controls to adjust the sub room volume and select sources. See Multi-room remote controls below (TUNE +) SPEAKERS AV PARAMETER BAND MULTI – ROOM & SOURCE/REC SEL CONTROL ON/OFF VIDEO SELECT SIGNAL SELECT SBch PROCESSING 4 Use the MASTER VOLUME dial to adjust the volume.
VSX_AX4AVi.book.fm 57 ページ 2005年6月20日 月曜日 午後6時27分 Other connections 08 1 Connect the IR receiver sensor to the MULTI-ROOM & SOURCE IR IN jack on the rear of this receiver. Closet or shelving unit IR Non-Pioneer component • The trigger maximum power is DC OUT 12V/50mA total. Pioneer component After you’ve specified the input functions that will switch on the trigger, you’ll be able to switch the component on or off just by pressing the input function(s) you’ve set on page 60.
VSX_AX4AVi.book.fm 58 ページ 2005年6月20日 08 月曜日 午後6時27分 Other connections • Before you can use the extra SR+ features, you need to make a few settings in the receiver. See The Input Setup menu on page 60 and SR+ Setup for Pioneer plasma displays on page 62 for detailed instructions. • Use a 3-ringed miniplug SR+ cable to connect the CONTROL IN jack of this receiver with the CONTROL OUT jack of your plasma display.
10_Other_connections.fm 59 ページ 2005年9月20日 火曜日 午前11時53分 Other connections Connecting a PC for Advanced MCACC output 08 Use a commercially-available cable to connect the RS232C jack on your computer to the 9-pin RS-232C jack on this receiver. See the documentation provided with the Advanced MCACC application for more information.
VSX_AX4AVi.book.fm 60 ページ 2005年6月20日 月曜日 午後6時27分 Other Settings 09 Chapter 9: Other Settings The Input Setup menu You only need to make settings in the Input Setup menu if you didn’t hook up your digital equipment according to the default settings (see Input function default and possible settings below). In this case, you need to tell the receiver what equipment is hooked up to which terminal so the buttons on the remote correspond to the components you’ve connected.
VSX_AX4AVi.book.fm 61 ページ 2005年6月20日 月曜日 午後6時27分 Other Settings 09 • 12V Trigger 1 / 2 – After connecting a component to one of the 12 volt triggers (see Switching components on and off using the 12 volt trigger on page 57), select M. ROOM, ROOM2, ROOM3 or OFF for the corresponding trigger setting to switch it on automatically along with the (main or sub) room specified. The Other Setup menu The Other Setup menu is where you can make customized settings to reflect how you are using the receiver.
VSX_AX4AVi.book.fm 62 ページ 2005年6月20日 月曜日 午後6時27分 Other Settings 09 Multi-Room and IR receiver setup 1 Select ‘SR+ Setup’ from the Other Setup menu. • Default setting: Variable / Setting 1 7.Other Setup If you’ve made multi-room connections (see Multi-room listening on page 54) you may need to specify your volume setting. Also use this menu to specify your IR receiver type (if necessary). 7b.SR+ Setup a.Multi Room Setup b.SR+ Setup c.OSD Adjustment d.i.
VSX_AX4AVi.book.fm 63 ページ 2005年6月20日 月曜日 午後6時27分 Using other functions 10 Chapter 10 Using other functions Setting the AV options There are a number of additional sound and picture settings you can make using the AV Parameter menu. The defaults, if not stated, are listed in bold. Important • Note that if a setting doesn’t appear in the AV Parameter menu, it is unavailable due to the current source, settings and status of the receiver. 1 Press AV PARAMETER.
VSX_AX4AVi.book.fm 64 ページ 2005年6月20日 10 月曜日 午後6時27分 Using other functions Setting What it does Option(s) Contrast Adjusts the contrast between light and dark. –10 to +10 Default: 0 Hue Adjusts the red/green balance. –10 to +10 Default: 0 a.Only when listening to 2-channel sources in Dolby Pro Logic IIx Music mode (also available with 2 Pro Logic II 5.1 channel sound). b.Only when listening to 2-channel sources in Neo:6 Music mode. c.
VSX_AX4AVi.book.fm 65 ページ 2005年6月20日 月曜日 午後6時27分 Using other functions 10 Reducing the level of an analog signal Dimming the display The input attenuator lowers the input level of an analog signal when it’s too strong. You can use this if you find the that the OVER indicator is lights often, or you can hear distortion in the sound.1 You can choose between four brightness levels for the front panel display. Note that when selecting sources, the display automatically brightens for a few seconds.
VSX_AX4AVi.book.
VSX_AX4AVi.book.fm 67 ページ 2005年6月20日 月曜日 午後6時27分 Controlling the rest of your system 11 Chapter 11: Controlling the rest of your system Setting the remote to control other components Most components can be assigned to one of the input source buttons (such as DVD/LD or CD) using the component’s manufacturer preset code stored in the remote.
VSX_AX4AVi.book.fm 68 ページ 2005年6月20日 11 月曜日 午後6時27分 Controlling the rest of your system 4 Point the two remote controls towards each other then press the button that will be doing the learning on this receiver’s remote control. PRES KEY starts flashing to indicate the remote is ready to accept a signal. DVD CH RECEIVER MUTE S.DIRECT STEREO SBch CH MCACC REC STOP MEMORY DISC STANDARD ADV.
VSX_AX4AVi.book.fm 69 ページ 2005年6月20日 月曜日 午後6時27分 Controlling the rest of your system 11 3 Press the button of the component for which you want to check the preset code, then press ENTER. The brand name and preset code appears in the display for three seconds. 2 Use / to select DIRECT F then press ENTER. The LCD on the remote prompts you for the button of the input source you want to control. Renaming input source names 4 Use / to switch direct function ON or OFF then press ENTER.
VSX_AX4AVi.book.fm 70 ページ 2005年6月20日 11 月曜日 午後6時27分 Controlling the rest of your system 5 Use / to select a command in the sequence then press ENTER. If this is the first command in the sequence, select 1ST CODE. Otherwise, simply choose the next command in the sequence. PRES KEY flashes after you press ENTER. Using multi operations You can start multi operations with the receiver switched on, or in standby.
VSX_AX4AVi.book.fm 71 ページ 2005年6月20日 月曜日 午後6時27分 Controlling the rest of your system 11 Controls for TVs Controls for other components This remote control can control components after entering the proper codes or teaching the receiver the commands (see Setting the remote to control other components on page 67 for more on this). Use the input source buttons to select the component.
VSX_AX4AVi.book.fm 72 ページ 2005年6月20日 11 月曜日 午後6時27分 Controlling the rest of your system Button (s) Function Components TOP MENU Displays the disc ‘top’ menu of a DVD player. DVD/DVR player MENU Displays menus concerning the DVD/DVR player current DVD or DVR you are using. Pauses the tape. Cassette deck Stops the tape. Cassette deck ENTER Starts playback. Cassette deck / Fast rewinds/fast forwards the tape. Cassette deck / / / Navigates DVD menu/options.
VSX_AX4AVi.book.fm 73 ページ 2005年6月20日 月曜日 午後6時27分 Additional information 12 Chapter 12: Additional information Troubleshooting Incorrect operations are often mistaken for trouble and malfunctions. If you think that there is something wrong with this component, check the points below. Sometimes the trouble may lie in another component. Investigate the other components and electrical appliances being used.
VSX_AX4AVi.book.fm 74 ページ 2005年6月20日 12 月曜日 午後6時27分 Additional information Symptom Remedy No sound from the surround or center speakers. • Check that the Stereo listening mode isn’t selected; select one of the surround listening modes (see Listening in surround sound on page 26). • Check that the surround/center speakers are not set to NO (see Speaker Setting on page 42). • Check the channel level settings (see Channel Level on page 43).
VSX_AX4AVi.book.fm 75 ページ 2005年6月20日 月曜日 午後6時27分 Additional information Symptom Remedy When playing a DTS format LD there is audible noise on the soundtrack. • Make sure that the input signal type is set to DIGITAL (see Choosing the input signal on page 28). Can't record audio. • You can only make a digital recording from a digital source, and an analog recording from an analog source. • For digital sources, make sure that what you’re recording isn’t copy protected.
VSX_AX4AVi.book.fm 76 ページ 2005年6月20日 12 月曜日 午後6時27分 Additional information Symptom Remedy After using the Auto MCACC • There may have been some low frequency noise in the room from an air-conditioner, motor, etc. Switch Setup, the speaker size setting is off all other appliances in the room and use Auto MCACC Setup again. incorrect. • Depending on a number of factors (room size, speaker placement, etc.) this may occur in some cases.
VSX_AX4AVi.book.fm 77 ページ 2005年6月20日 月曜日 午後6時27分 Additional information Symptom Remedy When playing Dolby Digital or DTS sources, the receiver’s format indicators do not light. • Check that the player is connected using a digital connection. • Make sure that the receiver is set to AUTO or DIGITAL (see Choosing the input signal on page 28). • Check that the player isn’t set up so that Dolby Digital and DTS sources are converted to PCM.
12_additional_info.fm 78 ページ 2005年9月20日 12 火曜日 午前11時56分 Additional information Symptom Remedy You can’t get i.LINK to display • Make sure your i.LINK source components are switched on. when using the SIGNAL SELECT • Check that i.LINK is assigned correctly (see The Input Setup menu on page 60). button. After upgrading a component, it is not recognized and cannot be selected using the i.LINK connection. • You may need to reset the i.
12_additional_info.fm 79 ページ 2005年9月20日 火曜日 午後12時9分 Additional information 12 Symptom Remedy No picture. • If your display device is not SD (480i/576i) compatible then neither the setup screens or the 480i/576i to HDMI converted video will be displayed. In this case, connect using the component, S-video or composite video jacks. • Depending in the output settings of the source component, it may be outputting a video format that can’t be displayed.
VSX_AX4AVi.book.fm 80 ページ 2005年6月20日 12 月曜日 午後6時27分 Additional information Surround sound formats Below is a brief description of the main surround sound formats you’ll find on DVDs, satellite, cable and terrestrial broadcasts, and video cassettes. Dolby Manufactured under license from Dolby Laboratories. “Dolby”, “Pro Logic”, “Surround EX”, and the double-D symbol are trademarks of Dolby Laboratories. DTS The DTS technologies are explained below. See www.dtstech.com for more detailed information.
VSX_AX4AVi.book.fm 81 ページ 2005年6月20日 月曜日 午後6時27分 Additional information WMA9 Pro can support up to 5.1/7.1 channel playback with sampling rates up to 24-bit/96kHz. Using the unique WMA compression techniques, WMA9 Pro can deliver multichannel music and soundtracks over high-speed internet networks at low bit rates with minimal audio degradation.
VSX_AX4AVi.book.fm 82 ページ 2005年6月20日 月曜日 午後6時27分 Additional information 12 the THX Surround EX playback mode, otherwise THX Select2 Cinema mode will apply ASA processing to provide optimum replay. • THX MusicMode For the replay of multi-channel music the THX MusicMode should be selected. In this mode THX ASA processing is applied to the surround channels of all 5.1 encoded music sources such as DTS, Dolby Digital and DVD-Audio to provide a wide stable rear soundstage.
12_additional_info.fm 83 ページ 2005年7月6日 水曜日 午後2時8分 Additional information 12 Multichannel signal formats SBch Processing Input signal format Standard THX Auto Surround SBch Processing ON (7.1 channel decoding used for all sources) WMA9 Pro (6.1/7.1 channel) Straight decoding WMA+THX CINEMA Straight decoding Dolby Digital EX (6.
12_additional_info.fm 84 ページ 2005年7月6日 12 水曜日 午後2時8分 Additional information Stream direct with different input signal formats The following charts show what you will hear with different input signal formats, depending on the Stream Direct mode (see Using Stream Direct on page 28) you have selected. Stereo (2 channel) signal formats Surround Back speaker(s) Connected (Maximum 7.1 channel playback) Not connected (Maximum 5.
VSX_AX4AVi.book.fm 85 ページ 2005年6月20日 月曜日 午後6時27分 Additional information 12 FM Tuner Section Specifications Continuous Power Output – Stereo Front. . . 180 W + 180 W (AX4AVi), 170 W + 170 W (AX2AV) (DIN 1 kHz, THD 1 %, 6 Ω) Front. . . 150 W + 150 W (AX4AVi), 140 W + 140 W (AX2AV) (DIN 1 kHz, THD 1 %, 8 Ω) Continuous Power Output – Multichannel (DIN 1 kHz, THD 1 %, 6 Ω) Front. . . 180 W + 180 W (AX4AVi), 170 W + 170 W (AX2AV) Center . . . . . . . . . . . . . . . . .
VSX_AX4AVi.book.fm 86 ページ 2005年6月20日 月曜日 午後6時27分 Additional information 12 • Never use thinners, benzine, insecticide sprays or other chemicals on or near this unit, since these will corrode the surface. Our philosophy Pioneer is dedicated to making your home theater listening experience as close as possible to the vision of the moviemakers and mastering engineer when they created the original soundtrack.
VSX_AX4AVi.book.
12_additional_info.fm 88 ページ 2005年11月22日 火曜日 午後2時33分 Published by Pioneer Corporation. Copyright © 2005 Pioneer Corporation. All rights reserved. PIONEER CORPORATION 4-1, Meguro 1-Chome, Meguro-ku, Tokyo 153-8654, Japan PIONEER ELECTRONICS (USA) INC. P.O. BOX 1540, Long Beach, California 90810-1540, U.S.A. TEL: (800) 421-1404 PIONEER ELECTRONICS OF CANADA, INC.