ENGLISH 16:9 Touch Panel Display FRANÇAIS Écran tactile 16/9 DEUTSCH AVD-W6210 NEDERLANDS This product conforms to CEMA cord colors. Le code couleur des câbles utilisé pour ce produit est conforme à CEMA.
Contents Contents ...................................................... 1 Dear Customer ............................................ 2 IMPORTANT SAFEGUARDS .................... 3 Please Read All of These Instructions Regarding Your Display and Retain them for Future Reference ........................ 3 Fitting and Removing the Display .......... 4 To fit the display .............................................. 4 To remove the display ...................................... 5 IMPORTANT INFORMATION ......
ENGLISH ESPAÑOL Selecting fine audio equipment such as the unit you’ve just purchased is only the start of your musical enjoyment. Now it’s time to consider how you can maximize the fun and excitement your equipment offers. This manufacturer and the Electronic Industries Association’s Consumer Electronics Group want you to get the most out of your equipment by playing it at a safe level.
IMPORTANT SAFEGUARDS Information to User Alteration or modifications carried out without appropriate authorization may invalidate the user’s right to operate the equipment. Please Read All of These Instructions Regarding Your Display and Retain them for Future Reference 1. Read this manual fully and carefully before operating your display. 2. Keep this manual handy for future reference. 3. Pay close attention to all warnings in this manual and follow the instructions carefully. 4.
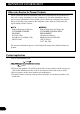
Fitting and Removing the Display ENGLISH Precaution: • To prevent failure, be sure to turn the ignition switch or system power OFF before fitting or removing the display. Also take care not to grip the screen or buttons too firmly or to drop the display. • Do not let any water get on the terminals on the display or on the cable and do not allow the terminals to be shorted by a metal object or the like. This can cause system breakdown. • Be careful not to touch terminals on the display or on the cable.
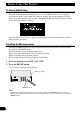
Fitting and Removing the Display To remove the display • Pull the lock release lever 3 and hold in that position, then slide the display upward and detach it from its base. • To prevent theft of the display, remove the display when leaving the vehicle. Base Press the lock release button while holding the display. 5 Keep holding the button and unplug the connector.
IMPORTANT INFORMATION About This Product ENGLISH ESPAÑOL • Do not place the display in a position where it will impede the driver’s visibility or affect the operation of your vehicle’s airbags or headrests. • This product is designed for use with the Touch Panel function of the Pioneer Navigation unit. (See the Operation Manual of the Pioneer Navigation unit on how to operate the Touch Panel.) For more information, please contact your dealer or the nearest authorized Pioneer service facility.
IMPORTANT INFORMATION After-sales Service for Pioneer Products Please contact the dealer or distributor from where you purchased the product for its after-sales service (including warranty conditions) or any other information. In case the necessary information is not available, please contact the companies listed below: Please do not ship your product to the companies at the addresses listed below for repair without advance contact. 7U.S.A Pioneer Electronic (USA) Inc. CUSTOMER SUPPORT DIVISION P.O.
Before Using This Product To Avoid Battery Exhaustion ENGLISH Always run the vehicle engine while using this unit. Using this unit without running the engine can result in battery drainage. To Protect the LCD Screen of the Display ESPAÑOL • Do not allow direct sunlight to fall on the Display when this unit is not being used. Extended exposure to direct sunlight can result in LCD screen malfunction due to the resulting high temperatures.
Before Using This Product To Ensure Safe Driving This unit senses whether the parking brake is on or off. When installed, it is arranged so that video cannot be viewed while the vehicle is moving. The various settings and adjustments are also not possible while driving. (The following message will be displayed on the screen while the vehicle is moving.) Stop the vehicle in a safe place, apply the parking brake and wait for the message to clear before starting operation.
Key Finder Component Parts and Features ENGLISH 7 Display Unit ESPAÑOL 1 Signal receptor 2 Ambient light sensor Senses ambient light. This system automatically adjusts the brightness of the display to compensate for ambient light. Switches between sources and switches power ON/OFF. 4 WIDE button Changes the method of enlarging 4:3 video to 16:9 video. Adjust the volume of the built-in speaker 0. Note: • Never set the volume so high that you cannot hear outside traffic and emergency vehicles.
Basic Operation Turn On Power Remember to start the car engine before turning on the power to preserve battery life. 1. Start the car engine. T LOCK AR C ON ST AC 2. Turn on the system. Press the SOURCE/POWER button. To turn off the system, press the SOURCE/POWER button and hold for 2 seconds. Volume Adjustment Adjust the volume of audio output from the built-in speaker. • Raise or lower the speaker volume.
Selecting a Source ENGLISH When the Pioneer Navigation unit is combined, you can select the images of each source. • Select the desired source. AV I N 1 ESPAÑOL Each press of the SOURCE/POWER button selects the desired source in the following order: [AV IN1] = [AV IN2] = [NAVI SOURCE] = Exit to [AV IN1] DEUTSCH Note: FRANÇAIS • [NAVI SOURCE] indicates the Pioneer Navigation unit with DVD-Video playback connected to the hide-away unit’s 26-pin input.
Basic Operation Changing the Wide Screen Mode You can change the way in which normal video (aspect ratio 4:3) enlarges to wide video (16:9). Select wide modes to suit the kind of video you are viewing. 1. Display a source to view. (Refer to the previous page.) 2. Select a wide mode. JUST Each press of the WIDE button selects the wide mode in the following order: [FULL] = [JUST] = [CINEMA] = [ZOOM] = [NORMAL] = Exit to [FULL] Note: • Settings are stored for each source (NAVI SOURCE, AV IN1, AV IN2).
Wide Modes Available ENGLISH FULL Video with an aspect ratio of 4:3 enlarges only horizontally. Enjoy viewing video widened without missing parts. ESPAÑOL JUST DEUTSCH Video appears more extended horizontally as it gets closer to both edges of the screen. Because video appears in about the same size as regular video around the middle of the screen, enjoy viewing it without feeling out of place. CINEMA FRANÇAIS Video enlarges vertically with a aspect ratio falling between FULL and ZOOM.
Operating the Setup Menu Entering the Setup Menu This system offers a number of functionality setup and adjustment features to make it easier to use. Customize the settings to suit your taste and environment. 1. Display the setup menu. Press the MENU-ENTER. MENU P I CTURE ADJUST V I DEO SET T I NG AUD I O SET T I NG RE TURN 2. Select a setting. MENU P I CTURE ADJUST V I DEO SET T I NG AUD I O SET T I NG RE TURN Press 5 or ∞ to select a desired item, and press the MENU-ENTER button.
Picture Adjust ENGLISH BRIGHTNESS/CONTRAST/COLOR/HUE Settings are stored for each source (NAVI SOURCE, AV IN1, AV IN2). Options Adjustment items Makes black appear darker or lighter. Contrast [CONTRAST]: Narrows or widens the gap between black and white (darken). Color [COLOR]: Makes colors appear lighter or darker. Hue [HUE]: Adjusts red or green of picture. ESPAÑOL Brightness [BRIGHTNESS]: Any of the above can be adjusted within the range of -24 to +24. 1. Display a source to adjust.
Operating the Setup Menu DIMMER Viewing can become difficult after extended video viewing if the screen is too bright at night or when ambient light darkens. You can select the brightness level from three settings; daytime, evening and nighttime viewing, after which this product will automatically adjusts the brightness to an optimum level within the setting range you selected and in relationship with the ambient light. 1. Display the setup menu and select [PICTURE ADJUST]. (Refer to page 15.) 2.
Video Setting ENGLISH Input Setting [AV IN2] To view videos by a VCR, DVD player or a back-up camera connected to the hide-away unit. 1. Display the setup menu and select [VIDEO SETTING]. (Refer to page 15.) ESPAÑOL 2. Choose [AV IN2]. V I DEO SE T T I NG AV I N 2 O F F REAR SOURCE NAV I POLAR I T Y BA T TERY P I CTURE A D J UST S E T UP P I CTURE MODE ST D I MG RETURN DEUTSCH 3. Select a connection mode. Select the connection mode of the source external unit to the right of [AV IN2].
Operating the Setup Menu Functions for Back-up Camera 7 Automatic Switching for Back-up Camera Using a commercially available back-up camera with the proper setting, this product automatically switches to the back-up camera image when the gear shift is moved to the REVERSE (R) position. For more information, consult your dealer or the nearest authorized Pioneer service facility. CAUTION This function is designed for use with a back-up camera only.
[PICTURE ADJUST] ENGLISH Press 5 or ∞ to select [SET UP], and press the MENU-ENTER button. [PICTURE ADJUST] menu is displayed. (refer to page 16.) [PICTURE MODE] You can select either [STD IMG] or [MIR IMG] for the back-up camera image. [STD IMG]: You can see the back-up camera image as a non-reverse image. [MIR IMG]: You can see the back-up camera image like a rear-view mirror image. ESPAÑOL Note: • The initial setting for [PICTURE MODE] is [STD IMG].
Operating the Setup Menu Audio Setting 7 [GUIDE] This setting controls whether the volume of each source is automatically muted during voice guidance. Setting the Mixing of the Guidance Voice [GUIDE] When connecting the Pioneer Navigation unit to the 26-pin input of this hide-away unit, you can select three types of setting for the guidance voice from the Pioneer Navigation unit. 1. Display the setup menu and select [AUDIO SETTING]. (Refer to page 15.) 2. Select a desired setting.
Using the Display Correctly ENGLISH CAUTION • If moisture or foreign matter should get inside the unit, turn OFF the power immediately and consult your dealer or the nearest authorized PIONEER service facility. Using the unit in this condition may result in a fire, electric shock or other failure. ESPAÑOL • If you notice smoke, a strange noise or smell, or any other abnormal signs from the display, turn OFF the power immediately and consult your dealer or the nearest authorized PIONEER service facility.
Using the Display Correctly About the Liquid Crystal Display (LCD) Screen • If the display is near the vent of an air conditioner when it is deployed, make sure that air from the air conditioner is not blowing on it. Heat from the heater may break the LCD screen, and cool air from the cooler may cause moisture to form inside the display resulting in possible damage.
Connecting the System ENGLISH CAUTION • PIONEER does not recommend that you install or service your display yourself. Installing or servicing the product may expose you to risk of electric shock or other hazards. Refer all installation and servicing of your display to authorized Pioneer service personnel. ESPAÑOL • Secure all wiring with cable clamps or electrical tape. Do not allow any bare wiring to remain exposed.
Connecting the System Note: • • 25 ACC position OF F O STAR • O N • ACC STAR • F N • If this unit is installed in a vehicle that does not have an ACC (accessory) position on the ignition switch, the red lead of the unit should be connected to a terminal coupled with ignition switch ON/OFF operations. If this is not done, the vehicle battery may be drained when you are away from the vehicle for several hours.
Names and Functions of Connection Terminals ENGLISH ■ Hide-away Unit ESPAÑOL Connects to the display unit. 2 AV IN1 RCA audio input (white, red) Receives stereo audio, as from a VCR, DVD player or other AV equipment. Receives video, as from a VCR, DVD player or other AV equipment. 4 REMOTE OUT Outputs remote control signals. (This part is for future use.) Receives stereo audio, as from a VCR, DVD player or other AV equipment. 6 AV IN2 RCA video input (yellow) Resets the display microprocessor.
Connecting the System Connecting the Power Cable Hide-away Unit Power cable Fuse resistor Violet/White (Refer to page 31.) Black (ground) To vehicle (metal) body. Fuse resistor Red To the electric terminal controlled by the ignition switch (12 V DC) ON/OFF. Do not connect this lead to power source terminals to which power is continuously supplied. If the lead is connected to such terminals, the battery may be drained.
Connection Diagram (VIDEO input) ENGLISH Display Unit ESPAÑOL 3 m (9ft. 10in.) AV IN1 RCA audio input (white, red) AV IN1 RCA video input (yellow) DEUTSCH Hide-away Unit AV IN1 INPUT AV IN2 INPUT FRANÇAIS Commercial RCA cable (sold separately) To video output ITALIANO Commercially available portable video component or back-up camera with RCA output Brown To audio output Note: NEDERLANDS • When other AV equipment is connected to the AV IN2 input, setting may be required. (Refer to page 18.
Connecting the System Connection Diagram (26-pin input) You can connect a separately sold Pioneer Navigation unit. Display Unit 26-pin cable (supplied with the Pioneer Navigation unit) 3 m (9ft. 10in.
Connecting the RCA Audio and Video Output ENGLISH Hide-away Unit ESPAÑOL Power cable (Refer to page 27.) RCA video output (yellow) RCA audio output (white, red) Commercial RCA cable (sold separately) To audio input (R) To audio input (L) Second display, video deck, etc.
Connecting the System Connecting ”REVERSE-GEAR SIGNAL INPUT“ Lead When using this product with a back-up camera, automatic switching to AV IN2 video when the gear shift is moved to the REVERSE (R) position is possible. Connect the back-up camera to the AV IN2 input. (Refer to page 28.) Hide-away Unit Connection method Clamp the reversing lamp lead. Power cable (Refer to page 27.) Clamp firmly with needlenosed pliers.
Installation ENGLISH CAUTION • For instructions on how to mount the display, consult your dealer. • Certain government laws may prohibit or restrict the placement and use of this system in your car. Please comply with all applicable laws and regulations regarding the use, installation and operation of your display.
Installation • Use of this product is subject to any government laws regarding placement or use. PIONEER does not accept any liability for any problems, damage or loss incurred as a result of the product being used with an incorrect setting or in violation of any government laws. • To ensure proper installation, use the supplied parts in the manner specified. If any parts other than the supplied ones are used, they may damage internal parts of the unit or they may work loose and the unit may come off.
Installing the Display Using the Accessory Mounting Base 1. Paste the cushions onto the bottom of the display base. Cushions 3. Fix the display on the mounting base. Tighten the hidden screw with the supplied hexagonal wrench until there is no rattling or gap between the display base and the mounting base. ESPAÑOL Paste the cushions onto the bottom of the display base to avoid scratching the dashboard. ENGLISH Use the mounting base to fasten the display to the dashboard. Display base DEUTSCH 2.
Installation 4. Determine the display installation position. Without removing the protective sheet on the rear of the mounting base, place the display on the dashboard and determine the position for installing the display. 5. Paste the mounting base onto the dashboard. Make sure the surface is free of moisture, dust, grime, oil, etc. before affixing the mounting base. Note: • Install the display in a position that conforms to the cautions on pages 32 and 33.
7. Adjust the display vertical position and display angle. ENGLISH 6. Fasten the mounting base onto the dashboard with the tapping screws. In order to stabilize the display, adjust the display vertical position so that the bottom of the display base contacts the dashboard. Adjust the display to a good angle for viewing. ESPAÑOL If you loosen the hidden screw with the supplied hexagonal wrench, you can adjust the vertical position of the display. (Refer to the step 3 on page 34.
Installation 8. Remove the display with the lock release lever. Pull the lock release lever. While holding it in that position, slide the display upward and detach it from its base. 37 9. Tightly screw in the hidden screw and replace the display on the mounting base.
Installing the Hide-away Unit ENGLISH Installation Precautions ESPAÑOL • Never install in locations such as the following because of the danger of malfunction due to high temperatures or humidity: * Locations such as a dashboard or rear tray where there is exposure to direct sunlight. * Near heater outlets. * Near doors, etc., where there is danger of exposure to rain. • When installing under the front seat, make sure there is no hindrance to sliding of the seat.
Specifications General Power source ...................................................................... 14.4 V DC (10.8 — 15.1 V × allowed) Grounding system ................................................................ Negative type Max. current consumption .................................................. 1.5 A Display Unit Screen size/Aspect ratio ...................................................... 6.5 inch wide/16:9 (effective display area: 154 × 87 mm) Pixels .................................
ENGLISH ESPAÑOL DEUTSCH FRANÇAIS ITALIANO NEDERLANDS 40
Table des matières Table des matières .................................... 1 Utilisation du menu de mise en oeuvre ............................................ 15 Cher Client .................................................. 2 Mise en place de l’écran .................................... 4 Retrait de l’écran .............................................. 5 Accès au menu de mise en oeuvre .................. 15 Réglage de l’image ..........................................
ENGLISH Cher Client: FRANÇAIS La sélection d’un équipement audio de qualité comme l’unité que vous venez d’acheter n’est que le début de votre plaisir musical. Maintenant, il est temps de penser à la manière de profiter au maximum des plaisirs que vous offre votre équipement. Ce fabricant et le Groupe “Consumer Electronics Group” de l’Association des Industries Electroniques veut que vous profitiez au maximum de votre équipement en l’utilisation à un niveau sûr.
IMPORTANTES MESURES DE SECURITE Veuillez lire toutes les explications relatives à cet écran et les conserver pour vous y référer éventuellement par la suite 1. Lisez attentivement toute cette brochure avant d’installer et d’utiliser votre écran. 2. Conservez ce manuel à portée de la main pour vous y référer ultérieurement. 3. Tenez compte de tous les avertissements formulés dans ce manuel et respectez soigneusement les consignes. 4.
Mise en place et retrait de l’écran ENGLISH Précautions: • Pour éviter des pannes, coupez la clé de contact du véhicule et mettez le système de navigation hors tension (OFF) avant d’installer ou de retirer l’écran. Prenez soin de ne pas serrer trop fort l’écran ou les boutons et de ne pas laisser tomber l’unité.
Mise en place et retrait de l’écran Retrait de l’écran • Tirez le levier de déblocage 3 et maintenez-le dans cette position, puis glissez l’écran vers le haut et séparez-le de sa base. • Par mesure de précaution contre le vol, retirez l’écran lorsque vous quittez le véhicule. Base Appuyez sur le bouton de déblocage tout en maintenant l’écran. 5 Conservez le bouton enfoncé et débranchez le connecteur.
INFORMATIONS IMPORTANTES Quelques mots concernant cet appareil ENGLISH FRANÇAIS • Ne placez pas l’écran à un endroit où il réduirait la visibilité du conducteur ou gênerait le fonctionnement des airbags du véhicule ou le réglage des appui-tête. • Cet appareil est destiné à être utilisé pour la fonction Écran tactile de l’appareil Pioneer de navigation. (Reportez-vous au mode d’emploi de l’appareil Pioneer de navigation pour connaître la manière d’utiliser l’écran tactile.
INFORMATIONS IMPORTANTES Service après-vente des produits PIONEER Veuillez contacter votre revendeur ou distributeur en ce qui concerne le service aprèsvente (et les conditions de garantie) ou tout autre information. En cas de nécessitée ou lorsque l’information recherchée n’est pas disponible, veuillez contacter Pioneer aux adresses suivantes; N’envoyez pas le produit à réparer sans avoir, au préalable, contacté nos bureaux. ■ U.S.A. Pioneer Electronics (USA) Inc. CUSTOMER SUPPORT DIVISION P.O.
Avant de vous servir de cet appareil Comment éviter de décharger la batterie ENGLISH Démarrez toujours le moteur du véhicule avant d’utiliser cet appareil. Faites toujours tourner le moteur lorsque vous utilisez l’appareil, sinon la batterie se décharge. Comment protéger l’écran à cristaux liquides FRANÇAIS • Protégez l’écran de la lumière solaire directe si l’appareil n’est pas en service.
Avant de vous servir de cet appareil Pour garantir une conduite sûre Cet appareil détecte si le frein de parking est ou n’est pas tiré. Lorsqu’il est installé la vidéo ne peut pas être vue lorsque le véhicule est en mouvement. Les différents réglages et mises au point ne peuvent pas non plus être effectués pendant la conduite. (Le message suivant s’affiche à l’écran lorsque le véhicule est en mouvement).
Tableau des commandes Composants et particularités ENGLISH 7 Unité écran FRANÇAIS 1 Récepteur de signal 2 Capteur de lumière ambiante Il capte la lumière ambiante. Ce système règle automatiquement la luminosité de l’écran pour compenser la lumière ambiante. Cette touche permet de passer d’une source à l’autre et de marche (ON) à arrêt (OFF). 4 Touche WIDE Il change la méthode d’agrandissement de la vidéo de 4:3 à 16:9. Elles règlent le niveau sonore du hautparleur intégré 0.
Opérations de base Mise sous tension N’oubliez pas de démarrer le moteur de la voiture avant de mettre sous tension pour économiser la durée de service de la batterie. 1. Démarrez le moteur de la voiture. T LOCK AR C ON ST AC 2. Mettez le système sous tension. Appuyez sur la touche SOURCE/POWER. Pour mettre hors tension l’appareil, appuyez, pendant au moins 2 secondes, sur la touche SOURCE/POWER. Réglage du niveau sonore Réglez le niveau sonore de la sortie audio du haut-parleur intégré.
Sélection d’une source ENGLISH Lorsqu’un appareil Pioneer de navigation est présent, vous pouvez sélectionner les images provenant des sources. • Sélection de la source désirée.
Opérations de base Changement du mode d’affichage sur l’écran Vous pouvez changer la manière d’afficher la vidéo de normal (rapport d’image 4:3) à large (16:9). Sélectionnez les modes d’affichage large en fonction du type de vidéo que vous regardez. 1. Affichez la source à regarder. (Reportez-vous à la page précédente.) 2. Choisissez un mode large.
Modes d’agrandissement disponibles ENGLISH FULL (Remplir) La vidéo au format 4:3 est agrandie uniquement dans le sens de la largeur (horizontalement). Vous bénéficiez alors d’une zone d’image plus large, sans perdre aucune donnée. FRANÇAIS JUST (Juste) DEUTSCH L’image semble davantage agrandie en largeur au fur et à mesure qu’on approche des bords de l’écran.
Utilisation du menu de mise en oeuvre Accès au menu de mise en oeuvre Ce système offre un certain nombre de possibilités en matière de mise en oeuvre des fonctionnalités et des réglages qui le rendent plus facile à utiliser. Personnalisez les réglages pour répondre à vos goûts et à l’environnement. 1. Affichez le menu de mise en oeuvre. Appuyez sur la touche MENU-ENTER. MENU P I CTURE ADJUST V I DEO SET T I NG AUD I O SET T I NG RE TURN 2. Sélectionnez un réglage.
Réglage de l’image ENGLISH BRIGHTNESS/CONTRAST/COLOR/HUE Les réglages sont conservés pour chaque source (NAVI SOURCE, AV IN1, AV IN2). Options Poste de réglage Fait apparaître le noir plus foncé ou plus clair. Contraste [CONTRAST]: Réduit ou élargit l’écart entre le noir et le blanc (assombrir). Couleur [COLOR]: Fait apparaître les couleurs plus sombres ou plus claires. Teinte [HUE]: Règle le rouge ou le vert de l’image.
Utilisation du menu de mise en oeuvre DIMMER (Atténuateur de luminosité) Regarder l’image peut devenir difficile après une longue période d’observation de la vidéo si l’écran est trop lumineux la nuit ou si la lumière ambiante s’assombrit. Vous pouvez choisir le niveau de luminosité parmi trois réglages: jour, soir et nuit, après quoi ce produit règle automatiquement la luminosité à un niveau optimal à l’intérieur de la plage de réglage que vous avez sélectionnée et en relation avec la lumière ambiante. 1.
Réglages relatifs à la vidéo ENGLISH Réglage de l’entrée [AV IN2] Pour regarder une vidéo à l’aide d’un magnétoscope, d’un lecteur de DVD ou d’une caméra de recul connectés à l’appareil déporté. FRANÇAIS 1. Affichez le menu de mise en oeuvre puis sélectionnez [VIDEO SETTING]. (Reportez-vous à la page 15.) 2. Choisissez [AV IN2]. V I DEO SE T T I NG AV I N 2 O F F REAR SOURCE NAV I POLAR I T Y BA T TERY P I CTURE A D J UST S E T UP P I CTURE MODE ST D I MG RETURN DEUTSCH 3.
Utilisation du menu de mise en oeuvre Fonctions pour la caméra de recul 7 Sélection automatique de la caméra de recul Si vous utilisez une caméra de recul, disponible dans le commerce et convenablement réglée, cet appareil affiche automatiquement l’image provenant de la caméra lorsque le sélecteur de vitesse est placé sur la position REVERSE (R). Pour de plus amples détails, consultez le revendeur ou un centre d’entretien agréé par Pioneer.
[PICTURE ADJUST] ENGLISH Appuyez sur la touche 5, ou sur la touche ∞, pour sélectionner [SET UP] puis appuyez sur la touche MENU-ENTER. Le menu [PICTURE ADJUST] s’affiche. (Reportez-vous à la page 16.) [PICTURE MODE] FRANÇAIS Pour l’image provenant de la caméra de recul, vous pouvez sélectionner [STD IMG] ou [MIR IMG]. [STD IMG]: L’image de la caméra de recul n’est pas inversée. [MIR IMG]: L’image de la caméra de recul est présentée comme une image de rétroviseur.
Utilisation du menu de mise en oeuvre Réglage audio 7 [GUIDE] Ce réglage agit automatiquement sur le silencieux de chaque source pendant le guidage vocal. Réglage du mélange du guide vocal [GUIDE] Après avoir relié l’appareil Pioneer de navigation à l’entrée 26 broches de l’appareil déporté, vous pouvez sélectionner l’une des trois manières de mélanger le guide vocal provenant de l’appareil Pioneer de navigation. 1. Affichez le menu de mise en oeuvre puis sélectionnez [AUDIO SETTING].
Utilisation convenable de l’écran ENGLISH ATTENTION • Si de l’humidité ou un corps étranger devait s’infiltrer dans l’unité, mettez-la immédiatement hors tension (OFF) et consultez votre concessionnaire ou un centre de service PIONEER agréé. Utiliser l’unité sans vérification pourrait provoquer un incendie, une électrocution ou d’autres problèmes.
Utilisation convenable de l’écran A propos de l’écran à cristaux liquides (LCD) • Si l’écran est près de la bouche d’un climatiseur d’air quand il est ouvert, assurez-vous que l’air du climatiseur ne souffle pas dessus. La chaleur du chauffage peut rompre l’écran à cristaux liquides et l’air frais du refroidisseur peut entraîner la formation d’humidité à l’intérieur, ce qui peut avoir pour effet d’endommager l’écran.
Branchement du système ENGLISH ATTENTION • PIONEER ne vous recommande pas d’installer ou d’entretenir vous-même cet écran, car ces travaux peuvent présenter un risque d’électrocution ou d’autres dangers. Confiez tous les travaux d’installation et d’entretien de votre écran au personnel de service Pioneer agréé. FRANÇAIS • Immobilisez toutes les câblages avec des serre-fils ou du ruban isolant. Ne laissez aucun conducteur à nu.
Branchement du système Remarque: • • 25 Position ACC OF F O STAR • O N • ACC STAR • F N • Si cette unité est installée dans un véhicule dont le contacteur d’allumage n’a pas de position ACC (accessoire), le fil rouge de l’unité doit être connecté à une borne couplée aux opérations de marche/arrêt du contacteur d’allumage. Sinon, la batterie du véhicule peut se décharger lorsque le véhicule n’est pas utilisé pendant plusieurs heures.
Noms et fonctions des prises de raccordement ENGLISH ■ Appareil déporté FRANÇAIS Elle connecte à l’écran. 2 Entrée audio Cinch (RCA) AV IN1 (blanc, rouge) 3 Entrée vidéo Cinch (RCA) AV IN1 (jaune) Elle reçoit la vidéo provenant d’un magnétoscope, d’un lecteur de DVD ou d’un autre équipement audiovisuel. 4 Sortie REMOTE OUT 5 Entrée audio Cinch (RCA) AV IN2 (blanc, rouge) 8 Alimentation Elle reçoit le câble d’alimentation fourni.
Branchement du système Branchement du câble d’alimentation Appareil deporté Câble d’alimentation Résistance de fusible Violet/Blanc (Reportez-vous à la page 31.) Noir (masse) A la carrosserie (partie métallique) du véhicule. Résistance de fusible Rouge A la borne électrique, contrôlée par la position ON/OFF de la clé de contact (courant continu 12 V). Ne raccordez pas ce fil sur les bornes continuellement sous tension. S’il est branché sur ces bornes, la batterie va se décharger.
Schéma de connexion (entrée VIDEO) ENGLISH Unité écran FRANÇAIS 3m Entrée audio Cinch (RCA) AV IN1 (blanc, rouge) Entrée vidéo Cinch (RCA) AV IN1 (jaune) DEUTSCH Appareil déporté Entrée AV IN1 Entrée AV IN2 ESPAÑOL Câbles Cinch (RCA) disponibles dans le commerce (vendus séparément) Vers la sortie vidéo ITALIANO Composant vidéo portatif disponible dans le commerce ou caméra de recul avec sortie Cinch (RCA) Brun Vers la sortie audio Remarque: NEDERLANDS • Si un autre équipement audiovisuel est
Branchement du système Schéma de connexion (Entrée 26 broches) Vous pouvez connecter un appareil Pioneer de navigation, vendu séparément.
Connexion à la sortie audio et vidéo Cinch (RCA) ENGLISH Appareil déporté FRANÇAIS Câble d’alimentation (Reportez-vous à la page 27.) Sortie vidéo Cinch (RCA) (jaune) Sortie audio Cinch (RCA) (blanc, rouge) Câbles Cinch (RCA) disponibles dans le commerce (vendus séparément) Vers l’entrée audio (R) Vers l’entrée audio (L) Second écran, platine vidéo, etc.
Branchement du système Connexion du conducteur ”REVERSE-GEAR SIGNAL INPUT“ Si vous utilisez ce produit avec une caméra de prise de vues de recul, la commutation automatique sur la vidéo AV IN2 lorsque le sélecteur de vitesse est placé sur la position REVERSE (R) est possible. Connectez la caméra de prise de vues de recul sur l’entrée AV IN2. (Reportez-vous à la page 28.) Appareil déporté Méthode de connexion Immobilisez le conducteur du feu de recul. Câble d’alimentation (Reportez-vous à la page 27.
Installation ENGLISH ATTENTION • Pour les instructions de montage de l’écran, consultez votre revendeur. FRANÇAIS • Les lois de certains gouvernements peuvent interdire ou limiter l’installation et l’emploi de ce système dans les voitures. Conformez-vous à toutes les lois et réglementations en vigueur sur l’installation, l’utilisation et le fonctionnement de l’écran.
Installation • L’utilisation de cet appareil est soumise aux lois des gouvernements en ce qui concerne son emplacement et son utilisation. PIONEER ne saurait être tenue responsable en cas d’anomalie, de dommage, ou de perte résultant de l’utilisation de l’appareil dans des conditions incorrectes ou en violation des lois du gouvernement. • Pour garantir une installation correcte, utilisez les pièces fournies de la manière indiquée.
Installation de l’écran avec la base de montage fournie 1. Collez les coussinets sur le fond de la base d’écran. Coussinets 3. Fixez l'écran sur la base de montage. Serrez la vis encastrée au moyen de la clé six pans fournie jusqu'à ce la base de montage et la base d'écran soient en contact étroit, sans vibration possible. FRANÇAIS Collez les coussinets sur le fond de la base d’écran afin d’éviter de griffer la planche de bord.
Installation 4. Déterminez la position d’installation de l’écran. Sans retirer la pellicule protectrice à l’arrière de la base de montage, placez l’écran sur la planche de bord et déterminez la position d’installation de l’écran. 5. Collez la base de montage sur la planche de bord. Assurez-vous que la surface est propre, sans humidité, poussière, huile, etc, avant de coller la base de montage. Remarque: • Installez l’écran à un endroit, respectant les précautions énoncée aux pages 32 et 33.
7. Ajustez la position verticale et l’angle de l’écran. ENGLISH 6. Fixez la base de montage sur la planche de bord à l’aide des vis taraudeuses. Pour stabiliser l’écran, ajustez sa position verticale de manière que le fond de la base de l’écran soit en contact avec la planche de bord. Ajustez ensuite l’écran à l’angle qui assure la meilleure vision. FRANÇAIS Si vous dessserrez la vis encastrée au moyen de la clé six pans fournies, vous pouvez régler la position verticale de l'écran.
Installation 8. Détachez l'écran en libérant le levier de déblocage. Tirez le levier de déblocage vers le haut. Maintenez-le dans cette position, puis glissez l'écran vers le haut et séparez-le de sa base. 37 9. Serrez la vis encastrée et replacez l'écran sur sa base de montage.
Installation de appareil déporté ENGLISH Précautions d’installation FRANÇAIS • N’installez pas cet appareil dans des emplacements tels que ceux indiqués ci-dessous, à cause des risques de dysfonctionnements dus à une température ou une humidité élevées: * le tableau de bord ou la plage arrière où il est exposé directement aux rayons du soleil. * près des grilles de sortie du chauffage. * Près des portes ou autres ouvertures, où il risque d’être exposé à la pluie.
Caractéristiques techniques Généralités Alimentation ........................................................................ 14,4 V CC (de 10,8 à 15,1 V possibles) Mise à la masse .................................................................... Pôle négatif Consommation maximale .................................................... 1,5 A Unité écran Taille de l’écran; rapport de la largeur à la hauteur ............ 6,5 pouces; 16:9 (Surface réelle d’affichage: 154 × 87 mm) Pixels ......................
ENGLISH FRANÇAIS DEUTSCH ESPAÑOL ITALIANO NEDERLANDS 40
PIONEER CORPORATION 4-1, MEGURO 1-CHOME, MEGURO-KU, TOKYO 153-8654, JAPAN PIONEER ELECTRONICS (USA) INC. P.O. Box 1540, Long Beach, California 90801-1540, U.S.A. TEL: (800) 421-1404 PIONEER EUROPE NV Haven 1087, Keetberglaan 1, B-9120 Melsele, Belgium TEL: (0) 3/570.05.11 PIONEER ELECTRONICS ASIACENTRE PTE. LTD. 253 Alexandra Road, #04-01, Singapore 159936 TEL: 65-6472-1111 PIONEER ELECTRONICS AUSTRALIA PTY. LTD.