Operation Manual DVD RDS AV RECEIVER AVH-5200DVD AVH-5200BT English
Contents Thank you for purchasing this PIONEER product. To ensure proper use, please read through this manual before using this product. It is especially important that you read and observe WARNINGs and CAUTIONs in this manual. Please keep the manual in a safe and accessible place for future reference.
Contents Changing audio language during playback (Multi-audio) 30 Changing the subtitle language during playback (Multi-subtitle) 30 Changing the viewing angle during playback (Multi-angle) 30 Return to the specified scene 31 Selecting audio output 31 PBC playback 31 Selecting tracks from the track title list 31 Selecting files from the file name list 31 Using advanced sound retriever 32 Changing audiobook speed 32 Displaying lists related to the currently playing song (Link Search) 32 Playing DivXÒ VOD co
Section 01 Precautions IMPORTANT SAFEGUARDS Please read all of these instructions regarding your display and retain them for future reference. 1 Read this manual fully and carefully before operating your display. 2 Keep this manual handy as a reference for operating procedures and safety information. 3 Pay close attention to all warnings in this manual and follow the instructions carefully. 4 Do not allow other persons to use this system until they have read and understood the operating instructions.
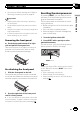
Section Precautions When using a display connected to REAR MONITOR OUTPUT Passengers in the rear seat can also watch DVDs if you connect this unit to a display using the REAR MONITOR OUTPUT. ! When no power is supplied to this unit, such as when the vehicle battery is being replaced, the microcomputer of this unit returns to its initial condition. We recommend that you transcribe the audio adjustment data.
Section 02 Before You Start If you want to dispose this product, do not mix it with general household waste. There is a separate collection system for used electronic products in accordance with legislation that requires proper treatment, recovery and recycling. Private households in the member states of the EU, in Switzerland and Norway may return their used electronic products free of charge to designated collection facilities or to a retailer (if you purchase a similar new one).
Section Before You Start ! You can turn off the warning tone. Refer to Switching the warning tone on page 50. ! Handle gently when removing or attaching the front panel. ! Avoid subjecting the front panel to excessive shock. ! Keep the front panel out of direct sunlight and high temperatures. ! If removed, replace the front panel on the unit before starting up your vehicle.
Section 02 Before You Start Feature demo mode The feature demo automatically starts when you select Off for the source and continues while the ignition switch is set to ACC or ON. To cancel the feature demo, press and hold MUTE/ . Press and hold MUTE/ again to restart. Operating the feature demo while the car engine is turned off it may drain the battery power.
Section What’s what 03 Head unit What’s what CAUTION ! Use an optional Pioneer USB cable (CD-U50E) to connect the USB audio player/USB memory as any device connected directly to the unit will protrude out from the unit and may be dangerous. ! Do not use unauthorized products. ! For details on how to operate a navigation unit from this unit, refer to its operation manual. Note When the navigation unit is connected, press MODE to switch to the navigation display.
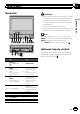
Section 04 Basic Operations Basic Operations 1 2 Wed 28 may 12:45 PM 3 4 Radio Rear Front 5 6 Rear View Disc iPod SD Adjusting the volume 1 Rotate MUTE/ to increase or decrease the volume. SD AUX 1 Touch panel keys 1 2 Wed 28 may 3 4 5 6 Notes Displaying the source menu. 12:45 PM Rear Switching to clock adjustment display. Refer to Setting the clock on page 13. Radio Source icon Selecting a favorite source.
Section Basic Operations 04 Operating the scroll bar and the scrubber bar Activating the touch panel keys 1 1 1 Audio F/R 0 L/R 0 Graphic EQ Super Bass Wed 28 may 12:45 PM 01 Sonic Center Control L+R 01 L/R:0 Loudness 8 Subwoofer 01 Abcdeabcdeabcdeabcdeab On Auto EQ Basic Operations Fader/Balance 12 Off 01:45 21 1 -02:45 2 1 Wed 28 may 12:45 PM Return Dolby D 96k24 Mch 01 01 L+R 01 3 Abcdeabcdeabcdeabcdeab 8 12 01:45 -02:45 2 1 Scroll icon Appears when selecta
Section 04 Basic Operations Common operations for menu settings/lists (AVH-5200BT only) Starting the Bluetooth telephone menu. Refer to Introduction of Bluetooth telephone operations on page 23. Displaying the list menu. Starting the search function. Displaying the menu. Refer to Introduction of menu operations on page 39. Displaying still images as a slide show when listening to another source. Viewing slide shows Refer to Introduction of still image playback operations on page 21.
Section Basic Operations 1 Display the system menu. Refer to Introduction of menu operations on page 39. 2 Touch Display Tilt. Ejecting an SD 1 Removing the front panel Refer to Removing the front panel on page 7. 2 Push an SD. 3 Ejecting an SD Setting the clock 1 Switch to Clock Adjustment display. Refer to Basic Operations on page 10. 2 Select the item to set. 3 Touch a or b to set the correct date and time.
Section 05 Tuner Introduction of tuner operations 1 2 3 Radio Local TA Abcdeabcdeabcde Abcdeabcdeabcde News 4 7 Recalling radio station frequencies assigned to preset tuning keys. Refer to Storing and recalling stations on page 25. 8 Displaying radio text Refer to Displaying radio text on page 25. Storing and recalling radio text. Refer to Storing and recalling radio text on page 25. 5 Wed 28 may 12:45 PM 87.50 MHz P.CH 2 Band: FM1 87.
Section Playing moving images 06 1 Touch panel keys Introduction of video playback operations You can view DVD/DVD-R/DVD-RW/CD/CD-R/ CD-RW/USB/SD/iPod. Wed 28 may Selecting the repeat range. Refer to Repeating playback on page 28. 2 During playback, touch the point at which you want to resume playback the next time the disc is loaded. Refer to Resume playback (Bookmark) on page 29. 3 Changing the screen mode. Refer to Changing the wide screen mode on page 33. 4 Switching the equalizer curves.
Section 06 Playing moving images 9 a Starting the search function. Refer to Searching for the part you want to play on page 29. Refer to Selecting files from the file name list on page 31. Displaying iPod menus. Refer to Playing videos from your iPod on page 28 and Browsing for a video/music on the iPod on page 28. Returning to normal playback during paused, slow motion, or frame-by-frame playback. h Speeding down the playback speed in four steps, during slow motion playback on Video CD.
Section Playing moving images ! ! ! ! tails, refer to Resume playback (Bookmark) on page 29. Some operations may not be available while watching a DVD due to the programming of the disc. In such cases, the icon appears on the screen. To ensure proper operation, connect the dock connector cable from the iPod directly to this unit. If the ignition switch is set to ACC or ON, the iPod battery will be charged while connected. However, the iPod battery is not charged when you select an SD as the source.
Section 07 Playing audio Introduction of sound playback operations You can listen to DVD-R/DVD-RW/CD/CD-R/ CD-RW/USB/SD/iPod sound files. 1 2 3 4 S.Rtrv ROM ALL Songs g 4 Switching the equalizer curves. Refer to Using the equalizer on page 40. Touch and hold for more than two seconds to turn the auto-equalizer on or off. Refer to Using the autoequalizer on page 41. 5 Displaying a list of track titles/file names to select songs on a CD.
Section Playing audio c Switching to Link Search mode to play songs related to the currently playing song on the iPod. Refer to Displaying lists related to the currently playing song (Link Search) on page 32. d Playing all songs on the iPod in random order. Refer to Playing all songs in random order (shuffle all) on page 28. e Conducting operation from your iPod and listening to it using your car’s speaker’s. Refer to Operating this unit’s iPod function from your iPod on page 27.
Section 07 Playing audio ! USB storage device that can be charged via USB will be recharged when plugged in and the ignition switch is set to ACC or ON. However, the USB storage device that can be charged via USB will not be recharged when you select an SD as the source. ! Disconnect the USB portable audio player/ USB memory when you are done using it.
Section Playing still images 08 Introduction of still image playback operations 4 Displaying the file name list to select the files. Refer to Selecting files from the file name list on page 31. 5 Starting or pausing the slideshow. 6 Rotating the displayed picture 90° clockwise 7 Capturing an image in JPEG files. Refer to Capture an image in JPEG files on page 33. 8 Selecting a folder. 9 Switching between media file types. Refer to Switching the media file type on page 27.
Section 08 Playing still images Notes ! This unit can play back a JPEG file recorded on CD-R/RW/ROM/SD/USB storage device. (Please see the following section for files that can be played back. Refer to page 67.) ! Files are played back in file number order and folders are skipped if they contain no files. (If folder 01 (ROOT) contains no files, playback commences with folder 02.
Section Bluetooth Telephone 09 Introduction of Bluetooth telephone operations 1 Wed 28 may Radio 12:45 PM 1 ! Be sure to park your vehicle in a safe place and apply the parking brake when performing this operation. 1 Incoming call notice Indicates that an incoming call has been received and has not been checked yet. ABCDEHGHI 01 ! Not displayed for calls made when your cellular phone is disconnected from this unit. 012345678901 Abcdeabcdeabcde Abcdeabcdeabcde P.
Section 09 Bluetooth Telephone 9 Adjusting the other party’s listening volume. Refer to Adjusting the other party’s listening volume on page 35. a Accepting an incoming call. Making a phone call, when selecting a phone number. Switching between callers on hold. b Ending a call. Rejecting an incoming call. Canceling call waiting. Accepting an incoming call Ending a call 1 Press MUTE/ . Notes ! Private mode can only be operated while you are talking on the phone.
Section Detailed instructions Storing and recalling stations You can easily store up to six stations for each band as presets. 1 Display the preset screen. Refer to Introduction of tuner operations on page 14. The preset screen appears in the display. 2 Touch and hold one of the preset tuning keys to store the selected frequency in the memory. The selected radio have been stored in the memory. 3 Touch one of the preset tuning keys to select the desired station.
Section Detailed instructions 10 1 Tune in to a TP or enhanced other network’s TP station. indicator lights up. 2 Turn Traffic announcement on. Refer to Introduction of tuner operations on page 14. # If the TA function is turned on when you are not tuned in to a TP or enhanced other network’s indicator lights up dimly. TP station, the 3 Rotate MUTE/ to adjust the TA volume when a traffic announcement begins.
Section Detailed instructions Switching the media file type When playing a disc containing a mixture of various media file types, such as DivX and MP3, you can switch between media file types to play. Audio data (CD-DA) and JPEG picture files on DVD-R/RW/ROM cannot be played back on this unit.
Section Detailed instructions 10 Playing all songs in random order (shuffle all) (Function for iPod) This method plays all songs on the iPod randomly.
Section Detailed instructions 2 Touch one of the categories in which you want to search for a video/music. ! ! ! ! ! ! ! ! ! ! ! ! ! Video Playlists (video playlists) Movies (movies) Music Videos (music videos) Video Podcasts (video podcasts) TV Shows (TV shows) Playlists (playlists) Artists (artists) Albums (albums) Songs (songs) Podcasts (podcasts) Genres (genres) Composers (composers) Audiobooks (audiobooks) 3 Touch the title of the list that you want to play.
Section Detailed instructions 10 For DVD videos, you can select Title (title), Chapter (chapter) or 10key (numeric keypad). For video CDs, you can select Track(track) or 10key(numeric keypad). ! Chapter search is not available when disc playback is stopped. ! This function cannot be operated during some DVD videos or Video CD playback featuring PBC (playback control). nected, select an audio setting other than DTS.
Section Detailed instructions Note 10 4 Start playback from the selected part. You will return to normal playback if you change the viewing angle during fast forward/fast rewind, pause or slow motion playback. Return to the specified scene (Function for DVD video) This function cannot be used if a specified scene has not been preprogrammed on the DVD disc.
Section Detailed instructions 10 # If folder 01 (ROOT) contains no files, playback commences with folder 02. 3 Touch the title of the list that you want to play. 3 4 Start playback of the selected list. Start playback of the selected list. Starting playback of the selected list. Starting playback of the selected list. ! If no related albums/songs are found, Not Found is displayed. Using advanced sound retriever Automatically enhances compressed audio and restores rich sound.
Section Detailed instructions Capture an image in JPEG files You can capture image data and use it as wallpaper. Images can be stored and recalled easily in this unit. ! Only one image can be stored on this unit. Old images are overwritten with the new ones. 1 Pause the slideshow when the desired image is displayed. Refer to Introduction of still image playback operations on page 21. Refer to Introduction of still image playback as a slideshow operations on page 22. 2 Capture the image.
Section Detailed instructions 10 After finding the number you want to call in the phone book, you can select the entry and make the call. 1 Switch to phone book mode. Refer to Introduction of Bluetooth telephone operations on page 23. The phone book display appears. 2 Select the phone number list. The detailed phone number list of the selected entry is displayed. 3 Select the phone number. # If you want to change the character to Russian, touch the icon. To return to English, touch the icon again.
Section Detailed instructions 2 Select Missed Calls, Dialled Calls or Received Calls. 10 # This function can be performed even while talking on the phone. # Settings can be stored for each device. Displaying the received call list. Switching the ring tone Displaying the dialed call list. Displaying the missed call list. 3 Touch the list number to select a phone number. Name and phone number are displayed in the detailed list. # If you want to store the phone number, touch and hold the list.
Section 10 Detailed instructions Making a call by entering phone number Pairing from this unit (Function of AVH-5200BT) (Function of AVH-5200BT) Connection 01: Phone1 02: Phone2 03: Phone3 04: Phone4 05: Phone5 Wed 28 may 12:45 PM 1 2 3 4 5 6 7 8 9 * 0 # 1 ABCDEHGHI 01 012345678901 Off C + Important Be sure to park your vehicle in a safe place and apply the parking brake when performing this operation. 1 Switch to the entering phone number mode.
Section Detailed instructions # The PIN code is set to 0000 as the default, but can be changed. Refer to Entering PIN code for Bluetooth wireless connection on the next page. # When establishing connection, the icon is displayed. Touch the icon to disconnect the device. Disconnecting a Bluetooth device. # If you want to delete a paired Bluetooth telephone, display Delete OK?. Touch Yes to delete the device. Deleting a paired device.
Section Detailed instructions 10 This function sets whether or not to make this unit visible to the other device. Initially, this function is set to on. 1 Display the Bluetooth Connection Menu. Refer to Introduction of Bluetooth telephone operations on page 23. 2 Touch Visibility to select visibility off. ! To turn visibility on, touch Visibility again. Displaying BD (Bluetooth Device) address (AVH-5200BT only) This unit displays its BD address. 1 Display the Bluetooth Connection Menu.
Section Menu operations 11 Introduction of menu operations 21 Audio Fader/Balance F/R 0 L/R 0 Graphic EQ Super Bass Auto EQ Notes ! You can display the Video setup menu when a Disc, USB or SD source is selected. ! If you start the Video setup menu, playback is stopped. ! You cannot display the Audio function menu when the mute function is on or a JPEG file is playing. On Sonic Center Control L/R:0 Loudness High Subwoofer Off 34 5 1 Touch panel keys 2 Menu column display 1 Display menus.
Section 11 Menu operations Audio Adjustments Notes ! When selecting FM as the source, you cannot switch to Source Level Adjuster. ! When selecting Bluetooth telephone as the source, you can only switch to Fader/Balance. Using fader/balance adjustment You can change the fader/balance setting to provide an ideal listening environment for all of the occupied seats. 1 Display the audio function menu. Refer to Introduction of menu operations on the previous page.
Section Menu operations 1 Display the audio function menu. Refer to Introduction of menu operations on page 39. 2 Touch Graphic EQ on the audio function menu. 3 Touch c or d to select the desired item. Powerful—Natural—Vocal—Custom1— Custom2—Flat—Super Bass 4 Touch the Equalizer band to adjust. 5 Touch a or b to adjust the level of the equalizer band. Range: +12dB to -12dB 11 3 Touch c or d to select a listening position.
Section 11 Menu operations 6 Touch c or d next to Frequency to select the cut-off frequency. 50Hz—63Hz—80Hz—100Hz—125Hz Only frequencies lower than those in the selected range are outputted from the subwoofer. Boosting the bass 1 Display the audio function menu. Refer to Introduction of menu operations on page 39. You can boost the bass level. 2 Compare the FM volume level with the level of the source you wish to adjust. 1 Display the audio function menu.
Section Menu operations 11 Setting up the DVD player Setting the audio language Setting the subtitle language You can set the preferred audio language. You can set a desired subtitle language. When available, the subtitles will be displayed in the selected language. 1 Display the Video Setup Menu. Refer to Introduction of menu operations on page 39. 1 Stop playback. Refer to Introduction of video playback operations on page 15. 2 Touch Audio Language on the Video Setup menu.
Section 11 Menu operations Setting the multi-angle DVD display The angle icon can be set so it appears on scenes where the angle can be switched. 1 Display the Video Setup Menu. Refer to Introduction of menu operations on page 39. 2 Touch Multi Angle on the Video Setup menu to turn angle icon display on or off. Setting the aspect ratio There are two kinds of display: a wide screen display that has a width-to-height ratio (TV aspect ratio) of 16:9, and regular display that has a TV aspect of 4:3.
Section Menu operations 11 Setting the code number and level details, refer to the instruction manual that came with the disc. A code number must be registered in order to play back discs with parental lock. 1 Display the Video Setup Menu. Refer to Introduction of menu operations on page 39. 2 Touch Parental on the Video Setup menu. 3 Touch 0 to 9 to input a four digit code number. # To cancel the entered numbers, touch C. 4 Registering the code.
Section 11 Menu operations 2 Touch DivX Subtitle on the Video Setup menu to select the desired subtitle setting. ! Original – Display the DivX subtitles ! Custom – Display the DivX external subtitles Notes ! Up to 42 characters can be displayed on one line. If more than 42 characters are set, the line breaks and the characters are displayed on the next line. ! Up to 126 characters can be displayed on one screen. If more than 126 characters are set, the excess characters will not be displayed.
Section Menu operations System settings Switching the auxiliary setting Activate this setting when using an auxiliary device connected to this unit. 1 Display the system menu. Refer to Introduction of menu operations on page 39. 2 Touch AUX Input on the system menu to turn AUX Input on or off. Setting AV input Activate this setting when using an external video component connected to this unit. 1 Display the system menu. Refer to Introduction of menu operations on page 39.
Section Menu operations 11 RDS setting Limiting stations to regional programming # To turn Auto PI Seek off, touch Auto PI again. When AF is used, the regional function limits the selection of stations to those broadcasting regional programs. Switching sound muting/ attenuation 1 Select the Radio source. Refer to Basic Operations on page 10. 2 Display the system menu. Refer to Introduction of menu operations on page 39. 3 Touch RDS Setup on the system menu.
Section Menu operations — On-screen display — Multi language setting for DivX ! If the embedded language and the selected language setting are not the same, text information may not be displayed properly. ! Some characters may not be displayed properly. ! To complete this operation, switch the ignition key off and on after you set this setting. 1 Display the system menu. Refer to Introduction of menu operations on page 39. 2 Touch System Language on the system menu to select the desired language.
Section 11 Menu operations 3 Touching the Flap Set Back keys allows you to move the LCD panel back and forth. The LCD panel slides to the back. The LCD panel slides to the front. Setting the automatic open function To prevent the display from hitting the shift lever of an automatic vehicle when it is in the P (park) position, or when you do not wish the display to open/close automatically, you can set the automatic open function to manual mode. 1 Display the system menu.
Section Menu operations 11 Before operating the auto EQ function You can switch the video output format of REAR MONITOR OUTPUT between NTSC and PAL. ! Carry out auto EQ in as quiet a place as possible, with the car engine and air conditioning switched off. Also cut power to car phones or portable telephones in the car, or remove them from the car before carrying out auto EQ. Sounds other than the measurement tone (surrounding sounds, engine sound, telephones ringing etc.
Section Menu operations 11 Performing auto EQ 1 Stop the car in a place that is quiet, close all the doors, windows and sun roof, and then turn the engine off. If the engine is left running, engine noise may prevent correct auto EQ. 2 Fix the optional microphone in the center of the headrest of the driver’s seat, facing forward. The auto EQ may differ depending on where you place the microphone. If desired, place the microphone on the front passenger seat to carry out auto EQ.
Section Menu operations 11 Entertainment settings Selecting the OSD color Selecting the illumination color The OSD color can be changed. This unit is equipped with multiple-color illumination. 1 Display the entertainment menu. Refer to Introduction of menu operations on page 39. Direct selection from preset illumination colors 2 Touch Appearance. 3 Touch Screen. You can select an illumination color from the color list. 4 Touch one of the colors on the list. 1 Display the entertainment menu.
Section 11 Menu operations Customizing menus 1 Display menu columns to register. Refer to Introduction of menu operations on page 39. 2 Touch and hold the menu column to register it. # To cancel registration, touch and hold the menu column again. 3 Display the custom menu and choose a registered menu. Refer to Introduction of menu operations on page 39. Note You can register up to 12 columns.
Section Other Functions Changing the picture adjustment You can adjust the Brightness (brightness), Contrast (contrast), Color (color) ,Hue (hue), Dimmer (dimmer), Temperature (temperature), Black Level (black level) and RGB Dot ADJ (RGB dot clock adjustment) for each source and rear view camera. ! You cannot adjust Color, Hue, Contrast and Black Level for the audio source. 1 Press and hold MUTE to display Picture Adjustment. The adjustment function names are displayed.
Section 12 Other Functions Adjusting the response positions of the touch panels (Touch Panel Calibration) If you feel that the touch panel keys on the screen deviate from the actual positions that respond to your touch, adjust the response positions of the touch panel. There are two adjustment methods: 4-point adjustment, in which you touch four corners of the screen; and 16-point adjustment, in which you make fine-adjustments on the entire screen. ! Touch the screen gently for adjustment.
Appendix Additional Information Common Symptom Cause The power will not turn on. The unit will not operate. Confirm once more Leads and connectors are incor- that all connecrectly connected. tions are correct. The fuse is blown. Action (Reference page) Rectify the cause and then replace the fuse. Be sure to install a fuse with the same rating. Press RESET. (Page Noise and/or other factors are 9) causing the builtin microprocessor to operate incorrectly.
Appendix Additional Information Symptom Cause Action (Reference page) Symptom Cause Action (Reference page) Nothing is displayed. The touch panel keys cannot be used. The rear view camera is not connected. Camera Polarity is at incorrect setting. Connect a rear view camera. Press and hold MUTE to return to the source display and then select the correct setting for Camera Polarity. (Page 50) Dialog language (and subtitle language) cannot be switched.
Appendix Additional Information Cause Action (Reference page) The image is extremely unclear/distorted and dark during playback. Some discs fea- Since this unit is compatible with ture a signal to prohibit copying. the analog copy generation management system, when playing a disc that has a signal prohibiting copying, horizontal stripes or other imperfections may appear when viewed on some displays. This is not a malfunction.
Appendix Additional Information Message Cause Action The inserted disc Select a file that Unplayable File-High Defi- contains a high can be played. definition DivX nition file. It is not possi- This unit’s flash Select a file that ble to write it memory used as can be played. the temporary in the flash. storage area is full. Authorization This unit’s DivX Error registration code has not been authorized by the DivX VOD contents provider.
Appendix Additional Information Cause Action Message Cause The USB connector or USB cable has shortcircuited. Check that the USB connector or USB cable is not caught in something or damaged. Unplayable File Select a file that This type of file cannot be played can be played. on this unit. Format Read Ready The connected USB portable audio player/ USB memory consumes more than maximum allowable current. Disconnect the USB portable audio player/USB memory and do not use it.
Appendix Additional Information Bluetooth Message Message Cause Action Error-10 The power failed for the Bluetooth module of this unit. Turn the ignition switch OFF and then to ACC or ON. If the error message is still displayed after performing the above action, please contact your dealer or an authorized Pioneer Service Station.
Appendix Additional Information Messages Translation CAUTION: Screen image may appear reversed. Pioneer recommends the use of a camera which outputs mirrorreversed images. Otherwise, the screen image will appear reversed.
Appendix Additional Information Indicator list Area 1 Area 2 1+1ch Indicates the audio channel. 2 ch Mch Indicates that a disc with PBC On is being played. Area 3 Area 1 Indicates that the selected frequency is being broadcast in stereo. Indicates that a radio text has been received. Indicates that TA (traffic announcement standby) is on. Indicates that the news program interruption is on. Indicates that a Bluetooth telephone is connected. Indicates that the digital format is Dolby Digital.
Appendix Additional Information Shows the disc/album currently being played. Shows the track/song currently being played. Shows the replay time currently being played. Shows the genre of the track/song currently being played. Indicates that the feature demo is on. Shows the comment currently being played. Shows the artist name for the track/ song currently being played. Handling guideline Additional Information Area 2 Discs and player Shows cellular phone information.
Appendix Additional Information Do not attach labels, write on or apply chemicals to the surface of the discs. Depending on the USB storage device, the device may cause noise to occur on the radio. To clean a disc, wipe the disc with a soft cloth outward from the center. Copyright protected files that are stored in the USB devices cannot be played back. Condensation may temporarily impair the player’s performance. Leave it to adjust to the warmer temperature for about one hour.
Appendix Additional Information Firmly secure the iPod when driving. Do not let the iPod fall onto the floor, where it may become jammed under the brake or accelerator pedal. For details, refer to the manuals for the iPod. About iPod settings ! When an iPod is connected, this unit changes the EQ (equalizer) setting of the iPod to off in order to optimize the acoustics. When you disconnect the iPod, the EQ returns to the original setting. ! You cannot set Repeat to off on the iPod when using this unit.
Appendix Additional Information The ID code of this unit must be registered to a DivX VOD provider in order to playback DivX VOD files. For information on ID codes, refer to Displaying the DivXÒ VOD registration code on page 46. Sampling frequency: 8 kHz to 44.1 kHz For more details about DivX, visit the following site: http://www.divx.com/ AAC file bought on the iTunes Store (.m4p file extension): No Important ! When naming a JPEG image file, add the corresponding filename extension (.jpg, .jpeg, .
Appendix Additional Information Multi-session playback: Yes Packet write data transfer: No Regardless of the length of blank section between the songs of the original recording, compressed audio discs play with a short pause between songs. External storage device (USB, SD) Playable folders: up to 6 000 Playable files: up to 65 535, up to 255 for one folder Playback of copyright protected files: No Partitioned external storage device (USB, SD): Only the first playable partition can be played.
Appendix Additional Information Example of a hierarchy 01 02 03 04 05 Level 1 Level 2 Level 3 Level 4 : Folder : Compressed audio file 01 to 05: Folder number 1 to 6: Playback sequence Disc Folder selection sequence or other operation may differ depending on the encoding or writing software. External storage device (USB, SD) Playback sequence is the same as recorded sequence in the external storage device (USB, SD). To specify the playback sequence, the following method is recommended.
Appendix Additional Information intended for home and other limited viewing uses only unless otherwise authorized by Macrovision Corporation. Reverse engineering or disassembly is prohibited. Bluetooth LED (light-emitting diode) backlight ! At low temperatures, using the LED backlight may increase image lag and degrade the image quality due to the characteristics of the LCD screen. Image quality will improve with an increase in temperature.
Appendix Additional Information MP3 Supply of this product only conveys a license for private, non-commercial use and does not convey a license nor imply any right to use this product in any commercial (i.e. revenuegenerating) real time broadcasting (terrestrial, satellite, cable and/or any other media), broadcasting/streaming via internet, intranets and/ or other networks or in other electronic content distribution systems, such as pay-audio or audio-on-demand applications.
Appendix Additional Information Additional Information Manufactured under license from Dolby Laboratories. Dolby, Pro Logic, and the doubleD symbol are trademarks of Dolby Laboratories. DivX DivXÒ is a registered trademark of DivX, Inc., and is used under license. ABOUT DIVX VIDEO: DivXÒ is a digital video format created by DivX, Inc. This is an official DivX Certified device that plays DivX video. Visit www.divx.com for more information and software tools to convert your files into DivX video.
Appendix Additional Information Language code chart for DVD Language (code), input code Japanese (ja), 1001 Dzongkha (dz), 0426 English (en), 0514 Ewe (ee), 0505 French (fr), 0618 Esperanto (eo), 0515 Spanish (es), 0519 Estonian (et), 0520 German (de), 0405 Basque (eu), 0521 Italian (it), 0920 Persian (fa), 0601 Chinese (zh), 2608 Fulah (ff), 0606 Dutch, Flemish (nl), 1412 Finnish (fi), 0609 Portuguese (pt), 1620 Fijian (fj), 0610 Swedish (sv), 1922 Faroese (fo), 0615 Russian (ru), 1821 Western Frisian (fy
Appendix Additional Information General Power source ............................. 14.4 V DC (10.8 V to 15.1 V allowable) Grounding system ................... Negative type Maximum current consumption ..................................................... 10.0 A Dimensions (W × H × D): DIN Chassis ..................... 180 mm × 50 mm × 160 mm Nose ........................... 188 mm × 58 mm × 32 mm D Chassis ..................... 178 mm × 50 mm × 165 mm Nose ...........................
Appendix Additional Information WMA decoding format ......... Ver. 7, 7.1, 8, 9, 10, 11 (2ch audio) (Windows Media Player) AAC decoding format ............ MPEG-4 AAC (iTunes encoded only) (.m4a) (Ver. 8.2 and earlier) DivX decoding format ............ Home Theater Ver. 3, 4, 5.2, 6 (.avi, .divx) FM tuner Frequency range ...................... 87.5 MHz to 108.0 MHz Usable sensitivity ..................... 9 dBf (0.8 µV/75 W, mono, S/N: 30 dB) Signal-to-noise ratio ...............
En 77
En
En 79
PIONEER CORPORATION 4-1, MEGURO 1-CHOME, MEGURO-KU TOKYO 153-8654, JAPAN PIONEER ELECTRONICS (USA) INC. P.O. Box 1540, Long Beach, California 90801-1540, U.S.A. TEL: (800) 421-1404 PIONEER EUROPE NV Haven 1087, Keetberglaan 1, B-9120 Melsele, Belgium/Belgique TEL: (0) 3/570.05.11 PIONEER ELECTRONICS ASIACENTRE PTE. LTD. 253 Alexandra Road, #04-01, Singapore 159936 TEL: 65-6472-7555 PIONEER ELECTRONICS AUSTRALIA PTY. LTD.