
Owner's Manual
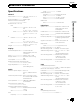
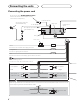

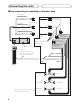
Table Of Contents
- Operation Manual
- Reset
- Clock Set
- Demo Mode
- Table of Contents
- Removing / Attaching Front Panel
- Parking Brake Interlock
- Touch Panel Calibration
- Parts & Controls
- Operation
- Basic Operation
- Tuner
- Playing Video
- Playing Audio
- Playing Still Images
- Bluetooth (130P5200BT)
- Introduction
- Calling a Number in the Phone Book
- Selecting a Number by Alphabet Search Mode
- Using the Missed, Received and Dialed Call Lists
- Setting Automatic Answering
- Adjusting the Other Party’s Listening Volume
- Ring Tone On / Off
- Using the Preset Dial Lists
- Making a Call by Entering Phone Number
- Setting the Private Mode
- Pairing from This Unit
- Using a Bluetooth Device to Pair
- Connecting to a Bluetooth Device Automatically
- Switching Visible Unit
- Displaying BD (Bluetooth Device) Address
- Entering PIN Code for Bluetooth Wireless Connection
- Registering a Connected Cellular Phone
- Bluetooth (130AVHP520 - Adapter Required)
- Introduction of Bluetooth Telephone Operations
- Bluetooth Audio Operations
- Setting Up for Bluetooth Audio
- Using the Missed, Received and Dialed Call Lists
- Setting Automatic Answering
- Switching the Ring Tone
- Using a Cellular Phone to Initiate a Connection
- Voice Recognition
- Connecting a Bluetooth Audio Player
- Connecting to a Bluetooth Device Automatically
- Displaying BD (Bluetooth Device) Address
- XM / SIRIUS Tuner
- HD Radio Tuner
- Using the AUX Sources
- Advanced Operations
- Tuner
- HD Radio
- iTunes Tagging
- Switching the Media File Type
- Operating the DVD Menu
- Operating This Unit’s iPod Function from your iPod
- Random
- Repeat
- Playing Videos from your iPod
- Browsing on the iPod
- DVD-Video Playback Options
- PBC Playback
- Selecting Tracks from the Track Title List
- Selecting Files from the File Name List
- Advanced Sound Retriever
- Audiobook Speed
- iPod Link Search
- DivX VOD Content
- Capture an Image in JPEG Files
- Changing the Wide Screen Mode
- XM / SIRIUS
- Changing the Picture Adjustment
- Setting Rear Monitor Output
- Touch Panel Calibration
- Using the AUX Sources
- Menu Operations
- Overview
- Common Menu Operations
- Audio Adjustments
- Setting Up the DVD Player
- System Settings
- AUX Source On / Off
- AV Input On / Off
- Rear Output & Subwoofer Controller
- Mute / Attenuation Settings
- Changing Languages for CAUTION
- Menu Language
- Clearing Bluetooth Memory (130P5200BT Only)
- Updating Bluetooth Connection Software (130P5200BT Only)
- Displaying the Bluetooth System Version (130P5200BT Only)
- Adjusting LCD Panel Slide Position
- Setting Automatic Open Function
- Switching the Warning Tone
- Rear View Camera
- Auto EQ
- Entertainment (Display) Settings
- Customizing Menus
- Troubleshooting
- Error Messages
- Specs
- Installation Manual
- Warranty

4
Connecting the units
Connecting the power cord
This product
Microphone (supplied)
(AVH-P5200BT only)
4 m
(13 ft. 1 in.)
Fuse (10 A)
RGB input
IP-BUS input
(Blue)
Yellow
Connect to the constant 12 V supply terminal.
Fuse resistor
Red
Connect to terminal controlled by ignition switch (12 V DC).
Black (chassis ground)
Connect to a clean, paint-free metal location.
Left Right
Front speaker Front speaker
R
ear speaker or
Subwoofer (4 Ω)
White
Gray
Gray/blackWhite/black
Green Violet
Green/black Violet/black
Violet
Violet/black
Not used.
Green
Green/black
When using a subwoofer of 70 W (2 Ω), be sure to connect with Violet and Violet/black leads of this unit. Do not
connect anything to Green and Green/black leads.
Subwoofer (4 Ω)
× 2
Rear speaker or
Subwoofer (4 Ω)
Orange/white
Connect to lighting switch terminal.
Fuse resistor
Wired remote input (WIRED REMOTE INP
UT)
Hard-wired remote control adaptor can be
connected (sold separately).
Microphone input Jack (MIC)
(A
VH-5200BT only)
17 cm (6-3/4 in.)
17 cm (6-3/4 in.)