H?}Radio· AVH-X491 BHS AVH-X391 BHS This HD Radio receiver enables: Pso) DVD RDS AV RECEIVER RECEPTEUR A/V RDS DVD RADIO AV RDS CON DVD HD2/HD3) Digital Sound) iTunes" Tagging) Artist Experience) ~ Important (Serial number) The serial number is located on the bottom of this unit. For your own security and convenience, be sure to record this number on the enclosed warranty card. ~ Important (numero de serie) Le numero de serie se trouve sous cet appareil.
Contents IThank you for buymg th1s P1oneer product. i Please read thmugh these instruct1ons so ,-ou Iwli1know how to operate your model properly. I:>.fte1you have fm1shed readmg the mstruc· 1!10ns. keep th1s document 1n a safe place for ! future referen ce. Q lmportant The screens sl1own 1n the exampl es may differ from actual sueens. wh1ch may be changed w1thout not1ce fo1· performance and funct 1on improvements. • Precaution .......................... 4 Information to User ....... ........... ...... ..
Contents Switching sound muting/attenuation .............. 42 Adjusting source levels ..... .. ... .. ..... ................ .42 Using the auto level control .. ...... ... ....... ......... .42 Adjusting loudness .... ..... ..... ... ... .................. ...42 Setting the subwoofer output. .... ... ..... .......... .. .42 Adjusting the cutoff frequency value ... ...... .... .42 Switching the rear speaker output.. ............... .43 Using BASS Boost .................. ..... ................. .
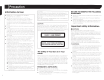
Precaution Information to User e MODE L NO. : AV H-X491 BHS . AVH -X39 1BHS • • • • • • Contains FCC iD : AJDK07 1 This device compl ies wit h Pad 15 of FCC Rules. Opemtion is sub ject t o the fol low ing two conditions: (1) this device may not cause lllterfe,·en ce. and (2) this device must accept any interference. in c lud1ng ~nte1·ference that nnay ca use u ndes ,,-eel ope 1 ·at ion of th 1s device. The Bluetooth ante n na cannot be removed (o r rep laced) by user.
Precaution • Do not disassemble or modify this product, as there are high-voltage components inside which may cause an electric shock. Be sure to consult your dealer or the nearest authorized Pioneer Service Station for internal inspection. adjustments or repairs. Before using this product. be sure to read and full y understand the following safety information: Do not operate this product.
Precaution Failure to ·operate After-sales service for Pioneer products Please con t act the dealer or distr ibutor from wh ich you purchased the product for after-sales service (in cl ud ing warranty conditions) 01- any other information. In case the necessary information 1s not avai Iable. please contact the compan ies Iisted below . Please do not ship your product to the companies at the addresses Iisted below for repair without making advance contact. e USA Pioneer El ectron ics (USA) Inc.
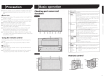
Precaution • Batt eries (battery pac k or batteri es install ed) mu st not be exposed to excessive heat suc h as sun sh ine, fi re or the like . Basic operation Checking pan names and functions AcAUTION • • • • • • • 1 LCD screen 2 Volume (+/- ) button 3 DISP button Remove t he battery if th e remote con t ro l is not used for a m o nth or long er. There is a da nger of exp los ion if the battery is incorrect ly re place d. Rep lace on ly with th e same or equivalent type.
Basic operation 1 Volume(+/-) 2 MODE 3 SRC AWARNING Press to cyc le through all the availab le sou rc es . Press and hold to turn the source off. ACAUTION TOP MENU Returns to the top menu during DVD playback. 5 MENU Disp lays the DVD menu during DVD playback. 6 Thumb pad Selects a menu on the DVD men u. 7 MUTE 8 AUDIO SUBTITLE ANGLE Changes the audio language . subtitle Janguage o1· vi ewing angle during DVD playback.
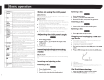
Basic operation 0 From the second time on, the scre en shown will differ dependin g on the previous co nditi ons. 2 Touch the language. 3 Touchl~l. The "Speaker Mode Settings '' screen appears. 4 Touch the speaker modes. • Standard Mode 4-spea ker system with front and rear speakers. or a 6-speaker system w ith front and rear speakers and subwoofers. • Network Mode 3-way system w ith a high range speake r. m idd le range speaker and subwoofe r (low range speaker) for reprod uct ion of high.
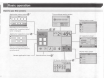
Basic operation How to use the screens Application menu screen ~· 4 Time and date setting screen 0 ... -o:JI2o16J OD=OD ... ~ooooo +=> .. - Depending on the connection method, the "smartphone setup" screen is displayed . Application operation screen ~· e 0 0 I MoothiOate (IIG lime Format t j@ I mtdly yimld 24hour Setting menu screen J J f'2).. * 1 (2)..
Basic operation Displaying the AV operation screen Changing the display order of sources 1 Press::. Changing the display order of source icons 2 Touch the AV operation key. The AV ope rati on scree n ap pears . 1 Display the "AV source selection" screen. 2 Touch and hold a source icon, and drag the icon to the desired position. T: Changing the display order of source keys Displays the source list. 1 Display the source list.
Basic operation Registration and connection of Bluetooth® device Operating list screens Displaying the "Biuetooth" screen 1 Press::. 2 Touch [?J, and then [I]. The "Biuetooth'' suee n appe ars . 2 3 Touch ing an rtem on th e list allows yo u to na rrow clown the opti ons an d proceed to t he next opemt ion. Appea r·s when al l c haract ers are not clr sp layecl on the dis play ar·ea . if you touch t he key. the r·est ar·e scmll ecl fm clrspl ay.
Registration and connection of Bluetooth® device Switching .visibi 1ity Thi s fun c ti on set s w hether or not t o make this product visibl e to the oth er device. The default setting is "On ". 1 Display the "Biuetooth" screen. ~ Refer to Displaying the IIBiuetooth " screen on page 12 2 Touch [Visibility] to switch "On" or "Off". · fo·r e . •· P•I"'•· · c~de· E.rit~fri··~.~· • ·•~•hiWireless 'Bluetooth . connection To connect your Bluetooth device to this product. you need to enter a PIN code.
Hands-free phoning 1'4.. V Calling a number in the phone book Synchronizes the contacts on this product•s phone book with the contacts on your phone manually. ~ The co ntacts on your pho ne w il l be auto mat ica lly tra nsfe rre d to this product. CJ "Visibility" of the "Biuetooth" sueen should be on.
Hands-free phoning 3 Touch [M]. Dialing from the preset dial list Display the "Phone menu" screen. :> Refer to Displaying the Phone m enu screen on page 14 2 Touch [MJ. 3 Touch the desired item. The d1al screen appears and dialing starts . Receiving a phone call 0 When two phones are connected at the same time. if an incoming cal l is rece ived on the second phone w hile yo u are talking on th e first phone. the dial confirmation screen for t he second phone w il l be disp layed.
Hands-free phoning • · With som e cellular ph ones, the ring sound may not be outp ut from the speakers. If private mode is selected on th e ce ll ular phone. hand s-f ree phoning may be disabl ed. • Registration and connection • Ce llular phone operations var y depending on the type of cellular phone. Refe r to the instru ction man ual that came with your cel lular phone fo r detailed instructi ons. When phone book transfer does not work.
Setup for iPod I iPhone or smartphone Information on the connections and functions for each device The settings and cables required for connecting each device, and the available sources are as follows.
HD RadioTM HD Radio indicator and Signal type indicator ,o/1., Switches the text display between V the main channel and sub channels. r/1. Displays the preset channel list. V Select an item on the list ("1" to "6") AM band t Analog AM Analog AM- Digital AM to switch to the preset channel. 1Yi Selects the FM1, FM2, FM3 V or AM band. FM band e Analog FM Analog FM- (j Performs ~o~~o Performs seek tuning or \./ non stop seek tuning.
Disc HD Radio™ Track number indicator 3 Touch [Radio settings]. Artist Experience) Vi sua l information related to content being played on your HD Radro recei ver, such as Album Art histor ical photographs. still art from li ve broadcasts. among other re lated content. Th e rad io settings screen appears. Local seek tuning allows you to only tune into those radro stations with sufficiently strong signa ls. 1 Display the Radio settings screen. Starting .
Disc 6 6 ~ Hides the touch panel keys. Video source screen 2 Video source screen 2 To display again the keys, touch anywhere on the screen. Performs frame-by-fra me playback. Performs slow-motion playback. Each time you touch Ill~ I it changes the speed in four steps in the following order: 1/16 ~ 1/8 ~ 1/4 ~ 1/2 Video source screen 1 6 Sets a repeat play range. I~~: Repeats all files. : I~~ : Repeats the current title. I~~ Repeats the current chapter.
Disc Switch es the media file type to CD (audio data (CD- DA)). Searching fQr the ·. part you \N~rlt ~Q play 0 0 0 0 0 0 ~ By pressing~ or ~ . you can also skip files/ chapte1·s forward or backward. By pressing and holding~ or ~ . you can als o perform fast reverse or fa st forward. If a Video-CO with PBC On is being played, IPBCOnl appears. You can set the screen size for the video image.
Com ressed files Audio source screen 1 (Example: USB) fj !4.. V Plays files in random order. I:Does not play files in random order. I~ I : Plays all files within the repeat I~ Hides the to~ch panel keys. To display agam the keys, touch anywhere on the screen. range in random order. Audio source screen 2 (Example: USB) ~*4 ~ Skips files forward ~ V or backward. ~ Switches between playback V and pause. ~ Switches _the c~rrent music V information d1splay. rj Sets a repeat play range.
Compressed files fj Video source screen (Example: Disc) Hides the touch panel keys. Still image screen To display again the keys, touch anywhere on the screen. ~ Rotates the displayed V ~ V picture 90° clockwise. Selects the previous or next folder. Still image screen ~ 4 • ~· rj ~~~fa~~~~:!~r~~verse Touch again to change the playback speed. ~ V 4 rj ~~ib~:~l:a~~~ward !4, Switches between V playback and pause. Switches between playback and pause. fj Sets a repeat play range.
Compressed files 0 Play back is performed in ord er of fold er numbers. Fold ers are skipped if they con t ain no playab le files. Operations common toa11·file types 4 Touch the item. Refine th e item until the desired song t itle or f ile name is d isplayed on the list. 5 Touch the desired song title or file name to play back. 0 Selecting files from the file name list You ca n play co mp ressed aud io. compressed video or stil l im age f iles stored in a disc or a USB storage device.
iPod Compressed files 0 If you save t he new image . th e c urrent w al lpape1· is overw ritten . Audio source screen 1 r"'""""""~~~~~~~$*1 $*2 $ *3 $*4 Setting the slideshow interval JPE G f iles ca n be viewed as a sli desh ow on t hi s product. In t h is setti ng, t he in terva l between eac h image ca n be set. Th e default setti ng is "10sec". 0 Thi s settin g is avail ab le d urin g playback of the JPE G f iles. ()Changes the audiobook speed.
iPod Video source screen Connecti ng your iPod ~*3 ~*4 ~ When connec tin g an iPod to this prod uct. sel ect the meth od folc onnecting you r device. Settings are requ ired according to the co nn ected device. :> Refer to Set up {or /Pod I !Phone or smadphone on page 16 :"J The available so urces vary depending on the selected method fm connec t ing you 1· dev1ce. :> Refe1· to Information on th e conn ectlon s and functions for each dev1ce on page 17 AcAUTION For safety rea sons.
AppRadioOne Even though an application is not com patible with 0 Displays the launcher application screen. Displays the previous screen. AppRadioOne AppRadioOne. depending on th e app lication an 1mage m ay be disp layed. But you can not operate the appl ication. .To use AppRadioOne . install the AppRadio app on the iPhone or smartphone 1n advance. For details about the AppRadio app. visit t he fol low ing site: http:/ /www.pioneerelectronics.
AppRad ioOne Pandora® 2 Press the Volume (+/-) button. r4, Gives a "Thumbs Down" to Th e aud 10 m 1x men u wi ll be d isplayed on the scre en . V r4. Displays the preset station list. V Select an item on the list ("1" to "6") the playing track and skips to the next track. to switch to the preset station. Playback screen 1 Playback screen 2 ~*1 Touch to mu te. Touch ag a m t o unmute so th at the sound 1s not m ixed. 2 Adju sts the au d1 o vo lume.
Pandora® AWARNING Certain uses of an iPhone or a smartphone may not be legal while driving in your jurisdiction, so you must be aware of and obey any such restrictions. If in doubt as to a particular function, only perform it while the car is parked. No feature should be used unless it is safe to do so under the driving conditions you are experiencing. Rar:tct~t~ <~P~r-ai~n$. You can enjoy Pandora by connecting an iPhone or a smartphone that has the Pandora application installed.
Spotify® fj Playback screen 1 (Track) Plays tracks in random order. Playback screen 1 (Radio mode) Playback screen 2 (Track) fj Skips tracks forward. f~ Skips tracks forward '-/ or backward. ~ Saves or deletes the current song information to or from "Your Music". V ~ Switches between playback V and pause. 30 e· 2 ~ Saves or deletes the current song information to or from "Your Music". rj Sets a repeat play range. fj Switches to radio mode. V ~ Switches between playback and pause.
Spotify® />1., V Gives a "Thumbs Down" to the playing track and skips to the next track. Playback screen 2 (Radio mode) Using.•. Spotify>with · your ·Pioneer car audio/video 0 To enjoy Spot ify as you drive. first download the Spotify app to your iPhon e or smartphone. You can download it from th e iTunes App Store or Google Play. Choose a free account or a paid Prem ium account. either in the app or at spotify.com. A Premium account gives you more features. like offline listening.
Bluetooth audio player Playback screen 1 '--==-l•ll~j 6 Touch [Biuetooth Audio] on the AV source selection screen. 0 6 Skips files forward or backward. 0 Track number indicator 6 Plays files in random order. Playback screen 2 0 0 0 0 Dependtng on the Bluetooth audio player con nected to this product. the available operations with thts product may be lim ited to the follow ing two leve ls : - A2DP (Advanced Audio Distribution Profi le): Onl y playi ng back songs on your audio player is possible.
SiriusXM® Satellite Radio ~ Switches between live broadcast V mode and Replay™ mode. Current channel display (live broadcast mode) ~ *1 ~ ~ Recalls the preset channel V stored to a key from memory. ~:~1Sffo Stores the current broadcast \../ frequency to a key. Time bar display (Replay™ mode) !j Selects a band. 0 ::J ~ :J :J and skip files forward or backward on the play time ind1cator scre en.
SiriusXM® Satellite Radio The activation pm cess usuall y take s 10 to 15 minutes but may take lon ger. Do not turn off thi s pmduct while the act1 vat ion message is displayed. Starting procedure 1 Display the "AV source selection" screen. \ :: J•l[~j 2 Touch [SiriusXM]. Selecting a channel from a list of all channels ::J It may take tim e to display t he c hann el li st dependmg on the Siriu sXM recept ion cond it ion. 1 Touch§]. 2 Select the list of all channels. 3 Touch the desired channel.
SiriusXM® Satelli te Radio Activatin g the Traffic·• .•& Weather Now Access the latest Traffic & Weather report for your favorite market. whenever you want to hear it. Touch~. grayed out: Traffic &Weather broadcast for your market is not yet avail able . w ith green dot: latest report available but not listened to yet. white: latest report available to he ar again. • • • 2 Touch the desired city. The latest traffic and weather mformation is played back. • To cancel the Traffic &Weather Now, touch [li].
SiriusXM® Satellite Radio :> Refe1- to Displaying the "SiriusXM settings .. screen on pag e 35 I AUXso urce The so u t-e e rs tum ed off an d th e Bl uet ooth c on nectr on is d isconnect ed befme the process starts. 6110 2 Touch [Featured Favorites] to switch "On" or "Off" . .., 21:48 ~ ~ If the Featmed Favo nt e Bancl need s to u pdate. the Featu 1ed Band Update message w ill appear. How to access Vvhen there rs a Feat ured Favmi t e. acce ss it w ith th e ba nd key. 1 Touch the band key.
AV input AUXsou rce Setting the video signal When you connect this product to an AUX equipment. select the suitable video signal setting. The defau lt setting is "Auto ''. 0 You can operate this function only for the video signal input into the AUX input. Display the "Video Setup" screen. \_:_:7•~·@] 2 Touch [Video Signal Setting]. 3 Touch [AUX]. You can d1splay the v1d eo image ou tput by the device conn ected to this product.
MIXTRA X 6 Activates the MIXTRAX mode. (Example: Displaying the "MIXTRAX :> s.etti11gs" screen 2 Touch [Effect Setting]. Press::. 2 Touch JE and then [AV Source Settings]. 3 Touch [MIXTRAX Settings]. The "MIXTRAX Settings" screen appears. Setting the playback portion You can spec if y the playback portio n. The default setting 1s "60s ··. 1 Display the "MIXTRAX Settings" screen. 6 :> J~ Switches between playback V and pause. 0 0 By pressing the ~ or ~ button.
System settings Displayin g the "System" ·setting screen 1 Display the "System" setting screen. :> Refer to D isplaying th e "System " setting screen on page 39 2 Touch [Beep Tone] to switch "On" or "Off". 1 Press ::. 2 Touch~' and then [ill. The ·' System" setting screen appears. Setting Bluetooth audio source activation The default setti ng 1s "On". 1 Display the "System" setting screen. ~ Refer to Displaying the "System., setting screen on pag e 39 2 Touch [AV Source Settings].
System settings Setting the polarity of the rear view camera ::1 ~ Th1s funct ion is ava1 la b le when "Back Camera Input'· is Setting the dimmer trigger Refe1· to Se tting rea r view camera activation on page 39 ,'J Refer to Displaying the '·System '' sett ing screen on page 39 • Battery (defau It): The po lal'ity of th e connected lea d is positive. • Ground: Th e po lar ity of the connected lead is negat ive. Setting the demo mode The default settin g is "On·.
System settings 0 This settin g 1s avail ab le only wh en yo u sto p your vehrcl e in a safe place and appl y the parking brake. 1 Display the "System" setting screen. ~ Refe r t o Displaying the "System " setting screen on page 39 • • • 2 Touch [Dimmer Settings]. 3 Touch [Dimmer Duration]. • Th e ;,Duration Setting " screen appea rs. 4 Drag the cursors to set the dimmer duration. • You can also set the dimmer duration touching ~or[E].
Audio adjustments Displaying the "Audio" setting screen 1 Press::. 2 Touch~, and then 81]. The "Audio " setting screen appears. Adjusting source levels SLA (so urc e leve l adjustment) let s yo u adju st the vo lune level of each sour-ce to pre ve nt rad ical changes in volu me when switch Ing between source s . ::J Sett~ngs ar·e bas ed on t he FM tuner vo lume level. w h ich r-e ma ins unch anged. I Th is funct 1on is not ava ila ble when the FM t uner is selected as the AV sour·ce .
Audio adjustments 0 This fun ct1 on 1s not ava il able wh en ad justm g the H1gh spe ake1-. Switching the rear speaker output This function is ava il able when "Standard Mode " is se lected as the speaker mode. Th e default setting is "Rear". 0 1 Turn the source off. ~ Refer to Selecting a source on page 11 2 Display the "Audio" setting screen. ~ Refe1- to Displaying the "Audio " setting screen on page 42 3 Touch [Rear Speaker Output]. 4 Touch to switch "Rear" or "Subwoofer".
Audio adjustments Usingthe equalizer Recalling equalizer curves The1'e are seven st ore d equal 1ze r c urves th at yo u can eas1 ly recall at an y t im e. Here is a list of t he eq ual izer cu1·ves: • S.Bass is a c u rve in wh ic h on ly low -p itc hed so u nd is boosted. • Powerful is a c u1·ve in wh ich low- and h igh-p1 t che d so unds ar·e boo sted. • Natural is a cu rve tn wh ic h low- and h1gh-p1tched sou nd s a re sl ig htl y boosted . • Vocal is a cu1·ve in w h ic h t he m id ran ge.
Theme menu Audio adjustments 2 Fix the microphone for acoustical measurement (sold separately) in the center of the headrest of the driver's seat, facing forward. Th e Auto EO may differ depending on where you place the microphone. If desit-ed. place the microphone on the front passenger seat and perform Auto EO. Saving · the ·sound ·settings You can save to reca ll the following current sound settings: bass boost. slope. subwoofer phase. speaker level. Graphic EO. HPF/L PF. listening position.
Theme menu 3 Touch the color you want. • Co lo red keys : Selec ts th e des ired pte set co lor. • [iJ (c u stom ): D ispl ays th e sc reen t o custom ize the • Selecting the theme color il lu mi na - A. t heme c o lor can be se lected f rom 5 d iff erent co lors. t ion co lo r. :> Refet- to Creat;ng a use r-defin ed co lor o n pa ge 46 ~ (1-a in bow): Shifts gt-adu a ll y betwee n t he f1ve def au lt colo rs in seq uence. Display the "Theme" screen. \-~--=I•~•~ • You can prev iew the Top menu scr
Setting up the video player \_:_:7•~·@] 2 Touch [DVD/DivX Setup]. 3 Touch [Multi Angle] repeatedly until the desired setting appears. • • On (default): Turns the multi-angle setting on. Off: Turns the mu lti -ang le setting off. Setting the aspect ratio There are two kind s of disp lays. A w1d e screen dis play has a width-to-he ight ratio (TV aspect) of 16:9. while a regular display has a TV aspect of 4:3. If you use a regular rear disp lay with a TV aspect of 4:3.
Setting up the video player Regrsterrng yo ur favorit e menu items rn shortcut s allows you to quick ly j ump to the registered menu screen by a simple touc h on t he "Favorites " screen. ::1 Up to 12 menu items can be reg ister-ed in the favmite menu. \_:_:7•~·@] 2 Touch [DVD/DivX Setup]. 2 Touch [Video Signal Setting]. 3 Touch [DivX® VOD]. 3 Touch [Camera]. The "DivX® VOD " sueen appear·s . The pop-up menu appea rs. 4 Touch [Deregistration Code]. 4 Touch the item.
. Common operations Ch anges the wide sc reen mode CD ::J ~ Refe1· to Changing the wide screen mode on page 49 Setting the time and date 1 Touch the current time on the screen. :I 0 2 Touch~ or~ to set the correct time and date. ::J You ca n ope mte t he fo llow ing items : Yea1·. mon th. date. hom m inut e. :1 You ca n ch ange the time d isp lay fm mat to "12hour" (d efault) or "24hour" . :I Yo u ca n c hange th e mder of dat e d isp lay fmmat: Day-monthyear. Month-d ay-yea1·.
Common operations :1 :1 ::J "'J from the image. the image may be displayed padly cut off either at the top/bottom or s rdes. ~ This setting is for· JPEG images o nl y. You cannot operate this functron while dnvrng. Differ-ent sett ings can be stored fo r each vrdeo source. When a vid eo is viewed in a w ide screen mode that does not mat ch its mrginal aspect ratr o. it may ap pe ar· different. The vrdeo im age wrl l appea r· coar-se r whe n vrewed rn "Zoom " mode. Other functions R.
Connection or power amp (sold separately), make sure to connect the ground wire first. Ensure that the ground wire is properly connected to metal parts of the car's body. The ground wire of the power amp and the one of this unit or any other device must be connected to the car separately with different screws. If the screw for the ground wire loosens or falls out, it could result in fire generation of smoke or malfunction. AcAUTION Secure all wiring with cable clamps or electrical tape.
Connection Power cord . Blu e/wh tte Con nect to system co ntro l teml inal of the povver amp (ma:< . 300 mA 12 V DC). 19· Light gt·een Used to detect the ON/ OFF statu s of the pat-king bmk e. Thts lead mu st be co nnec ted to the powe1- supp ly std e of the parking bta ke switch. 1i Power suppl y side 12 Pa rk ing brake switc h 13 Gmund stde Speaker leads 1 2 ~ 6. 8 9 10 3 7 8 To powe r su ppl y Powe 1- cot-d Ye llow To temlina l suppl ied w1 th powe r tegard less of tg ni t ion svv itch pos1t1on.
· Connection iPhoneand smartphone :> :> :> For detai ls on how to co nnect an externa l device using a se paratel y so ld cabl e. refer to the manu al for the cable. For detail s conce rn ing th e con necti on. operat ions and compatibility of iPh one . refe1· to Setup (or iPod I /Phone or smattphone on page 16. For deta il s concern ing the co nnectio n and ope rati ons of Android device . refer to Se tup (or iPod I /Phone or smattphone on page 16.
Connection Android device External video component and the display Connecting via the USB port T ·i-' USB port USB cable (su pp lied w ith CD-MU200 (so ld separat ely)) (]~ . USB- micro USB cable (Type USB A- micro USB B) (supplied with CO-MU200 (so ld separately)) ·I - A ndroid device Camera About rear view camera W hen you use the rear view camera. the rear vi ew image is automatically switched from the video by moving the shift lever to REVERSE (R).
Installation Connection [ill :> The ap propr iate setting is requ it-e d to use t he ext em al vid eo compo nen t. Refer to AV input on page 37 &WARNING NEVER install the rear display in a location that enables the driver to watch the video source while driving. Th is p roduct 's rear video out pu t is fo r co nnec t io n of a d isp lay to enable pa ssengers in th e rear seats to wat c h t he video source.
Installation · .....__ 00 00& ~ 0& 1 1 Mtc rop hone le ad Groove 1 Ta b ~~ M icropho ne base 2 Attach the microphone clip to the sun visor. 2 Mount the microphone on the steering column. ·J j Fact ory t'adt o-mou nt ing btacket If th e paw l tn te deres w ith installati on . you m ay be nd it dow n out of the wa y. Dash boa rd m c onso le 4. Ttus s head sc rew or f lush sudace screw Be sure to use th e snew s supp lted w it h th is pt'Odu ct.
Appendix Troubleshooting If you have problems operating this product. refer t o this section. The mo st common proble ms are li sted below. alon g with likely causes and solutions. If a soluti on to your pmble m cannot be found here. co ntact yo ur dealer or the nea rest authorized Pioneer serv ice facility. No sounds are produced. The volume level will not rise. - - Common problems A black screen is displayed, and operation is not possible using the touch panel keys. .;Power OFF' mode is on.
Appendix Problems with the Application screen Common Spotify A black screen is displayed. AMP Error - Skip limit reached. - - - \!Vh1le o perat1ng an appl1c at 1on. the app l1cat1 on vvas ende d on the smar·tphon e s1cl e. - Press :: to d isp lay t he To p m enu sc reen . The smad ph o ne OS m ay be awaiting sc reen ope rat1on . - Stop t he veh ic le 1n a safe p lac e an d c heck th e suee n on the sm ad phon e .
Appendix Channel Not Subscribed. Call SiriusXM to Subscribe. - The channe l that you have requested is not in cluded in your SiriusXM subscript ion package. - Check th e conten t of yo ur Siriu sXM su bsuipti on package . Unplayable Disc - This type of drsc cannot be played on th is product . - Replace th e disc wi th one that can be played on th is product. Channel Locked Please Enter the Lock Code - Locked by the radio Pa r-enta l Contro l feat ure. - Re leas e th e ch anne l lock.
Appendix USB was disconnected for device protection. Do not reinsert this USB memory into the unit. Please restart the unit. - The USB conn ector or USB cab le is shor-t-cr rcult ed. Check that the USB con necto r- or USB cab le rs not ca ug ht in somet h ing or da maged. The con nect ed USB st or-age device cons um es m ore than max imum all owable curTen t. - Disco nnect the US B stma ge device and do not use it . Turn th e ignition switch to OFF.
· Appendix AVCHD recorded discs This unit is not compatib le w it h d iscs recorded in AVCHD (Advanced Video Co dec H1gh Def1n1tion) format. Do not inse rt AVCHD discs. If inserted. th e disc may not be ejected. Playing DuaiDisc • • • • • Dual Discs are two-s id ed discs that have a reco r·dable CD for au dio on on e side and a re cordable DVD for vide o on the other. Playback of the DVD side is possible with this product. Howeve r.
Appendix • • For details on the Di vx video ver-sions that can be played on this product. refer· to Specifica tion s on pag e 66 . For more deta ils about Di vX . visi t th e fo llow ing site: http://www.d rvx .c om/ DivX subtitle files • Srt format subt tt le ft les wt t h t he extens ton ".srr can be used • Only one subt itle fil e can be used for each DivX fil e. Multip le subtitle ftle s ca nn ot be ass oci ated.
Appendix [2 [] till Some spec1al operations may be prohibited because of the composition of DivX files. F1les with high transfer rates may not be played back correctly. The standard tt-ansfer rate is 4 Mbps for COs and 10.08 M bps for DVDs. DivX files on the USB storage device cannot be played. CD-R/-RW File extens1on: .avi/.divx Prof1le (DivX version): Home Theater Ver. 3.11/Ver. 4.x/Ver. 5.x/ Ver. 6.x Compatible aud1o codec: MP3. Dolby Digital Bit rate (MP3): 8 kbps to 320 kbps (CBR).
Appendix WMA Windows Media is either a regtstered trademark or trademark of Micr-osoft Cor-poratton tn the Untted States and/or other countr-ies. Thts product tncludes technology owned by Microsoft Corporation and cannot be used or distributed without a ltcense from Miuosoft Ltcenstng. Inc. FLAC Copyright© 2000-2009 Josh Coalson Copyright© 2011-2013 Xiph.Or-g Foundatton Redtstr-ibution and use in sour-ce and btnary forms. with or wtthout modification.
Appendix • • • • content app lication(s) fm the sma rtphone. avail ab le fmm the serv ice provider. downl oa ded to your smartphone. A current acc ount wrth the co ntent servrce provider. Smartphone Data Plan. N ot e: if th e Data Plan for yo ur smartphone does not provid e for u n limited data usage . add it iona l c ha rges f mm yo u r car rier may app ly for access ing a pp- based connected content via 3G . EDGE and / or LTE (4G ) networks . Connection to the lnt emet via 3G . EDGE.
Appendix Specifications General . .. .... .. .. ........ ..... 14.4 V DC Ra ted power source .. ( 10.8 V to 15. 1 V allowab le) Negati ve type Ground ing system Maxi mum cutTent cons umption ...... .. .. .. ......... .. .... .. . ......... 10 .0 A D1mens1o ns (W x H > D): D .... 178mm x 100mm x 165mm Chass is (7 in. x 3-7/ 81n. x 6-1 / 2 in. ) Nose .... 171 m m x 97 mm x 18 mm ( 6-3/ 4 in. x 3-7/ 8 in. x 3/ 4 in .) (AV H- X491 BH S) 171 mm x 97 mm x 3 mm Nose ( 6-3/ 4 in. x 3-7/ 8 in. x 1/ 8 in.
Appendix CEA2006 Specifications Power ou tput ................ 14W RMS x 4 Channels (40 and ~ 1 % THD+N) S/N ratio ...................................... 91 dBA (reference: 1 W into 40) fill Specifications and design are subject to possible modifications wi thout notice due to improvements.
PIONEER CORPORATION Register your product at Enregistrez votre produit sur Registre su producto en http://www.pioneerelectronics.com 28-8, Honkomagome 2-chome, Bunkyo-ku, Tokyo 113-0021, JAPAN PIONEER ELECTRONICS (USA) INC. P.O. Box 1540, Long Beach, California 90801-1540, U.S.A. TEL: (800) 421-1404 PIONEER ELECTRONICS OF CANADA, INC.
PIONEER ELECTRONICS (USA) INC. PIONEER ELECTRONIQUE DU CANADA, INC. GARANTIE LIMITEE GARANTIE VALl DE SEULEMENT DANS LE PAYS OU LE PRODUIT A ETE ACHETE GARANTIE Pioneer Electronics (USA) Inc. (PUSA) et Pioneer Electronique du Canada, Inc.
PIONEER ELECTRONICS (USA) INC. PIONEER ELECTRONICS OF CANADA, INC. LIMITED WARRANTY WARRANTY VALID ONLY IN COUNTRY OF PRODUCT PURCHASE WARRANTY Pioneer Electronics (USA) Inc. (PUSA), and Pioneer Electronics Of Canada, Inc. (POC), warrantthatproductsdistributed by PUSAinthe U.S.A.