
Owner's Manual

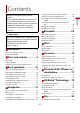
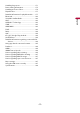

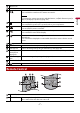
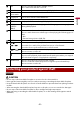
Table Of Contents
- Operation Manual
- Resetting the microprocessor
- Contents
- Precaution
- Parts and Controls
- Protecting your product against theft
- Basic operation
- Navigation
- Menu screen view and operations
- Map Screen
- Searching for a destination
- Searching for a location by address
- Searching for Points of Interest (POI)
- Selecting a destination from stored locations
- Selecting a destination from stored routes
- Selecting a destination from history
- Searching for a location using [Combined Search]
- Searching for a location by the coordinates
- Searching for a location by scrolling the map
- Selecting the route options
- Starting the navigation
- Checking and modifying the current route
- Storing a location in [Saved Location]
- Storing a route in [Saved Routes]
- Receiving real-time traffic information (TMC)
- Checking useful information about your trip
- Navigation Settings
- Updating the map
- Bluetooth
- Wi-Fi
- AV source
- Setup for iPod®/iPhone®or smartphone
- HD Radio™ Technology
- Disc
- Compressed files
- iPod
- AppRadio Mode +
- Apple CarPlay™
- Android Auto™
- Pandora®
- SiriusXM® Satellite Radio
- HDMI
- AUX
- AV input
- Wireless Mirroring
- iDatalink
- Settings
- Favorite menu
- Other functions
- Appendix
- Troubleshooting
- Error messages
- Positioning technology
- Handling large errors
- Route setting information
- Handling and care of discs
- Playable discs
- Detailed information for playable media
- Bluetooth
- SiriusXM® Satellite Radio
- Wi-Fi
- HD Radio™ Technology
- SDXC
- WMA/WMV
- FLAC
- DivX
- AAC
- Google™, Google Play, Android
- Android Auto
- Detailed information regarding connected iPod devices
- Using app-based connected content
- Pandora®
- HDMI
- IVONA Text-to-Speech
- Specs
- Installation Manual
- Quick Start Guide
- Spec Sheet
- Warranty

English
- 7 -
LCD screen
VOL (+/-)
Press to switch between the Application screen and the AV operation screen.
Press and hold to switch to the camera view mode.
NOTE
To activate the camera view mode with this button, set [Back Camera Input] to
[On] or [AV Input] to [Camera] (page 135).
Press to display the top menu screen.
Press and hold to power off. To power back on, press any button.
Press to display the menu bar (page 15).
Press and hold to mute or unmute.
Press to display the top menu screen or back to previous screen.
Press and hold to turn off the display.
Press to activate the voice recognition mode with a connected iPhone or
smartphone.
Press and hold to display the connectable device list screen or device search
screen.
RESET Press to reset the microprocessor (page 10).
SD card slot Refer to Inserting and ejecting an SD memory card (page 88).
Auto EQ
microphone
input jack
Use to connect a microphone for acoustical measurement (sold separately).
Disc-loading
slot
Refer to Inserting and ejecting a disc (page 83).
Detachable faceplate
Press to remove the detachable faceplate from this product.
Remote Control
VOLUME (+/-)
REAR SRC Press to cycle through all the available rear sources.
Press and hold to turn the rear source off.
©
..
..
®
E!.
®
~
®
@)
@
@
G)
@
-
-