
Owner's Manual


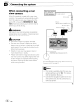


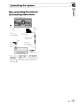
Table Of Contents
- Quick Start Guide
- Operation Manual (Supplied on CD-ROM Only)
- Restore Default Settings
- Table of Contents
- Using This Manual
- Parts & Controls
- Operation
- Basic Operation
- Using the Navigation Menu Screens
- Using the Map
- Eco-Friendly Driving Functions
- Searching for and Selecting a Location
- After the Location is Decided
- Checking and Modifying the Current Route
- Registering and Editing Locations
- Using Traffic Information
- Registering and Connecting a Bluetooth Device
- Using Hands-Free Phoning
- Basic Operations of the AV Source
- Using the Radio
- HD Radio
- Playing Audio CDs
- Playing Music Files on ROM
- Playing a DVD-Video
- Playing a DivX Video
- DVD-Video or DivX Setup
- Playing Music Files (from USB or SD)
- Playing Video Files (from USB or SD)
- Using an iPod
- Using Pandora
- Using Aha Radio
- Using the Bluetooth Audio Player
- Using the XM Tuner
- Using the SIRIUS Tuner
- Using AV Input
- Using the External Unit (EXT1, EXT2)
- Customizing Preferences
- Operating your Navigation System with Voice
- Setting the Anti-Theft Function
- Returning the Navigation System to the Default or Factory Settings
- Troubleshooting
- Messages
- Additional Information
- Glossary
- Specs
- Installation Manual
- Upgrade Instructions and Operation Manual Addendum (Use after Upgrading with 130SD239FM)
- Table of Contents
- Compatibility
- Using This Manual
- iPod Compatibility
- Instructions for Upgrading
- How to use the Navigation Menu Screens
- How to use the Map
- Eco-Friendly Driving Functions
- Searching for and Selecting a Location
- After the Location is Decided
- Checking and Modifying the Current Route
- Registering and Editing Locations
- Using Hands-Free Phoning
- Fuel Cost Management
- Using Applications
- Basic Operations of the Audio Source
- Using the Tuner
- HD Radio
- Playing Audio CDs
- Playing Music Files on ROM
- Playing Music Files on USB
- Using an iPod
- Using the XM Tuner
- Using the SIRIUS Tuner
- Using an External Unit (EXT1, EXT2)
- Using the AUX Source
- Customizing Preferences
- Other Functions
- Troubleshooting
- Messages
- Important Information for the User
- Scan of CD-ROM
- Warranty

Section
C_c_o_n_n_e_c_ti_n_9_
t
_
h
_
e
_
s
_y_s_te_m
)
ca
When
connecting
the
external
video
component
Using
an
AV
input
(AV1)
The navigation unit
4
CAUTION
Be
sure to use a mini-jack
AV
cable (CD-RM10)
(sold separately) for wiring.
If
you use other
cables, the wiring position
might
differ resulting
in disturbed images and sounds.
L:
Left audio (White)
R: Right audio (Red)
V:
Video (Yellow)
G: Ground
OK
(S)
~L
tre
L
V G R
R G V
USB and
mini-jack connector
~-.-~
2 m
(6
ft. 7 in.)
To
audio outputs
'Ii
Yellow~~
,
=
.•.
'
Il
r----t:::::::=-
RCA
cables
(sold separately)
To
video output
•
You
must
set
"AV1
Input"
in
"AV
System
Settings"
to
"Video"
when
connecting
the
external video
component.
(For details,
refer to Operation Manual.)
En
GD