
Owner's Manual
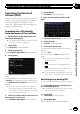
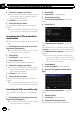
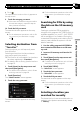
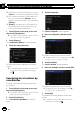

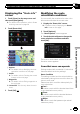
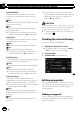
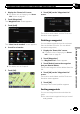
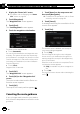
Table Of Contents
- Quick Start Guide
- Operation Manual (Supplied on CD-ROM Only)
- Restore Default Settings
- Table of Contents
- Using This Manual
- Parts & Controls
- Operation
- Basic Operation
- Using the Navigation Menu Screens
- Using the Map
- Eco-Friendly Driving Functions
- Searching for and Selecting a Location
- After the Location is Decided
- Checking and Modifying the Current Route
- Registering and Editing Locations
- Using Traffic Information
- Registering and Connecting a Bluetooth Device
- Using Hands-Free Phoning
- Basic Operations of the AV Source
- Using the Radio
- HD Radio
- Playing Audio CDs
- Playing Music Files on ROM
- Playing a DVD-Video
- Playing a DivX Video
- DVD-Video or DivX Setup
- Playing Music Files (from USB or SD)
- Playing Video Files (from USB or SD)
- Using an iPod
- Using Pandora
- Using Aha Radio
- Using the Bluetooth Audio Player
- Using the XM Tuner
- Using the SIRIUS Tuner
- Using AV Input
- Using the External Unit (EXT1, EXT2)
- Customizing Preferences
- Operating your Navigation System with Voice
- Setting the Anti-Theft Function
- Returning the Navigation System to the Default or Factory Settings
- Troubleshooting
- Messages
- Additional Information
- Glossary
- Specs
- Installation Manual
- Upgrade Instructions and Operation Manual Addendum (Use after Upgrading with 130SD239FM)
- Table of Contents
- Compatibility
- Using This Manual
- iPod Compatibility
- Instructions for Upgrading
- How to use the Navigation Menu Screens
- How to use the Map
- Eco-Friendly Driving Functions
- Searching for and Selecting a Location
- After the Location is Decided
- Checking and Modifying the Current Route
- Registering and Editing Locations
- Using Hands-Free Phoning
- Fuel Cost Management
- Using Applications
- Basic Operations of the Audio Source
- Using the Tuner
- HD Radio
- Playing Audio CDs
- Playing Music Files on ROM
- Playing Music Files on USB
- Using an iPod
- Using the XM Tuner
- Using the SIRIUS Tuner
- Using an External Unit (EXT1, EXT2)
- Using the AUX Source
- Customizing Preferences
- Other Functions
- Troubleshooting
- Messages
- Important Information for the User
- Scan of CD-ROM
- Warranty

p The location is also stored when you touch
[Scroll] in the location confirmation screen.
p If no location is stored in Destination His-
tory, you cannot select [History ]. (If you
perform a route calculation, you can select
[History].)
p “History” can store up to 100 locations. If
the entries reach the maximum, the new
entr y overwrites the oldest one.
1 Touch [Home] on the map screen and
then touch [Navigation].
= For details of the operations, refer to Screen
switching overview on page 28.
2 Touch [History].
The “Destination History” screen appears.
3 Touch the entry you want.
The searched location appears on the map
screen.
= For the subsequent operations, refer to Set-
ting a route to your destination on page
48.
Searching for a location by
coordinates
Entering a latitude and longitude pinpoints
the location.
1 Touch [Home] on the map screen and
then touch [Navigation].
= For details of the operations, refer to Screen
switching overview on page 28.
2 Touch [Coordinate].
The “Coordinate Input Menu” screen ap-
pears.
3 Touch [Longitude].
The “Enter Longitude” screen appears.
4 Enter the longitude, and then touch
[OK].
The screen returns to the previous screen.
p To enter W 50°1’2.5” for example, touch [W],
[0], [5], [0], [0], [1], [0], [2], and [5].
5 Touch [Latitude].
The “Enter Latitude” screen appears.
6 Enter the latitude, and then touch [OK].
The screen returns to the previous screen.
p To enter N 5°1’2.5” for example, touch [N],
[0], [5], [0], [1], [0], [2], and [5].
7 Touch [OK].
The searched location appears on the map
screen.
= For details, refer to Setting a route to your
destination on page 48.
En
46
Chapter
08
Searching for and selecting a location