7 Inch Wide AV System Display ENGLISH Operation Manual AVX-7300
Selecting fine audio equipment such as the unit you’ve just purchased is only the start of your musical enjoyment. Now it’s time to consider how you can maximize the fun and excitement your equipment offers. This manufacturer and the Electronic Industries Association’s Consumer Electronics Group want you to get the most out of your equipment by playing it at a safe level.
For U.S. and Canadian Models About This Product Video System of a Connected Component This product is compatible with the NTSC system. When connecting other components to this product, be sure components are compatible with the same video systems. If it is not, images will not be correctly reproduced. Precaution: • This product is incompatible with the PAL system. Refer to “Video System of a Connected Component” on page 2 for explanation of other area models video system.
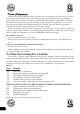
Before Using IMPORTANT SAFEGUARDS PLEASE READ ALL OF THESE INSTRUCTIONS REGARDING YOUR DISPLAY AND RETAIN THEM FOR FUTURE REFERENCE 1. Read this manual fully and carefully before operating your display. 2. Keep this manual handy for future reference. 3. Pay close attention to all warnings in this manual and follow the instructions carefully. 4. Do not allow other persons to use this system until they have read and understood the operating instructions. 5.
Before Using 5
Contents Dear Customer .............................................. i For U.S. and Canadian Models .................... ii - About This Product - Important - Precaution IMPORTANT SAFEGUARDS ........................ iii - PLEASE READ ALL OF THESE INSTRUCTIONS REGARDING YOUR DISPLAY AND RETAIN THEM FOR FUTURE REFERENCE Before Using .......................................... 2 Before Using This Product ..........................
Before Using Before Using This Product About This Product [For European models] • This product complies with the EMC Directives (89/336/EEC, 92/31/EEC) and CE Marking Directive (93/68/EEC). Video System of a Connected Component [For models except U.S. and Canadian models] Before Using This product is NTSC/PAL system compatible. When connecting other components to this product, be sure components are compatible with the same video systems. If it is not, images will not be correctly reproduced.
Before Using To Ensure Safe Driving WARNING • To avoid the risk of accident and the potential violation of applicable laws, this product is not for use with a video screen that is visible to the driver. • In some countries or states the viewing of images on a display inside a vehicle even by persons other than the driver may be illegal. Where such regulations apply, they must be obeyed. To ensure safe vehicle operation, complicated functions are not operable during driving.
In Case of Trouble Should this product fail to operate properly, contact your dealer or nearest authorized Pioneer Service Station. Preventing the Battery from Becoming Exhausted When using this product, be sure your car engine is running. If you use this product when your engine is not running, the battery will become exhausted. Resetting the Microprocessor Before Using The microprocessor must be reset under the following conditions: When using this product for the first time after installation.
Before Using Detaching and Replacing the Front Panel Theft Protection The front panel of this product is detachable to discourage theft. When the front panel is detached, this product will not be operable as the front panel contains the Signal receptor and OPEN/CLOSE button that are necessary for operation. Detaching the Front Panel • Eject the front panel. The LED indicator will flash while the front panel is being detached. Note: • Take care not to grip it too tightly or drop it.
Key Finder The following diagram shows the display when it is deployed. OPEN/CLOSE button Before Using Display RESET button V.
Operation of the Display Operation of the Display Deploying the Display • Turn your vehicle’s engine ON. The display will be automatically deployed by the automatic close/open mode. If the display is not automatically deployed, press the OPEN/CLOSE button. Note: • The automatic close/open mode will operate the display as follows. * When the ignition switch is turned OFF while the display is deployed, the display will be closed after approximately 6 seconds.
Screen Angle Adjustment The angle of this product’s screen continues changing as long as you keep pressing the ANGLE button. • Adjust the screen to an easily viewable angle. Operation of the Display Precaution: • If you can hear the display knocking against your vehicle’s console or dashboard, press the ANGLE button on the (–) side to move the screen a little forward. Note: • When adjusting the angle, be sure to press the ANGLE button. Forcible adjusting of the display by hand may damage it.
Operation of the Display Closing the Display • Turn the vehicle’s engine OFF. The display will be automatically closed by the automatic close/open mode. If the display does not close automatically, press the OPEN/CLOSE button. Note: • When closing the display, check to make sure that it has closed completely. If the display has stopped halfway, leaving it like this could result in damage to it. • The automatic close/open mode will operate the display as follows.
Changing the Wide Mode You can select a desired mode for enlarging a 4:3 picture to a 16:9 one. • Select the desired mode in the following order: Full (FULL) A 4:3 picture is enlarged in the horizontal direction only, enabling you to enjoy a 4:3 TV picture (normal picture) without any omissions.
Operation of the Display Switching the Illumination Color (For European models) This product is equipped with two illumination colors, green and red. You can select the desired illumination color. • Switch to the desired illumination color. Hold for 2 seconds Repeat the preceding operation to switch to the previous color.
Switching the Video Source 7 Switching to RGB You can watch videos from a component connected to this produt’s RGB input. • Switch to RGB. Note: • If you select the “AVM” video select setting in the display setting menu, video is locked to RGB. (See page 14.) 7 Switching to AV and VTR You can switch between video from a component connected to this product’s video input (VTR) and video from a component connected to the AV-BUS input (AV) .
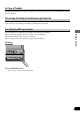
Setting the Display Setting the Display Operating the Setting Menu Entering the Display Setting Menu Perform display and picture setting with this menu. 1 Enter the Display Setting Menu. Hold for 2 seconds 2 Select the desired mode in the following order: Each press changes the Mode ... VSEL SET = AUTO OPEN = BRIGHT = COLOR* = HUE* = DIMMER To cancel the Display Setting Menu, press the WIDE button again for 2 seconds.
Switching the Video Select Setting You can change the video select setting. the WIDE button and select the video select mode (VSEL SET) in 1 Press the Display Setting Menu. 2 Switch to the desired video select setting in the following order: AUTO = MANUAL = AVM When the Head Unit source is switched to a component (e.g. SDV-P7) connected to the AV-BUS, output automatically switches to video from that component.
Setting the Display Adjusting the Bright You can adjust the bright of the picture. 1 Press the WIDE button and select the Bright mode (BRIGHT) in the Display Setting Menu. 2 Adjust the Bright. Note: • The density of the display black can be adjusted within the range of “–24” to “+24.” • The adjustment values are recorded separately for the AV, VTR and RGB video. The adjustment values of a component (AV) connected to the AV-BUS input are also recorded separately.
Adjusting the Hue You can adjust the hue of the picture. 1 Press the WIDE button and select the Hue mode (HUE) in the Display Setting Menu. 2 Adjust the Hue. Note: Adjusting the Dimmer The brightness of the LCD screen can be adjusted automatically to the brightness you set to match the ambient brightness. Separate adjustment values can be recorded for bright conditions (yellow) as well as dark conditions (blue).
Others Others Using the Display Correctly CAUTION • If moisture or foreign matter should get inside the product, turn OFF the power immediately and consult your dealer or the nearest authorized PIONEER Service Station. Using the product in this condition may result in a fire or electric shock, or other failure.
About the Liquid Crystal Display (LCD) Screen • If the display is near the vent of an air conditioner when it is deployed, make sure that air from the air conditioner is not blowing on it. Heat from the heater may break the LCD screen, and cool air from the cooler may cause moisture to form inside the display resulting in possible damage. Also, if the display is cooled down by the cooler, the screen may become dark, or the life span of the small fluorescent tube used inside the display may be shortened.
Appendix Appendix Specifications General Display Power source .... 14.4 V DC (10.8 – 15.1 V allowable) Grounding system .................................. Negative type Max. current consumption ...................................... 4 A Dimensions (DIN) (chassis) ...... 180 (W) × 50 (H) × 160 (D) mm [7-1/8 (W) × 2 (H) × 6-1/4 (D) in] (nose) ............ 188 (W) × 58 (H) × 31 (D) mm [7-3/8 (W) × 2-1/4 (H) × 1-1/4 (D) in] (D) (chassis) ......
Appendix 20
PIONEER CORPORATION 4-1, MEGURO 1-CHOME, MEGURO-KU, TOKYO 153-8654, JAPAN PIONEER ELECTRONICS (USA) INC. P.O. Box 1760, Long Beach, California 90801, U.S.A. TEL: (800) 421-1404 PIONEER EUROPE NV Haven 1087, Keetberglaan 1, B-9120 Melsele, Belgium TEL: (0) 3/570.05.11 PIONEER ELECTRONICS AUSTRALIA PTY. LTD. 178-184 Boundary Road, Braeside, Victoria 3195, Australia TEL: (03) 9586-6300 PIONEER ELECTRONICS OF CANADA, INC.