ESPAÑOL Speaker System Enceintes acoustiques Lautsprechersystem Sistema di diffusori Luidsprekersysteem Sistemas de parlantes NEDERLANDS S-BD422 S-BD122 S-BD122FS ITALIANO Blu-ray Disc receiver Système Home-Cinéma Blu-ray Disc Blu-ray Disc Receiver Sintoamplificatore con predisposizione Blu-ray Disc Blu-ray Disc receiver receptor de Blu-ray Disc DEUTSCH XV-BD422B XV-BD122B XV-BD122FSB FRANÇAIS Blu-ray Disc surround system Système Home-Cinéma Blu-ray Disc Blu-ray Disc Mehrkanal-System Sistema surrou
Safety Information Thank you for buying this Pioneer product. Please read through these operating instructions so you will know how to operate your model properly. After you have finished reading the instructions, put them away in a safe place for future reference.
If the AC plug of this unit does not match the AC outlet you want to use, the plug must be removed and appropriate one fitted. Replacement and mounting of an AC plug on the power supply cord of this unit should be performed only by qualified service personnel. If connected to an AC outlet, the cut-off plug can cause severe electrical shock. Make sure it is properly disposed of after removal.
Notes on Copyrights • Because AACS (Advanced Access Content System) is approved as content protection system for Blu-ray Disc format, similar to use of CSS (Content Scramble System) for DVD format, certain restrictions are imposed on playback, analog signal output, etc., of AACS protected contents. The operation of this product and restrictions on this product may vary depending on your time of purchase as those restrictions may be adopted and/ or changed by AACS after the production of this product.
Important Notice for TV colour system The colour system of this player differs according to currently playing discs. For example, when the player plays the disc recorded in the NTSC colour system, the image is output as an NTSC signal. Only the multi system colour TV can receive all signals output from the player. • If you have a PAL colour system TV, you will see just distorted images when using discs or video contents recorded in NTSC.
Table of Contents 1 Before you start 8 8 8 8 8 9 9 10 16 17 19 20 20 20 Introduction – Supplied accessories – Accessories of speaker box (BCS-424) – Accessories of speaker box (BCS-222) – Accessories of speaker box (BCS-FS121) – Putting the batteries in the remote control – Software update – Types of discs/files that can be played – Trademarks and licenses Remote control Front panel Rear panel – BCS-424/BCS-222 – BCS-FS121 2 Connecting 21 21 22 22 23 23 24 24 25 25 26 26 27 27 28 28 29 29 30 30 30 31
5 Playback from Home Media Gallery 48 48 50 50 50 51 51 51 51 About Home Media Gallery – About network playback Playback file on the network Disc/USB playback – Playing back image files Playing in the desired order (Playlist) – Adding tracks/files – Playing the playlist – Deleting tracks/files from the playlist 6 Playing the web contents 52 52 Available web contents Playing the items 7 Other Operating 53 54 54 54 54 54 54 55 56 57 Recording Audio CD to a USB device Radio Operations – Listening t
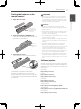
En Before you start Chapter 1 Before you start 1 Accessories of speaker box (BCS-222) Before you start Introduction Supplied accessories Non-skid pads (5) Screws M3.5x12 [Taping type] (4) (These screws are used to fix the speakers to the stands.) Video cable (1) Remote control (1) Battery (2) FM antenna (1) Accessories of speaker box (BCS-FS121) Non-skid pads (2) Screws M3.5x12 [Taping type] (2) (These screws are used to fix the speakers to the stands.
Before you start Putting the batteries in the remote control 1. Open the rear cover. 9 En WARNING Caution Press lightly on this part and slide into the direction of the arrow. 2. Insert the batteries (AAA/R03 x 2). Insert as indicated by the +/* marks into the battery compartment. Insert the negative (*) side first. 3. Close the rear cover. Close securely (a click should be heard). • Do not use any batteries other than the ones specified. Also, do not use a new battery together with an old one.
Before you start En Types of discs/files that can be played 1 Playable discs Discs with the logo marks below indicated on the disc label, package or jacket can be played. Before you start Caution • Only the discs that have been finalized can be played.
Before you start • "Blu-ray Disc", "Blu-ray" and "Blu-ray Disc" logo are trademarks of Blu-ray Disc Association. • is a trademark of DVD Format/Logo Licensing Corporation. About audio formats The following audio formats are supported on this player: • Dolby TrueHD • Dolby Digital Plus • HD DVDs • Dolby Digital • DVD-RAM discs • DTS-HD Master Audio It is possible that some discs other than the ones listed above may not be playable either.
En 1 Before you start Before you start BONUSVIEW functions such as playback of secondary video (Picture-in-Picture) and secondary audio can be used. The data used with the BONUSVIEW functions (the secondary video (Picture-in-Picture) and secondary audio data) may be stored in the storage. For details on secondary video and secondary audio playback, refer to the disc’s instructions. "BONUSVIEW" is trademark of Blu-ray Disc Association.
Before you start Playing CDs DualDisc playback A DualDisc is a two-sided disc, one side of which contains DVD content - video, audio, etc. - while the other side contains non-DVD content such as digital audio material. The DVD side of a DualDisc can be played on this player. The non-DVD, audio side of the disc is not compatible with this player. It is possible that when loading or ejecting a DualDisc, the opposite side to that being played will be scratched. Scratched discs may not be playable.
En Before you start Playable files 1 Video, image and audio files recorded on DVDs, CDs or USB devices can be played. Before you start Caution • In DVD, only the one recorded by the ISO 9660 file system can be played. • Some files may not be playable. • For some files, it may not be possible to use certain functions during playback. • It may not be possible to play some files, even if they have the extension of a file playable on this player.
Before you start 15 En Table of Playable Files Playable media USB devices1 Network2 File specifications MP3 (.mp3) 1 1 1 Sampling frequencies: Up to 48 kHz Bit rate: Up to 320 kbps Audio type: MPEG-1 Audio Layer 3 WMA (.wma) 1 1 1 Sampling frequencies: Up to 48 kHz Bit rate: Up to 192 kbps Audio type: WMA version 9 LPCM (.wav) 1 1 1 Sampling frequencies: Up to 192 kHz Quantization bitrate: 16 bit Channel: 2ch FLAC (.
En Before you start Trademarks and licenses 1 Before you start The terms HDMI and HDMI High-Definition Multimedia Interface, and the HDMI Logo are trademarks or registered trademarks of HDMI Licensing, LLC in the United States and other countries. “x.v.Colour”, and trademarks of Sony Corporation. are YouTube™ is a trademark of Google Inc. Manufactured under license from Dolby Laboratories. “Dolby” and the double-D symbol are trademarks of Dolby Laboratories.
Before you start Remote control 2 3 En • • • • • • • • • 1• • • • • • • • • (STANDBY/ON): Press to turn the power on and off. FUNCTION: Changes the input source or function. When switching while viewing the display window on the player 1. The input source switches every time the FUNCTION is pressed. 2. Select the desired input source and press ENTER. When switching while viewing the TV monitor 1. Press FUNCTION to display the [Source Menu]. 2.
En 1 Before you start VOL +/– : Adjusts speaker volume. • • • • • • • • • 7• • • • • • • • • SOUND RETRIEVER: Switches Sound Retriever setting (See page 57). CLEAR: Press to clear the numeric number, etc. CD/SACD: See page 43. Before you start USB REC: Records an audio. DISPLAY: Displays or exits On- Screen Display. MUTE: Mute the unit. • • • • • • • • • 4• • • • • • • • • TOP MENU: Press to display the top menu of the BD-ROM or DVD-Video.
Before you start 19 En Front panel 2 3 4 9 1 Disc tray 2 Operation buttons (STANDBY/ON) Switches the unit ON or OFF. Note If the power does not turn OFF, pressing the (STANDBY/ON) button for more than 5 seconds reboots the unit and the operation becomes possible. (OPEN/CLOSE) FUNCTION Changes the input source or function. When switching while viewing the display window using the button on the front panel 1. The input source switches every time the FUNCTION is pressed. 2.
En Before you start Rear panel 1 BCS-424/BCS-222 Before you start 1 2 3 6 7 8 9 5 4a b 3 6 7 8 9 5 4a b BCS-FS121 1 2 1 AC IN Plug into the power source.
Connecting Chapter 2 21 En 3. Mount the front/surround speaker. Connecting 1 Pass the speaker cable through the cable hole on the side of the base. Assemble the speakers Speaker setup for BCS-424 2 1. Connect the wires to the player. Insert the cables connected to the player to the same colored connector on the speaker. 2 Insert the lower cabinet to the base so that the cable hole is positioned at the backside. Caution • These speaker terminals carry HAZARDOUS LIVE voltage.
En Connecting 5 Fix the upper cabinet and the lower cabinet from the backside of the speaker using the two screws (M4 x 12). Wall mounting the speaker for BCS-424 The center speaker have a mounting hole which can be used to mount the speaker on the wall. Before mounting Remember that the speaker system is heavy and that its weight could cause the screws to work loose, or the wall material to fail to support it, resulting in the speaker falling.
A C A A A A F D F A A A A G B F C C B A A C D G G A B A A A A A A Additional notes onGspeaker A F D A for BCS-424 A A A A A Precautions: A A A A AB C C D E D The subwoofer is not magnetically shielded and so should not be placed near a TV or monitor. B Magnetic storage media (such as floppy discs and tape or video cassettes) should also not be A A B C D E kept close C to the subwoofer. A G the subwoofer to a wall or Do not attach ceiling. They may fall off and cause injury.
En Connecting Speaker setup for BCS-222 Preparing the speakers 1. Connect the wires to the player. Insert the cables connected to the player to the same colored connector on the speaker. Wall mounting the speaker for BCS-222 All speakers have a mounting hole which can be used to mount the speaker on the wall. Before mounting Remember that the speaker system is heavy and that its weight could cause the screws to work loose, or the wall material to fail to support it, resulting in the speaker falling.
A C A A A A F D F A A C C B A A C D G G A B A A A A A A A A A Precautions: A A A AB C C D E A The subwooferD is not magnetically shielded and so should not be placed near a TV or monitor. B Magnetic storage media (such as floppy discs and tape or video cassettes) should also not be A B C D E kept close C to the subwoofer. A A G the subwoofer to a wall or Do not attach ceiling. They may fall off and cause injury.
En Connecting Speaker setup for BCS-FS121 Preparing the speakers 1. Connect the wires to the player. Insert the cables connected to the player to the same colored connector on the speaker. Wall mounting the speaker for BCS-FS121 All speakers have a mounting hole which can be used to mount the speaker on the wall.
A C A A G F A D D A A A A A A B G Additional notes on speaker F A D A A for BCS-FS121 A A A A A The subwoofer is not magnetically shielded and so should not be placed near a TV or monitor. B Magnetic storage media (such as floppy discs and tape or video cassettes) should also not be kept close C to the subwoofer. G Do not attach the subwoofer to a wall or ceiling. They may fall off and cause injury.
En Connecting Connecting to Your TV Make one of the following connections, depending on the capabilities of your existing equipment. • HDMI connection (page 28) HDMI connection If you have a HDMI TV or monitor, you can connect it to this player using a HDMI cable (High Speed HDMI®/™ Cable). Connect the HDMI terminal on the player to the HDMI terminal on a HDMI compatible TV or monitor.
Connecting ARC (Audio Return Channel) function The ARC function enables an HDMI capable TV to send the audio stream to HDMI OUT of this player. 29 En Video connection Connect the VIDEO OUT terminal on the player to the video in terminal on the TV using a video cable. You can hear the sound through the system’s speakers. To use this function: -- Your TV must support the ARC function. 2 Rear of the unit Connecting -- The setting method of ARC may differ depending on the TV.
En Connecting Antenna connection Connect the supplied antenna for listening to the radio. Connections with external device AUX connection You can enjoy the sound from an external component through the speakers of this system. 2 Connecting Connect the analog audio output terminals of your component into the AUX L/R (INPUT) on this unit. And then select the [AUX] option by pressing FUNCTION and ENTER.
Connecting 31 En PORTABLE IN connection OPTICAL IN 1/2 connection You can enjoy the sound from your portable audio player through the speakers of this system. You can enjoy the sound from your component with a digital optical connection through the speakers of this system. Connect the headphones (or line out ) terminal of the portable audio player into the PORTABLE IN socket of this unit. And then select the [Portable In] option by pressing FUNCTION and ENTER.
En Connecting HDMI IN 1/2 connection You can enjoy the pictures and sound from your component through this connection. Connect the HDMI OUT terminal of your component into the HDMI IN 1 or 2 terminal on this unit. And then select the [HDMI IN 1/2] option by pressing FUNCTION and ENTER. 2 Rear of the unit Connecting optional Bluetooth® ADAPTER When the Bluetooth ADAPTER (Pioneer Model No.
Connecting Connecting to your Home Network Broadband service 2 Router Wired network connection Using a wired network provides the best performance, because the attached devices connect directly to the network and are not subject to radio frequency interference. Please refer to the documentation for your network device for further instructions. Connect the player’s LAN port to the corresponding port on your Modem or Router using a commercially available LAN or Ethernet cable.
En Connecting Notes on network connection: 2 • Many network connection problems during set up can often be fixed by re-setting the router or modem. After connecting the player to the home network, quickly power off and/ or disconnect the power cord of the home network router or cable modem. Then power on and/or connect the power cord again.
Connecting 35 En USB device connection This player can play movie, music and photo files contained in the USB device. About USB devices 1. Insert a USB device to the USB port until it fits into place. The USB devices that can be connected to the player are as shown below. • USB 2.0-compatible memory devices • FAT16 or FAT32 file system, minimum 1 GB capacity (2 GB or more recommended) 2 Connecting Note • Devices formatted with a file system other than the above cannot be used.
En Getting Started Capter 3 Getting Started Making settings using the Setup Navigator menu Be sure to perform these settings when using the player in the following situations. 3 • When you use the player for the first time. • After Initial Setup format. Getting Started • After updating the player’s software. Caution • Before turning on the power, check that the connections between the player and other devices are correct.
Getting Started 37 En Operating the TV with the player’s remote control When the manufacturer code for your brand of TV is set on the player’s remote control, the TV can be operated using the player’s remote control. Caution • For some models it may not be possible to operate the TV with the player’s remote control, even for TVs of brands listed on the manufacturer code list. 3 1. Input the 2-digit manufacturer code. Press the number buttons (0 to 9) to input the code while pressing TV CONTROL u.
En Getting Started TV preset code list Manufacturer Code(s) 3 Getting Started PIONEER 00, 31, 32, 07, 36, 42, 51, 22 ACURA 44 ADMIRAL 31 AIWA 60 AKAI 32, 35, 42 AKURA 41 ALBA 07, 39, 41, 44 AMSTRAD 42, 44, 47 ANITECH 44 ASA 45 ASUKA 41 AUDIOGONIC 07, 36 BASIC LINE 41, 44 BAUR 31, 07, 42 BEKO 38 BEON 07 BLAUPUNKT 31 BLUE SKY 41 BLUE STAR 18 BPL 18 BRANDT 36 BTC 41 BUSH 07, 41, 42, 44, 47, 56 CASCADE 44 CATHAY 07 CENTURION 07 CGB 42 CIMLINE 44 CLARIVOX 07 CLATRONIC 38 CONDOR 38 CONTEC 44 CROSLEY 32 CRO
Playback Chapter 4 Playback Playing discs or files This section describes the player’s main operations. For the types of discs and files that can be played, see page 10. Video, image and audio files recorded on discs are played with the Home Media Gallery (page 48). 1. Press u STANDBY/ON to turn on the power. Turn the TV’s power on and switch its input beforehand. 2. Press h OPEN/CLOSE to open the disc tray and load the disc. 3. Press d PLAY to play the disc. yy To pause, press e PAUSE during playback.
En Playback Forward and reverse scanning Step forward and step reverse During playback, press mREV or nFWD. yy The scanning speed switches each time the button is pressed. The speed steps depend on the disc or file (the speed is displayed on the TV screen). While playback is paused, press q/ or /r. yy The picture moves a step forward or reverse each time the button is pressed. To resume normal playback Press d PLAY. Press d PLAY.
Playback To cancel Repeat Play yy Press REPEAT several times during Repeat Play. Note yy Repeat Play is canceled in the following cases: –– When you search outside the repeat range. –– When you start other Repeat Play or Random Play. 41 En Making bookmarks You can make bookmarks on the video currently playing and play back the scene later. During playback, press BOOKMARK. yy The bookmark is made. yy Maximum number of bookmarks are 12.
En Playback Playing photos as slideshows Switching the subtitles This function plays the photos, switching them automatically. For discs or files on which multiple subtitles are recorded, the subtitles can be switched during playback. During playback, press INDEX. yy Display the thumbnail of image files. The maximum number is 12 at once. yy If you select one of the image and press ENTER, slideshow will start from the image you selected.
Playback Switching the audio For discs or files on which multiple audio streams/channels are recorded, audio streams/ channels can be switched during playback. During playback, press AUDIO. yy The current audio and total number of recorded audio streams are displayed on the TV screen. To switch the audio, press AUDIO again. yy The audio can also be switched by selecting Audio from the TOOLS menu. yy If the audio is not switched when AUDIO is pressed, switch it from the disc menu screen.
En Playback Enjoying BONUSVIEW or BD-LIVE This player is compatible with BD-Video BONUSVIEW and BD-LIVE. When using BD-Video discs compatible with BONUSVIEW, you can enjoy such functions as secondary video (picture in picture) (page 46) and secondary audio (page 46). With BDVideo discs supporting BD-LIVE, special video images and other data can be downloaded from the Internet. 4 Data recorded on BD video and downloaded from BD-LIVE is stored on the USB flash drive (external memory).
Playback 45 En Playback functions The functions that can be used differ according to the type of disc and file. In some cases, some of the functions cannot be used. Check the usable functions on the table below.
Playback En Using the TOOLS menu Item Description Various functions can be called out according to the player’s operating status. Ins Search Skip forward 30 seconds. Ins Replay Skip backward 10 seconds. Slide Show Switch the playback speed while playing the picture slide show. Transition Change the style of the slide show while playing the picture slide show. 1. Display the TOOLS menu. Press TOOLS during playback. 2. Select and set the item. Use / to select, then press ENTER.
Playback Playing a specific title, chapter, track or file (Search) 1. Select Title or Chapter (track/file). Use / to select, then press ENTER. 2. Input the Title or Chapter (track/file) number. Use the number buttons (0 to 9) or / to input the number. yy To search for title 32, input 3 and 2, then press ENTER. yy Press CLEAR to clear the values you have input. 3. Starting playback from the specified title, chapter or track. Press ENTER. You can select from 2 types of random playback. 1. Select Mode.
En Playback from Home Media Gallery Chapter 5 Playback from Home Media Gallery About Home Media Gallery • The following files are allowed to be played from Home Media Gallery: –– PCs running Microsoft Windows Vista or XP with Windows Media Player 11 installed –– PCs running Microsoft Windows 7 with Windows Media Player 12 installed –– DLNA-compatible digital media servers (on PCs or other components) Files stored in a PC or DMS (Digital Media Server) as described above can be played by Digital Media
Playback from Home Media Gallery DLNA®, the DLNA Logo and DLNA CERTIFIED® are trademarks, service marks, or certification marks of the Digital Living Network Alliance. 49 En • Even when encoded in a compatible format, some files may not play correctly. Pioneer is not responsible for any malfunction of the player and/or the Home Media Gallery features due to communication errors/malfunctions associated with your network connection and/or your PC, or other connected equipment.
En Playback from Home Media Gallery Playback file on the network 1. Press HOME MEDIA GALLERY to display the Home Media Gallery. The Home Media Gallery can also be displayed by selecting [Home Media Gallery] from Home Menu, then pressing ENTER. 2. Select the server which contains the file you want to play. 3. Select the file you want to play. Use / to select, then press ENTER. To end Home Media Gallery Press HOME MEDIA GALLERY.
Playback from Home Media Gallery Playing in the desired order (Playlist) The discs that can add tracks and files to the Playlist are as shown below. • DVDs/CDs/USB devices on which audio files are recorded Adding tracks/files Use this procedure to add tracks and files, and create the Playlist. 1. Press HOME MEDIA GALLERY to display the Home Media Gallery. The Home Media Gallery can also be displayed by selecting Home Media Gallery from Home Menu, then pressing ENTER. 2. Select Disc or USB.
En Playing the web contents Chapter 6 Playing the web contents You can enjoy some streaming contents on the Internet with the player. Available web contents Playing the items Caution You must connect the player to the Internet beforehand. See Connecting to your Home Network on page 33 for the details. • YouTube (MPEG4 AVC H.264) • Picasa Note About YouTube • YouTube videos of the following sizes can be played.
Other Operating Chapter 7 Other Operating Recording Audio CD to a USB device You can record audio CD to a USB device using this player. 1. Insert an USB device into the USB port on the front panel. Note yy Please connect only one USB device. 2. Open the disc tray and place an Audio CD on the tray. Press OPEN/CLOSE. 53 En 7. Start recording. Use / / / to select [Start] and press ENTER to start recording. 8. Exit CD recording display.
En Other Operating Radio Operations Improving poor FM reception Be sure that FM aerial is connected. (Refer to the page 30) Listening to the radio 1. Press FUNCTION until FM appears in the display window and press ENTER. The last received station is tuned in. 2. Scanning will start when either the or the button is pressed. or Press / repeatedly. Seeing information about a radio station The FM tuner is supplied with the RDS (Radio Data System) facility.
Other Operating 55 En Bluetooth® ADAPTER for Wireless Enjoyment of Music Listen to music on a Bluetooth wireless technology enabled device • Bluetooth wireless technology enabled device: cell phone Pairing of the unit and a Bluetooth wireless technology enabled device.
En Other Operating Note • This unit does not support AVRCP. • This unit does not support Mono Headset Profile (Hands Free Profile). • A Bluetooth wireless technology enabled device cannot be operated by this unit. • This unit cannot be used to listen to one seg sounds on a Bluetooth wireless technology enabled device. Music contents protected by SCMS-T cannot be listened to. • Only one Bluetooth wireless technology enabled device may be paired with this unit; multiple pairing is not possible.
Other Operating 57 En Sound Press SOUND on the remote control to display the sound select menu on the TV screen. Use cursor button to make a selection, then press ENTER. Press SOUND to exit the Sound Menu. Note • When HDMI IN 1 or HDMI IN 2 are selected, the Sound Menu cannot be displayed. Switch to other input source and then switch the Sound. • When HDMI IN 1 or HDMI IN 2 is selected, VIRTUAL 3D SOUND and SOUND RETRIEVER buttons do not function.
En Advanced settings Advanced settings Operating the initial setup screen Changing the settings 1. When playback is stopped, display the Home Menu screen. HOME MENU. Press Chapter 8 2. Select and set Initial Setup. Use / to select, then press ENTER. 3. Select the item and change the setting. Use / / / to select, then press ENTER. Closing the Initial Setup screen Press HOME MENU or RETURN. Note • The items that can be selected depend on the player’s status.
Advanced settings 59 En Audio Output Setting Options Explanation DRC (Dynamic Range Control) Off Select this to output audio signals without using the DRC function. On Select this to adjust the range between the loudest and softest sounds (dynamic range) for playback at average volume. Use this when it is hard to hear dialog or when watching movies at midnight. Auto Select to switch the DRC setting On/Off automatically according to the input audio signal from the disc.
En Advanced settings Network Setting Options IP Setting Select this to set the IP address of the player and DNS server (page 62). Proxy Server Only set the proxy server if so instructed by your Internet service provider (page 63). Information Displays the values of the MAC address, IP address, subnet mask, default gateway, DNS server (primary) and DNS server (secondary). Connection Test Select this to test the network connection (page 63).
Advanced settings Options Setting Options Explanation Screen Saver Off The screen saver is not activated. 1 min The screen saver will be activated if no operation has been performed for more than one minute/two minutes/three minutes. Operating the remote control can deactivate the screen saver. 2 min 3 min Auto Power Off 61 En Off Select this if you do not want the power to turn off automatically.
En Advanced settings Adjusting the video Setting the IP address 1. Select and set Display Setting d Video Adjust d Next Screen. Use / to select, then press ENTER. 1. Select and set Network d IP Setting d Next Screen. Use / to select, then press ENTER. 2. Select the item and change the setting. Use / to select the item, then use / to change the setting. Once the setting is RETURN to close the completed, press settings screen. 2. Set IP address.
Advanced settings 63 Setting the proxy server Testing the network connection Only set the proxy server if so instructed by your Internet service provider. Select and set Network d Connection Test d Start. Use / to select, then press ENTER. [Network is OK.] is displayed once the test is completed. If any other message is displayed, check the connections and/or settings (pages 33 and 62). 1. Select and set Network d Proxy Server d Next Screen. Use / to select, then press ENTER. 2.
En Advanced settings Registering or Changing the password Use this procedure to register or change the code number required for the Parental Lock settings. About default password of this unit The default password is [0000]. yy This unit might ask you to enter a password when you change the password. yy If you reset this unit, your password is simultaneously changed to the default setting. 1. Select and set Security d Change Password d Next Screen. Use / to select, then press ENTER. 2.
Advanced settings Software updating The player’s software can be updated using one of the methods shown below. • Connecting to the Internet. • Using a disc. • Using a USB flash drive. Product information on this player is provided on the Pioneer website. Check the website shown on page 9 for update and service information on your Blu-ray disc player. Caution • Do not unplug the power cord or remove the USB flash drive/disc during software updating.
En Advanced settings Updating using a USB flash drive/disc Note Advanced settings yy When an update file is provided on the Pioneer website, use your computer to download it onto a USB flash drive or disc. Carefully read the instructions on downloading update files provided on the Pioneer website. yy Store the update file in the root directory of the USB flash drive or disc. Do not store it within a folder. yy Do not put any files other than the update file on the USB flash drive or disc.
Advanced settings 67 En Language code table and country/area code table Language code table Language name, language code, input code French, fr/fra, 0618 Galician, gl/glg, 0712 Georgian, ka/kat, 1101 German, de/deu, 0405 Greek, el/ell, 0512 Guarani, gn/grn, 0714 Gujarati, gu/guj, 0721 Hausa, ha/hau, 0801 Hebrew, iw/heb, 0923 Hindi, hi/hin, 0809 Hungarian, hu/hun, 0821 Icelandic, is/isl, 0919 Indonesian, in/ind, 0914 Interlingua, ia/ina, 0901 Interlingue, ie/ile, 0905 Inupiaq, ik/ipk, 0911 Irish, ga/gle,
En Troubleshooting Chapter 9 Troubleshooting Incorrect operation is often mistaken for trouble or malfunction. If you think that there is something wrong with this component, check the points below. Sometimes the trouble may lie in another component. Inspect the other components and electrical appliances being used. If the trouble cannot be rectified even after checking the points below, ask your nearest Pioneer authorized service center or your dealer to carry out repair work.
Troubleshooting 69 En Sound Problem yyNo sound is output. yySound is not output properly. Multi-channel sound is not output. No sound from surround or center speaker. No sound from the subwoofer. Excessive noise during radio reception. Check yyIs the disc played back in slow motion? yyIs the disc played back in fast forward or fast reverse? Are the cables properly connected? Remedy No sound is output during slow motion play and forward and reverse scanning.
En Troubleshooting Control function Problem Check Control function does not Is the HDMI cable properly work. connected? Is the HDMI cable you are using a High Speed HDMI®/™ Cable? Is this player connected to the TV using an HDMI cable to watch the picture? Does the connected device support the Control function? Is Control set to On on the connected device? Remedy To use the Control function, connect the Flat Screen TV to the HDMI OUT terminal (page 28). Use a High Speed HDMI®/™ Cable.
Troubleshooting 71 En Problem Troubleshooting Check Remedy The component connected to If the client is automatically authorized, you need to enter the the network is not properly set. corresponding information again. Check whether the connection status is set to “Do not authorize”. Check the audio files stored on the component connected to the There are no playable audio files on the component network. connected to the network. Playback does not start.
En Troubleshooting Others Problem Power does not turned on. Power turns OFF without warning The player’s power turns off automatically. The player's power turns on automatically. Check Is the power cord properly connected? Is Control set to On? Is Control set to On? Cannot be operated with the remote control. Are you operating the remote control from a point too far away from the player? Are the batteries dead? Settings I have made have yyHave you disconnected the been cleared.
Appendix 73 En Chapter 10 Appendix Specifications General for BCS-424/BCS-222 Power requirements AC 110 V to 240 V, 50 Hz/60 Hz Power consumption 190 W (In Standby mode: Less than 0.5 W) Dimensions (W x H x D) Approx. 430 mm x 345 mm x 62 mm Net Weight (Approx.) 3.4 kg Operating temperature 5 °C to 35 °C Operating humidity 5 % to 85 % General for BCS-FS121 Power requirements AC 110 V to 240 V, 50 Hz/60 Hz Power consumption 105 W (In Standby mode: Less than 0.
En Appendix Amplifier for BCS-424/BCS-222 Power output (RMS) THD 30 % Total 1100 W Front 170 W × 2 (4 Ω) Center 250 W (3 Ω) Rear 170 W × 2 (4 Ω) Sub-Woofer 250 W (3 Ω) Amplifier for BCS-FS121 Power output (RMS) THD 30 % Total 550 W Front 170 W × 2 (4 Ω) Sub-Woofer 250 W (3 Ω) System Laser Semiconductor laser Signal system Standard PAL/NTSC colour TV system LAN port Ethernet jack x 1, 10BASE-T / 100BASE-TX Bus Power Supply (USB) DC 5 V 500 mA Speakers for BCS-424 S-BD422 • Front
Appendix 75 En Speakers for BCS-222 S-BD122 • Front/Surround speaker (Left/Right) Type 1 Way Net Dimensions (W x H x D) 95 mm x 80 mm x 90 mm Impedance Rated 4Ω Net Weight 0.3 kg Type 1 Way Net Dimensions (W x H x D) 230 mm x 80 mm x 90 mm Impedance Rated 3Ω Net Weight 0.7 kg Type 1 Way Net Dimensions (W x H x D) 200 mm x 340 mm x 270 mm Impedance Rated 3Ω Net Weight 3.
En Appendix Maintenance Notes on discs Handling the unit Handling discs When shipping the unit Please save the original shipping carton and packing materials. If you need to ship the unit, for maximum protection, re-pack the unit as it was originally packed at the factory. Storing discs • Do not use volatile liquids such as insecticide spray near the unit. After playing, store the disc in its case.
Appendix 77 En Important Information Relating to Network Services All information, data, documents, communications, downloads, files, text, images, photographs, graphics, videos, webcasts, publications, tools, resources, software, code, programs, applets, widgets, applications, products and other content (“Content”) and all services and offerings (“Services”) provided or made available by or through any third party (each a “Service Provider”) is the sole responsibility of the Service Provider from whom
Consignes de sécurité Nous vous remercions d’avoir acquis un produit Pioneer. Veuillez lire attentivement ce mode d’emploi afin de connaître la manière d’utiliser l’appareil comme il convient. Cela fait, conservez le mode d’emploi de façon à pouvoir vous y référer en cas de nécessité.
Si la fiche d’alimentation secteur de cet appareil ne convient pas à la prise secteur à utiliser, la fiche doit être remplacée par une appropriée. Ce remplacement et la fixation d’une fiche secteur sur le cordon d’alimentation de cet appareil doivent être effectués par un personnel de service qualifié. En cas de branchement sur une prise secteur, la fiche de coupure peut provoquer une sérieuse décharge électrique. Assurez-vous qu’elle est éliminée correctement après sa dépose.
Remarques sur les droits d’auteur • De même que le système CSS (Content Scramble System) protège le contenu des DVD, le système AACS (Advanced Access Content System) protège le contenu des disques Blu-ray ; les contenus ainsi protégés sont donc soumis à certaines restrictions en termes de lecture, de sortie de signal analogique, etc.
Information importante concernant votre système de télévision en couleur Le système de couleurs de ce lecteur diffère en fonction du disque en cours de lecture. Par exemple, lorsque le lecteur lit le disque enregistré sur un système de couleurs NTSC, l’image est restituée comme un signal NTSC. Seul un appareil avec un système multi peut recevoir tous les signaux de sortie du lecteur.
Table des matières 26 33 33 35 35 35 – Fixation murale des enceintes du système BCS-FS121 – Remarques additionnelles à propos des enceintes du système BCS-FS121 – Installation des enceintes du système BCS-FS121 Raccordement à votre téléviseur – Connexion HDMI – Fonction ARC (Audio Return Channel) – Connexion vidéo Raccordement de l’antenne Connexions à des équipements externes – Connexion AUX – Connexion PORTABLE IN – Connexion OPTICAL IN 1/2 – Connexion HDMI IN 1/2 – Raccordement de l’ADAPTATEUR Bluetoo
42 42 42 43 43 43 43 44 45 46 47 47 47 47 – Zoom – Lecture de photos en diaporama – Changement de l’angle de prise de vues – Changement des sous-titres – Changement du son – Commutation de la zone de lecture CD/ SACD – Affichage des informations du disque – Utilisation de BONUSVIEW ou BD-LIVE – Fonctions de lecture Utilisation du menu TOOLS – Lecture à partir d’un temps précis (Recherche temporelle) – Lecture d’un titre, d’un chapitre, d’une plage ou d’un fichier particulier (Recherche) – Lecture d’une pl
8 Fr Avant de commencer Chapitre 1 Avant de commencer 1 Accessoires du boîtier du haut-parleur (BCS-222) Avant de commencer Introduction Accessoires fournis Tampon antidérapant (5) Vis M3.5x12 [type à tôle] (4) (Ces vis sont utilisées pour fixer les enceintes sur les supports.) Câble vidéo (1) Télécommande (1) Piles (2) Antenne FM (1) Accessoires du boîtier du haut-parleur (BCS-FS121) Tampon antidérapant (2) Vis M3.
Avant de commencer Mise en place des piles dans la télécommande 1. Ouvrez le couvercle arrière. 9 Fr AVERTISSEMENT Attention Appuyez légèrement sur cette partie et faites glisser dans le sens de la flèche. 2. Insérez les piles (AAA/R03 x 2). Insérez les piles en tenant compte des repères +/* dans le logement de piles. Insérez d’abord le côté négatif (*). 3. Fermez le couvercle arrière. Fermez bien le couvercle (vous devez entendre un clic).
10 Avant de commencer Fr Types de disques/fichiers lisibles 1 Disques lisibles Les disques portant les logos suivants sur l’étiquette, le carton ou la jaquette peuvent être lus. Avant de commencer Attention • Attention seuls les disques finalisés peuvent être lus.
Avant de commencer • “Blu-ray Disc”, “Blu-ray” et le logo “Blu-ray Disc” sont des marques commerciales de la Blu-ray Disc Association. • Disques illisibles • HD DVDs • Disques DVD-RAM Il est possible que certains disques ne figurant pas dans la liste ci-dessus ne puissent pas non plus être lus. Remarque • Certains disques ne pourront pas être lus bien qu’ils portent un des logos de la page précédente.
12 Fr 1 Avant de commencer Avant de commencer Les fonctions BONUSVIEW, comme la lecture d’une seconde image (Image dans l’image) et d’un second son, peuvent être utilisées. Les données utilisées avec les fonctions BONUSVIEW (les données de la seconde image (Image dans l’image) et du second son) peuvent être sauvegardées dans la mémoire. Pour le détail sur la lecture d’une seconde image et d’un second son, reportez-vous à la notice du disque.
Avant de commencer Les disques ne contenant pas ces codes ne peuvent pas être lus. Les disques suivants peuvent être lus sur ce lecteur. • BD : –– Modèles commercialisés au Royaume-Uni : 2 (2 compris) et ALL –– Modèles commercialisés en Australie et Nouvelle-Zélande : 4 (4 compris) et ALL –– Modèles commercialisés en Russie : 5 (5 compris) et ALL –– Autres modèles : 3 (3 compris) et ALL Lecture de CD Au sujet de la copie de CD protégés : Ce lecteur se conforme aux spécifications du format CD audio.
14 Fr Avant de commencer Fichiers lisibles 1 Les fichiers vidéo, photo et audio enregistrés sur des DVD, CD ou des dispositifs USB peuvent être lus. Avant de commencer Attention • Parmi les DVD, seuls ceux qui sont enregistrés avec le système de fichiers ISO 9660 peuvent être lus. • Certains fichiers ne pourront pas être lus. • Avec certains fichiers, il peut être impossible d’utiliser certaines fonctions lors de la lecture.
Avant de commencer 15 Fr Attenti Tableau de fichiers lisibles Supports lisibles Dispositifs USB1 Network2 MP3 (.mp3) 1 1 1 Fréquences d’échantillonnage : jusqu’à 48 kHz Débit binaire : Jusqu’à 320 kbps Type audio : MPEG-1 Audio Layer 3 (MP3) WMA (.wma) 1 1 1 Fréquences d’échantillonnage : jusqu’à 48 kHz Débit binaire : Jusqu’à 192 kbps Type audio : WMA version 9 LPCM (.
16 Fr Avant de commencer Marques de commerce et licences 1 Avant de commencer Les termes HDMI et HDMI High-Definition Multimedia Interface ainsi que le logo HDMI sont des marques commerciales ou des marques déposées de HDMI Licensing, LLC aux États-Unis et dans d’autres pays. Fabriqué sous licence de Dolby Laboratories. Le terme « Dolby » et le sigle double D sont des marques commerciales de Dolby Laboratories.
Avant de commencer Télécommande 17 • • • • • • • • • 1• • • • • • • • • (STANDBY/ON) : Pour mettre le lecteur sous et hors tension. FUNCTION : Permet de modifier la fonction ou la source d’entrée. 2 Changement de source en regardant l’affichage sur le lecteur 1. La source d’entrée change à chaque fois que vous appuyez sur la touche FUNCTION. 2. Sélectionnez la source d’entrée souhaitée et appuyez sur ENTER. 4 Changement de source en regardant l’écran du téléviseur 1.
18 Fr 1 Avant de commencer Avant de commencer • • • • • • • • • 3• • • • • • • • • • • • • • • • • • 6• • • • • • • • • VIRTUAL 3D SOUND : Pour permuter les effets Son 3D virtuel (Voir page 57). Touches numériques 0-9 : Permettent de sélectionner les options numérotées dans un menu ou de saisir des caractères en mode pavé numérique. SOUND : Pour permuter les réglages de son (Voir page 57). VOL +/– : Permet de régler le volume des enceintes. AUDIO : Voir page 43.
Avant de commencer 19 Fr Panneau avant 2 3 4 9 1 Plateau du disque 2 Touches de fonction (STANDBY/ON) ALLUME et ARRETE l’appareil. Remarque Si l’appareil ne se met pas hors tension, le fait d’appuyez sur la touche (STANDBY/ON) pendant plus de 5 secondes redémarre l’appareil et il est alors possible de l’utiliser à nouveau. (OPEN/CLOSE) FUNCTION Permet de modifier la fonction ou la source d’entrée.
20 Fr Avant de commencer Panneau arrière 1 BCS-424/BCS-222 Avant de commencer 1 2 3 6 7 8 9 5 4a b 3 6 7 8 9 5 4a b BCS-FS121 1 2 1 AC IN Branchez-le dans la source d’alimentation.
Raccordements Chapitre 2 21 Fr 3. Montez les enceintes avant/surround. Raccordements 1 Faites passer le câble de haut-parleur dans le trou prévu à cet effet sur le côté de la base. Assemblage des enceintes Raccordement des enceintes du système BCS-424 2 1. Branchez les fils sur le lecteur. Raccordez les câbles connectés au lecteur aux prises de couleurs identiques sur l’enceinte. 2 Insérez l’enceinte inférieure sur la base de sorte que le trou du câble soit positionné à l’arrière.
22 Fr Raccordements 5 Fixez l’enceinte supérieure et l’enceinte inférieure, depuis l’arrière, à l’aide des deux vis (M4 x 12). Fixation murale des enceintes du système BCS-424 L’enceinte centrale possède un orifice de fixation qui peut être utilisé pour fixer l’enceinte au mur.
A C A A A A A G B F F D F A A C B A A C D G G A BA A A A A A E Raccordements 23 A C Remarques additionnelles A A D G à proposFdes enceintes du A A système BCS-424 A A A A B A Installation des enceintes du E A système BCS-424 L’illustration suivante montre un exemple d’installation du système. Notez que les Adans ces instructions diffèrent illustrations D de l’unité réelle, pour faciliter l’explication.
24 Fr Raccordements Raccordement des enceintes du système BCS-222 Fixation murale des enceintes du système BCS-222 Préparation des enceintes Toutes les enceintes possèdent un orifice de fixation qui peut être utilisé pour fixer l’enceinte sur un mur. 1. Branchez les fils sur le lecteur. 2 Raccordez les câbles connectés au lecteur aux prises de couleurs identiques sur l’enceinte.
A C A A A A A G B F F D F A A C B A A C D G G A A A B A A A A E Raccordements 25 A C Remarques additionnelles A A D G à proposFdes enceintes du A A système BCS-222 A A A A B A Installation des enceintes du E A système BCS-222 L’illustration suivante montre un exemple d’installation du système. Notez que les Adans ces instructions diffèrent illustrations D de l’unité réelle, pour faciliter l’explication.
26 Fr Raccordements Raccordement des enceintes du système BCS-FS121 Fixation murale des enceintes du système BCS-FS121 Préparation des enceintes Toutes les enceintes possèdent un orifice de fixation qui peut être utilisé pour fixer l’enceinte sur un mur. 1. Branchez les fils sur le lecteur. 2 Raccordez les câbles connectés au lecteur aux prises de couleurs identiques sur l’enceinte.
A C A A G F A D D A A A A A B E A C A Remarques additionnelles G A D à propos des Fenceintes du A système BCS-FS121A A A A Installez les haut-parleurs principaux avant gauche et droit à égale distance de votre téléviseur. A A B A Précautions : L’enceinte centrale fournie avec ce système A est protégée contre les interférences D électromagnétiques.
28 Fr Raccordements Raccordement à votre téléviseur Effectuez l’un des raccordements suivants, en fonction des caractéristiques disponibles sur votre appareil. • Connexion HDMI (page 28) 2 • Connexion vidéo (page 29) Connexion HDMI Si vous possédez un téléviseur ou un moniteur équipé d’une entrée HDMI, vous pouvez le raccorder au lecteur via un câble HDMI (Câble HDMI®/™ haute vitesse).
Raccordements Fonction ARC (Audio Return Channel) La fonction ARC permet à un téléviseur compatible HDMI d’envoyer le flux audio sur la sortie HDMI OUT de ce lecteur. 29 Fr Connexion vidéo Raccordez la prise de sortie vidéo VIDEO OUT du lecteur à la prise d’entrée vidéo du téléviseur à l’aide d’un câble vidéo. Vous pouvez entendre le son à la sortie des enceintes du système. Pour utiliser cette fonction : -- Votre téléviseur doit prendre en charge la fonction ARC.
30 Fr Raccordements Raccordement de l’antenne Connexions à des équipements externes Branchez l’antenne fournie pour écouter la radio. Connexion AUX Vous pouvez écouter les fichiers son d’un équipement externe sur les enceintes de ce système. 2 Raccordements Raccordez le câble de sortie analogique audio de votre équipement externe aux entrées G/D de cet appareil. Sélectionnez ensuite l’option [AUX] en appuyant sur la touche FUNCTION, puis sur ENTER.
Raccordements 31 Fr Connexion PORTABLE IN Connexion OPTICAL IN 1/2 Vous pouvez écouter les fichiers son de votre baladeur sur les enceintes de ce système. Vous pouvez visionner les fichiers vidéo et écouter les fichiers audio de votre équipement externe à l’aide de cette connexion. Raccordez la prise casque (ou sortie de ligne) du baladeur à la prise PORTABLE IN de cet appareil. Sélectionnez ensuite l’option [Portable In] en appuyant sur la touche FUNCTION, puis sur ENTER.
32 Fr Raccordements Connexion HDMI IN 1/2 Vous pouvez visionner les fichiers vidéo et écouter les fichiers audio de votre équipement externe à l’aide de cette connexion. 2 Raccordez la prise de sortie HDMI OUT de votre appareil à la prise d’entrée HDMI IN 1 ou 2 de l’appareil. Sélectionnez ensuite l’option [HDMI IN 1/2] en appuyant sur la touche FUNCTION, puis sur ENTER.
Raccordements Raccordement à votre réseau domestique Service haut débit 2 Routeur Raccordement au réseau câblé L’utilisation d’un réseau câblé offre les meilleures performances car les périphériques raccordés se connectent directement au réseau et ne subissent pas d’interférences de radiofréquences. Reportez-vous à la documentation relative à votre périphérique réseau pour plus d’informations.
34 Fr Raccordements Remarques sur la connexion réseau 2 Raccordements • Bon nombre de problèmes de connexion réseau qui surviennent pendant la configuration peuvent souvent être résolus en réinitialisant le routeur ou le modem. Pour ce faire, après avoir raccordé le lecteur au réseau domestique, éteignez et/ou débranchez rapidement le câble d’alimentation du routeur ou du modem câblé du réseau domestique. Ensuite, rallumez l’appareil et/ou rebranchez le cordon d’alimentation.
Raccordements Raccordement d’un périphérique USB À propos des dispositifs USB 35 Fr Ce lecteur peut lire les fichiers vidéo, audio et photo contenus sur un périphérique USB. 1. Insérez un périphérique USB dans le port USB en veillant à ce qu’il soit bien branché. Les dispositifs USB suivants peuvent être raccordés au lecteur. • Clés compatibles USB 2.
36 Fr Pour commencer Chapitre 3 Pour commencer Paramétrage à l’aide du menu Setup Navigator Veillez à bien régler ces paramètres lorsque vous utilisez le lecteur dans les situations suivantes. HOME MENU pour afficher Appuyez sur la page Home Menu, sélectionnez Initial Setup Setup Navigator Start, puis appuyez sur ENTER. 3. Lancez le Setup Navigator. Appuyez sur ENTER. yy Le Setup Navigator s’ouvre.
Pour commencer 37 Fr Commande du téléviseur avec la télécommande du lecteur Si le code fabricant de votre marque de téléviseur a été enregistré sur la télécommande du lecteur, celle-ci pourra être utilisée également pour la commande du téléviseur. Attention • Il ne sera peut-être pas possible de faire fonctionner certains modèles de téléviseur avec la télécommande du lecteur, bien que ces modèles figurent dans la liste des codes des fabricants. 1. Spécifiez le code fabricant à 2 chiffres.
38 Fr Pour commencer Liste des codes de téléviseurs préréglés Fabricant Code(s) 3 Pour commencer PIONEER 00, 31, 32, 07, 36, 42, 51, 22 ACURA 44 ADMIRAL 31 AIWA 60 AKAI 32, 35, 42 AKURA 41 ALBA 07, 39, 41, 44 AMSTRAD 42, 44, 47 ANITECH 44 ASA 45 ASUKA 41 AUDIOGONIC 07, 36 BASIC LINE 41, 44 BAUR 31, 07, 42 BEKO 38 BEON 07 BLAUPUNKT 31 BLUE SKY 41 BLUE STAR 18 BPL 18 BRANDT 36 BTC 41 BUSH 07, 41, 42, 44, 47, 56 CASCADE 44 CATHAY 07 CENTURION 07 CGB 42 CIMLINE 44 CLARIVOX 07 CLATRONIC 38 CONDOR 38 CONTEC 4
Lecture Chapitre 4 Lecture Lecture de disques ou de fichiers Le fonctionnement de base du lecteur est décrit dans cette section. Pour les types de disques et de fichiers pouvant être lus, reportez-vous à page 10. Les fichiers vidéo, photo et audio enregistrés sur des disques sont lus avec Home Media Gallery (page 48). 2. Appuyez sur h OPEN/CLOSE pour ouvrir le tiroir à disque et insérez le disque. Remarque yy Insérez le disque en orientant sa face imprimée vers le haut.
40 Fr Lecture Recherche avant et arrière Lecture au ralenti Pendant la lecture, appuyez sur mREV ou nFWD. yy La vitesse de la recherche change chaque fois que vous appuyez sur la touche. La variation de vitesse dépend du disque ou du fichier (la vitesse est indiquée sur l’écran du téléviseur). Pendant la pause de la lecture, appuyez sur q/ ou /r et maintenez la pression. yy La vitesse change chaque fois que vous appuyez sur la touche (la vitesse est indiquée sur l’écran du téléviseur).
Lecture Répétition de la lecture (Lecture répétée) Procédez de la façon suivante pour répéter le disque, le titre, le chapitre, la plage ou le fichier actuel. Pendant la lecture, appuyez sur REPEAT. yy À chaque pression sur REPEAT le mode de répétition change de la façon suivante. BD Chapitre actuel d Titre actuel DVD Chapitre actuel d Titre actuel d Tous les titres Pour annuler la lecture répétée yy Appuyez plusieurs fois sur REPEAT pendant la lecture répétée.
42 Fr Lecture Pose de signets Vous pouvez poser des signets sur la vidéo en cours de lecture pour revenir plus tard à la scène marquée. Pendant la lecture, appuyez sur BOOKMARK. yy Un signet est posé. yy Le nombre de signets pouvant être posés est limité à 12. Lecture d’une scène marquée 1. Appuyez sur la touche BOOKMARK et maintenez-la quelques secondes enfoncée. yy La liste de signets apparaît. 4 Lecture 2. Sélectionnez le signet que vous souhaitez lire.
Lecture 43 Fr Changement des sous-titres Changement du son Pour les disques ou les fichiers sur lesquels différents sous-titres ont été enregistrés, les sous-titres peuvent être changés au cours de la lecture. Pour les disques ou les fichiers sur lesquels différents flux/voies audio ont été enregistrés, les flux/voies audio peuvent être commutés au cours de la lecture. Attention yy Les sous-titres ne peuvent pas être changés dans le cas de disques enregistrés par un enregistreur DVD ou BD.
44 Fr Lecture Utilisation de BONUSVIEW ou BD-LIVE Ce lecteur est compatible avec les BD-Vidéo BONUSVIEW et BD-LIVE. Lorsque vous utilisez des BD-Vidéo compatibles avec BONUSVIEW, vous bénéficiez de certaines fonctions comme la seconde image (image dans l’image) (page 46) et le second son (page 46). Avec les BD-Vidéo offrant BD-LIVE, des images vidéo spéciales ainsi que d’autres données peuvent être téléchargées d’Internet.
Lecture 45 Fr Fonctions de lecture Les fonctions pouvant être utilisées dépendent du type de disque et de fichier. Dans certains cas, certaines fonctions ne peuvent pas être utilisées. Les fonctions disponibles sont indiquées dans le tableau suivant.
46 Lecture Fr Utilisation du menu TOOLS Les fonctions pouvant être rappelées dépendent du mode de fonctionnement du lecteur. 1. Affichez le menu TOOLS. Appuyez sur TOOLS pendant la lecture. 2. Sélectionnez et réglez le paramètre. Utilisez / pour effectuer un choix, puis appuyez sur ENTER. Remarque yy Les paramètres ne pouvant pas être changés apparaissent en gris. Les paramètres pouvant être sélectionnés dépendent de l’état du lecteur.
Lecture Lecture à partir d’un temps précis (Recherche temporelle) 2. Sélectionnez le mode de lecture. Utilisez / pour effectuer un choix, puis appuyez sur ENTER. 1. Sélectionnez Time. Utilisez / pour effectuer un choix, puis appuyez sur ENTER. Random play 3. Démarrez la lecture au temps précisé. Appuyez sur ENTER. Lecture d’un titre, d’un chapitre, d’une plage ou d’un fichier particulier (Recherche) 1. Sélectionnez Title ou Chapter (plage/ fichier).
48 Fr Lecture avec Home Media Gallery Chapitre 5 Lecture avec Home Media Gallery À propos de Home Media Gallery Remarque • La fonction Home Media Gallery permet de lire des fichiers disponibles sur les serveurs multimédia connectés au même réseau local (LAN) que le lecteur.
Lecture avec Home Media Gallery Le logo DLNA permet de trouver facilement les produits conformes aux Directives d’interopérabilité DLNA. Cet appareil est conforme aux Directives d’interopérabilité DLNA v1.5. Lorsqu’un ordinateur intégrant un logiciel serveur DLNA ou un autre périphérique compatible DLNA est relié à ce lecteur, certains paramètres du logiciel ou du périphérique devront éventuellement être changés.
50 Fr Lecture avec Home Media Gallery Lecture de fichiers sur le réseau 1. Appuyez sur HOME MEDIA GALLERY pour afficher la page Home Media Gallery. La page Home Media Gallery peut aussi être affichée en sélectionnant [Home Media Gallery] sur la page Home Menu puis en appuyant sur ENTER. 2. Sélectionnez le serveur contenant le fichier que vous voulez lire. 3. Sélectionnez le fichier que vous voulez lire. Utilisez / pour effectuer un choix, puis appuyez sur ENTER.
Lecture avec Home Media Gallery Lecture dans l’ordre souhaité (Playlist) Les disques permettant d’ajouter des plages et des fichiers à la Playlist sont les suivants. • DVD/CD/Dispositifs USB sur lesquels des fichiers audio sont enregistrés Ajout de plages ou de fichiers Procédez de la façon suivante pour ajouter des plages et des fichiers, et créer la Playlist. 1. Appuyez sur HOME MEDIA GALLERY pour afficher la page Home Media Gallery.
52 Fr Lecture de contenus web Chapitre 6 Lecture de contenus web Vous pouvez lire des contenus obtenus d’Internet via le lecteur. Contenus web disponibles • YouTube (MPEG4 AVC H.264) • Picasa Remarque 6 À propos de YouTube • Les vidéos YouTube des tailles suivantes peuvent être lues.
Autres opérations Chapitre 7 Autres opérations Extraction/enregistrement d’un CD audio vers un périphérique USB Ce lecteur permet d’extraire un CD audio et de l’enregistrer sur un périphérique de stockage USB. 1. Connectez un périphérique de stockage USB à la prise USB sur le panneau avant de l’appareil. Remarque yy Ne connectez qu’un seul périphérique USB. 2. Ouvrez le tiroir disque et placez un CD audio dessus. Appuyez sur OPEN/CLOSE. 3. Refermez le tiroir disque.
54 Fr Autres opérations Utilisation de la radio Vérifiez que les antennes FM soient connectées. (Reportez-vous à la page 30.) Ecouter la radio 1. Appuyez sur la touche FUNCTION jusqu’à ce que l’indication FM apparaisse sur l’affichage, puis appuyez sur ENTER. L’appareil se règle sur la dernière station reçue. 2. Le balayage des stations commence lorsque vous appuyez sur la touche ou . Ou Appuyez sur la touche reprises.
Autres opérations ADAPTATEUR Bluetooth® pour profiter de la musique sans fil • Périphérique optimisé pour la technologie sans fil Bluetooth : Téléphone portable • Périphérique optimisé pour la technologie sans fil Bluetooth : Lecteur de musique numérique • Périphérique non équipé de la technologie sans fil Bluetooth : Lecteur de musique numérique + émetteur audio Bluetooth (vendu dans le commerce) Lecture de musique sans fil Lorsque l’ADAPTATEUR Bluetooth (modèle Pioneer nº AS-BT100 ou AS-BT200) est racco
56 Fr Autres opérations Remarque • Cet appareil ne prend pas en charge le profil AVRCP. • Cet appareil ne prend pas en charge le profil Mono Headset (casque/écouteur monaural), encore appelé profil “mains libres”. • Cet appareil ne peut pas contrôler/commander un périphérique sans fil Bluetooth. • Cet appareil ne peut pas être utilisé pour écouter des sons “one seg” sur un périphérique sans fil Bluetooth. Les contenus de musique protégés par la technologie SCMS-T ne peuvent pas être lus.
Autres opérations 57 Fr Son Appuyez sur la touche SOUND de la télécommande pour afficher le menu de sélection du son sur l’écran du téléviseur. Utilisez les touches de navigation pour effectuer la sélection, puis appuyez sur ENTER. Appuyez sur la touche SOUND pour quitter le menu Sound. Remarque • Lorsque la source HDMI IN 1 ou HDMI IN 2 est sélectionnée, le menu Sound ne peut pas être affiché. Sélectionnez une autre source d’entrée pour accéder au menu Sound.
58 Fr Réglages détaillés Réglages détaillés Utilisation de la page Initial Setup Changement des réglages 1. Lorsque la lecture est arrêtée, affichez la page Home Menu. HOME MENU. Appuyez sur Chapitre 8 2. Sélectionnez et validez Initial Setup. Utilisez / pour effectuer un choix, puis appuyez sur ENTER. 3. Sélectionnez le paramètre et changez son réglage. Utilisez / / / pour effectuer un choix, puis appuyez sur ENTER. Fermeture de la page Initial Setup Appuyez sur HOME MENU ou RETURN.
Réglages détaillés Audio Output Réglage DRC (Dynamic Range Control) Speaker Setup HDMI Test Tone Color Space Resolution HDMI Audio Out Options Off Explication Sélectionnez cette option pour transmettre des signaux audio sans utiliser le contrôle de la plage dynamique. On Sélectionnez cette option pour régler la plage entre sons forts et sons faibles (plage dynamique) lors de la lecture à volume modéré.
60 Fr Réglages détaillés Network Réglage IP Setting Proxy Server Information Connection Test Internet Connection BD-Live Connection DLNA OSD Audio * Pour certains disques, il peut être impossible de passer à la langue sélectionnée. Si vous précisez une langue non enregistrée sur le BD ou le DVD, une des langues enregistrées sera automatiquement sélectionnée et utilisée.
Réglages détaillés Security Réglage Change Password Options Parental Control Country Code Screen Saver Auto Power Off Quick Start Update Load Default System Information Disc Auto Update BUDA Karaoke Setup Karaoke Switch Microphone Setup Fr Options Explication Enregistrez (changez) le mot de passe pour utiliser le contrôle parental ou l’annuler lors de la lecture de DVD-Vidéo pourvus d’un contrôle parental (page 64). Changez le niveau du contrôle parental du lecteur (page 64).
62 Fr Réglages détaillés Réglage de l’image 1. Sélectionnez et validez Display Setting d Video Adjust d Next Screen. Utilisez / pour effectuer un choix, puis appuyez sur ENTER. 2. Sélectionnez le paramètre et changez son réglage. Utilisez / pour sélectionnez le paramètre puis utilisez / pour changer son réglage. Lorsque le réglage est terminé, appuyez RETURN pour dégager l’écran de sur réglage.
Réglages détaillés 63 Fr Réglage du serveur proxy Affichage des réglages du réseau Ne réglez le serveur proxy que si votre fournisseur de service Internet vous le demande. Sélectionnez et validez Network d Information d Next Screen. Utilisez / pour effectuer un choix, puis appuyez sur ENTER. Les réglages de l’adresse MAC, l’adresse IP, le masque de sous-réseau, la passerelle par défaut et le serveur DNS (primaire et secondaire) s’affichent.
64 Fr Réglages détaillés Effacement des données ajoutées aux BD et des données des applications Procédez de la façon suivante pour effacer les données qui ont été ajoutées aux BD (données téléchargées avec la fonction BD-LIVE et données utilisées avec la fonction BONUSVIEW) et les données des applications. Attention yy L’effacement des données prend un certain temps. yy Ne débranchez pas le cordon d’alimentation pendant l’effacement des données. 1. Sélectionnez et validez BUDA d BUDA Setup.
Réglages détaillés Mise à jour du logiciel Le logiciel du lecteur peut être mis à jour d’une des façons suivantes. • En se connectant à Internet. • En utilisant un disque. • Utilisation d’un disque à mémoire flash USB. Vous trouverez plus d’informations au sujet de ce lecteur sur le site Pioneer. Consultez ce site à page 9 pour toute information sur la mise à jour et les services relatifs à votre lecteur de disque Blu-ray.
66 Fr Réglages détaillés 1. Insérez le disque à mémoire flash USB ou le disque sur lequel le fichier de mise à jour doit être sauvegardé. Rétablissement des réglages par défaut du lecteur 2. Lorsque la lecture est arrêtée, affichez la page Home Menu. Appuyez sur HOME MENU. 1. Assurez-vous que le lecteur est en service. 3. Sélectionnez et validez Initial Setup. Utilisez / pour effectuer un choix, puis appuyez sur ENTER. 4.
Réglages détaillés 67 Fr Tableau des codes de langues et Tableau des codes de pays et régions Tableau des codes de langues Nom de la langue, code de la langue, code numérique French, fr/fra, 0618 Galician, gl/glg, 0712 Georgian, ka/kat, 1101 German, de/deu, 0405 Greek, el/ell, 0512 Guarani, gn/grn, 0714 Gujarati, gu/guj, 0721 Hausa, ha/hau, 0801 Hebrew, iw/heb, 0923 Hindi, hi/hin, 0809 Hungarian, hu/hun, 0821 Icelandic, is/isl, 0919 Indonesian, in/ind, 0914 Interlingua, ia/ina, 0901 Interlingue, ie/ile,
68 Fr En cas de panne Chapitre 9 En cas de panne Une erreur de commande est souvent prise pour une anomalie de fonctionnement ou une panne. Si vous estimez que ce composant ne fonctionne pas correctement, vérifiez les points ci-dessous. Parfois, le problème peut provenir d’un autre composant. Examinez les autres composants et les appareils électriques utilisés.
En cas de panne 69 Fr Son Anomalie Vérification yyAucun son n’est produit. yyEst-ce que vous utilisez la yyLe son n’est pas restitué lecture au ralenti ? correctement. yyEst-ce que vous effectuez une recherche avant ou arrière rapide ? Est-ce que les câbles audio sont correctement raccordés ? Le son multivoies n’est pas restitué. Aucun son n’est émis des enceintes surround ou centrale.
70 Fr En cas de panne Contrôle Anomalie Vérification Le Contrôle par l’HDMI ne Est-ce que le câble HDMI est correctement raccordé ? fonctionne pas.
En cas de panne Anomalie Impossible d’accéder au composant ou au PC raccordé via le réseau. Fr Solution Dans certains cas, il n’est pas possible d’accéder à un composant sur lequel un logiciel antivirus a été installé. Mettez le composant audio en réseau sous tension avant cet appareil. Si le l’autorisation est automatique, vous devez saisir de nouveau les informations appropriées. Vérifiez si la connexion n’est pas réglée sur “Do not authorize” (Ne pas autoriser).
72 Fr En cas de panne Anomalie Vérification Le trafic est très important sur le réseau auquel vous avez accès par Internet. Une connexion routée par un réseau local LAN sans fil existe sur le même réseau. Solution Utilisez une liaison 100BASE-TX pour accéder aux composants en réseau. yyUne insuffisance de largeur de bande peut exister sur la bande 2,4 GHz utilisée par le réseau local LAN sans fil. Faite en sorte que les connexions LAN câblées ne soient pas routée via un LAN sans fil.
Annexe 73 Fr Chapitre 10 Annexe Spécifications Généralités BCS-424/BCS-222 Alimentation CA 110 V à 240 V, 50 Hz/60 Hz Consommation électrique 190 W (en mode veille : moins de 0,5 W) Dimensions (L x H x P) Approximativement 430 mm x 345 mm x 62 mm Poids net (approx.
74 Fr Annexe Amplificateur BCS-424/BCS-222 Puissance de sortie (RMS) THD 30 % Total 1100 W Avant 170 W × 2 (4 Ω) Centre 250 W (3 Ω) Arrière 170 W × 2 (4 Ω) Subwoofer 250 W (3 Ω) Amplificateur BCS-FS121 Puissance de sortie (RMS) THD 30 % Total 550 W Avant 170 W × 2 (4 Ω) Subwoofer 250 W (3 Ω) Système Laser Laser semi-conducteur Système de signal Système de télévision couleur standard PAL/NTSC Port LAN Prise Ethernet x 1, 10BASE-T/100BASE-TX Alimentation bus (USB) DC 5 V 500 mA Ence
Annexe 75 Fr Enceintes BCS-222 S-BD122 • Haut-parleur avant/enceintes satellites (gauche/droite) Type 1 Way Impédance nominale 4 Ω Dimensions nettes (L x H x P) 95 mm x 80 mm x 90 mm Poids net 0,3 kg Dimensions nettes (L x H x P) 230 mm x 80 mm x 90 mm Poids net 0,7 kg Dimensions nettes (L x H x P) 200 mm x 340 mm x 270 mm Poids net 3,4 kg • Enceinte centrale Type 1 Way Impédance nominale 3 Ω • Caisson de graves Type 1 Way Impédance nominale 3 Ω Enceintes BCS-FS121 S-BD122FS • Haut-par
76 Fr Annexe Entretien Remarques sur les disques Manipulation de l’appareil Manipulation des disques Lors du transport Conservez le carton et les emballages d’origine. Si vous devez transporter l’appareil, pour une protection maximale, emballez-le tel que vous l’avez reçu à sa sortie de l’usine. Entretien des surfaces extérieures • N’utilisez pas de liquides volatiles tels qu’un insecticide en aérosol à proximité de l’appareil. • Si vous frottez trop fort, vous risquez d’endommager la surface.
Annexe 77 Fr Informations importantes sur les services en réseau L’intégralité des informations, données, documents, communications, téléchargements, fichiers, textes, images, photographiques, dessins, vidéos, diffusions web, publications, outils, ressources, logiciels, instructions, programmes, applets, widgets, applications, produits et autres formes de contenu (“contenu”), ainsi que tous les services et offres (“services”) fournis ou mis à disposition, directement ou indirectement, par des tiers (“pres
78 Fr Annexe Avis relatif à la licence du logiciel Nous fournissons à titre de référence des traductions des licences des logiciels utilisés dans cet appareil. Ces traductions ne sont pas des textes officiels. Le texte original (en anglais) se trouve sur la feuille volante. curl AVIS DE COPYRIGHT ET AUTORISATION Copyright © 1996 - 2007, Daniel Stenberg, . Tous droits réservés.
Annexe être modifiées. En d’autres termes, ce code ne peut pas être simplement copié et affecté à une autre licence de distribution [licence publique GNU incluse]. zlib Ce logiciel est partiellement basé sur la bibliothèque zlib. Voir http://www.zlib.net pour plus d’informations.
80 Fr Annexe 10 Annexe (Ci-après, le terme "modification" implique, sans s'y réduire, le terme traduction) Chaque concessionaire sera désigné par "vous". Les activités autres que la copie, la distribution et la modification ne sont pas couvertes par la présente Licence ; elles sont hors de son champ d'application.
Annexe libres dont les conditions de distribution sont différentes, écrivez à l'auteur pour lui en demander l'autorisation. Pour les logiciels dont la Free Software Foundation est titulaire des droits d'auteur, écrivez à la Free Software Foundation ; nous faisons parfois des exceptions dans ce sens. Notre décision sera guidée par le double objectif de préserver le statut libre de tous les dérivés de nos logiciels libres et de promouvoir le partage et la réutilisation des logiciels en général.
82 Fr Annexe 10 Annexe [Ceci est la première version de la GPL Limitée. Elle succède à la version 2 de la Licence Publique GNU pour les bibliothèques, d’où le numéro de version 2.1. Préambule Les licences de la plupart des logiciels sont conçues pour vous enlever toute liberté de les partager et de les modifier.
Annexe de version si tel est votre désir). Ne vous livrez à aucune autre modification dans ces notes. Une fois que ce changement a été effectué dans une copie donnée, il est irréversible pour cette copie, aussi la Licence Publique Générale ordinaire s’appliquera à toutes les copies et tous les travaux dérivés qui en seront extraits. Cette option vous servira lorsque vous souhaiterez copier une portion du code de la Bibliothèque dans un programme qui n’est pas lui-même une bibliothèque. 4.
84 Fr Annexe 10 Annexe un accès aux objets spécifiés ci-dessus. e) Vérifier que l’utilisateur a déjà reçu une copie de ces objets, ou que vous la lui avez déjà envoyée. Pour un programme exécutable, la forme requise du «travail qui utilise la Bibliothèque» doit comprendre toute donnée et tout utilitaire nécessaires pour pouvoir reconstruire l’exécutable.
Annexe 85 Fr termes de la Licence Publique Générale GNU Limitée publiée par la Free Software Foundation (version 2.1 ou bien toute autre version ultérieure choisie par vous). Cette bibliothèque est distribuée car potentiellement utile, mais SANS AUCUNE GARANTIE, ni explicite ni implicite, y compris les garanties de COMMERCIALISATION OU D’ADAPTATION DANS UN BUT SPÉCIFIQUE. Reportez-vous à la Licence Publique Générale GNU Limitée pour plus de détails.
Sicherheitshinweise Vielen Dank, dass Sie sich für dieses Pioneer-Produkt entschieden haben. Bitte lesen Sie diese Bedienungsanleitung gründlich durch, um sich mit der Bedienung des Geräts vertraut zu machen. Nachdem Sie die Bedienungsanleitung gelesen haben, legen Sie sie griffbereit zum Nachschlagen ab.
Falls der Netzstecker des Netzkabels dieses Gerätes nicht in die Zusatzsteckdose einer anderen Komponente passt, muss er gegen einen Netzstecker der geeigneten Ausführung ausgewechselt werden. Ein derartiger Austausch des Netzsteckers muss vom Kundendienstpersonal vorgenommen werden.
Hinweise zum Copyright • AACS (Advanced Access Content System) ist ein gültiges System zum Schutz von Inhalten für das Blu-ray-Disc-Format, ähnlich CSS (Content Scramble System) für das DVD-Format. Für z. B. die Wiedergabe oder den analogen Signalausgang bei AACSgeschützten Inhalten können bestimmte Einschränkungen festgelegt werden.
Wichtige Hinweise zur TV-Farbnorm Die Farbnorm dieses Players richtet sich nach der gerade wiedergegebenen Disc. Wird auf diesem Player z. B. eine in der NTSCFarbnorm aufgenommene Disc wiedergegeben, wird das Bild als NTSC-Signal ausgegeben. Nur Multinorm-Farbfernseher können sämtliche Bildsignale dieses Players anzeigen. • Falls Sie einen Fernseher mit PAL-Farbnorm besitzen, wird das Bild bei der Wiedergabe von Discs oder Videofilmen im NTSC-Format verzerrt angezeigt.
Inhaltsverzeichnis 33 33 35 35 35 Anschluss von Zusatzgeräten – AUX-Anschluss – PORTABLE IN-Anschluss – OPTICAL IN 1/2-Anschluss – HDMI IN 1/2-Anschluss – Anschluss des optionalen Bluetooth® ADAPTER Verbindung mit dem Heimnetzwerk – Kabel-Netzwerkverbindung Anschluss eines USB-Gerätes – Über USB-Geräte – Anschluss des USB-Geräts 3 Die ersten Schritte 36 38 Vornehmen von Einstellungen mithilfe des Setup Navigator-Menüs Bedienung des Fernsehgeräts mit der Fernbedienung des Players – Liste der TV-Herste
45 46 46 47 47 47 – Wiedergabe-Funktionen Verwendung des TOOLS-Menüs – Abspielen ab einer bestimmten Zeit (Zeitsuche) – Abspielen eines bestimmten Titels, Kapitels, Tracks Tracks (Suche) bzw.
8 De Vor der Inbetriebnahme Kapitel 1 1 Vor der Inbetriebnahme Vor der Inbetriebnahme Lautsprecherzubehör (BCS-222) Einführung Mitgeliefertes Zubehör Videokabel (1) Fernbedienung (1) Batterien (2) UKW-Antenne (1) Rutschfeste Unterlagen (5) Schrauben M3.5x12 [Blechschraube] (4) (Diese Schrauben werden verwendet, um die Lautsprecher an den Ständern zu befestigen.) Lautsprecherzubehör (BCS-FS121) Rutschfeste Unterlagen (2) Schrauben M3.
Vor der Inbetriebnahme Einlegen der Batterien in die Fernbedienung 1. Öffnen Sie die rückseitige Abdeckung. 9 De Achtung • Verwenden Sie keine anderen Batterien als die vorgeschriebenen. Legen Sie außerdem keine neuen und alten Batterien gemischt ein. Drücken Sie leicht auf die Abdeckung, und schieben Sie sie in Pfeilrichtung. 2. Setzen Sie die Batterien ein (AAA/R03 x 2). Beachten Sie beim Einsetzen der Batterien die Zeichen +/* im Batteriefach. Setzen Sie den Minuspol (*) zuerst ein. 3.
10 Vor der Inbetriebnahme De Abspielbare Disc- und Dateitypen 1 Abspielbare Discs Vor der Inbetriebnahme Es können Discs abgespielt werden, deren Beschriftung, Verpackung oder Außenhülle eines der folgenden Logos aufweist. Achtung • Nur finalisierte Discs können abgespielt werden.
Vor der Inbetriebnahme • „Blu-ray Disc“, „Blu-ray“ und das „Blu-ray Disc“ Logo sind Markenzeichen der Blu-ray Disc Association. • Über Audioformate Von diesem Player werden folgende Audioformate unterstützt: • Dolby TrueHD • Dolby Digital Plus Nicht abspielbare Discs • Dolby Digital • HD-DVDs • DTS-HD Master Audio • DVD-RAM-Discs • DTS-HD High Resolution Audio Es ist möglich, dass einige andere als die oben aufgeführten Discs ebenfalls nicht abspielbar sind.
12 De 1 Vor der Inbetriebnahme Vor der Inbetriebnahme BONUSVIEW-Funktionen wie die Wiedergabe eines sekundären Videostreams (Bild-in-Bild, P-in-P) und eines sekundären Audiostreams können verwendet werden. Die mit den BONUSVIEW-Funktionen verwendeten Daten (Sekundärvideo- (Bild-in-Bild) und Sekundäraudiodaten) können im Speicher abgelegt werden. Ausführliche Hinweise zur Wiedergabe des sekundären Videostreams und des sekundären Audiostreams finden Sie in der Anleitung zur Disc.
Vor der Inbetriebnahme –– Modelle für Europa, Australien und Neuseeland: B (including B) und ALL –– Modelle für Russland: C (einschließlich C) und ALL –– Andere: A (including A) und ALL –– Modelle für Großbritannien: 2 (einschließlich 2) und ALL –– Modelle für Australien und Neuseeland: 4 (einschließlich 4) und ALL –– Modelle für Russland: 5 (einschließlich 5) und ALL –– Anderes: 3 (einschließlich 3) und ALL Abspielen von CDs Über kopiergeschützte CDs: Dieser Player ist auf Übereinstimmung mit den Spezif
14 De Vor der Inbetriebnahme Abspielbare Dateien 1 Video-, Bild- und Audiodateien, die auf DVDs, CDs oder USB-Geräten aufgenommen wurden, können abgespielt werden. Vor der Inbetriebnahme Achtung • Im DVD-Modus können nur DVDs abgespielt werden, die mit dem ISO 9660-Dateisystem aufgenommen wurden. • Einige Dateien können möglicherweise nicht abgespielt werden. • Bei einigen Dateien können bestimmte Funktionen während der Wiedergabe nicht verwendet werden.
Vor der Inbetriebnahme 15 De Tabelle abspielbarer Dateien Abspielbare Medien Netzwerk2 Dateispezifikationen MP3 (.mp3) 1 1 1 Abtastfrequenzen: Bis zu 48 kHz Bit-Rate: Bis zu 320 kbps Audio-Typ: MPEG-1 Audio Layer 3 WMA (.wma) 1 1 1 Abtastfrequenzen: Bis zu 48 kHz Bit-Rate: Bis zu 192 kbps Audio-Typ: WMA version 9 LPCM (.wav) 1 1 1 Abtastfrequenzen: Bis zu 192 kHz Quantisierung-Bitrate: 16 bit Kanal: 2-Kanal FLAC (.
16 De Vor der Inbetriebnahme Markenzeichen und Lizenzen 1 Vor der Inbetriebnahme Die Bezeichnungen HDMI und High-Definition Multimedia Interface sowie das HDMILogo sind Warenzeichen oder eingetragene Warenzeichen von HDMI Licensing, LLC in den USA und anderen Ländern. “x.v.Colour”, und Warenzeichen der Sony Corporation. Hergestellt unter Lizenz von Dolby Laboratories. „Dolby“ und das Doppel-D-Symbol sind Warenzeichen von Dolby Laboratories. Picasa™ Web Albums ist ein Warenzeichen von Google Inc.
Vor der Inbetriebnahme Fernbedienung 17 De • • • • • • • • • 1• • • • • • • • • (STANDBY/ON): Drücken Sie diese Taste, um das Gerät ein- und auszuschalten. FUNCTION: Auswahl einer Eingangsquelle oder Funktion. 2 Wenn Sie umschalten, während Sie Display-Fenster am Player beobachten. 1. Die Eingangsquelle wird bei jedem Drücken von FUNCTION umgeschaltet. 2. Wählen Sie den gewünschten Eingang und drücken Sie ENTER.
18 De 1 Vor der Inbetriebnahme • • • • • • • • • 3• • • • • • • • • • • • • • • • • • 6• • • • • • • • • VIRTUAL 3D SOUND: Effekte des virtuellen 3D-Klangs ändern (siehe Seite 57). Nummerntasten 0-9: Auswahl einer Aufzählungsoption eines Menüs oder Eingabe von Zeichen über das Keypad. Vor der Inbetriebnahme SOUND: Ruft die Klangeinstellungen auf (siehe Seite 57). AUDIO: Siehe Seite 43. VOL +/– : Einstellen der Lautstärke. SUBTITLE: Siehe Seite 42.
Vor der Inbetriebnahme 19 De Bedienungsfeld 2 3 4 9 1 Disc-Fach 2 Bedienungstasten (STANDBY/ON) Schaltet das Gerät EIN und AUS. Hinweis Wenn sich der Strom nicht ausschalten lässt, bewirkt das mehr als 5 Sekunden lange Drücken der Taste (STANDBY/ON) den Neustart der Einheit, so dass die Operation möglich wird. (OPEN/CLOSE) FUNCTION Auswahl einer Eingangsquelle oder Funktion. Wenn Sie umschalten, während Sie unter Verwendung der Taste auf dem vorderen Bedienfeld das Display-Fenster beobachten. 1.
20 De Vor der Inbetriebnahme Rückseite 1 BCS-424/BCS-222 Vor der Inbetriebnahme 1 2 3 6 7 8 9 5 4a b 3 6 7 8 9 5 4a b BCS-FS121 1 2 1 AC IN Anschluss an eine Steckdose.
Anschluss Kapitel 2 21 De 3. Montieren Sie den Front-/Surround-lautsprecher. Anschluss 1 Das Lautsprecherkabel durch die Kabelöffnung an der Seite der Basis durchführen. Montage der Lautsprecher Lautsprechereinstellungen BCS-424 2 1. Schließen Sie die Kabel am Player an. Führen Sie die an den Player angeschlossenen Kabel jeweils in den gleich gefärbten Anschluss am Lautsprecher ein. 2 Das untere Gehäuse so in die Basis einführen, dass sich die Kabelöffnung auf der Rückseite befindet.
22 De Anschluss 5 Das obere Gehäuse und das untere Gehäuse von der Rückseite des Lautsprechers her mit den zwei Schrauben (M4 x 12) befestigen. Wandmontage der Lautsprecher BCS-424 Der Mittellautsprecher ist mit einer Motageöffnung versehen, die dazu verwendet werden kann, den Lautsprecher an der Wand zu montieren. Vor der Montage 2 Anschluss Achtung • Ziehen Sie die Schrauben nicht zu stark an.
A A G B F B C AA AD A D C G G A A A C A F F A BA A A den Zusatzhinweise zu C A A Lautsprechern BCS-424 D G A Anschluss A A A A A A F Stellen Sie die vorderen Haupt-Lautsprecher links A und rechts in gleichem AbstandAzum Fernsehgerät A A auf. D Vorsichtshinweise A D A A A A B Der mit diesem System mitgelieferte CenterLautsprecher ist magnetisch abgeschirmt.
24 De Anschluss Lautsprechereinstellungen BCS-222 Wandmontage der Lautsprecher BCS-222 Vorbereitung der Lautsprecher Alle Lautsprecher besitzen eine Montageöffnung, die verwendet werden kann, um den Lautsprecher an der Wand zu montieren. 1. Schließen Sie die Kabel am Player an. 2 Führen Sie die an den Player angeschlossenen Kabel jeweils in den gleich gefärbten Anschluss am Lautsprecher ein. Vor der Montage Anschluss Das Lautsprechersystem ist sehr schwer.
A A G B F B C AA AD A D C G G A A A C A F F A A A B A den Zusatzhinweise zu C A A Lautsprechern BCS-222 D G A Anschluss A A A A A A Stellen Sie die Fvorderen Haupt-Lautsprecher links A und rechts in gleichem AbstandAzum Fernsehgerät A A auf. D Vorsichtshinweise A D A A A A B Der mit diesem System mitgelieferte CenterLautsprecher ist magnetisch abgeschirmt.
26 De Anschluss Lautsprechereinstellungen BCS-FS121 Wandmontage der Lautsprecher BCS-FS121 Vorbereitung der Lautsprecher Alle Lautsprecher besitzen eine Montageöffnung, die verwendet werden kann, um den Lautsprecher an der Wand zu montieren. 1. Schließen Sie die Kabel am Player an. 2 Führen Sie die an den Player angeschlossenen Kabel jeweils in den gleich gefärbten Anschluss am Lautsprecher ein. Vor der Montage Anschluss Das Lautsprechersystem ist sehr schwer.
A C A A A G E E F A A A D D A A B Zusatzhinweise zuC den A G ABCS-FS121 Lautsprechern D F A A A Stellen Sie die vorderen Haupt-Lautsprecher links A A und rechts in gleichem A Abstand zum Fernsehgerät auf. Vorsichtshinweise A D A A B C D A Der mit diesem System mitgelieferte CenterLautsprecher ist magnetisch abgeschirmt. Falls die Lautsprecher sehr A nahe am Fernsehgerät D aufgestellt werden, können Farbverfälschungen jedoch nicht ausgeschlossen werden.
28 De Anschluss Anschluss an einen Fernseher Nehmen Sie, abhängig von den Möglichkeiten Ihrer Geräte, einen der folgenden Anschlüsse vor. • HDMI-Anschluss (Seite 28) 2 HDMI-Anschluss Wenn Sie einen HDMI-Fernseher oder -Monitor haben, können Se diesen mit einem HDMI-Kabel (High-Speed-HDMI®/™-Kabel) an diesen Player anschließen. Schließen Sie den HDMI-Anschluss am Player an den HDMI-Anschluss am HDMIkompatiblen Fernseher oder Monitor an.
Anschluss ARC-Funktion (Audio Return Channel) Mithilfe der ARC-Funktion kann ein HDMIfähiges Fernsehgerät einen Audio-Stream an den HDMI OUT-Ausgang dieses Players senden. Verbinden Sie die VIDEO OUT-Buchse des Players über das Videokabel mit der VideoEingangsbuchse des Fernsehers. Der Ton wird über die Systemlautsprecher ausgegeben. 2 Geräterückseite Anschluss -- Die Aktivierung der Option ARC kann je nach Fernsehgerät variieren.
30 De Anschluss Antennenanschluss Schließen Sie zum Radioempfang die mitgelieferte Antenne an. Anschluss von Zusatzgeräten AUX-Anschluss Sie haben die Möglichkeit, den Ton eines Zusatzgerätes über die Lautsprecher dieses Systems wiederzugeben. 2 Anschluss Schließen Sie die analogen AudioAusgangsbuchsen des Gerätes an den Anschluss AUX L/R (INPUT) dieses Gerätes an. Wählen Sie dann mit den Tasten FUNCTION sowie ENTER die Option [AUX].
Anschluss 31 De PORTABLE IN-Anschluss OPTICAL IN 1/2-Anschluss Sie haben die Möglichkeit, den Ton eines tragbaren Audio-Players über die Lautsprecher dieses Systems wiederzugeben. Der Ton eines Gerätes kann über einen optischen Anschluss über die Lautsprecher dieses Systems ausgegeben werden. Verbinden Sie die Kopfhörerbuchse (oder Line Out-Buchse) des tragbaren Audio-Players mit der PORTABLE IN-Buchse dieses Gerätes: Wählen Sie dann mit den Tasten FUNCTION sowie ENTER die Option [Portable In].
32 De Anschluss HDMI IN 1/2-Anschluss Sie haben die Möglichkeit, Bild und Ton eines Gerätes über diesen Anschluss wiederzugeben. 2 Verbinden Sie die HDMI OUT-Buchse des Gerätes mit der HDMI IN 1- oder 2 Buchse dieses Gerätes. Wählen Sie dann mit den Tasten FUNCTION sowie ENTER die Option [HDMI IN 1/2]. Anschluss Geräterückseite Anschluss des optionalen Bluetooth® ADAPTER Wenn der Bluetooth ADAPTER (PioneerModell Nr.
Anschluss Verbindung mit dem Heimnetzwerk BreitbandDienst 2 Router Kabel-Netzwerkverbindung Ein Kabel-Netzwerk ermöglicht eine optimale Leistung, da die angeschlossenen Geräte direkt mit dem Netzwerk verbunden sind und keinerlei Störfrequenzen ausgesetzt sind. Weitere Hinweise finden Sie in der Bedienungsanleitung des Netzwerkgerätes. Verbinden Sie den LAN-Anschluss des Players über ein handelsübliches LAN- oder EthernetKabel.
34 De Anschluss Hinweise zur Netzwerkverbindung: 2 Anschluss • Viele Probleme bei der Netzwerkverbindung während der Einrichtung können häufi g durch ein Zurücksetzen des Routers bzw. Modems behoben werden. Schalten Sie nach der Verbindung des Players mit dem Heimnetzwerk den Router bzw. das Kabelmodem des Heimnetzwerks aus und/ oder trennen Sie das Netzkabel. Schalten Sie das Gerät dann wieder ein und oder schließen Sie das Netzkabel wieder an.
Anschluss Anschluss eines USBGerätes Über USB-Geräte Die USB-Geräte, die sich an den Player anschließen lassen, sind wie unten gezeigt. • USB 2.0-kompatible Speichergeräte Hinweis De • Wenn mehr als ein USB-Gerät angeschlossen ist, kann sich die Nummer, die für das USB-Gerät angezeigt wird, je nach dem Typ des verwendeten USB-Geräts oder den Umständen ändern. Gehen Sie, um die Nummer des USB-Geräts zu bestätigen, in [HOME MENU] [Home Media Gallery].
36 De Die ersten Schritte Kapitel 3 Die ersten Schritte Vornehmen von Einstellungen mithilfe des Setup Navigator-Menüs Achten Sie darauf, diese Einstellungen vorzunehmen, wenn Sie den Player in den folgenden Situationen verwenden. 3 Die ersten Schritte • Bei der ersten Verwendung des Players • Nach Initial Setup Formatieren • Nach dem Aktualisieren der Software des Players.
Die ersten Schritte 37 De Bedienung des Fernsehgeräts mit der Fernbedienung des Players Wenn der Herstellercode für die Marke Ihres Fernsehgeräts auf die Fernbedienung des Players eingestellt ist, kann das Fernsehgerät mit der Fernbedienung des Players bedient werden. Achtung • Die Einstellung wird nach dem Austausch von Batterien möglicherweise auf den Standardwert zurückgesetzt. Setzen Sie sie in diesem Fall zurück. 3 1. Geben Sie den 2-stelligen Herstellercode ein.
38 De Die ersten Schritte Liste der TV-Herstellercodes Hersteller Code(s) 3 Die ersten Schritte PIONEER 00, 31, 32, 07, 36, 42, 51, 22 ACURA 44 ADMIRAL 31 AIWA 60 AKAI 32, 35, 42 AKURA 41 ALBA 07, 39, 41, 44 AMSTRAD 42, 44, 47 ANITECH 44 ASA 45 ASUKA 41 AUDIOGONIC 07, 36 BASIC LINE 41, 44 BAUR 31, 07, 42 BEKO 38 BEON 07 BLAUPUNKT 31 BLUE SKY 41 BLUE STAR 18 BPL 18 BRANDT 36 BTC 41 BUSH 07, 41, 42, 44, 47, 56 CASCADE 44 CATHAY 07 CENTURION 07 CGB 42 CIMLINE 44 CLARIVOX 07 CLATRONIC 38 CONDOR 38 CONTEC 44
Wiedergabe Kapitel 4 Wiedergabe Abspielen von Discs oder Dateien Dieses Kapitel beschreibt die Hauptbedienfunktionen des Players. Hinweise zu den Typen von Discs und abspielbaren Dateien finden Sie unter Seite 10. Auf Discs aufgenommene Video-, Bild- und Audiodateien werden mit Home Media Gallery wiedergegeben (Seite 48). 1. Drücken Sie u STANDBY/ON, um den Player einzuschalten. Schalten Sie das Fernsehgerät ein und schalten Sie zuerst dessen Eingang um.
40 De Wiedergabe Vorwärts- und Rückwärtssuchlauf Schritt vorwärts und Schritt rückwärts Drücken Sie während der Wiedergabe mREV oder nFWD. yy Bei jedem Drücken der Taste wird die Geschwindigkeit des Suchlaufs umgeschaltet. Die Geschwindigkeitsintervalle hängen von der Disc oder Datei ab (die Geschwindigkeit wird auf dem Fernsehbildschirm angezeigt). Drücken Sie bei auf Pause geschalteter Wiedergabe q/ oder /r. yy Das Bild wechselt bei jedem Drücken der Taste einen Schritt vorwärts oder zurück.
Wiedergabe Beenden der Wiederholwiedergabe yy Drücken Sie REPEAT mehrmals während der Wiederholwiedergabe. Hinweis yy Die Wiederholwiedergabe wird in folgenden Fällen abgebrochen: –– Wenn außerhalb des Wiederholungsbereichs gesucht wird. –– Wenn eine andere Wiederholung oder die Zufallswiedergabe gestartet wird. Abspielen in der gewünschten Reihenfolge (Programmwiedergabe) 1 Drücken Sie PROGRAM während der Wiedergabe. yy Der Programm-Bildschirm wird angezeigt. 3.
42 De Wiedergabe Wiedergabe von Fotos als Diashows Diese Funktion spielt die Fotos ab und schaltet sie automatisch um. Drücken Sie INDEX während der Wiedergabe. yy Zeigen Sie die Miniaturbilder der Bilddateien an. Die maximale Anzahl beträgt 12 auf einmal. yy Wenn Sie eines der Bilder wählen und ENTER drücken, beginnt die Diashow mit dem gewählten Bild.
Wiedergabe Umschalten des Audios Bei Discs oder Dateien, für die mehrere Audiostreams/Kanäle aufgenommen wurden, können die Audiostreams/Kanäle während der Wiedergabe umgeschaltet werden. Umschalten des CD/SACDWiedergabebereichs 1. Wählen Sie den zur Wiedergabe gewünschten Bereich. Drücken Sie CD/SACD im Stoppmodus. Der Wiedergabebereich schaltet auf dem Frontplattendispla bei jedem Drücken dieser Taste um.
44 De Wiedergabe Genießen von BONUSVIEW oder BD-LIVE Dieser Player ist mit BD-Video BONUSVIEW und BD-LIVE kompatibel. Bei Verwendung von BD-Video-Discs, die mit BONUSVIEW kompatibel sind, können Sie solche Funktionen als Sekundärvideo (Bild-inBild) (Seite 46) und Sekundäraudio (Seite 46) genießen. Bei BD-Video-Discs, die BD-LIVE unterstützen, können spezielle Videobilder und andere Daten aus dem Internet heruntergeladen werden.
Wiedergabe 45 De Wiedergabe-Funktionen Die verwendbaren Funktionen hängen vom Typ der Disc und der Datei ab. In bestimmten Fällen können einige der Funktionen verwendet werden. Die jeweils verwendbaren Funktionen finden Sie in der nachstehenden Tabelle.
46 Wiedergabe De Verwendung des TOOLSMenüs Je nach dem Betriebsstatus des Players können verschiedene Funktionen aufgerufen werden. 1. Rufen Sie das TOOLS-Menü auf. Drücken Sie TOOLS während der Wiedergabe. 2. Wählen Sie den Eintrag, und stellen Sie ihn ein. Wählen Sie den gewünschten Eintrag mit / aus, und drücken Sie anschließend ENTER. Hinweis yy Einträge, die nicht geändert werden können, werden in grau angezeigt. Welche Einträge ausgewählt werden können, hängt vom Status des Players ab.
Wiedergabe Abspielen eines bestimmten Titels, Kapitels, Tracks Tracks (Suche) bzw. einer Datei (Suche) 1. Wählen Sie Title oder Kapitel (Track/ Datei). Wählen Sie den gewünschten Eintrag mit / aus, und drücken Sie anschließend ENTER. 2. Geben Sie die Titel- oder Kapitel (Track/ Datei)-Nummer ein. Geben Sie die Nummer mit den Zifferntasten (0 bis 9) oder mit / ein. yy Um nach Titel 32 zu suchen, geben Sie 3 und 2 ein, und drücken Sie dann ENTER. yy Drücken Sie CLEAR, um die eingegebenen Werte zu löschen.
48 De Wiedergabe von Home Media Gallery Kapitel 5 Wiedergabe von Home Media Gallery Über Home Media Gallery • Die folgenden Dateien können von Home Media Gallery abgespielt werden: –– PCs, die mit Microsoft Windows Vista oder XP laufen, mit installiertem Windows Media Player 11 –– PCs, die mit Microsoft Windows 7 laufen, mit installiertem Windows Media Player 12 –– DLNA-kompatible digitale Media-Server (auf PCs oder anderen Komponenten) In einem PC oder DMS (digitaler Media-Server) wie oben beschrieben
Wiedergabe von Home Media Gallery DLNA®, das DNLA-Logo und DLNA CERTIFIED® sind Warenzeichen, Dienstleistungsmarken oder Zertifikationsmarken von Digital Living Network Alliance. Über ein Netzwerk abspielbarer Inhalt • Auch bei Codierung in einem kompatiblen Format kann es sein, das manche Dateien nicht korrekt abgespielt werden. • Manche Funktionen werden möglicherweise nicht unterstützt, je nach dem Servertyp oder der verwendeten Version. • Unterstützte Dateiformate sind je nach Server unterschiedlich.
50 De Wiedergabe von Home Media Gallery Wiedergabe einer Datei über das Netzwerk 1. Drücken Sie HOME MEDIA GALLERY, um die Home Media Gallery anzuzeigen. Die Home Media Gallery kann auch angezeigt werden, indem Sie [Home Media Gallery] aus dem Home Menu wählen und dann ENTER drücken. 2. Wählen Sie den Server, der die zur Wiedergabe gewünschte Datei enthält. 3. Wählen Sie die zur Wiedergabe gewünschte Datei. Wählen Sie den gewünschten Eintrag mit / aus, und drücken Sie anschließend ENTER.
Wiedergabe von Home Media Gallery Abspielen in der gewünschten Reihenfolge (Playlist) Die Discs, bei denen Tracks und Dateien zur Playlist hinzugefügt werden können, sind nachstehend aufgeführt. • DVDs/CDs/USB-Geräte, auf denen Audiodateien aufgenommen wurden Hinzufügen von Tracks/ Dateien Verwenden Sie dieses Verfahren, um Tracks oder Dateien hinzuzufügen und die Playlist zu erstellen. 1. Drücken Sie HOME MEDIA GALLERY, um die Home Media Gallery anzuzeigen.
52 De Abspielen der Web-Inhalte Kapitel 6 Abspielen der WebInhalte Sie können einige Streaming-Inhalte im Internet mit dem Player genießen. Verfügbare Web-Inhalte • YouTube (MPEG4 AVC H.264) • Picasa Hinweis Über YouTube • YouTube-Videos der folgenden Größen können abgespielt werden.
Anderer Betrieb Kapitel 7 Anderer Betrieb Aufnehmen von Audio CD auf ein USB-Gerät 53 6. Einstellen der Aufnahmegeschwindigkeit. Verwenden Sie / / / , um [Speed] zu wählen, und drücken Sie dann ENTER. yy Bei jedem Drücken von ENTER ändert sich die Aufnahmegeschwindigkeit. Die Aufnahmegeschwindigkeit ändert sich wie unten dargestellt. Sie können mit diesem Player eine Audio-CD auf ein USB-Gerät aufnehmen. Normal: beim Aufnehmen, während Sie die Musik hören. 1.
54 De Anderer Betrieb Radiobetrieb Die UKW-Antenne muss angeschlossen sein. (Siehe Seite 30.) Radio hören 1. Drücken Sie FUNCTION, bis im DisplayFenster FM erscheint, und drücken sie dann ENTER. Der zuletzt empfangene Sender wird eingestellt. 2. Das Scannen beginnt, wenn entweder die - oder die -Taste gedrückt wird. Oder Drücken Sie mehrmals auf / . Oder Drücken Sie mehrmals TUNE –/+ auf dem Bedienfeld des Players. 3.
Anderer Betrieb Bluetooth® ADAPTER zum kabellosen Musikgenuss • Mit kabelloser Bluetooth-Technologie ausgerüstetes Gerät: Mobiltelefon • Mit kabelloser Bluetooth-Technologie ausgerüstetes Gerät: Digitales Musikabspielgerät • Nicht mit kabelloser BluetoothTechnologie ausgerüstetes Gerät: Digitales Musikabspielgerät + Bluetooth-Audiosender (im Handel erhältlich) Kabellose Musikwiedergabe Wenn der Bluetooth ADAPTER (PioneerModell Nr.
56 De Anderer Betrieb Hinweis • Diese Einheit unterstützt nicht AVRCP. • Diese Einheit unterstützt nicht Mono Headset Profile (Hands Free Profile [Freisprech-Profil]). • Ein Bluetooth-fähiges Gerät kann durch diese Einheit nicht betrieben werden. • Diese Einheit kann nicht verwendet werden, um One-Seg-Signale auf einem Bluetooth-fähigen Gerät zu hören. Musik-Inhalte, die durch SCMS-T geschützt sind, können nicht gehört werden. • Nur ein Bluetooth-fähiges Gerät darf mit dieser Einheit gepaart werden.
Anderer Betrieb 57 De Klang Drücken sie auf der Fernbedienung SOUND, um das Klangauswahl-Menü auf dem Fernseher anzuzeigen. Verwenden Sie zur Auswahl die Cursor-Taste und drücken Sie dann ENTER. Drücken Sie SOUND, um das Klangauswahl-Menü zu verlassen. Hinweis • Bei Auswahl von HDMI IN 1 oder HDMI IN 2 kann das Klangauswahl-Menü nicht angezeigt werden. Wechseln Sie vor dem Ändern der Klangeinstellungen bitte die Eingangsquelle.
58 De Erweiterte Einstellungen Kapitel 8 Erweiterte Einstellungen Ändern der Einstellungen Verwendung des Initial SetupBildschirms 1. Rufen Sie bei gestoppter Wiedergabe den Home Menu -Bildschirm auf. HOME MENU. Drücken Sie 2. Wählen und stellen Sie Initial Setup ein. Wählen Sie den gewünschten Eintrag mit / aus, und drücken Sie anschließend ENTER. 3. Wählen Sie den Eintrag, und ändern Sie die Einstellung. Wählen Sie den gewünschten Eintrag mit / / / aus, und drücken Sie anschließend ENTER.
Erweiterte Einstellungen Einstellung Options Audio Output DRC (Dynamikbereich- Off Steuerung) 59 De Erläuterung Wählen Sie diese Option, um Audiosignale ohne Verwendung der DRC-Funktion auszugeben. On Wählen Sie diese Option, um den Bereich zwischen den lautesten und weichsten Sounds (Dynamikumfang) für Wiedergabe mit durchschnittlicher Lautstärke einstellen. Verwenden Sie dies, wenn es schwer ist, den Dialog zu hören oder wenn Sie Spielfilme spät in der Nacht sehen.
60 De Erweiterte Einstellungen Network Einstellung Options IP Setting Wählen Sie dies, um die IP-Adresse des Players und des DNS-Servers einzustellen (Seite 62). Erläuterung Proxy Server Stellen Sie den Proxy-Server nur ein, wie von Ihrem Internetanbieter vorgeschrieben (Seite 63). Information Zeigt die Werte für MAC-Adresse, IP-Adresse, Subnet-Maske, Default-Gateway und DNS-Server (primär) imd DNS-Server (sekundär) an.
Erweiterte Einstellungen 61 De Security Einstellung Options Change Password Registrieren (ändern) Sie das Passwort für die Kindersicherungseinstellungen oder für die Entsperrung zum Abspielen von DVD-Videos mit Kindersicherungsfunktion (Seite 64). Parental Control Zum Ändern der Kindersicherungsebene des Players (Seite 64). Country Code Zum Ändern des Länder-/Gebietscodes (Seite 64). Options Screen Saver Off Der Bildschirmschoner ist nicht aktiviert.
62 De Erweiterte Einstellungen Abstimmen der Video-Wiedergabe 1. Wählen Sie Display Setting d Video Adjust d Next Screen. Wählen Sie den gewünschten Eintrag mit / aus, und drücken Sie anschließend ENTER. 2. Wählen Sie den Eintrag, und ändern Sie die Einstellung. Verwenden Sie / zum Auswählen des Element, und ändern Sie danach die Einstellung mit / Wenn die Einstellung RETURN, um den fertig ist, drücken Sie Einstellungen-Bildschirm zu schließen.
Erweiterte Einstellungen Einstellen des Proxy-Servers Stellen Sie den Proxy-Server nur ein, wenn dies von Ihrem Internetanbieter vorgeschrieben ist. 1. Wählen Sie Network d Proxy Server d Next Screen, und nehmen Sie eine Einstellung vor. Wählen Sie den gewünschten Eintrag mit / aus, und drücken Sie anschließend ENTER. Anzeige der Netzwerk-Einstellungen Wählen Sie Network d Information d Next Screen, und nehmen Sie eine Einstellung vor.
64 De Erweiterte Einstellungen Ändern oder Registrieren des Passworts Verwenden Sie dieses Verfahren, um die Code-Nummer für die Einstellungen der Kindersicherung zu registrieren oder zu ändern. Über das Standard-Passwort dieses Geräts Das Standard-Passwort ist „0000“. yy Dieses Gerät fordert Sie möglicherweise zur Eingabe eines Passworts auf, wenn Sie das Passwort ändern möchten. yy Wenn Sie dieses Gerät zurücksetzen, wird Ihr Passwort automatisch auf die Standardeinstellung zurückgesetzt. 1.
Erweiterte Einstellungen Software-Aktualisierung Die Software des Players kann mit einem der unten beschriebenen Verfahren aktualisiert werden. • Verbindung zum Internet. • Verwendung einer Disc. • Verwendung eines USB-Flashdrive. Produktinformation über diesen Player ist auf der Pioneer-Website verfügbar. Sehen Sie auf der auf Seite 9 gezeigten Website bezüglich Informationen zum Update oder zur Wartung Ihres Blu-ray Disc-Player nach.
66 De Erweiterte Einstellungen Aktualisierung mit einem USBFlashdrive/ einer Disc Hinweis Erweiterte Einstellungen 8 yy Wenn eine Aktualisierungsdatei auf der PioneerWebsite geboten wird, verwenden Sie Ihren Computer zum Herunterladen auf den USBFlashdrive oder eine Disc. Lesen Sie sorgfältig die Anweisungen zum Herunterladen von Aktualisierungsdateien auf der Pioneer-Website. yy Speichern Sie die Aktualisierungsdatei im Stammverzeichnis des USB-Flashdrives oder der Disc.
Erweiterte Einstellungen 67 De Sprachcode-Tabelle und Länder-/Gebietscode-Tabelle Sprachcode-Tabelle Sprachbezeichnung, Sprachcode, Eingabecode French, fr/fra, 0618 Galician, gl/glg, 0712 Georgian, ka/kat, 1101 German, de/deu, 0405 Greek, el/ell, 0512 Guarani, gn/grn, 0714 Gujarati, gu/guj, 0721 Hausa, ha/hau, 0801 Hebrew, iw/heb, 0923 Hindi, hi/hin, 0809 Hungarian, hu/hun, 0821 Icelandic, is/isl, 0919 Indonesian, in/ind, 0914 Interlingua, ia/ina, 0901 Interlingue, ie/ile, 0905 Inupiaq, ik/ipk, 0911 Iri
68 De Störungssuche Kapitel 9 Störungssuche Bedienungsfehler werden oft irrtümlich für Störungen oder Ausfälle gehalten. Wenn Sie den Eindruck haben, dass diese Komponente nicht ordnungsgemäß funktioniert, überprüfen Sie bitte die folgenden Punkte. Manchmal wird eine Störung auch durch ein externes Gerät verursacht. Überprüfen Sie die anderen verwendeten Komponenten und elektrischen Geräte.
Störungssuche 69 De Ton Problem yy Kein Ton. yy Ton wird nicht richtig ausgegeben. Prüfen yy Wird die Disc in Zeitlupe abgespielt? yy Wird die Disc im schnellen Vorlauf oder Rücklauf abgespielt? Sind die Audiokabel richtig angeschlossen? Abhilfe Während der Zeitlupenwiedergabe und dem Vorwärts- und Rückwärtssuchlauf erfolgt keine Tonausgabe.
70 De Störungssuche Steuerungsfunktion Problem Prüfen Steuerungsfunktion funktioniert Ist das HDMI-Kabel richtig nicht.
Störungssuche Problem Ein Zugriff auf ein an das Netzwerk angeschlossene Gerät oder einen vernetzten PC ist nicht möglich. Die Wiedergabe starte nicht. Der PC wird nicht richtig gesteuert. Abhilfe Es gibt Fälle, in denen ein Zugriff auf ein Gerät mit installierter Internet-Sicherheitssoftware nicht möglich ist. Das Audiogerät auf dem Netzwerk, das ausgeschaltet war, wird eingeschaltet. Das an das Netzwerk angeschlossene Gerät ist nicht richtig eingestellt.
72 De Störungssuche Problem Prüfen Das LAN-Kabel ist momentan abgetrennt. Das Netzwerk, über das die Internet-Verbindung läuft, ist momentan stark belastet. Auf dem gleichen Netzwerk wird eine Verbindung über ein Drahtlos-LAN geleitet. Abhilfe Schließen Sie das LAN-Kabel richtig an. Verwenden Sie 100BASE-TX für den Zugriff auf Geräte auf dem Netzwerk. yy Die Bandbreite auf dem vom Drahtlos-LAN verwendeten 2,4-GHzBand reicht möglicherweise nicht aus.
Anhang 73 De Kapitel 10 Anhang Technische Daten Allgemein BCS-424/BCS-222 Stromversorgung AC 110 V bis 240 V, 50 Hz/60 Hz Leistungsaufnahme 190 W (Im Bereitschaftsbetrieb: unter 0,5 W) Abmessungen (B x H x T) Ca. 430 mm x 345 mm x 62 mm Gesamtgewicht (ca.
74 De Anhang Verstärker BCS-424/BCS-222 Ausgangsleistung (RMS) THD 30 % Gesamt 1100 W Vorn 170 W × 2 (4 Ω) Mitte 250 W (3 Ω) Hinten 170 W × 2 (4 Ω) Sub-Woofer 250 W (3 Ω) Verstärker BCS-FS121 Ausgangsleistung (RMS) THD 30 % Gesamt 550 W Vorn 170 W × 2 (4 Ω) Sub-Woofer 250 W (3 Ω) System Laser Halbleiterlaser Fernsehnorm Standard PAL/NTSC Farb-Fernsehnorm LAN-Anschluss Ethernet-Buchse x 1, 10BASE-T/100BASE-TX Stromversorgung über Bus (USB) DC 5 V 500 mA Lautsprecher BCS-424 S-BD422
Anhang 75 De Lautsprecher BCS-222 S-BD122 • Vordere/Surround-Lautsprecher (Links/Rechts) Typ 1 Weg Gesamtabmessungen (B x H x T) 95 mm x 80 mm x 90 mm Nennimpedanz 4Ω Gesamtgewicht 0,3 kg Typ 1 Weg Gesamtabmessungen (B x H x T) 230 mm x 80 mm x 90 mm Nennimpedanz 3Ω Gesamtgewicht 0,7 kg Typ 1 Weg Gesamtabmessungen (B x H x T) 200 mm x 340 mm x 270 mm Nennimpedanz 3Ω Gesamtgewicht 3,4 kg • Gesamtgewicht • Subwoofer Lautsprecher BCS-FS121 S-BD122FS • Vordere/Surround-Lautsprecher (
76 De Anhang Wartung Hinweise zu Discs Handhabung des Gerätes Handhabung von Discs Transport und Versand des Gerätes Bewahren Sie den Original-Versandkarton und das Verpackungsmaterial auf. Wenn Sie das Gerät einsenden müssen, verpacken Sie es wieder so, wie es ab Werk geliefert wurde, um es optimal zu schützen. Außenseiten sauber halten • Verwenden Sie keine flüchtigen Flüssigkeiten wie Insektensprays in der Nähe des Gerätes.
Anhang 77 De Wichtige Informationen zu Netzwerkdiensten Die Bereitstellung oder Zurverfügungstellung sämtlicher Informationen, Daten, Dokumente, Kommunikation, Downloads, Dateien, Texte, Bilder, Fotos, Grafiken, Videos, Webcasts, Veröffentlichungen, Tools, Ressourcen, Software, Code, Programme, Applets, Widgets, Anwendungen, Produkte und andere Inhalte (“Inhalte”) sowie sämtlicher Dienste und Angebote (“Dienste”) durch Sie oder Dritte (jeweils “Dienstanbieter”) liegt in der alleinigen Verantwortung des Di
Informazioni sulla sicurezza Vi ringraziamo per avere acquistato questo prodotto Pioneer. Vi preghiamo di leggere queste queste istruzioni per l’uso in modo da sapere usare correttamente il proprio modello. Dopo aver letto queste istruzioni, riporle in un luogo sicuro per poterle consultare di nuovo al momento del bisogno.
Se la spina del cavo di alimentazione di questo apparecchio non si adatta alla presa di corrente alternata di rete nella quale si intende inserire la spina stessa, questa deve essere sostituita con una adatta allo scopo. La sostituzione della spina del cavo di alimentazione deve essere effettuata solamente da personale di servizio qualificato.
Nota sul Copyright • A causa del fatto che l’AACS (sistema con contenuto di accesso avanzato) è approvato come sistema di protezione del contenuto per il formato disco Bluray, similare all’uso del CSS (sistema di miscelazione del contenuto) per il formato DVD, certe limitazioni sono imposte per la riproduzione, l’uscita del segnale analogico, ecc. dei contenuti protetti dell’AACS.
Avviso importante per il sistema della TV a colori Il sistema colore di questo lettore cambia sulla base del sistema del disco correntemente in riproduzione. Per esempio, quando il lettore riproduce un disco registrato con il sistema colore NTSC, l’uscita dell’immagine sarà con segnale NTSC. Solo un apparecchio TV multi sistema colore è in grado di ricevere tutti i segnali in uscita dal lettore.
Sommario 1 Contenuto della confezione 8 8 8 9 10 16 17 19 20 20 20 Introduzione – Accessori forniti – Accessori della cassa dell’altoparlante (BCS-424) – Accessori della cassa dell’altoparlante (BCS-222) – Accessori della cassa dell’altoparlante (BCS-FS121) – Inserimento delle batterie nel telecomando – Software Update – Tipi di dischi/file riproducibili – Marchi registrati e licenze Telecomando Pannello anteriore Pannello posteriore – BCS-424/BCS-222 – BCS-FS121 2 Collegamento 21 21 22 22 Regolare
43 43 44 45 46 46 47 47 47 – Cambio dell’area di riproduzione CD/ SACD – Visualizzazione di informazioni sul disco – Uso di BONUSVIEW o BD-LIVE – Funzioni di riproduzione Uso del menu TOOLS – Riproduzione da un momento particolare (ricerca a tempo) – Riproduzione di un titolo, capitolo, brano o file specifici (ricerca) – Riproduzione in ordine casuale di una gamma specifica di dischi, titoli o capitoli (brani/file) – Continuazione della riproduzione da una posizione particolare (Continued Viewing Playback
8 It Contenuto della confezione Capitolo 1 1 Contenuto della confezione Contenuto della confezione Accessori della cassa dell’altoparlante (BCS-222) Introduzione Accessori forniti Piedini antiscivolo (5) Viti M3.5x12 [tipo filettato] (4) (Queste viti sono utilizzate per fissare gli altoparlanti sui supporti.
Contenuto della confezione Inserimento delle batterie nel telecomando 1. Aprire la copertina dal retro. 2. Inserire le batterie (AAA/R03 x 2). Inserire nel modo indicato dai segni +/* del vano delle batterie. Inserire per primo il polo negativo (*). 3. Aprire la copertina dal retro. Chiudere bene (si deve sentire un clic). It AVVERTENZA • Non usare o conservare batterie in luce solare diretta o in altri luoghi eccessivamente caldi, ad esempio in un’automobile o vicino ad una sorgente di calore.
10 Contenuto della confezione It Tipi di dischi/file riproducibili 1 Dischi riproducibili Dischi con i logo che seguono stampati sull’etichetta, sulla custodia o sulla copertina. Contenuto della confezione Attenzione • Si possono visualizzare solo dischi finalizzati.
Contenuto della confezione • “Blu-ray Disc”, “Blu-ray” ed il “Blu-ray Disc” sono marchi di fabbrica della Blu-ray Disc Association. • I formati audio I seguenti formati audio sono supportati da questo lettore: • Dolby TrueHD • Dolby Digital Plus Dischi non riproducibili • Dolby Digital • DVD HD • DTS-HD Master Audio • Dischi DVD-RAM • DTS-HD High Resolution Audio È possibile che alcuni dischi non presenti nella lista qui sopra non possano venire riprodotti.
12 It 1 Contenuto della confezione Contenuto della confezione Le funzioni BONUSVIEW come la riproduzione di video secondari (immagine nell’immagine) ed audio secondario possono venire usate. I dati usati con la funzione BONUSVIEW (il video secondario (immagine nell’immagine) ed i dati dell’audio secondario) possono venire salvati in dispositivi di memoria di massa. Per dettagli sulla riproduzione di video ed audio secondari, consultare le istruzioni del disco.
Contenuto della confezione • DVDs: Riproduzione di CD I CD protetti dalla copia: Questo lettore è costruito in conformità alle caratteristiche del formato CD audio. Questo lettore non supporta la riproduzione o le funzioni di dischi che non siano conformi a tali caratteristiche. File video, audio e di immagine, e cartelle I file audio o di immagine possono essere riprodotti su questo lettore, se le cartelle su disco o sul dispositivo USB sono state create come descritto qui sotto.
14 It Contenuto della confezione File riproducibili 1 I file video, di immagini ed audio registrati su DVD, CD o dispositivi USB possono venire riprodotti. Contenuto della confezione Attenzione • Solo i DVD registrati con il file system ISO 9660 possono venire riprodotti. • Alcuni file possono non essere riproducibili. • Con alcuni file, può non esser possibile usare certe funzioni di riproduzione.
Contenuto della confezione 15 It Tipi di file riproducibili Supporti fisici utilizzabili Dispositivi USB1 Network2 MP3 (.mp3) 1 1 1 Frequenze di campionamento: Fino a 48 kHz Bitrate: Fino a 320 kbps Tipo di audio: MPEG-1 Audio Layer 3 WMA (.wma) 1 1 1 Frequenze di campionamento: Fino a 48 kHz Bitrate: Fino a 192 kbps Tipo di audio: WMA versione 9 LPCM (.wav) 1 1 1 Frequenze di campionamento: Fino a 192 kHz Quantization bitrate: 16 bit Canali: 2 can FLAC (.
16 It Contenuto della confezione Marchi registrati e licenze 1 Contenuto della confezione I termini HDMI e HDMI High-Definition Multimedia Interface, e inoltre quelli HDMI Logo sono marchi di fabbrica o marchi di fabbrica depositati della HDMI Licensing, LLC negli Stati Uniti ed altri paesi. Prodotto su licenza dei Dolby Laboratories. “Dolby” e il simbolo della doppia D sono marchi dei Dolby Laboratories. Fabbricato su licenza del brevetto U.S.A.
Contenuto della confezione Telecomando 17 • • • • • • • • • 1• • • • • • • • • (STANDBY/ON): Da premere per accendere e spegnere l’apparecchio. FUNCTION: Modifica la sorgente d’ingresso o la funzione. 2 Se si commuta mentre si visualizza la finestra dello schermo sul lettore 1. La sorgente in entrata si commuta ogni volta che viene premuto FUNCTION. 2. Selezionare la sorgente in entrata desiderata e premere ENTER. 4 Se si commuta mentre si visualizza lo schermo della TV 1.
18 It 1 Contenuto della confezione • • • • • • • • • 3• • • • • • • • • • • • • • • • • • 6• • • • • • • • • VIRTUAL 3D SOUND: Selezionare gli effetti Suono virtuale 3D (Vedi pagina 57). Tasti numerici 0-9: Seleziona le opzioni numerate o lettere di immissione nel menu del tastierino. Contenuto della confezione SOUND: Selezionare le impostazioni del Suono (Vedi pagina 57). AUDIO: Vedi pagina 43. VOL +/– : Regola il volume dell’altoparlante.
Contenuto della confezione 19 It Pannello anteriore 2 3 4 9 1 Vassoio del disco 2 Pulsanti di funzionamento (STANDBY/ON) Accende e spegne l’unità. Nota Se non si disattiva la corrente su OFF, premendo il tasto (STANDBY/ON) per più di 5 secondi, l’unità si riavvia e l’operazione diventa possibile. (OPEN/CLOSE) FUNCTION Modifica la sorgente d’ingresso o la funzione. Se si commuta mentre si visualizza la finestra dello schermo usando il tasto sul pannello frontale 1.
20 It Contenuto della confezione Pannello posteriore 1 BCS-424/BCS-222 Contenuto della confezione 1 2 3 6 7 8 9 5 4a b 3 6 7 8 9 5 4a b BCS-FS121 1 2 1 AC IN Viene inserito nella fonte di alimentazione elettrica.
Collegamento Capitolo 2 21 It 3. Montare l’altoparlante surround anteriore. Collegamento 1 Far passare il cavo dell’altoparlante attraverso il foro del cavo sul lato della base. Regolare le impostazioni di installazione 2 Preparazione degli altoparlanti 1. Collegare i cavi al lettore. Inserire i cavi connessi al lettore nel connettore dello stesso colore sull’altoparlante. Attenzione • I terminali degli altoparlanti sono sotto tensione, alla stessa PERICOLOSA tensione della corrente di rete.
22 It Collegamento 5 Fissare la scatola superiore e quella inferiore dalla parte posteriore dell’altoparlante usando le due viti (M4 x 12). Montaggio a muro dell’altoparlante per BCS-424 L’altoparlante centrale ha un foro di montaggio che può essere usato per montarlo sulla parete. Prima dell’installazione Ricordarsi che il sistema di altoparlanti è pesante e il peso potrebbe allentare le viti o il materiale della parete potrebbe non essere adeguato a sorreggere, provocando la caduta dell’altoparlante.
A C A A A A F D F A A A A G B F C C B A A C D G G A B A A A A A A A G Note aggiuntive A F A D A sull’altoparlante perA BCS-424 A A A Precauzioni: A A AB C A E Collegamento 23 It B C E D E frontale F G di sinistra (L)/ Altoparlante A B Altoparlante C E D E F frontale G di destra (R): A Collocare gli altoparlanti frontali ai lati A del monitor o dello schermo e quanto più possibile a livello con la superficie dello schermo.
24 It Collegamento Montaggio degli altoparlanti BCS-222 Montaggio a muro dell’altoparlante per BCS-222 Preparazione degli altoparlanti Tutti gli altoparlanti sono dotati di un foro di montaggio che può essere usato per montare un altoparlante sulla parete. 1. Collegare i cavi al lettore. 2 Inserire i cavi connessi al lettore nel connettore dello stesso colore sull’altoparlante.
A C A A A A A G B F F D F A A C C A B A A C D G G A B A A A A A A G Note aggiuntive A F A D sull’altoparlante perA BCS-222 A A A A Precauzioni: A A A Il subwoofer non è schermato magneticamente e non dovrebbe essere posto vicino a un TV o a un monitor. I supporti Bdi memorizzazione A B C D E magnetica (floppy-disk, nastri Ao videocassette) devono essere conservati lontani dal subwoofer. C G Non appendere il subwoofer a una parete o al F soffitto.
26 It Collegamento Montaggio degli altoparlanti BCS-FS121 Montaggio a muro dell’altoparlante per BCS-FS121 Preparazione degli altoparlanti Tutti gli altoparlanti sono dotati di un foro di montaggio che può essere usato per montare un altoparlante sulla parete. 1. Collegare i cavi al lettore. 2 Inserire i cavi connessi al lettore nel connettore dello stesso colore sull’altoparlante.
A C A A G F A A A A D B D A A E A Collegamento 27 It C A G Note aggiuntive F A A D A A sull’altoparlante per BCS-FS121 A Installare gli altoparlanti principali anteriore destro e sinistro alla stessa distanza dal TV. A Precauzioni: A B A D C Il subwoofer non è schermato magneticamente e non dovrebbe essere posto vicino a un TV o a un monitor. I supporti Bdi memorizzazione magnetica (floppy-disk, nastri o videocassette) devono essere conservati lontani dal subwoofer.
28 It Collegamento Connessioni alla TV Effettuare uno dei collegamenti che seguono a seconda delle capacità delle apparecchiature esistenti. • Connessione HDMI (pagina 28) • Connessione video (pagina 29) 2 Connessione HDMI Se avete una HDMI TV o uno schermo, è possibile connetterli a questo lettore usando un cavo HDMI (Cavo HDMI®/™ ad alta velocità). Connettere il terminale HDMI sul lettore a quello HDMI su una TV o uno schermo compatibile con HDMI.
Collegamento Funzione ARC (canale di ritorno audio) La funzione ARC permette che una TV adatta per HDMI invii il flusso audio alla presa HDMI OUT di questo lettore. 29 It Connessione video Collegare il connettore VIDEO OUT del lettore al connettore video sul TV tramite il cavo video. Potete ascoltare l’audio sull’altoparlante del sistema. Per usare questa funzione: -- La vostra TV deve supportare la funzione ARC.
30 It Collegamento Connessione dell’antenna Per ascoltare la radio connettere l’antenna fornita in dotazione. Connessione con il dispositivo esterno Connessione AUX Potete godere del suono prodotto da un componente esterno tramite gli altoparlanti di questo sistema. 2 Collegamento Connettere i jack di uscita audio analogici del componente alla porta AUX S/D (INPUT) di questa unità. E quindi selezionare l’opzione [AUX] premendo FUNCTION e ENTER.
Collegamento 31 It Collegamento ingresso OPTICAL IN 1/2 Potete godere del suono del lettore audio portatile tramite gli altoparlanti di questo sistema. Potete godere del suono del componente con un collegamento ottico digitale tramite gli altoparlanti di questo sistema. Collegare il jack della cuffia (o allinearlo) del lettore audio portatile nella presa PORTABLE IN di questa unità. E quindi selezionare l’opzione [Portable In] premendo tasti FUNCTION e ENTER.
32 It Collegamento Connessione INGRESSO HDMI 1/2 Potete godere delle immagini e suono del componente tramite questo collegamento. 2 Connettere il jack HDMI OUT del componente ai jack HDMI IN 1 o 2 dell’unità. E quindi selezionare l’opzione [HDMI IN 1/2] premendo FUNCTION e ENTER. Collegamento Lato posteriore dell’unità Verso il jack HDMI OUT del proprio componente (decoder, ricevitore satellitare digitale, consolle video game ecc.
Collegamento Connessione alla rete domestica Questo lettore può essere connesso a una rete locale (LAN) tramite il portale LAN sulla parte posteriore del pannello. Connettendo l’unità alla rete a banda larga domestica, avete accesso a servizi quali interattività BD Live e servizi online. 2 Per ulteriori informazioni consultare la documentazione relativa alla propria periferica di rete. Server certificato per PC e/o DLNA Nota • Non collegare un cavo telefonico modulare alla porta LAN.
34 It Collegamento Note relative alla connessione di rete: 2 Collegamento • Molti problemi di connessione di rete durate la configurazione possono essere risolti eseguendo un reset del router o modem. Dopo avere connesso il lettore alla rete domestica, accendere e spegnere il cavo di alimentazione del router delle rete domestica oppure al modem via cavo. Quindi accendere e/o riconnettere il cavo di alimentazione.
Collegamento Connessione dispositivo USB I dispositivi USB 35 It Questo lettore è in grado di riprodurre file video, musicali e di foto presenti di un dispositivo USB. 1. Inserire un dispositivo USB nella porta USB fino a quando non è ben inserito. I dispositivi USB collegabili a questo lettore sono i seguenti. 2 • Dispositivi di memoria di massa USB 2.
36 It Come iniziare Capitolo 3 Come iniziare Impostazioni con il menu Setup Navigator Prima di usare il lettore nei casi seguenti, non mancare di fare queste regolazioni. • Al primo uso del lettore. • Dopo la formattazione di Initial Setup. 3 • Dopo aver aggiornato il software del lettore. Come iniziare Attenzione • Prima di accendere l’apparecchio, controllare che i collegamenti fra il lettore e gli altri dispositivi siano corretti.
Come iniziare 37 It Controllo del televisore con il telecomando del lettore Quando il codice della marca del proprio televisore viene impostato col telecomando del lettore, il televisore può venire controllato col telecomando del lettore. Attenzione • Nel caso di alcuni modelli potrebbe non esser possibile controllare il televisore col telecomando del lettore anche se la marca è fra quelle della lista. 3 1. Digitare le 2 lettere del codice della marca.
38 It Come iniziare Lista dei codici di controllo del televisore Code(s)Codici delle marche 3 Come iniziare PIONEER 00, 31, 32, 07, 36, 42, 51, 22 ACURA 44 ADMIRAL 31 AIWA 60 AKAI 32, 35, 42 AKURA 41 ALBA 07, 39, 41, 44 AMSTRAD 42, 44, 47 ANITECH 44 ASA 45 ASUKA 41 AUDIOGONIC 07, 36 BASIC LINE 41, 44 BAUR 31, 07, 42 BEKO 38 BEON 07 BLAUPUNKT 31 BLUE SKY 41 BLUE STAR 18 BPL 18 BRANDT 36 BTC 41 BUSH 07, 41, 42, 44, 47, 56 CASCADE 44 CATHAY 07 CENTURION 07 CGB 42 CIMLINE 44 CLARIVOX 07 CLATRONIC 38 CONDOR
Riproduzione Capitolo 4 Riproduzione Riproduzione di dischi e file Questa sezione descrive le operazioni principali del lettore. Per quanto riguarda i tipi di disco e file che possono venire riprodotti, consultare pagina 10. I file video, di immagini e musicali registrati su disco vengono riprodotti con Home Media Gallery (pagina 48). 1. Premere u STANDBY/ON per accendere il sistema. Accendere il televisore e scegliere l’ingresso desiderato. Nota yy Caricare il disco col lato stampato rivolto in alto.
40 It Riproduzione Scansione in avanti ed inversa Passi in avanti ed all’indietro Durante la riproduzione, premere mREV o nFWD. yy La velocità di scansione cambia ad ogni pressione del pulsante. La variazione di velocità dipende dal disco o file (la velocità appare nello schermo del televisore). A riproduzione in pausa, premere q/ o /r. yy L’immagine avanza o indietreggia di un passo ad ogni pressione del pulsante.
Riproduzione Per cancellare la riproduzione ripetuta yy Premere REPEAT varie volte durante la riproduzione ripetuta. Nota yy La riproduzione ripetuta viene cancellata nei seguenti casi: –– Se si ricerca al di fuori della gamma di ripetizione. –– Se si inizia un’altra riproduzione a ripetizione o casuale. Riproduzione in un ordine desiderato (riproduzione programmata) It Creazione di segnalibri È possibile lasciare segnalibri nel video riprodotto per poter riprendere di lì la riproduzione.
42 It Riproduzione Riproduzione di foto in slideshow Questa funzione riproduce le foto, cambiandole automaticamente. Durante la riproduzione, premere INDEX. yy Appare l’anteprima dei file di immagini. Il numero massimo in una volta è 12. yy Se si sceglie una delle immagini e si preme ENTER, lo slideshow inizia dall’immagine scelta. Rotazione/ribaltamento di foto Se uno slideshow è in riproduzione o in pausa, il display cambia nel modo seguente quando i pulsanti / / / vengono premuti.
Riproduzione Cambiamento dell’audio Con dischi o file che contengono più stream o canali audio, questi possono venire cambiati durante la riproduzione. Durante la riproduzione, premere AUDIO. yy L’audio attuale ed il numero totale di stream audio registrati appaiono sullo schermo del televisore. Per cambiare audio, premere di nuovo AUDIO. yy L’audio può venire cambiato anche scegliendo Audio dal menu TOOLS. yy Se l’audio non cambia quando AUDIO viene premuto, cambiarlo dalla schermata del menu del disco.
44 It Riproduzione Uso di BONUSVIEW o BD-LIVE Questo lettore è compatibile con le funzioni BONUSVIEW e BD-LIVE dei BD-Video. Se il disco BD-Video è compatibile con BONUSVIEW, è possibile ottenere il video secondario (immagine nell’immagine) (pagina 46) e l’audio secondario (pagina 46). Se il disco BD-Video supporta BD-LIVE, è possibile scaricare speciali video ed altri dati da Internet.
Riproduzione 45 It Funzioni di riproduzione Le funzioni utilizzabili che possono venire usate dipendono dal disco o file. In certi casi, alcune delle funzioni non possono venire usate. Controllare le funzioni utilizzabili con la tabella che segue.
46 Riproduzione It Uso del menu TOOLS A seconda delle condizioni operative del lettore si possono attivare varie funzioni. 1. Far comparire il menu TOOLS. Premere TOOLS during playback. 2. Scegliere ed impostare la voce desiderata. Usare / per scegliere, poi premere ENTER. Nota yy Le voci non alterabili sono visualizzate in grigio. Le voci selezionabili dipendono dallo stato operativo del lettore. Per cambiare l’impostazione della voce scelta 4 Usare / per cambiare.
Riproduzione Riproduzione di un titolo, capitolo, brano o file specifici (ricerca) 1. Scegliere Title o capitolo (brano/file). Usare / per scegliere, poi premere ENTER. 2. Digitare il numero del titolo o capitolo (brano/file). Usare i pulsanti numerici (da 0 a 9) o / per digitare il numero. yy Per trovare il titolo 32, digitare 3 e 2, poi premere ENTER. yy Premere CLEAR per cancellare quanto già digitato. 3. Inizio della riproduzione da un titolo, capitolo o brano particolare. Premere ENTER.
48 It Riproduzione con Home Media Gallery Capitolo 5 Riproduzione con Home Media Gallery Home Media Gallery –– Personal computer basati su Microsoft Windows Vista o XP con Windows Media Player 11 installato –– PC che usano Microsoft Windows 7 con Windows Media Player 12 installato –– Media server digitali DLNA compatibili (su personal computer e altri componenti) I file memorizzati in un PC o DMS (Digital Media Server) come descritto sopra sono riproducibili con Digital Media Player (DMP).
Riproduzione con Home Media Gallery Materiale riproducibile via rete • Anche se codificate in formati compatibili, certi file possono non venire riprodotti correttamente. • Alcune funzioni possono non essere supportate dal tipo o versione del server posseduto. • I formati dei file supportati variano a seconda del server. I file presenti non supportati dal server non vengono visualizzati da quest’unità. Per maggiori informazioni, consultare il fabbricante del proprio server.
50 It Riproduzione con Home Media Gallery Playback del file in rete 1. Premere HOME MEDIA GALLERY per far comparire Home Media Gallery. Home Media Gallery appare anche scegliendo [Home Media Gallery] dal Home Menu e premendo ENTER. 2. Scegliere il server contenente il file da riprodurre. 3. Selezionare il file da riprodurre. Usare / per scegliere, poi premere ENTER. Per chiudere Home Media Gallery Premere HOME MEDIA GALLERY.
Riproduzione con Home Media Gallery Riproduzione in un ordine desiderato (Playlist) I dischi che possono aggiungere brani e file alla Playlist sono visualizzati di seguito. • DVD/CD/dispositivi USB che contengono file audio Aggiunta di brani o file Usare questa per aggiungere brani e file alla Playlist. 1. Premere HOME MEDIA GALLERY per far comparire Home Media Gallery. Home Media Gallery appare anche scegliendo Home Media Gallery dal Home Menu e premendo ENTER. 1.
52 It Riproduzione di contenuti dal Web Capitolo 6 Riproduzione di contenuti dal Web Con questo lettore è possibile riprodurre stream da Internet. Contenuti dal Web disponibili • YouTube (MPEG4 AVC H.264) • Picasa Nota La fornitura di contenuto di terze parti può venire cambiata, sospesa, interrotta o smessa in qualsiasi momento senza preavviso, senza che per questo Pioneer debba sostenerne la responsabilità.
Altre operazioni Capitolo 7 Altre operazioni Registrare Audio CD su un dispositivo USB Si può registrare un audio CD su un dispositivo USB usando questo lettore. 1. Connettere il dispositivo USB alla porta USB sul pannello frontale Nota yy Connettere solo un dispositivo USB. 2. Aprire il vassoio del disco e mettere un Audio CD su di esso. Premere OPEN/CLOSE. 3. Chiudere il vassoio del disco. Se è stato premuto OPEN/CLOSE , il playback si avvierà automaticamente.
54 It Altre operazioni Funzionamento della radio Eliminazione di tutte le stazioni salvate Assicuratevi che le antenne FM siano connesse. (Vedere a pagina 30) 1. Tenere premuto STOP per due secondi. [ERASE ALL] lampeggerà sulla finestra della schermata. Ascoltare la RADIO 2. Premere STOP per eliminare tutte le emittenti radio salvate. 1. Premere FUNCTION finché appare FM sulla finestra dello schermo e premere ENTER. Viene sintonizzata l’ultima stazione radio ricevuta. 2.
Altre operazioni 55 ADATTATORE Bluetooth® per Wireless Enjoyment of Music Ascoltare musica su un dispositivo abilitato Bluetooth a tecnologia wireless • Dispositivo con tecnologia wireless Bluetooth: telefono cellulare Abbinare l’unità con un dispositivo abilitato Bluetooth a tecnologia wireless.
56 It Altre operazioni Nota • Questa unità non supporta AVRCP. • Questa unità non supporta Mono Headset Profile (Hands Free Profile). • Da questa unità non si possono eseguire operazioni su un dispositivo abilitato Bluetooth a tecnologia wireless. • Questa unità non può essere usata per ascoltare un seg sounds su un dispositivo abilitato Bluetooth a tecnologia wireless. I contenuti musicali protetti da SCMS-T non possono essere ascoltati.
Altre operazioni 57 It Suono Premere SOUND sul telecomando per visualizzare il suono, selezionando il menù sullo schermo TV. Usare il tasto del cursore per la selezione, poi premere ENTER. Premere SOUND per uscire dal menù del Suono. Nota • Se si seleziona HDMI IN 1 o HDMI IN 2, il menù del Suono non può essere visualizzato. Commutare su un’altra sorgente in entrata e poi attivare il Suono. • Se si seleziona HDMI IN 1 o HDMI IN 2, i tasti VIRTUAL 3D SOUND e SOUND RETRIEVER non funzionano.
58 It Impostazioni avanzate Impostazioni avanzate Uso della schermata Initial Setup (Impostazione iniziale) Modifica delle impostazioni 1. Far comparire la schermata Home Menu a riproduzione ferma. HOME MENU. Premere Capitolo 8 2. Scegliere ed impostare Initial Setup. Usare / per scegliere, poi premere ENTER. 3. Scegliere una voce e modificarla. Usare / / / per scegliere, poi premere ENTER. Chiusura della schermata Initial Setup Premere HOME MENU o RETURN.
Impostazioni avanzate Audio Output Impostazione Options Spiegazioni DRC (Dynamic Range Control) Off Da scegliere per emettere segnale audio senza usare la funzione DRC. On Da scegliere per regolare la gamma fra il suono più forte e piu debole (gamma dinamica) per la riproduzione a volume medio. Da usare se I dialoghi sono difficili da sentire o si guardano film a notte fonda. Auto Da scegliere per attivare o disattivare l’impostazione DRC a seconda del segnale audio in ingresso dal disco.
60 It Impostazioni avanzate Network Impostazione Options IP Setting Da scegliere per impostare l’indirizzo IP del lettore ed il server DNS (pagina 62). Spiegazioni Proxy Server Impostare il server proxy solo se questo viene richiesto dal provider d’Internet (pagina 63). Information Visualizza i valori dell’indirizzo MAC, indirizzo IP, subnet mask, default gateway, DNS server (primario) e DNS server (secondario). Connection Test Da scegliere per testare la connessione di rete (pagina 63).
Impostazioni avanzate Impostazione Options 61 It Spiegazioni Permette di fare le impostazioni con il menu Setup Navigator. Per dettagli, vedi pagina 36. Security Change Password Registrare (cambiare) il password per le impostazioni di controllo genitori o per sbloccare la riproduzione di DVD-Video che possiedono il controllo genitori (pagina 64). Parental Control Permette di cambiare il livello di controllo genitori del lettore (pagina 64).
62 It Impostazioni avanzate Regolazione del video 1. Scegliere e regolare Display Setting d Video Adjust d Next Screen. Usare / per scegliere, poi premere ENTER. 2. Scegliere una voce e modificarla. Usare / per scegliere la voce, poi / per cambiarne l’impostazione. Ad impostazione completata, premere RETURN per chiudere la schermata. 1. Scegliere e regolare Audio Output d Test Tone d Next Screen. Usare / / / per scegliere, poi premere ENTER. 2. Sarà emesso un tono test.
Impostazioni avanzate 63 It Impostazione del server proxy Test della connessione di rete Il server proxy va impostato solo se richiesto dal proprio provider Internet. Scegliere ed impostare Network d Connection Test d Start. Usare / per scegliere, poi premere ENTER. [Network is OK.] appare a test finito. Se appare un altro messaggio, controllare i collegamenti e/o le impostazioni (pagine 33 e 62). 1. Scegliere ed impostare Network d Proxy Server d Next Screen.
64 It Impostazioni avanzate Memorizzazione o modifica del password Usare questa procedura per memorizzare o cambiare il numero di codice richiesto per le impostazioni Parental Lock. Il password predefinito di questa unità Il password predefinito è [0000]. yy Questa unità potrebbe chiedervi di digitare il password prima di permettervi di cambiarlo. yy Se l’unità viene resettata, il password torna ad essere quello predefinito. 1. Scegliere ed impostare Security d Change Password d Next Screen.
Impostazioni avanzate Aggiornamento del software Il software del lettore è aggiornabile con uno dei seguenti metodi. • Collegandosi ad Internet. • Usando un disco. • Uso di un dispositivo di memoria di massa USB. Le informazioni su questo lettore sono fornite dal sito di Pioneer. Per aggiornamenti ed informazioni sul vostro lettore Blu-ray, controllare il sito Web visto a pagina 9.
66 It Impostazioni avanzate Aggiornamento usando un dispositivo di memoria di massa USB/disco Nota Impostazioni avanzate 8 yy Scaricato un file di aggiornamento dal sito Web di Pioneer, usare il proprio computer per trasferirlo su di un dispositivo di memoria di massa USB o disco. Leggere attentamente le istruzioni al momento del download del file di aggiornamento fornito dal sito Web di Pioneer.
Impostazioni avanzate 67 It Tabella dei codici delle lingue e tabella dei codici di paesi ed area Tabella dei codici di lingua Nome della lingua, codice della lingua, codice introdotto French, fr/fra, 0618 Galician, gl/glg, 0712 Georgian, ka/kat, 1101 German, de/deu, 0405 Greek, el/ell, 0512 Guarani, gn/grn, 0714 Gujarati, gu/guj, 0721 Hausa, ha/hau, 0801 Hebrew, iw/heb, 0923 Hindi, hi/hin, 0809 Hungarian, hu/hun, 0821 Icelandic, is/isl, 0919 Indonesian, in/ind, 0914 Interlingua, ia/ina, 0901 Interlingu
68 It Diagnostica Capitolo 9 Diagnostica L’uso scorretto dell’apparecchio viene spesso scambiato per un guasto. Se si ritiene che questo componente non funzioni bene, controllare la sezione che segue. A volte il problema risiede in un altro componente. Controllare tutti i componenti ed apparecchi elettronici usati. Se il problema non può venire eliminato neppure dopo aver fatto i controlli suggeriti, chiedere assistenza tecnica al più vicino centro assistenza o rivenditore autorizzato Pioneer.
Diagnostica 69 It Suono Problema Controllare yyNon viene emesso alcun yyIl disco viene riprodotto al suono. rallentatore? yyIl suono non viene yyIl disco viene riprodotto emesso correttamente. durante l’avanzamento o il ritorno rapidi? I cavi audio sono collegati correttamente? Il segnale audio multicanale non viene emesso. Nessun suono dall’altoparlante surround o centrale.
70 It Diagnostica Funzione Control Problema Controllare La funzione di controllo Il cavo HDMI è collegato non funziona. correttamente? Il cavo HDMI usato è un Cavo HDMI®/™ ad alta velocità? Si è collegato il lettore al televisore utilizzando un cavo HDMI per guardare il video? Il dispositivo collegato supporta la funzione Control? La funzione Control del dispositivo collegato è su On? Rimedio Per usare la funzione Control, connettere lo schermo piatto della TV al terminale HDMI OUT (pagina 28).
Diagnostica Problema Non è possibile raggiungere il componente o PC collegato via rete. La riproduzione non inizia. Il PC non è stato usato correttamente. Controllare Il componente in questione contiene software di limitazione dell’accesso a Internet. Un componente audio della rete che era stato spento ora è acceso. Il componente collegato alla rete non è regolato correttamente. Il componente collegato alla rete non contiene file riproducibili.
72 It Diagnostica Altri problemi Problema L’apparecchio non si accende. Controllare Il cavo di alimentazione è collegato correttamente? La corrente si disattiva su OFF senza preavviso La corrente del lettore si disattiva automaticamente. Control è regolato su On? Il lettore si spegne automaticamente. Control è regolato su On? Non è possibile operare Si usa il telecomando da un con il telecomando.
Appendice 73 It Capitolo 10 Appendice Specifiche tecniche Generale BCS-424/BCS-222 Requisiti di alimentazione AC 110 V a 240 V, 50 Hz/60 Hz Assorbimento energetico 190 W (In modo Standby: meno di 0,5 W) DIMENSIONI (L x A x P) Approx.
74 It Appendice Amplificatore BCS-424/BCS-222 Uscita di potenza (RMS) THD 30 % Totale 1100 W Anteriore 170 W × 2 (4 Ω) Centro 250 W (3 Ω) Vista posteriore 170 W × 2 (4 Ω) Subwoofer 250 W (3 Ω) Amplificatore BCS-FS121 Uscita di potenza (RMS) THD 30 % Totale 550 W Anteriore 170 W × 2 (4 Ω) Subwoofer 250 W (3 Ω) Sistema Laser Laser a semiconduttore Sistema segnali Sistema colore TV PAL/NTSC standard Porta LAN jack Ethernet x 1, 10BASE-T/100BASE-TX Alimentazione tensione bus (USB) DC 5
Appendice 75 It Altoparlanti BCS-222 S-BD122 • Cassa anteriore/surround (sinistra/destra) Tipo 1 vie Dimensioni nette (L x A x P) 95 mm x 80 mm x 90 mm Impedenza nominale 4Ω Peso netto 0,3 kg Tipo 1 vie Dimensioni nette (L x A x P) 230 mm x 80 mm x 90 mm Impedenza nominale 3Ω Peso netto 0,7 kg Tipo 1 vie Dimensioni nette (L x A x P) 200 mm x 340 mm x 270 mm Impedenza nominale 3Ω Peso netto 3,4 kg • Diffusore centrale • Subwoofer Altoparlanti BCS-FS121 S-BD122FS • Cassa anteriore/
76 It Appendice Manutenzione Note sui Dischi Maneggiare l’unità Manipolazione dei Dischi Maneggiare l’unità Conservare la confezione di trasporto originale e il materiale dell’imballo. Se occorre trasportare l’unità, per ottenere la massima protezione è possibile reimballare il prodotto nell’imballo originale fornito dalla fabbrica. Tenere pulite le superfici esterne • Non utilizzare liquidi volatili in prossimità dell’unità, come ad esempio spray insetticida.
Appendice 77 It Informazione importante riguardo i servizi in rete Tutte le informazioni, dati, documenti, comunicazioni, scaricamenti di file, file, testo, immagini, fotografie, grafici, video, abbozzi di web, pubblicazioni, utilità, risorse, software, codici, programmi, programmi applet, oggetti, applicazioni, prodotti e altro contenuto (“contenuto”) e tutti i servizi e le offerte (“servizi”) forniti o resi disponibili da o tramite una qualsiasi terza parte (ciascuno con un “provider di servizi”) sono d
Veiligheidsinformatie Hartelijk dank voor uw aankoop van dit Pioneer product. Lees deze gebruiksaanwijzing aandachtig door om bekend te raken met de juiste bediening van uw apparaat. Na het doorlezen van de gebruiksaanwijzing dient u deze te bewaren op een veilige plaats, voor latere naslag.
Als de netstekker van dit apparaat niet geschikt is voor het stopcontact dat u wilt gebruiken, moet u de stekker verwijderen en een geschikte stekker aanbrengen. Laat het vervangen en aanbrengen van een nieuwe netstekker over aan vakkundig onderhoudspersoneel. Als de verwijderde stekker per ongeluk in een stopcontact zou worden gestoken, kan dit resulteren in een ernstige elektrische schok. Zorg er daarom voor dat de oude stekker na het verwijderen op de juiste wijze wordt weggegooid.
Opmerkingen over de auteursrechten • Er zijn bepaalde beperkingen voor het afspelen, de analoge signaaluitvoer e.d. van door AACS (Advanced Access Content System) beschermde inhoud omdat AACS goedgekeurd is als inhoudbeschermingsysteem voor het Blu-ray diskformaat, vergelijkbaar met het gebruik van CSS (Content Scramble System).
Belangrijke informatie over het tvkleurensysteem Het door deze speler gebruikte tv-kleurensysteem richt zich naar de afgespeelde schijven. Wanneer de speler bijvoorbeeld een volgens het NTSC-kleurensysteem opgenomen schijf afspeelt, wordt het beeld als NTSC-signaal uitgevoerd. Alleen kleurentelevisies die voor meerdere kleurensystemen geschikt zijn, kunnen alle door de speler uitgevoerde signalen verwerken.
Inhoudsopgave 27 33 33 35 35 35 – Extra gegevens over de speaker voor de BCS-FS121 – Positioneren van het systeem voor de BCS-FS121 Aansluiten op uw tv – HDMI-aansluiting – ARC (Audio Return Channel)-functie – Video-aansluiting De antenne aansluiten Op een extern apparaat aansluiten – AUX-aansluiting – PORTABLE IN-aansluiting – OPTICAL IN 1/2-aansluiting – HDMI IN 1/2-aansluiting – Aansluiten van optionele Bluetooth® ADAPTER Aansluiten op uw thuisnetwerk – Aansluiting voor bekabeld netwerk Een USB-appara
42 42 42 43 43 – Foto’s weergeven als diavoorstelling – Omschakelen van de camerahoek – Omschakelen van de ondertiteling – Omschakelen van de audio – Omschakelen van het CD/SACD weergavedeel – Disc-informatie weergeven – Genieten van BONUSVIEW of BD-LIVE – Afspeelfuncties Gebruik van het TOOLS menu – Afspelen vanaf een specifiek tijdstip (Tijdzoekfunctie) – Afspelen van een bepaalde titel, hoofdstuk, muziekstuk of bestand (Zoekfunctie) – Willekeurige weergave van een bepaald gedeelte van een disc, of bepaa
8 Nl Voordat u begint Hoofdstuk 1 Voordat u begint 1 Toebehoren voor luidsprekerboxen (BCS-222) Voordat u begint Inleiding Meegeleverde toebehoren Antislipkussentjes (5) Schroeven M3.5x12 [voor bevestiging] (4) (Deze schroeven worden gebruikt om de luidsprekers aan de houders te bevestigen.) Videokabel (1) Afstandsbediening (1) Batterijen (2) Fm-antenne (1) Toebehoren voor luidsprekerboxen (BCS-FS121) Antislipkussentjes (2) Schroeven M3.
Voordat u begint Aanbrengen van de batterijen in de afstandsbediening 1. Open het achterdeksel. 2. Doe de batterijen in het vak (AAA/R03 x 2). Volg bij het inleggen de +/*-markeringen binnenin het batterijvak. Leg het negatieve (*) uiteinde eerst in. 3. Sluit het achterdeksel. Druk het stevig dicht (zodat u een klik hoort).
10 Voordat u begint Nl Soorten discs/bestanden die kunnen worden afgespeeld 1 Afspeelbare discs Voordat u begint Discs die zijn voorzien van een van de volgende beeldmerken op het label, het hoesje of doosje kunnen worden afgespeeld. Waarschuwing • Alleen correct afgesloten discs kunnen worden afgespeeld.
Voordat u begint • "Blu-ray Disc", "Blu-ray" en het "Blu-ray Disc"logo zijn handelsmerken van de Blu-ray Disc Association. is een handelsmerk van DVD Format/ Logo Licensing Corporation.
12 Nl 1 Voordat u begint Voordat u begint BONUSVIEW-functies zoals het weergeven van secundaire videobeelden (inzetbeeld) en secundaire geluidssporen kunnen worden gebruikt indien beschikbaar. De gegevens die worden gebruikt voor de BONUSVIEW-functies (de secundaire videobeelden (inzetbeeld) en de secundaire geluidssporen) kunnen worden opgeslagen in het opslagmedium. Zie voor nadere details over de weergave van secundaire video en secundaire geluidssporen de handleiding van de disc.
Voordat u begint • Blu-ray discs: –– Modellen voor het V.K. : 2 (inclusief 2) en ALL –– Modellen voor Australië en Nieuw Zeeland: 4 (inclusief 4) en ALL –– Modellen voor Rusland: 5 (inclusief 5) en ALL –– Overige: 3 (inclusief 3) en ALL Afspelen van CD’s Over kopieerbeveiligde CD’s: Deze speler is ontworpen om te voldoen aan de specificaties van het Audio-CD-formaat. Deze speler is niet geschikt voor het afspelen of andere functies van discs die niet voldoen aan deze specificaties.
14 Nl Voordat u begint Afspeelbare bestanden 1 Video, afbeeldingen en audiobestanden die zijn opgenomen op DVD’s, CD’s of USB-apparatuur kunnen worden weergegeven. Voordat u begint Waarschuwing • Alleen DVD’s die zijn opgenomen volgens het ISO 9660 bestandssysteem kunnen worden afgespeeld. • Sommige bestanden kunnen niet worden afgespeeld. • Bij sommige bestanden kunnen bepaalde functies tijdens het afspelen niet werken.
Voordat u begint 15 Nl Tabel met afspeelbare bestanden Afspeelbare media USBapparatuur1 Netwerk2 MP3 (.mp3) 1 1 1 Bemonsteringsfrequenties: Max. 48 kHz Bitsnelheid: tot 320 kbps Audiotype: MPEG-1 Audio Layer 3 WMA (.wma) 1 1 1 Bemonsteringsfrequenties: Max. 48 kHz Bitsnelheid: tot 192 kbps Audiotype: WMA versie 9 LPCM (.wav) 1 1 1 Bemonsteringsfrequenties: Max. 192 kHz Kwantisering bitsnelheid: 16 bits Kanalen: 2ch FLAC (.flac) 1 1 Bemonsteringsfrequenties: Max.
16 Nl Voordat u begint Handelsmerken en licenties 1 Voordat u begint De termen HDMI en HDMI High-Definition Multimedia Interface en het HDMI-logo zijn handelsmerken of gedeponeerde handelsmerken van HDMI Licensing, LLC in de Verenigde Staten en andere landen. Gefabriceerd onder licentie van Dolby Laboratories. “Dolby” en het symbool double-D zijn handelsmerken van Dolby Laboratories. Vervaardigd onder licentie van de volgende Amerikaanse patentnummers: 5.956.674; 5.974.380; 6.226.616; 6.487.535; 7.392.
Voordat u begint Afstandsbediening 17 Nl (STANDBY/ON): Druk hierop om de stroom in of uit te schakelen. FUNCTION: Hiermee wijzigt u de invoerbron of functie. 2 3 4 Bron wijzigen terwijl u naar het displayvenster op het apparaat kijkt 1. De ingangsbron wijzigt elke keer dat FUNCTION wordt ingedrukt. 2. Selecteer de gewenste ingangsbron en druk op ENTER. Bron wijzigen terwijl u naar de televisiemonitor kijkt 1. Druk op FUNCTION zodat [Source Menu] verschijnt. 2.
18 Nl 1 Voordat u begint • • • • • • • • • 3• • • • • • • • • • • • • • • • • • 6• • • • • • • • • VIRTUAL 3D SOUND: Wijzigen van de VIRTUAL 3D SOUND-effecten (Zie pagina 57). 0-9 cijfertoetsen: Genummerde opties in een menu of letters in het toetsenblokmenu invoeren. Voordat u begint SOUND: Overschakelen naar Sound Settings (Zie pagina 57). AUDIO: Zie pagina 43. VOL +/– : Hiermee past u het luidsprekervolume aan. SUBTITLE: Zie pagina 42.
Voordat u begint 19 Nl Frontpaneel 2 3 4 9 1 Disklade 2 Bedieningsknoppen (STANDBY/ON) Schakel het toestel AAN/UIT. Opmerking Als het apparaat niet uitschakelt, houd de toets (STANDBY/ON) langer dan 5 seconden ingedrukt, zodat het apparaat opnieuw opstart en weer kan worden bediend. (OPEN/CLOSE) FUNCTION Hiermee wijzigt u de invoerbron of functie. Bron wijzigen terwijl u naar het displayvenster kijkt via de toets op het voorpaneel 1. De ingangsbron wijzigt elke keer dat FUNCTION wordt ingedrukt.
20 Nl Voordat u begint Achterzijde 1 BCS-424/BCS-222 Voordat u begint 1 2 3 6 7 8 9 5 4a b 3 6 7 8 9 5 4a b BCS-FS121 1 2 1 AC IN Steek deze kabel in een stopcontact.
Aansluitingen Hoofdstuk 2 21 Nl 3. Installeer de voor/surroundluidspreker. Aansluitingen 1 Leid de luidsprekerkabel door het kabelgat aan de zijkant van het voetstuk. Luidsprekers monteren Luidsprekers installeren BCS-424 2 De luidsprekers voorbereiden 2 Zet de onderste kast zodanig op het voetstuk, dat het kabelgat zich aan de achterzijde bevindt. Waarschuwing • Op deze luidsprekeraansluitingen staat een GEVAARLIJKE spanning.
22 Nl Aansluitingen 5 Bevestig de bovenste en de onderste kast met behulp van de twee schroeven (M4 x 12) via de achterzijde van de luidspreker. Wandbevestiging van de speaker voor de BCS-424 In de middenluidspreker bevindt zich een montagegat dat kan worden gebruikt om de luidspreker aan de wand te bevestigen. Vóór de montage Denk eraan dat het luidsprekersysteem zwaar is en dat de schroeven of het bouwmateriaal van de wand door dit gewicht los kunnen komen waardoor de luidspreker valt.
A C A A A A F D F A A A A G B F C C B A A C D G G A B A A A A A A Extra gegevens overG de A F D A speaker voor de BCS-424 A A A A A A Nl B C E D Elinksvoor F G Luidspreker (L) A B Luidspreker C E D E Frechtsvoor G (R): A de luidsprekers voor aan de Zet A E D E F Gmidden Luidspreker Plaats de middelste luidspreker onder of voor de monitor of het scherm.
24 Nl Aansluitingen Luidsprekers installeren BCS-222 De luidsprekers voorbereiden 1. Sluit de luidsprekerkabels op de speler aan. Steek de snoeren die op het apparaat zijn aangesloten in de connector met dezelfde kleur van de luidspreker. 2 Aansluitingen Waarschuwing • Op deze luidsprekeraansluitingen staat een GEVAARLIJKE spanning.
A C A A A A F D F A A C C B A A C D G G A B A A A A E E A A Extra gegevens overG de A F D speaker voor de BCS-222 A A A A G B F A A A A A 25 Nl B C E D Elinksvoor F G Luidspreker (L)/ A B Luidspreker C E D E Frechtsvoor G (R): A de luidsprekers voor aan de Zet A E D E F Gmidden: Luidspreker Plaats de middelste luidspreker onder of voor de monitor of het scherm.
26 Nl Aansluitingen Luidsprekers installeren BCS-FS121 Wandbevestiging van de speaker voor de BCS-FS121 De luidsprekers voorbereiden Alle luidsprekers hebben een montageopening die kan worden gebruikt om de luidspreker aan de wand te bevestigen. 1. Sluit de luidsprekerkabels op de speler aan. 2 Steek de snoeren die op het apparaat zijn aangesloten in de connector met dezelfde kleur van de luidspreker. Aansluitingen Waarschuwing • Op deze luidsprekeraansluitingen staat een GEVAARLIJKE spanning.
A C A A G F A D D A A A E E A A B E A Aansluitingen 27 Nl C A G Extra gegevens over de F A D A A speaker voor de BCS-FS121 A A A A Monter de linker en rechter hoofdluidsprekers op gelijke afstanden van de televisie. B C D E F G Eenheid Waarschuwing • Plaats de centerluidspreker buiten bereik van kinderen. Wanneer een luidspreker valt, kan hij worden beschadigd en lichamelijk letsel en/of materiële schade veroorzaken.
28 Nl Aansluitingen Aansluiten op uw tv Maak een van de volgende aansluitingen, afhankelijk van de mogelijkheden van uw tv. • HDMI-aansluiting (pagina 28) • Video-aansluiting (pagina 29) 2 Opmerking HDMI-aansluiting Als u een HDMI-TV of -monitor heeft, dan kunt u deze via een HDMI-kabel (High Speed HDMI®/™-kabel) op deze speler aansluiten. Sluit het HDMI-aansluitpunt van de speler aan op het HDMI-aansluitpunt van een met HDMI compatibele televisie of monitor.
Aansluitingen ARC (Audio Return Channel)functie Met behulp van de ARC-functie kan een tv met HDMI het audiosignaal van de tv naar de HDMI-uitgang van deze speler sturen. 29 Nl Video-aansluiting Gebruik een videokabel om de uitgang VIDEO OUT op de speler aan te sluiten op de videoingang op de tv. U kunt het geluid via de luidsprekers van het systeem weergeven. U gebruikt deze functie als volgt: -- Uw TV dient de ARC-functie te ondersteunen.
30 Nl Aansluitingen De antenne aansluiten Sluit voor de ontvangst van radio-uitzendingen de meegeleverde antenne aan. Op een extern apparaat aansluiten AUX-aansluiting U kunt het geluid van een externe component via de luidsprekers van dit systeem weergeven. 2 Aansluitingen Sluit de analoge audio-uitgangen van de component aan op de AUX L/R-ingangen van het hoofdapparaat. Selecteer vervolgens de optie [AUX] door achtereenvolgens op FUNCTION en ENTER te drukken.
Aansluitingen 31 Nl PORTABLE IN-aansluiting OPTICAL IN 1/2-aansluiting U kunt het geluid van uw draagbare audiospeler via de luidsprekers van dit systeem weergeven. U kunt het geluid van een component met een digitale optische verbinding via de luidsprekers van dit systeem weergeven. Sluit de hoofdtelefoonaansluiting (of de uitgang line out ) van de draagbare audiospeler aan op de PORTABLE IN-aansluiting van dit apparaat.
32 Nl Aansluitingen HDMI IN 1/2-aansluiting U kunt het beeld en het geluid van uw component via deze aansluiting weergeven. 2 Sluit de HDMI OUT-uitgang van uw component aan op de HDMI IN 1- of 2-ingang op dit apparaat. Selecteer vervolgens de optie [HDMI IN 1/2] door achtereenvolgens op FUNCTION en ENTER te drukken. Aansluitingen Achterkant van het apparaat Naar de HDMIUitgang van de component (settop box, digitale satellietontvanger, videogameapparaat e.d.).
Aansluitingen Aansluiten op uw thuisnetwerk 2 Door gebruik te maken van een bekabeld netwerk bereikt u de beste prestaties, omdat de aangesloten apparaten rechtstreeks met het netwerk in verbinding staan en niet vatbaar zijn voor radiofrequente storing. Computer en/of DLNAgecertificeerde server Opmerking • Wanneer u de LAN-kabel aansluit of loskoppelt, houdt u de kabelstekker vast. Wanneer u de LANkabel loskoppelt, trek dan niet aan de kabel.
34 Nl Aansluitingen Belangrijke informatie over netwerkverbindingen: 2 Aansluitingen • Problemen bij het tot stand brengen van een netwerkverbinding kunt u vaak oplossen door de router of de modem te resetten. Nadat u de speler op het thuisnetwerk hebt aangesloten, schakelt u de stroom even uit of maakt u de stroomkabel van de router van het thuisnetwerk of de kabelmodem los. Vervolgens schakelt u de stroom weer in en/of sluit u de stroomkabel weer aan.
Aansluitingen Een USB-apparaat aansluiten Over USB-apparatuur De USB-apparatuur die op de speler kan worden aangesloten, wordt hieronder vermeld. • USB 2.0-compatibele geheugenapparaten Opmerking Nl • De USB-poort van het toestel kan niet worden aangesloten op de computer. Het toestel kan niet gebruikt worden als opslagtoestel.
36 Nl Aan de slag Hoofdstuk 3 Aan de slag Instellingen via het Setup Navigator menu U moet deze instellingen maken wanneer u de speler gebruikt in de volgende situaties. • Wanneer u de speler voor het eerst gaat gebruiken. 3 • Na een Initial Setup formattering. Aan de slag • Na het updaten van de software van de speler. Waarschuwing • Voor u de stroom inschakelt, moet u eerst controleren of alle aansluitingen tussen de speler en de andere apparatuur in orde zijn.
Aan de slag 37 Nl Bediening van de TV met de afstandsbediening van de speler Door de merkencode voor uw merk TV-toestel te kiezen op de afstandsbediening van de speler, zult u het TV-toestel kunnen bedienen met de afstandsbediening van de speler. Waarschuwing • Bij sommige modellen is het mogelijk dat u de TV niet kunt bedienen met de afstandsbediening van de speler, ook al staat het merk van de TV wel vermeld in de merkencodelijst. 1. Voer de 2-cijferige merkencode in.
38 Nl Aan de slag Lijst met TV voorkeuzecodes Merken codes 3 Aan de slag PIONEER 00, 31, 32, 07, 36, 42, 51, 22 ACURA 44 ADMIRAL 31 AIWA 60 AKAI 32, 35, 42 AKURA 41 ALBA 07, 39, 41, 44 AMSTRAD 42, 44, 47 ANITECH 44 ASA 45 ASUKA 41 AUDIOGONIC 07, 36 BASIC LINE 41, 44 BAUR 31, 07, 42 BEKO 38 BEON 07 BLAUPUNKT 31 BLUE SKY 41 BLUE STAR 18 BPL 18 BRANDT 36 BTC 41 BUSH 07, 41, 42, 44, 47, 56 CASCADE 44 CATHAY 07 CENTURION 07 CGB 42 CIMLINE 44 CLARIVOX 07 CLATRONIC 38 CONDOR 38 CONTEC 44 CROSLEY 32 CROWN 38, 4
Afspelen Hoofdstuk 4 Afspelen Afspelen van discs of bestanden In dit hoofdstuk worden de voornaamste functies van de speler beschreven. Voor de soorten discs en bestanden die kunnen worden afgespeeld, zie pagina 10. Video, afbeeldingen en audiobestanden die op disc zijn opgenomen worden afgespeeld via de Home Media Gallery (pagina 48). 1. Druk op u STANDBY/ON om het toestel in te schakelen. Schakel eerst uw TV-toestel in en kies het ingangskanaal.
40 Nl Afspelen Vooruit en terug zoeken Stapsgewijze vooruit en terug Druk tijdens het afspelen op mREV of nFWD. yy De zoeksnelheid verandert bij elke druk op de toets. De snelheid is afhankelijk van de disc of het bestand (de snelheid wordt op het TV-scherm getoond). Met het afspelen gepauzeerd, drukt u op q/ of /r. yy Het beeld gaat dan een stapje vooruit of terug bij elke druk op de toets. Terugkeren naar de normale weergave Druk op d PLAY. Druk op dPLAY.
Afspelen Uitschakelen van de herhaalde weergave yy Druk tijdens herhaalde weergave een paar keer op REPEAT. Opmerking yy De herhaalfunctie wordt uitgeschakeld in de volgende gevallen: –– Wanneer u gaat zoeken buiten de herhaalde passage. –– Wanneer u een andere herhaalfunctie of willekeurige weergave start. Afspelen in de gewenste volgorde (Programma-weergave) 1 Druk tijdens het afspelen op PROGRAM. yy Het programmascherm verschijnt.
42 Nl Afspelen Foto’s weergeven als diavoorstelling Omschakelen van de ondertiteling Deze functie geeft de foto’s automatisch één voor één weer. Bij discs en bestanden waarvoor meerdere ondertitels zijn opgenomen, kunt u tijdens het afspelen de ondertiteling omschakelen. Druk tijdens het afspelen op INDEX. yy De miniatuurweergaven van de beeldbestanden worden nu getoond. Er kunnen er maximaal 12 tegelijk worden getoond.
Afspelen 43 Nl Omschakelen van de audio Disc-informatie weergeven Bij discs en bestanden waarvoor meerdere audiosignalen/kanalen zijn opgenomen, kunt u tijdens het afspelen het audiosignaal/kanaal omschakelen. Druk op DISPLAY. De disc-informatie verschijnt op het TV-scherm. Druk nog eens op DISPLAY om de weergave van de informatie weer uit te schakelen. Druk tijdens het afspelen op AUDIO. yy De huidige audio en het totale aantal opgenomen audiosignalen/kanalen wordt getoond op het TV-scherm.
44 Nl Afspelen Genieten van BONUSVIEW of BD-LIVE Deze speler is geschikt voor BD-Video BONUS VIEW en BD-LIVE. Bij gebruik van voor BONUSVIEW geschikte BD-Video’s kunt u profiteren van functies als secundaire video (beeld-in-beeld/inzetbeeld) (pagina 46) en secundaire audio (pagina 46). Bij BD-Video’s die geschikt zijn voor BD-LIVE kunnen speciale videobeelden en andere gegevens worden gedownload van het internet.
Afspelen 45 Nl Afspeelfuncties Welke afspeelfuncties u kunt gebruiken, hangt af van de afgespeelde disc of het bestand. In bepaalde gevallen zullen sommige functies niet werken. Controleer welke functies beschikbaar zijn in de onderstaande tabel.
46 Afspelen Nl Gebruik van het TOOLS menu Er kunnen verschillende functies worden verricht, afhankelijk van de bedieningsstand van de speler. 1. Laat het TOOLS-menu verschijnen. Druk tijdens het afspelen op TOOLS. 2. Selecteer het onderdeel en stel het in. Gebruik / om de instelling te kiezen en druk dan op ENTER. Opmerking yy De onderdelen die niet gewijzigd kunnen worden, staan grijs aangegeven. Welke onderdelen u kunt kiezen is afhankelijk van de werkingsstand van de speler.
Afspelen 47 Afspelen vanaf een specifiek tijdstip (Tijdzoekfunctie) 2. Schakelt de afspeelfunctie om. Gebruik / om de instelling te kiezen en druk dan op ENTER. 1. Selecteer Time. Gebruik / om de instelling te kiezen en druk dan op ENTER. Willekeurige weergave 2. Voer het gewenste tijdstip in. Gebruik de cijfertoetsen (0 t/m 9) om het gewenste tijdstip in te voeren. yy Om af te spelen vanaf 45 minuten, kiest u 0, 0, 4, 5, 0 en 0, en dan drukt u op ENTER.
48 Nl Afspelen via de Home Media Gallery Hoofdstuk 5 Afspelen via de Home Media Gallery Over de Home Media Gallery • De volgende bestanden kunnen worden afgespeeld via de Home Media Gallery: –– PC’s die onder Microsoft Windows Vista of XP draaien met Windows Media Player 11 geïnstalleerd –– PC’s die onder Microsoft Windows 7 draaien met Windows Media Player 12 geïnstalleerd –– DLNA-compatibele digitale mediaservers (op PC’s of andere apparatuur) Bestanden opgeslagen op een PC of DMS (Digitale Media Serv
Afspelen via de Home Media Gallery DLNA®, het DLNA-logo en DLNA CERTIFIED® zijn handelsmerken, servicemerken of certificatiemerken van Digital Living Network Alliance. Content die via een netwerk kan worden afgespeeld • Sommige bestanden worden mogelijk niet juist afgespeeld, ook wanneer ze in een compatibel formaat zijn gecodeerd. • Sommige functies worden wellicht niet ondersteund, afhankelijk van het servertype of de versie die wordt gebruikt. • De ondersteunde bestandsformaten variëren per server.
50 Nl Afspelen via de Home Media Gallery Een bestand op het netwerk afspelen 1. Druk op HOME MEDIA GALLERY om de Home Media Gallery te openen. U kunt de Home Media Gallery ook openen door [Home Media Gallery] te kiezen in het Home Menu en dan op ENTER te drukken. 2. Selecteer de server die het bestand bevat dat u wilt afspelen. 3. Selecteer het bestand dat u wilt afspelen. Gebruik / om de instelling te kiezen en druk dan op ENTER. Home Media Gallery beëindigen. Druk op HOME MEDIA GALLERY.
Afspelen via de Home Media Gallery Afspelen in de gewenste volgorde (Playlist) De discs waarvan u muziekstukken en bestanden aan de Playlist kunt toevoegen, staan hieronder vermeld. • DVD’s/CD’s/USB-apparatuur waarop audiobestanden zijn opgenomen Toevoegen van muziekstukken/bestanden Ga als volgt te werk om muziekstukken en bestanden toe te voegen en zo een Playlist samen te stellen. 1. Druk op HOME MEDIA GALLERY om de Home Media Gallery te openen.
52 Nl Afspelen van materiaal van het web Hoofdstuk 6 Afspelen van materiaal van het web Met deze speler kunt u zogenaamd "streaming" materiaal van het web afspelen. Geschikt materiaal van het web • YouTube (MPEG4 AVC H.264) • Picasa Opmerking 6 Afspelen van materiaal van het web Over YouTube • U kunt YouTube video’s met de volgende afmetingen weer laten geven.
Overige bediening Hoofdstuk 7 Overige bediening Opnemen van een audio-cd op een USBapparaat Via deze speler kan een audio-cd op een USBapparaat worden opgenomen. 1. Sluit een USB-apparaat aan op de USBpoort van het voorpaneel. Opmerking yy Sluit slechts één USB-apparaat aan. 2. Open de disklade en plaats een audiocd in de lade. Press OPEN/CLOSE. 53 Nl 6. Stel de opnamesnelheid in. Gebruike / / / om [Speed] te selecteren en druk op ENTER.
54 Nl Overige bediening Radio bedienen Zorg dat zowel de FM antennes aangesloten zijn. (Zie pagina 30) Naar de radio luisteren 1. Druk op FUNCTION totdat FM in de display verschijnt en druk daarna op ENTER. De radiotuner stemt nu af op het radiostation waarop u het laatst hebt afgestemd. 2. Scannen start als toets of wordt ingedrukt. Of Druk een paar keer kort achter elkaar op / . Of Druk herhaaldelijk op TUNE –/+ op het voorpaneel van de speler. Alle opgeslagen stations verwijderen 1.
Overige bediening Bluetooth® ADAPTER voor draadloos muziekgenot • Apparaat met Bluetooth draadloze technologie: mobiele telefoon • Apparaat met Bluetooth draadloze technologie: Digitale muziekspeler • Apparaat zonder Bluetooth draadloze technologie: Digitale muziekspeler + Bluetooth audiozender (commercieel verkrijgbaar) Draadloos muziek afspelen Wanneer de Bluetooth ADAPTER (Pioneermodelnr.
56 Nl Overige bediening Opmerking • Dit apparaat ondersteunt geen AVRCP. • Dit apparaat ondersteunt geen Mono Headset Profile (handsfree profile). • Een apparaat voor Bluetooth draadloze technologie kan niet via dit systeem worden bediend. • Dit apparaat kan niet worden gebruikt voor het beluisteren van one-seg sound op een apparaat voor Bluetooth draadloze technologie. Door SCMS-T beschermde muziekcontent kan niet worden beluisterd.
Overige bediening 57 Nl Geluid Druk op SOUND van de afstandsbediening om het menu voor het selecteren van geluiden op het televisiescherm te selecteren. Gebruik de cursortoets om een selectie te maken en druk daarna op ENTER. Druk op SOUND om het Sound Menu te verlaten. Opmerking • Als HDMI IN 1 of HDMI IN 2 zijn geselecteerd, kan het Sound Menu niet worden afgespeeld. Schakel over naar een andere ingangsbron en schakel dan het geluid in.
58 Nl Geavanceerde instellingen Bediening van het begininstellingenscherm Hoofdstuk 8 Geavanceerde instellingen 1. Zorg dat het afspelen gestopt is en laat het Home Menu scherm verschijnen. HOME MENU. Druk op Wijzigen van de instellingen 2. Kies de Initial Setup en stel deze in. Gebruik / om de instelling te kiezen en druk dan op ENTER. 3. Selecteer een onderdeel en wijzig de instelling. Gebruik / / / om de instelling te kiezen en druk dan op ENTER.
Geavanceerde instellingen Instelling Opties Audio Output DRC (Regeling dynamisch Off bereik) 59 Nl Beschrijving Kies hiervoor om audiosignalen te produceren zonder gebruik te maken van de DRC-functie. On Kies hiervoor om het verschil tussen de hardste en zachtste geluiden (het dynamisch bereik) te verkleinen voor weergave bij een gemiddeld volume.
60 Nl Network Language Playback Geavanceerde instellingen 8 Geavanceerde instellingen Instelling IP Setting Proxy Server Information Opties Beschrijving Kies deze instelling om het IP-adres van de speler en de DNS-server in te stellen (pagina 62). Stel alleen een proxy-server in als uw Internet-provider dat vereist (pagina 63). Toont de waarden voor het MAC-adres, IP-adres, subnetmasker, standaard gateway, DNS-server (primair) en DNS-server (secundair).
Geavanceerde instellingen Instelling Opties 61 Nl Beschrijving Maak de instellingen via het Setup Navigator menu. Zie pagina 36 voor verdere informatie. Security Change Password Registreer (wijzig) het wachtwoord voor de kinderslot-instellingen of voor het ontgrendelen om een kinderslot-beveiligde DVD-Video af te spelen (pagina 64). Parental Control Wijzig het kinderslot-niveau van de speler (pagina 64). Country Code Wijzig de land/gebiedscode (pagina 64).
62 Nl Geavanceerde instellingen Instellen van de video 1. Kies en maak de instelling voor Display Setting d Video Adjust d Next Screen. Gebruik / om de instelling te kiezen en druk dan op ENTER. 2. Selecteer een onderdeel en wijzig de instelling. Gebruik / om het gewenste item te selecteren en gebruik vervolgens / om de instelling te wijzigen. Druk op RETURN om het instelscherm te sluiten wanneer u klaar bent.
Geavanceerde instellingen Instellen van de proxy-server Stel alleen een proxy-server in als uw Internetprovider dat voorschrijft. 1. Kies en maak de instelling voor Network d Proxy Server d Next Screen. Gebruik / om de instelling te kiezen en druk dan op ENTER. 2. Kies en maak de instelling voor Use of Not use onder Proxy Server. Gebruik / om de instelling te kiezen en druk dan op . yy Use – Kies deze stand wanneer u een proxy-server gebruikt.
64 Nl Geavanceerde instellingen Registreren of wijzigen van uw wachtwoord Ga als volgt te werk voor het registreren of wijzigen van het wachtwoord dat vereist is voor de kinderslot-instellingen. Over het standaard wachtwoord van dit toestel Het standaard wachtwoord is [0000]. yy Dit toestel kan om een wachtwoord vragen wanneer u het wachtwoord wilt veranderen. yy Als u dit toestel reset, wordt ook uw wachtwoord teruggezet op de standaardinstelling. 1.
Geavanceerde instellingen Software bijwerken De software van de speler kan worden bijgewerkt via één van de onderstaande methodes. • Via het internet. • Via een disc. • Gebruiken van een USB-geheugenapparaat. Productinformatie over deze speler kunt u vinden op de Pioneer website. Controleer de website vermeld op pagina 9 voor informatie over updates en serviceberichten voor uw Bluray disc speler.
66 Nl Geavanceerde instellingen Updaten via een USBgeheugenapparaat/disc Opmerking Geavanceerde instellingen 8 yy Wanneer er op de Pioneer website een updatebestand beschikbaar is, kunt u dit met uw computer downloaden naar een USB-geheugenapparaat of disc. Lees eerst zorgvuldig de instructies voor het downloaden van updatebestanden op de Pioneer website. yy Sla het updatebestand op in de rootmap van het USB-geheugenapparaat of van de disc. Sla het bestand niet in een andere map op.
Geavanceerde instellingen 67 Nl Taalcodetabel en land/gebiedscodetabel Taalcodetabel Naam van de taal, taalcode, invoercode French, fr/fra, 0618 Galician, gl/glg, 0712 Georgian, ka/kat, 1101 German, de/deu, 0405 Greek, el/ell, 0512 Guarani, gn/grn, 0714 Gujarati, gu/guj, 0721 Hausa, ha/hau, 0801 Hebrew, iw/heb, 0923 Hindi, hi/hin, 0809 Hungarian, hu/hun, 0821 Icelandic, is/isl, 0919 Indonesian, in/ind, 0914 Interlingua, ia/ina, 0901 Interlingue, ie/ile, 0905 Inupiaq, ik/ipk, 0911 Irish, ga/gle, 0701 Ita
68 Nl Verhelpen van storingen Hoofdstuk 9 Verhelpen van storingen Verkeerde bediening kan vaak de oorzaak zijn van een schijnbare storing of foutieve werking. Wanneer u denkt dat er iets mis is met dit toestel, controleert u eerst de onderstaande punten. Soms ligt de oorzaak van het probleem bij een ander apparaat. Controleer daarom ook de andere componenten en elektrische apparatuur die gebruikt wordt.
Verhelpen van storingen 69 Nl Geluid Probleem yyEr klinkt geen geluid. yyHet geluid wordt niet goed weergegeven. Controle yyWordt de disc afgespeeld met vertraagde weergave? yyWordt de disc snel doorzocht in voorwaartse of achterwaartse richting? Zijn de audiokabels goed aangesloten? Is de audiokabel misschien beschadigd? Staat Audio Output juist ingesteld? Zijn de aangesloten apparaten juist ingesteld? Er wordt geen meerkanaals-geluid weergegeven.
70 Nl Verhelpen van storingen HDMI-bedieningsfunctie Probleem De HDMIbedieningsfunctie werkt niet. Controle Is de HDMI-kabel correct aangesloten? Oplossing Sluit de Flat Screen TV aan op het HDMI OUT-aansluitpunt (pagina 28) om de Control-functie te kunnen gebruiken.
Verhelpen van storingen Probleem Geen toegang mogelijk tot het apparaat of PC die via het netwerk is aangesloten. Het afspelen begint niet. De PC werkt niet naar behoren. De audiobestanden die op de apparaten in het netwerk zijn opgeslagen, zoals een PC, kunnen niet worden afgespeeld. De audioweergave wordt plotseling gestopt of er zijn storingen. De LAN-kabel is niet goed aangesloten. Er is veel dataverkeer op het netwerk terwijl er tevens verbinding is met internet op hetzelfde netwerk.
72 Nl Verhelpen van storingen Probleem Controle Oplossing Er is een verbinding die via een yyEr kan een tekort aan bandbreedte op de 2,4 GHz band zijn die gebruikt wordt door het draadloos LAN. Maak bedrade draadloos LAN op hetzelfde LANverbindingen die niet via een draadloos LAN lopen. netwerk loopt. yyPlaats het apparaat uit de buurt van apparatuur die elektromagnetische straling uitzendt op de 2,4 GHz band (magnetrons, spelconsoles enz.).
Aanhangsel 73 Nl Hoofdstuk 10 Aanhangsel Technische gegevens Algemeen BCS-424/BCS-222 Stroomvereisten AC 110 V tot 240 V, 50 Hz/60 Hz Opgenomen vermogen 190 W (in standby-modus: minder dan 0,5 W) Afmetingen (B x H x D) Circa 430 mm x 345 mm x 62 mm Netto gewicht (circa) 3,4 kg Gebruikstemperatuur 5 °C tot 35 °C Relatieve vochtigheid 5 % tot 85 % Algemeen BCS-FS121 Stroomvereisten AC 110 V tot 240 V, 50 Hz/60 Hz Opgenomen vermogen 105 W (in standby-modus: minder dan 0,5 W) Afmetingen (B x
74 Nl Aanhangsel Versterker BCS-424/BCS-222 Uitgangsvermogen (RMS) THD 30 % Totaal 1100 W Voorzijde 170 W × 2 (4 ohm) Centre 250 W (3 ohm) Achter 170 W × 2 (4 ohm) Sub-Woofer 250 W (3 ohm) Versterker BCS-FS121 Uitgangsvermogen (RMS) THD 30 % Totaal 550 W Voorzijde 170 W × 2 (4 ohm) Sub-Woofer 250 W (3 ohm) Systeem Laser Halfgeleiderlaser Golflengte Standaard PAL/NTSC-kleuren-tv LAN-poort Ethernet-aansluiting x 1, 10BASE-T/100BASE-TX USB-busvoeding DC 5 V 500 mA Luidsprekers BCS-42
Aanhangsel 75 Nl Luidsprekers BCS-222 S-BD122 • Front/surround-luidsprekerbox (links/rechts) Type eenweg Afmetingen (B x H x D) 95 mm x 80 mm x 90 mm Gewogen impedantie 4 ohm Netto gewicht 0,3 kg Type eenweg Afmetingen (B x H x D) 230 mm x 80 mm x 90 mm Gewogen impedantie 3 ohm Netto gewicht 0,7 kg Type eenweg Afmetingen (B x H x D) 200 mm x 340 mm x 270 mm Gewogen impedantie 3 ohm Netto gewicht 3,4 kg • Middenluidspreker • Subwoofer Luidsprekers BCS-FS121 S-BD122FS • Front/surro
76 Nl Aanhangsel Onderhoud Opmerkingen over schijven Omgaan met het apparaat Omgaan met schijven Het apparaat verzenden Bewaar de originele verzenddoos en verpakkingsmaterialen. Als u het apparaat moet verzenden, kunt u het apparaat voor een maximale bescherming weer inpakken zoals het oorspronkelijk in de fabriek is gedaan. Houd het oppervlak van de behuizing schoon • Gebruik geen vluchtige stoffen, zoals insecticiden, in de buurt van het apparaat.
Aanhangsel 77 Nl Belangrijke informatie met betrekking tot de netwerkservices Voor alle informatie, gegevens, documenten, communicaties, downloads, bestanden, teksten, afbeeldingen, foto's, grafische voorstellingen, video's, webcasts, publicaties, hulpprogramma's, bronnen, software, code, programma's, applets, widgets, toepassingen, producten en andere inhoud ('Inhoud') en alle services en aanbiedingen ('Services') die via een derde partij (elk een 'Serviceprovider') wordt geleverd of beschikbaar wordt ge
Información de seguridad Le damos las gracias por la adquisición de este producto Pioneer. Lea a fondo estas instrucciones de utilización para que aprenda a utilizar correctamente su modelo. Después de haber terminado de leer estas instrucciones, guárdelas en un lugar seguro para, en caso de ser necesario, consultarlas en el futuro. IMPORTANTE CAUTION RISK OF ELECTRIC SHOCK DO NOT OPEN La luz intermitente con el símbolo de punta de flecha dentro un triángulo equilátero.
Si la clavija del cable de alimentación de CA de este aparato no se adapta a la toma de corriente de CA que usted desea utilizar, deberá cambiar la clavija por otra que se adapte apropiadamente. El reemplazo y montaje de una clavija del cable de alimentación de CA sólo deberá realizarlos personal de servicio técnico cualificado. Si se enchufa la clavija cortada a una toma de corriente de CA, puede causar fuertes descargas eléctricas.
Notas sobre el copyright • Debido a que AACS (Sistema de Contenido de Acceso Avanzado) está aprobado como sistema de protección de contenidos para el formato de discos Blu-ray, similar al uso del sistema de protección anticopia CSS (Content Scramble System) para el formato DVD, se imponen ciertas restricciones sobre la reproducción, salida de señal analógica, etc., de contenidos protegidos con AACS.
Aviso importante para los sistemas de color de su televisor El sistema de color de este reproductor varía en función de los discos que se están reproduciendo en ese momento. Por ejemplo, cuando la unidad reproduce un disco grabado en el sistema de color NTSC, la imagen se emite como una señal NTSC. El sistema multicolor del televisor es el único que puede recibir todas las señales emitidas por el reproductor.
Índice 1 Antes de comenzar 8 8 8 8 8 16 17 19 20 20 20 Introducción – Accesorios suministrados – Accesorios y cajas de altavoces (BCS-424) – Accesorios y cajas de altavoces (BCS-222) – Accesorios y cajas de altavoces (BCSFS121) – Colocación de las pilas en el control remoto – Actualización del software – Tipos de discos/archivos que se pueden reproducir – Marcas comerciales y licencias Mando a distancia Panel frontal Panel trasero – BCS-424/BCS-222 – BCS-FS121 2 Conexión 21 21 22 22 23 Montaje los a
45 46 46 – Funciones de reproducción Utilizando el menú TOOLS – Reproducción desde un tiempo específico (Búsqueda con tiempo) – Reproducción de un título, capítulo, pista o archivo específico (Búsqueda) – Reproducción de la gama especificada de discos, títulos o capítulos (pistas/archivos) en orden aleatorio – Reproducción continua desde una posición específica (Reproducción de visión continua) 55 5 Reproducción desde Home Media Gallery 67 48 48 50 50 50 51 51 51 51 Acerca de Home Media Gallery – Ace
8 Es Antes de comenzar Capítulo 1 Antes de comenzar 1 Accesorios y cajas de altavoces (BCS-222) Antes de comenzar Introducción Accesorios suministrados Apoyos antideslizantes (5) Tornillos M3.5x12 [del tipo de unión] (4) (Estos tornillos se emplean para fijar los altavoces a los soportes.) Cable de vídeo (1) Mando a distancia (1) Pilas (2) Antena FM (1) Accesorios y cajas de altavoces (BCS-FS121) Apoyos antideslizantes (2) Tornillos M3.
Antes de comenzar Colocación de las pilas en el control remoto 1. Abra la cubierta trasera. 2. Introduzca las pilas (AAA/R03 x 2). Introdúzcalas en su compartimento como indican las marcas +/*. Introduzca primero el lado negativo (*). 3. Cierre la cubierta trasera. Cierre firmemente (deberá oírse un clic). ADVERTENCIA • No utilice ni guarde las pilas a la luz solar directa ni en otros lugares de mucho calor como, por ejemplo, dentro de un automóvil o cerca de una calefacción.
10 Antes de comenzar Es Tipos de discos/archivos que se pueden reproducir 1 Discos que se pueden reproducir Antes de comenzar Se pueden reproducir los discos que tienen los logotipos de abajo en la etiqueta, envoltura o carátula. Aviso • Sólo se pueden reproducir los discos que han sido finalizados.
Antes de comenzar • “Blu-ray Disc”, “Blu-ray” y el logotipo “Blu-ray Disc” son marcas de fábrica de Blu-ray Disc Association. es una marca registrada de DVD Format/Logo Licensing Corporation.
12 Es 1 Antes de comenzar Antes de comenzar Se pueden usar las funciones BONUSVIEW de reproducción de vídeo secundario (imagen en imagen) y de audio secundario. Los datos usados con las funciones BONUSVIEW (datos de vídeo secundario (imagen en imagen) y de audio secundario) pueden guardarse en la memoria. Para conocer detalles de la reproducción de vídeo y audio secundarios, consulte las instrucciones del disco. “BONUSVIEW” es una marca de fábrica de Blu-ray Disc Association.
Antes de comenzar • BD: –– Modelos del R.U.: 2 (incluyendo 2) y ALL –– Modelos de Australia y Nueva Zelanda: 4 (incluyendo 4) y ALL –– Modelos de Rusia: 5 (incluyendo 5) y ALL –– Otros: 3 (incluyendo 3) y ALL Reproducción de CD Acerca de los CD protegidos contra la copia: Este reproductor ha sido diseñado para cumplir con las especificaciones del formato Audio CD. Este reproductor no soporta la reproducción ni las funciones de los discos que no satisfacen estas especificaciones.
14 Es Antes de comenzar Archivos que pueden reproducirse 1 Los archivos de vídeo, imagen y audio grabados en DVD, CD o USB se pueden reproducir. Antes de comenzar Aviso • En los DVD sólo se pueden reproducir los grabados con el sistema de archivos ISO 9660. • Algunos archivos no se pueden reproducir. • Con algunos archivos tal vez no se puedan usar ciertas funciones durante la reproducción.
Antes de comenzar 15 Es Tabla de archivos que pueden reproducirse Medios que pueden reproducirse Red2 File specifications MP3 (.mp3) 1 1 1 Frecuencias de muestreo: Hasta 48 kHz Velocidad de bits: Hasta 320 kbps Tipo de audio: MPEG-1 Audio Layer 3 WMA (.wma) 1 1 1 Frecuencias de muestreo: Hasta 48 kHz Velocidad de bits: Hasta 192 kbps Tipo de audio: WMA versión 9 LPCM (.
16 Es Antes de comenzar Marcas comerciales y licencias 1 Antes de comenzar Los términos HDMI y HDMI High-Definition Multimedia Interface y el logotipo HDMI son marcas de fábrica y marcas registradas de HDMI Licensing, LLC en los Estados Unidos y en otros países. Fabricado bajo licencia de Dolby Laboratories. “Dolby” y el símbolo de la doble D son marcas comerciales de Dolby Laboratories. Fabricado bajo licencia de las patentes de Estados Unidos nos 5.956.674; 5.974.380; 6.226.616; 6.487.535; 7.392.
Antes de comenzar Mando a distancia Es • • • • • • • • • 1• • • • • • • • • (STANDBY/ON): Pulse para conectar y desconectar la alimentación. FUNCTION: Cambia la fuente de entrada o función. 2 Si cambia la entrada mientras está viendo la ventana de visualización en el reproductor 1. Cada vez que pulse FUNCTION, la fuente de entrada cambiará. 2. Seleccione la fuente de entrada deseada y pulse ENTER. 3 Si cambia la entrada mientras está viendo el monitor de televisión 1.
18 Es 1 Antes de comenzar • • • • • • • • • 3• • • • • • • • • • • • • • • • • • 6• • • • • • • • • VIRTUAL 3D SOUND: Cambia los efectos de Sonido Virtual en 3D (Consulte la página 57). Botones numéricos 0-9: Selecciona las opciones numeradas de un menú o ingresa letras en el menú del teclado. Antes de comenzar SOUND: Cambia a los ajustes de Sonido (Consulte la página 57). AUDIO: Consulte la página 43. VOL +/– : Ajusta el volumen de los altavoces.
Antes de comenzar 19 Es Panel frontal 2 3 4 9 1 Bandeja de disco 2 Botones de operación (STANDBY/ON) Enciende o apaga la unidad. Nota Si la unidad no se apaga, pulse el botón (STANDBY/ON) durante más de 5 segundos: la unidad se reiniciará y podrá llevar a cabo la operación. (OPEN/CLOSE) FUNCTION Cambia la fuente de entrada o función. Si cambia la entrada mientras está viendo la ventana de visualización y utiliza el botón del panel frontal 1.
20 Es Antes de comenzar Panel trasero 1 BCS-424/BCS-222 Antes de comenzar 1 2 3 6 7 8 9 5 4a b 3 6 7 8 9 5 4a b BCS-FS121 1 2 1 AC IN Conecta la alimentación eléctrica.
Conexión Capítulo 2 21 Es 3. Monte el altavoz delantero/surround. 1 Pase el cable del altavoz a través del orificio para cables que encontrará en la parte lateral de la base. Conexión Montaje los altavoces Configuración de los altavoces BCS-424 2 1. Conecte los cables al reproductor. Introduzca los cables conectados en el reproductor en el conector del altavoz que presente el mismo color.
22 Es Conexión 5 Utilice los dos tornillos (M4 x 12) para asegurar la estructura superior y la estructura inferior desde la parte lateral del altavoz. Montaje mural de los altavoces BCS-424 El altavoz central presenta un orificio de montaje que puede emplearse para el montaje mural del mismo. Antes del montaje Recuerde que el sistema de altavoces es pesado y que su peso podría hacer que se aflojen los tornillos, o que falle el material de la pared que los sujeta, con una posible caída de los altavoces.
A C A A A A F D F A A A A G B F C C A B A A C D G G A B A A A A A A G Observaciones adicionales A F D A sobre los altavoces BCS-424 A A A A A A Colocación del sistema BCS-424 A Es B C E D E frontale F G di sinistra (L)/ Altoparlante A B Altoparlante C E D E F frontale G di destra (R): A Collocare gli altoparlanti frontali ai lati A E La figura seguente mostra un esempio di posizionamento del sistema.
24 Es Conexión Configuración de los altavoces BCS-222 Montaje mural de los altavoces BCS-222 Preparación de los altavoces Todos los altavoces incluyen un orificio de montaje que puede emplearse para montar el altavoz en la pared. 1. Conecte los cables al reproductor. 2 Introduzca los cables conectados en el reproductor en el conector del altavoz que presente el mismo color.
A C A A A A A G B F F D F A A C C A B A A C D G G A B A A A A A A G Observaciones adicionales A F D sobre los altavoces BCS-222 A A A A A A A G No instale el subwoofer en ninguna pared ni F techo. Podrían caerse o causar lesiones. A A A Es B C E D E frontale F G di sinistra (L)/ Altoparlante A B Altoparlante C E D E F frontale G di destra (R): A Collocare gli altoparlanti frontali ai lati A E La figura seguente mostra un esempio di posizionamento del sistema.
26 Es Conexión Configuración de los altavoces BCS-FS121 Montaje mural de los altavoces BCS-FS121 Preparación de los altavoces Todos los altavoces incluyen un orificio de montaje que puede emplearse para montar el altavoz en la pared. 1. Conecte los cables al reproductor. 2 Introduzca los cables conectados en el reproductor en el conector del altavoz que presente el mismo color.
A C A A G F A D B A A A D A A A E Conexión 27 Es C A G Observaciones adicionales F A A D A A BCS-FS121 sobre los altavoces A Instale los altavoces principales delanteros izquierdo y derecho a la misma distancia del televisor. A A A A A B Precauciones: El subwoofer no está protegido magnéticamente y, por esta razón, no puede colocarse cerca de un televisor o monitor. NoBcoloque medios de almacenaje magnéticos (como discos flexibles y cintas o cassettes deC vídeo) cerca del subwoofer.
28 Es Conexión Conexiones al televisor Realice una de las siguientes conexiones, dependiendo de la capacidad del equipo en cuestión. • Conexión HDMI (página 28) • Conexión del vídeo (página 29) 2 Conexión HDMI Si dispone de un televisor o monitor HDMI, puede conectarlo a este reproductor mediante un cable HDMI (cable HDMI®/™ de alta velocidad). Conecte el terminal HDMI del reproductor al terminal HDMI de un televisor o monitor compatible con HDMI.
Conexión Función ARC (Canal de retorno de audio) La función ARC permite a un televisor con capacidad HDMI enviar audio a la salida HDMI OUT de este reproductor. 29 Es Conexión del vídeo Conecte la toma VIDEO OUT del reproductor a la toma de entrada de vídeo situada en el televisor mediante un cable de vídeo. Puede oír el sonido a través del altavoz del sistema. Para utilizar esta función: -- El televisor deberá ser compatible con la función ARC.
30 Es Conexión Conexión de la antena Conecte la antena suministrada para escuchar la radio. Conexiones con un dispositivo externo Conexión AUX Puede disfrutar del sonido de un componente externo a través de los altavoces de este sistema. 2 Conexión Conecte las tomas de salida de audio analógica al componente en AUX L/R (INPUT) de esta unidad. Y seleccione la opción [AUX] pulsando FUNCTION y ENTER.
Conexión 31 Es Conexión PORTABLE IN Conexión OPTICAL IN 1/2 Puede disfrutar del sonido de su reproductor de audio portátil a través de los altavoces de este sistema. Puede disfrutar del sonido de su componente con una conexión óptica digital a través de los altavoces de este sistema. Conecte la clavija de los auriculares (o salida de línea) del reproductor d audio portátil en la toma PORTABLE IN de esta unidad. Y seleccione la opción [Portable In] pulsando FUNCTION y ENTER.
32 Es Conexión Conexión HDMI IN 1/2 Puede disfrutar de la imagen y sonido de su componente a través de esta conexión. Conecte la clavija HDMI OUT de su componente en la toma HDMI IN 1 o 2 de esta unidad. Y, a continuación, seleccione la opción [HDMI IN 1/2] pulsando FUNCTION y ENTER. 2 Parte trasera de la unidad Conexion del ADAPTADOR Bluetooth® opcional Cuando el ADAPTADOR Bluetooth (Modelo de Pioneer No.
Conexión Conexión a la red doméstica Este reproductor puede conectarse a una red de área local (LAN) a través del puerto LAN del panel trasero. Al conectar la unidad a una red particular de banda ancha, tiene acceso a servicios como interactividad BD-LIVE y servicios en línea. 2 Para más información consulte la documentación del dispositivo de red. PC y/o servidor certificado DLNA Nota • Cuando enchufe o desenchufe el cable LAN, hágalo sujetando el cable por el enchufe.
34 Es Conexión Notas sobre la conexión de red: 2 Conexión • Muchos de los problemas de conexión a la red que se producen durante la configuración pueden resolverse a menudo reiniciando el router o cable módem. Después de conectar el reproductor a la red doméstica, apague inmediatamente y/o desconecte el cable de alimentación del router o cable módem de la red doméstica. Después, encienda y/o conecte de nuevo el cable de alimentación.
Conexión Conexión de dispositivos USB Acerca de los aparatos USB Los aparatos USB que se pueden conectar al reproductor se muestran más abajo. • Sistema de archivos FAT16 ó FAT32, capacidad mínima de 1 GB (se recomiendan 2 GB o más) Es • Si hay más de un dispositivo USB conectado, el número que aparecerá para el dispositivo USB podrá variar en función del tipo de dispositivo conectado o de las circunstancias. Para confirmar el número del dispositivo USB, vaya a [HOME MENU] [Home Media Gallery].
36 Es Operaciones a realizar Capítulo 3 Operaciones a realizar Ajustes utilizando el menú Setup Navigator Asegúrese de hacer estos ajustes cuando use el reproductor en las situaciones siguientes. 3 • Cuando use el reproductor por primera vez. • Después de formatear Initial Setup. Operaciones a realizar • Después de actualizar el software del reproductor.
Operaciones a realizar 37 Es Control del TV con el mando a distancia del reproductor Cuando el código del fabricante para su marca de TV se establezca en el mando a distancia del reproductor, el TV podrá controlarse con el mando a distancia del reproductor. Aviso • Para algunos modelos puede que no sea posible controlar el TV con el mando a distancia del reproductor, incluso con TV cuya marca aparezca en la lista de códigos del fabricante. 1. Introduzca el código de 2 dígitos del fabricante.
38 Es Operaciones a realizar Lista de códigos de preajuste del TV Códigos de Fabricante 3 Operaciones a realizar PIONEER 00, 31, 32, 07, 36, 42, 51, 22 ACURA 44 ADMIRAL 31 AIWA 60 AKAI 32, 35, 42 AKURA 41 ALBA 07, 39, 41, 44 AMSTRAD 42, 44, 47 ANITECH 44 ASA 45 ASUKA 41 AUDIOGONIC 07, 36 BASIC LINE 41, 44 BAUR 31, 07, 42 BEKO 38 BEON 07 BLAUPUNKT 31 BLUE SKY 41 BLUE STAR 18 BPL 18 BRANDT 36 BTC 41 BUSH 07, 41, 42, 44, 47, 56 CASCADE 44 CATHAY 07 CENTURION 07 CGB 42 CIMLINE 44 CLARIVOX 07 CLATRONIC 38 CO
Reproducción Capítulo 4 Reproducción Reproducción de discos o archivos Esta sección describe las operaciones principales del reproductor. Para los tipos de discos y archivos que pueden reproducirse, vea página 6. Los archivos de vídeo, imagen y audio grabados en discos se reproducen con Home Media Gallery (página 48). 1. Pulse u STANDBY/ON para conectar la alimentación. Encienda el TV y cambie su entrada de antemano. Nota yy Meta el disco con la cara impresa hacia arriba.
40 Es Reproducción Exploración hacia adelante o hacia atrás Durante la reproducción, pulse mREV o nFWD. yy La velocidad de exploración cambia cada vez que se pulsa el botón. Los pasos de velocidad dependen del disco o archivo (la velocidad se visualiza en la pantalla del TV). Para reanudar la reproducción normal Pulse d PLAY. Reproducción de capítulos, pistas o archivos específicos 4 Reproducción Durante la reproducción, introduzca el número de capítulos/pistas/archivos que quiera seleccionar.
Reproducción Reproducción repetida (Repetición de reproducción) Use este procedimiento para reproducir repetidamente el disco, título, capítulo, pista o archivo que se reproduce actualmente. Durante la reproducción, pulse REPEAT. yy Cada vez que pulsa REPEAT, el tipo de modo de repetición cambia como se muestra más abajo.
42 Es Reproducción Zoom Cambio de los subtítulos Durante la reproducción, pulse ZOOM. yy Cada vez que pulsa ZOOM, el nivel del zoom cambia como se muestra más abajo. Para los discos o archivos con múltiples subtítulos grabados, los subtítulos se pueden cambiar durante la reproducción. Zoom 2x d Zoom 3x d Zoom 4x d Zoom 1/2 d Zoom 1/3 d Zoom 1/4 d Normal (no se visualiza) Nota yy Esta función no se activa con algunos discos.
Reproducción Cambio del audio Para los discos o archivos con múltiples series/canales de audio grabados, las series/ canales de audio se pueden cambiar durante la reproducción. Durante la reproducción, pulse AUDIO. yy El audio actual y el número total de series de audio grabadas se visualizan en la pantalla del TV. Para cambiar el audio, pulse de nuevo AUDIO. yy El audio también se puede cambiar seleccionando Audio desde el menú TOOLS.
44 Es Reproducción Para disfrutar de BONUSVIEW o BD-LIVE Este reproductor es compatible con BD-Video BONUSVIEW y BD-LIVE. Cuando se usan discos BD-Video compatibles con BONUSVIEW se puede disfrutar de funciones como vídeo secundario (imagen en imagen) (página 46) y audio secundario (página 46). Con discos BD-Video compatibles con BD-LIVE se pueden descargar de Internet imágenes de vídeo especiales y otros datos.
Reproducción 45 Es Funciones de reproducción Las funciones que pueden usarse cambian según el tipo de disco y el archivo. En algunos casos no se pueden usar algunas de las funciones. Verifique en la tabla de abajo las funciones que pueden usarse.
46 Reproducción Es Utilizando el menú TOOLS Se pueden recuperar varias funciones según el estado de funcionamiento del reproductor. 1. Visualice el menú TOOLS. Pulse TOOLS durante la reproducción. 2. Seleccione y establezca el elemento. Use / para seleccionar y luego pulse ENTER. Elemento Bitrate Still off Ins Search Ins Replay Slide Show Transition Nota yy Los elementos que no se pueden cambiar se visualizan en gris. Los elementos que pueden seleccionarse dependen del estado del reproductor.
Reproducción Reproducción de un título, capítulo, pista o archivo específico (Búsqueda) 1. Seleccione Title o capítulo (pista/ archivo). Use / para seleccionar y luego pulse ENTER. 2. Introduzca el número del título o capítulo (pista/archivo). Use los botones de números (0 a 9) o / para introducir el número. yy Para buscar el título 32, pulse 3 y 2, luego pulse ENTER. yy Pulse CLEAR para cancelar los datos introducidos.
48 Es Reproducción desde Home Media Gallery Capítulo 5 Reproducción desde Home Media Gallery Acerca de Home Media Gallery • Home Media Gallery le permite reproducir archivos en servidores de medios conectados a un Área de Red Local (LAN) idéntica a la que está conectado el receptor.
Reproducción desde Home Media Gallery El logotipo con el certificado DLNA permite encontrar fácilmente los productos que cumplen las directrices de interoperabilidad de DLNA. Esta unidad cumple con las directrices de interoperabilidad DLNA v1.5. Cuando un PC que use software de servidor DLNA u otro aparato compatible con DLNA se conecte a este reproductor, puede que sea necesario hacer algunos cambios de software o de otros aparatos.
50 Es Reproducción desde Home Media Gallery Reproducción de archivos en la red 1. Pulse HOME MEDIA GALLERY para visualizar Home Media Gallery. Home Media Gallery también se puede visualizar seleccionando [Home Media Gallery] desde Home Menu y luego pulsando ENTER. 2. Seleccione el servidor que tiene el archivo que quiere reproducir. 3. Seleccione el archivo que quiera reproducir. Use / para seleccionar y luego pulse ENTER. Para terminar Home Media Gallery Pulse HOME MEDIA GALLERY.
Reproducción desde Home Media Gallery Reproducción en el orden deseado (Playlist) Abajo se muestran los discos que pueden añadir pistas y archivos a Playlist. • DVD/CD/aparatos USB con archivos de audio grabados Adición de pistas/archivos Use este procedimiento para añadir pistas y archivos, y para crear la Playlist. 1. Pulse HOME MEDIA GALLERY para visualizar Home Media Gallery. Home Media Gallery también se puede visualizar seleccionando Home Media Gallery desde Home Menu y luego pulsando ENTER. 2.
52 Es Reproducción de contenido de Web Capítulo 6 Reproducción de contenido de Web Con el reproductor puede disfrutar de algún contenido de streaming en Internet. Contenido de Web disponible • YouTube (MPEG4 AVC H.264) • Picasa Nota 6 Reproducción de contenido de Web Acerca de YouTube • Puede reproducir vídeos de YouTube de los tamaños siguientes.
Otras operaciones Capítulo 7 Otras operaciones Cómo grabar un Audio CD en un dispositivo USB Este reproductor permite grabar discos Audio CD en dispositivos USB. 1. Introduzca un dispositivo USB en el puerto USB del panel frontal. Nota yy Únicamente deberá introducir un solo dispositivo USB. 2. Abra la bandeja del disco y coloque un CD en el interior. Pulse OPEN/CLOSE. 3. Cierre la bandeja del disco. Cuando pulse OPEN/CLOSE, la reproducción se iniciará de forma automática.
54 Es Otras operaciones Funcionamiento de la radio Asegúrese de que tanto la antena aérea de FM están conectadas. (Consulte la página 30) Escuchar la radio 1. Pulse FUNCTION hasta que en la pantalla de visualización se muestre FM; a continuación, pulse ENTER. Se sintonizará la última emisora recibida. 2. La exploración comenzará al pulsar el botón o el botón . O Pulse / varias veces. O Pulse varias veces TUNE –/+ en el panel frontal del reproductor. 3.
Otras operaciones ADAPTADOR Bluetooth® para el disfrute inalámbrico de la música • Dispositivo habilitado de tecnología Bluetooth inalámbrica: teléfono móvil • Dispositivo habilitado de tecnología Bluetooth inalámbrica: Reproductor de música digital • Dispositivo no equipado con tecnología Bluetooth inalámbrica: Reproductor de música digital + transmisor de audio con Bluetooth (de venta en tiendas) Reproducción inalámbrica de música Cuando el ADAPTADOR Bluetooth (Modelo de Pioneer No.
56 Es Otras operaciones Nota • Esta unidad no es compatible con AVRCP. • Esta unidad no es compatible con el Perfil de Auriculares Mono (Perfil de Manos Libres). • Esta unidad no permite hacer funcionar un dispositivo equipado con tecnología inalámbrica Bluetooth. • Esta unidad no se puede emplear para escuchar sonidos de 1 segundo en un dispositivo equipado con tecnología inalámbrica Bluetooth. Los contenidos de música protegidos por SCMS-T no se pueden escuchar.
Otras operaciones 57 Es Sonido Pulse SOUND en el mando a distancia para que en la pantalla del televisor se muestre el menú de selección de sonidos. Utilice el botón de cursor para efectuar una selección; a continuación, pulse ENTER. Para salir del menú Sound, pulse SOUND. Nota • Si ha seleccionado HDMI IN 1 o HDMI IN 2, el menú Sound no se podrá mostrar. Cambie a otra fuente de entrada y pulse entonces Sound.
58 Es Ajustes avanzados Ajustes avanzados Utilización de la pantalla Initial Setup Cambio de los ajustes 1. Visualice la pantalla Home Menu cuando pare la reproducción. HOME MENU. Pulse Capítulo 8 2. Seleccione y establezca Initial Setup. Use / para seleccionar y luego pulse ENTER. 3. Seleccione el elemento y cambie el ajuste. Use / / / para seleccionar y luego pulse ENTER. Cierre de la pantalla Initial Setup Pulse HOME MENU o RETURN.
Ajustes avanzados 59 Es Audio Output Configuración Options DRC (Control de gama dinámica) Off Explicación Seleccione esto para dar salida a señales de audio sin usar la función DRC. On Seleccione esto para ajustar la gama entre los sonidos más altos y más bajos (gama dinámica) para reproducir con un volumen de promedio. Use esto cuando sea difícil oír los diálogos o cuando vea programas a medianoche.
60 Es Ajustes avanzados Network Configuración Options IP Setting Seleccione esto para poner la dirección IP del reproductor y del servidor DNS (página 62). Proxy Server Establezca solamente el servidor representante si así se lo indica el proveedor de servicios de Internet (página 63). Information Visualiza los valores de la dirección MAC, la dirección IP, la máscara de subred, la entrada predeterminada, el servidor DNS (primario) y el servidor DNS (secundario).
Ajustes avanzados Configuración Setup Navigator Options 61 Explicación Empiece a hacer los ajustes usando el menú Setup Navigator. Para conocer detalles, consulte página 36. Security Options Change Password Registre (cambie) la contraseña para los ajustes del bloqueo de los padres o para desbloquear y reproducir DVD-Video con el bloqueo de los padres (página 64). Parental Control Cambie el nivel del bloqueo de los padres fijado en el reproductor (página 64)..
62 Es Ajustes avanzados Ajuste de vídeo 1. Seleccione y ajuste Display Setting d Video Adjust d Next Screen. Use / para seleccionar y luego pulse ENTER. 2. Seleccione el elemento y cambie el ajuste. Use / para seleccionar el elemento y luego use / para cambiar el ajuste. Una RETURN vez completado el ajuste, pulse para cerrar la pantalla de ajustes. Elemento Descripción Brightness Seleccione esto para ajustar el brillo de la pantalla del TV.
Ajustes avanzados Selección del servidor representante Establezca solamente el servidor representante si así se lo indica el proveedor de servicios de Internet. 1. Seleccione y establezca Network d Proxy Server d Next Screen. Use / para seleccionar y luego pulse ENTER. 2. Seleccione y establezca Use o Not use en Proxy Server. Use / para cambiar y luego pulse . yy Use – Seleccione esto cuando use un servidor representante. yy Not use – Seleccione esto cuando no use un servidor representante.
64 Es Ajustes avanzados Registre o cambie la contraseña Use este procedimiento para registrar o cambiar el número de código requerido para los ajustes de bloqueo de los padres. Acerca de la contraseña predeterminada de esta unidad La contraseña predeterminada es [0000]. yy Esta unidad puede pedirle que introduzca una contraseña cuando cambie la contraseña. yy Si repone esta unidad, su contraseña pasará a ser automáticamente la predeterminada. 1.
Ajustes avanzados Actualización del software El software del reproductor se puede actualizar con uno de los métodos indicados más abajo. • Conectando a Internet. • Usando un disco. • Uso de una unidad flash USB. En el sitio Web de Pioneer se ofrece información de este reproductor. Visite el sitio Web mostrado en la página 9 para actualizar y obtener información de servicio de su reproductor de discos Blu-ray.
66 Es Ajustes avanzados Actualización usando una unidad flash USB/disco Nota Ajustes avanzados yy Cuando se provee un archivo de actualización en el sitio Web de Pioneer, use su ordenador para descargarlo a una unidad flash USB o a un disco. Lea atentamente las instrucciones de descarga de archivos de actualización provistos en el sitio Web de Pioneer. yy Guarde el archivo de actualización en el directorio raíz de la unidad flash USB o en un disco. No lo guarde dentro de una carpeta.
Ajustes avanzados 67 Es Tabla de códigos de idioma y tabla de códigos de países/área Tabla de códigos de idiomas Nombre de idioma, código de idioma, código de entrada French, fr/fra, 0618 Galician, gl/glg, 0712 Georgian, ka/kat, 1101 German, de/deu, 0405 Greek, el/ell, 0512 Guarani, gn/grn, 0714 Gujarati, gu/guj, 0721 Hausa, ha/hau, 0801 Hebrew, iw/heb, 0923 Hindi, hi/hin, 0809 Hungarian, hu/hun, 0821 Icelandic, is/isl, 0919 Indonesian, in/ind, 0914 Interlingua, ia/ina, 0901 Interlingue, ie/ile, 0905 In
68 Es Solución de problemas Capítulo 9 Solución de problemas La operación incorrecta se confunde a menudo con un problema o un fallo de funcionamiento. Si piensa que algo funciona mal con este componente, compruebe los puntos de abajo. Algunas veces, el problema puede estar en otro componente. Inspeccione los otros componentes y los aparatos eléctricos que esté utilizando.
Solución de problemas 69 Es Sonido Problema yyNo sale sonido. yyNo sale correctamente el sonido. Verificación yy¿Se reproduce el disco a cámara lenta? yy¿Se reproduce el disco en avance o retroceso rápido? ¿Están bien conectados los cables? ¿Está dañado el cable de audio? No sale el sonido multicanal. No se escucha ningún sonido por el altavoz surround ni por el central.
70 Es Solución de problemas Función de control Problema La función de control no funciona.
Solución de problemas Problema No se puede acceder al componente u ordenador conectado a través de la red. No se inicia la reproducción. Verificación El componente conectado tiene instalado software de seguridad de Internet. Se enciende el componente de audio de la red que había sido apagado El componente conectado a la red no están bien ajustado. 71 Es Remedio Hay casos en los que no se puede acceder a un componente que tiene instalado software de seguridad de Internet.
72 Es Solución de problemas Problema Verificación Remedio Hay un tráfico pesado debido al Use 100BASE-TX para acceder a los componentes de la red. acceso a Internet en la misma red. Cuando hay una conexión yyEs posible que falte ancho de banda en la banda de 2,4 GHz utilizada enrutada a través de una LAN por la LAN inalámbrica. Efectúe conexiones de LAN alámbricas que inalámbrica en la misma red. no estén enrutadas a través de una LAN inalámbrica.
Apéndice 73 Es Capítulo 10 Apéndice Especificaciones General BCS-424/BCS-222 Requisitos de alimentación AC 110 V a 240 V, 50 Hz/60 Hz Consumo de energía 190 W (En modo de reposo: menos de 0,5 W) Dimensiones (An x Al x Pr) Aprox. 430 mm x 345 mm x 62 mm Peso neto (aprox.
74 Es Apéndice Amplificador BCS-424/BCS-222 Salida de potencia (RMS) THD 30 % Total 1100 W Parte anterior 170 W × 2 (4 Ω) Centro 250 W (3 Ω) Parte trasera 170 W × 2 (4 Ω) Subwoofer 250 W (3 Ω) Amplificador BCS-FS121 Salida de potencia (RMS) THD 30 % Total 550 W Parte anterior 170 W × 2 (4 Ω) Subwoofer 250 W (3 Ω) Sistema Láser Láser semiconductor Sistema de señal Sistema de televisor a color PAL/NTSC estándar Puerto LAN Toma Ethernet x 1, 10BASE-T/100BASE-TX Alimentación bus (USB) D
Apéndice 75 Es Altavoces BCS-222 S-BD122 • Altavoz delantero/Surround (Izquierdo/Delantero) Tipo 1 vía Dimensiones netas (An x Al x Pr) 95 mm x 80 mm x 90 mm Relación de impedancia 4Ω Peso neto 0,3 kg Tipo 1 vía Dimensiones netas (An x Al x Pr) 230 mm x 80 mm x 90 mm Relación de impedancia 3Ω Peso neto 0,7 kg Tipo 1 vía Dimensiones netas (An x Al x Pr) 200 mm x 340 mm x 270 mm Relación de impedancia 3Ω Peso neto 3,4 kg • Altavoz central • Subwoofer Altavoces BCS-FS121 S-BD122FS •
76 Es Apéndice Mantenimiento Notas sobre los discos Manejo de la unidad Manejo de los discos Durante el transporte de la unidad Conserve la caja y los materiales de embalaje originales. Si necesita enviar de nuevo la unidad, para una máxima protección de la misma, empaquétela como venía de fábrica. Almacenamiento de los discos • No utilice líquidos volátiles, como insecticidas, cerca de la unidad. Tras la reproducción, guarde el disco en su caja.
Apéndice 77 Es Información importante relacionada con los servicios de red Toda la información, datos, documentos, comunicaciones, descargas, archivos, texto, imágenes, fotografías, gráficos, videos, webcasts, publicaciones, herramientas, recursos, software, código, programas, applets, widgets, aplicaciones, productos y demás contenido (“el Contenido”) y todos los servicios y ofertas (“los Servicios”) proporcionados por o a través de una tercera parte (consideradas cada una un “proveedor de servicios”) se
http://www.pioneer.fr http://www.pioneer.de http://www.pioneer.it http://www.pioneer.nl http://www.pioneer.be http://www.pioneer.es http://www.pioneer.eu 3,21((5 &25325$7,21 $OO ULJKWV UHVHUYHG 3,21((5 &25325$7,21 7RXV GURLWV GH UHSURGXFWLRQ HW GH WUDGXFWLRQ UpVHUYpV PIONEER CORPORATION 1-1, Shin-ogura, Saiwai-ku, Kawasaki-shi, Kanagawa 212-0031, Japan PIONEER ELECTRONICS (USA) INC. P.O. BOX 1540, Long Beach, California 90801-1540, U.S.A.