
User guide


06
46
En
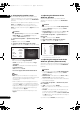
Setting the output terminals
Set the terminals from which the player’s video and audio
signals are to be output.
1 Select and set Options Output Terminal
Next Screen.
Use / to select, then press ENTER.
2 Select and set the video and audio output
terminals.
Select the actually connected video and audio output
terminals.
Use /// to select, then press ENTER.
For details on the settings, refer to step 4 on page 19.
When COMPONENT or VIDEO is selected for Video, no
sound is output from the HDMI OUT terminal (a warning
message is displayed).
Software updating
The software of the player can be updated by connecting
it to the Internet using a LAN cable.
Before updating the software, make sure that you have
connected the player to the network and made the
necessary settings (pages 18 and 43).
Caution
•Do not unplug the power cord during software
updating. Otherwise, the updating will be aborted and
malfunction may occur with the player.
•There are two processes for software updating,
downloading and updating. Both processes may take
a certain period of time.
•Depending on the Internet connection conditions,
downloading may take a long time.
•Other operations are defea
ted duri
ng software
updating. Furthermore updating process cannot be
canceled.
•When the front panel display is off, turn it on with FL
DIMMER. When updating the player’s software with
the front panel display off, do not unplug the power
cord until the FL OFF indicator turns off.
Note
•Steps 1 to
4 are the operations performed by the user
(they are intended to download the software from the
Internet).
•Steps 5 to
7 are the operations performed
(automatically) by the player (they are intended to
update the software).
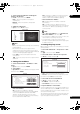
1 When playback is stopped, display the Home
Menu screen.
Press HOME MENU.
2 Select and set Initial Setup.
Use / to select, then press ENTER.
3 Select and set Options Software Update
Start.
Use / to select, then press ENTER.
•If the player is already running the latest software, the
message “The player’s software is up to date and does
not need updating.” is displayed.
4 Select and set Yes.
Use / to select Yes, then press ENTER.
•The help menu is displayed if the player ca
nnot
co
nnect to the Internet. Check the connections and
settings (pages 18 and 43).
5 Downloading of the software start.
The software download status is displayed on the screen.
•Depending on the Internet connection conditions,
software downloading may take a certain period of
time.
6 Updating starts.
The front panel display shows messages such as
“DATA CHECK”, “WRT SYS1”, “WRT DRV” and “WRT
FLC”.
• Softwar e updating may take a certain period of time.
7 Updating completes.
The front panel display shows “DOWNLOAD OK” and
the player turns off automatically.
Restoring all the settings to
the factory default settings
1 Check that the player’s power is turned on.
2 When a disc is playing, press to stop playback.
Eject the disc from the player.
3 While pressing , press STANDBY/ON.
Operate using the buttons on the player’s front panel.
Note
•After restoring all the settings to the factory default
settings, use Setup Navigator to reset the player
(page 19).
• When all the settings are restored to the factory
defaults, all the data for the secondary video (Picture-
in-Picture), secondary audio, bookmarks, etc., is
erased.
320_UXJCA_EN.book 46 ページ 2009年2月13日 金曜日 午後4時26分