Operating Instructions Blu-ray Disc PLAYER
Thank you for buying this Pioneer product. Please read through these operating instructions so you will know how to operate your model properly. After you have finished reading the instructions, put them away in a safe place for future reference.
If the AC plug of this unit does not match the AC outlet you want to use, the plug must be removed and appropriate one fitted. Replacement and mounting of an AC plug on the power supply cord of this unit should be performed only by qualified service personnel. If connected to an AC outlet, the cut-off plug can cause severe electrical shock. Make sure it is properly disposed of after removal.
Contents 01 Before you start 06 Using the Home Media Gallery Features . . . . . . . . . . . . . . . . . . . . . . . . . . . . . . . . . . . . . . . . . . . . What’s in the box . . . . . . . . . . . . . . . . . . . . . . . . . . . . . . . . . . . . . Putting the batteries in the remote control. . . . . . . . . . . . . . . . . . Using the remote control . . . . . . . . . . . . . . . . . . . . . . . . . . . . . . . Disc/content format playback compatibility . . . . . . . . . . . . . . . . .
Chapter 1 01 Before you start Features BD-ROM playback Blu-ray Disc is a next-generation video disc format featuring far higher disc capacity than conventional DVD. The higher capacity makes a whole range of new and enhanced features possible, such as support for high-definition video up to 1920 x 1080 pixels, high quality, surround sound audio, greater interactivity and richer content.
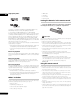
01 High quality audio • HDMI cable • LAN cable • Power cable • Warranty card Putting the batteries in the remote control • Insert two AA/R6P batteries into the battery compartment following the indications (,) inside the compartment. This player is compatible with Dolby TrueHD, Dolby Digital Plus, DTS-HD High Resolution Audio, Dolby Digital and DTS.
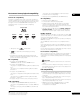
Disc/content format playback compatibility – This player can also play DVD discs containing PC data. See below for the file compatibility. 01 • This player cannot play DVD-Audio and DVD-RAM discs. General disc compatibility This player is compatible with a range of disc types (media) and formats. Compatible discs will usually feature one of the following logos on the disc and/or disc packaging.
• Please note, the following file naming structure needs to be adhered to when creating/renaming any digital media to be played on the unit (either through computer-created disc media, or the Home Media Gallery connection). This disclaimer does not apply to any media purchased at retail locations: Due to the coding system used, this player will only read/play files named using standard alphanumeric characters. Any other characters or symbols (e.g.
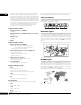
Chapter 2 02 Connecting up Rear panel 1 2 3 CONTROL 4 5 6 7 8 IN IR AC IN 9 AUDIO OUT (5.1ch) Y IN CENTER VIDEO OUT SETTING 2 HDMI OUT PB LAN(100) L DIGITAL AUDIO OUT AUDIO OUT (2ch) FRONT SURROUND L SETTING 1 IR RECEIVER S R PR COMPONENT VIDEO OUT COAXIAL OPTICAL SUB WOOFER R 10 11 1 AC IN Connect the supplied power cord here, then plug into a power outlet. 8 AUDIO OUT (5.1ch) Multi-channel (5.
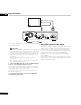
02 Easy connections To audio input To video input TV CONTROL IN IR AC IN AUDIO OUT (5.1ch) Y IN CENTER VIDEO OUT SETTING 2 HDMI OUT PB LAN(100) AUDIO OUT (2ch) FRONT SURROUND L DIGITAL AUDIO OUT L SETTING 1 IR RECEIVER S R PR COMPONENT VIDEO OUT COAXIAL OPTICAL SUB WOOFER R To power outlet This is a basic setup that allows you to watch discs on your TV using just the cables supplied. Important • This player is equipped with copy protection technology.
Connecting for HDMI output If you have an HDMI or DVI (with HDCP) equipped monitor or display, you can connect it to this player using the supplied HDMI cable. The HDMI connector outputs uncompressed digital video, as well as most digital audio formats. Important • This unit has been designed to be compliant with HDMI (High-Definition Multimedia Interface). Depending on the component you have connected, using a DVI connection may result in unreliable signal transfers.
02 Changing the output video resolution Use the OUTPUT RESOLUTION button located on both the front panel and the remote control to switch the output video resolution for the HDMI and component video outputs. The table below shows the output settings. 24p output For smooth presentation of 1080/24p or 720/24p video with an HDMI-equipped display compatible with 1080/24p input, set 24p Direct Out (page 39) on this player to On.
Connecting for surround sound Analog connections This player offers both analog and digital connections for surround sound. The digital outputs (coaxial and optical) provide a convenient way to connect this player to an AV receiver with built-in Dolby Digital and/or DTS decoders. The 5.1ch analog outputs can be used to connect to an AV receiver with multi-channel analog audio inputs. Check the operating instructions that came with your AV receiver for more on these connections.
02 Network connection Connecting directly to a PC This player can be connected to a local area network (LAN) via the Ethernet port on the rear panel. After making the physical connection the player needs to be set up for network communication. This is done from the Initial Setup menu — see Setting up for network use on page 19 for detailed instructions. If you only need to use one PC to act as a media server, you can connect this player directly to the PC using the included LAN cable.
Using an external IR receiver with this player 02 If you prefer to keep your AV equipment in a closed cabinet, you can use an external IR receiver connected to the IR IN jack. You can thus have just the receiver outside of the cabinet and still be able to control the player. IR receiver CONTROL IN IR AUDIO OUT (5.
03 Chapter 3 Controls and displays Front panel 1 2 3 4 5 10 1 STANDBY/ON Press to switch the player on (the power indicator and indicator in the middle of the unit light up when the power is on) or into standby. 2 Disc tray 9 6 6 (play) Press to start or resume playback. 7 (stop) Press to stop playback (you can resume playback by pressing ). 8 (pause) (pause) Press to pause playback. Press again to restart.
Remote control 9 DISPLAY Press to display information (see page 23). 03 10 ANGLE Press to change the camera angle during BD-ROM or DVD-Video movie multi-angle scene playback (see page 23). STANDBY/ON 1 FL DIMMER OPEN/CLOSE 3 2 HOME MEDIA GALLERY 5 4 6 CLEAR 7 8 11 13 ENTER AUDIO SUBTITLE ANGLE OUTPUT RESOLUTION DISPLAY POPUP MENU DISC NAVIGATOR ENTER HOME MENU RETURN 15 RED GREEN YELLOW BLUE 13 /// and ENTER Use to navigate on-screen displays and menus.
04 Chapter 4 Getting Started Switching on and setting up When you switch the player on for the first time the Setup Navigator screen appears. We recommend using this to make a few basic player settings. 4 Press ENTER to start setting up using the Setup Navigator. Setup Navigator Before using, make some simple settings for the BD player. Start Cancel Please use the Initial Setup if you want to make more detailed settings.
7 Select ‘Finish Setup’ to accept the settings and exit the Setup Navigator, or ‘Go Back’ to go through the settings again. 4 Use the on-screen keypad to enter a name for the player. This is how the player will appear to connected devices on the local area network. Setup Navigator 04 Device name input Setup is complete! Enjoy using your BD player! Finish Setup Go Back You can run the Setup Navigator at any time by selecting it from the Options menu — see page 41.
04 Playing movies, music and photos Using this player, you can enjoy watching movies, listening to music and browsing photos, from DVD discs or from a media server on the network. How you navigate, browse and play content varies according to the format of the content and the media: • To play a DVD movie disc (i.e., one containing DVD-Video application format), see Playing BD/DVD movies and Audio CD below.
Playback controls • Some actions in the Disc Navigator/Home Media Gallery (such as changing the Browse category) will cause the resume position to be lost. 04 Scanning video and audio CLEAR AUDIO ENTER SUBTITLE ANGLE OUTPUT RESOLUTION DISPLAY You can fast-scan BD/DVD movies or Audio CDs, forward or backward at various speeds. 1 During playback, press or to start scanning. There is no sound while scanning video and audio. 2 Press repeatedly to increase the scanning speed.
04 Playing video in slow motion The available options depend on what kind of disc/file is playing (=available/=unavailable):1 You can play BD and DVD movies at different forward slow motion speeds. Disc/file type BD-ROM PC File (Music) PC File (Movie) PC File (Photo) Audio CD Time Search Title Search Repeat Chapter 3 To resume normal playback, press .
Switching camera angles • There may be a short delay after pressing the button for the audio channel to change. ANGLE Some BD and DVD movies feature scenes shot from two or more angles — check the disc box for details. • During playback, press ANGLE to switch the angle. • There may be a short delay after pressing the button before the angle changes. • Playback resumes if the angle is changed while paused.
04 Frequently Asked Questions • Why won’t the disc I loaded play? First check that you loaded the disc the right way up (label side up), and that it’s clean and not damaged. See Taking care of your player and discs on page 44 for information on cleaning discs. If a disc loaded correctly won’t play, it’s probably an incompatible format or disc type. See Disc/content format playback compatibility on page 7 for more on disc compatibility.
Chapter 5 05 Using the Disc Navigator Use the Disc Navigator to browse through the PC files on a DVD-R/ -RW disc to find what you want to play. You can use the Disc Navigator when a disc is playing or stopped. Important • It’s not possible to use the Disc Navigator with DVD-Video discs, or with Audio CDs. Introduction Most of the features described in this chapter make use of on-screen displays. Navigate these using the /// and ENTER. To go back to the previous menu or screen, use the RETURN button.
05 Searching movies Displaying the browse menu • Press to display the browse menu: All Movies All Movies Browse Search Sort 20 items Scallop-man 3 1:31 Closer Discount store 1:02 1:31 School of legend 1:25 Advance in the future part-2 The EEL 1:33 1:26 World Baseball 1:57 Dream on the way Finding a southpaw 1:36 1:18 Dear Customer 1:18 From the Search sub-menu you can enter a few (up to 20) characters of a movie title or genre.
4 Use the / buttons to change the current selection (highlighted in yellow). • Press ENTER to start full-screen slideshow playback from the currently selected photo. Browsing photos The browse sub-menu gives you several ways to browse photos. Folder1 • Press to start or resume slideshow playback from the last photo displayed. 30 items Go back file_001 file_002 file_003 Displaying the Photo Options menu • 05 Go back Press to display the Photo Options menu.
05 Music Navigator Displaying the Song Options menu The music section of the Disc Navigator allows you to browse and play all the compatible music files found on the loaded DVD-R/-RW disc (non-music files are not displayed). • Press to display Song Options menu: Acoustic Guitar Electrified See also File compatibility on page 7 for more on compatible file types.
Browsing songs Now playing song information The browse sub-menu gives you various ways to browse songs.
06 Chapter 6 Using the Home Media Gallery Introduction The Home Media Gallery allows you to browse and play movies, music and photos stored on media servers connected on an identical Local Area Network (LAN) as the player.
Using the Home Media Gallery Movie Navigator Before using the Home Media Gallery, make sure that you have connected the player to the network and made the necessary settings. See Network connection on page 14 and Setting up for network use on page 19 for more information. From the movie section of the Home Media Gallery you can browse and play all the compatible movie files found on your local area network (non-movie files are not displayed).
06 Searching movies Displaying the browse menu • Press to display the browse menu: All Movies All Movies Browse Search Sort Movie Sources 1214 items Scallop-man 3 1:31 Closer Discount store 1:02 1:31 School of legend 1:25 Advance in the future part-2 The EEL 1:33 1:26 World Baseball 1:57 Dream on the way Finding a southpaw 1:36 1:18 Dear Customer 1:18 From the Search sub-menu you can enter a few (up to 20) characters of a movie title or genre.
Photo Navigator Displaying the browse menu The photo section of the Home Media Gallery allows you to browse and display all the compatible photo files found on your local area network (non-photo files are not displayed). Summer_Vacation See also File compatibility on page 7 for more on compatible file types. 1 If you haven’t already done so, select ‘Home Media Gallery’ from the Home Menu, then ‘Photos’. You should see a list of albums from the selected server.
06 • Folders: Display a list of folders and photo files. Select a folder and press ENTER to see a list of photos and subfolders within the folder. (The folder configuration may change depending on the server type.) 2 Use the / buttons to change the current selection (highlighted in yellow). 3 Press ENTER to display the album list. Searching photos Pioneer All Stars From the Search sub-menu you can enter a few (up to 20) characters of a photo title.
Displaying the browse menu • • Quicklist: Display a list of all the songs currently in your Quicklist.
06 About Windows Media Player 11/Windows Media Connect Windows Media Player 11/Windows Media Connect is software to deliver music, photos and movies from a Microsoft Windows XP computer to home stereo systems and TVs. The same function is also available in Windows Media Player 11. With this software, you can play back files stored on the PC through various devices wherever you like in your home. At this time you cannot download the Windows Media Connect software from Microsoft’s website.
Chapter 7 07 Video/Audio Adjust menu From the Video/Audio Adjust menu you can make various settings that affect how video is presented on your TV and how the sounds. Items in the Video/Audio Adjust menu can only be changed during playback. Video Adjust • Default setting: Standard From the Video Adjust screen you can select the Standard or Cinema video presentation or define presets of your own in Memory 1 to Memory 3. 1 Press HOME MENU and select ‘Video/Audio Adjust’ from the on-screen display.
07 Audio Adjust From the Audio Adjust menu you can set the Audio DRC (Dynamic Range control). Audio DRC • Default setting: Off When watching Dolby Digital BD and DVD discs, as well as PC files with Dolby Digital audio, at low volume, it’s easy to lose the quieter sounds completely — including some of the dialog. Switching Audio DRC to On can help by bringing up the quieter sounds, while controlling loud peaks. How much of a difference you hear depends on the material you’re listening to.
Chapter 8 Initial Setup menu 08 Using the Initial Setup menu The Initial Setup menu is where you can set various player options for sound, picture, language and so on. Note that settings can only be changed when the player is stopped. If you disconnect the player from the wall outlet before switching the player off, any new settings made during that session will be lost. • Press HOME MENU and select ‘Initial Setup’.
08 Setting Options Explanation Audio Out Dolby Digital Out Dolby Digital • Outputs a Dolby Digital signal when a Dolby Digital source is being played. Dolby Digital PCM Converts Dolby Digital sources to Linear PCM output. Use if your connected equipment doesn’t support Dolby Digital audio. This setting is effective in digital audio outputs. DTS Out DTS • Outputs a DTS signal when a DTS source is being played. DTS PCM Converts sources with DTS audio to Linear PCM output.
Setting Options Explanation Change Password (Set Password) Next Screen Set or change the password necessary to play BD or DVD discs that have level/age restrictions. In order to change the password, you’ll need to first enter your existing one. DVD Parental Lock Change Level Enter your password and then set the parental lock level. Discs with a lock level higher than that set in the player will require the password to play. DVD Country Code Enter your password and then set a country/area code.
08 About the audio output settings The table below shows how the audio settings you make in the Initial Setup menu (page 39) affect the output to the analog (2ch/5.1ch), digital and HDMI outputs with various types of disc/files. Analog outputs Disc audio format HDMI output1 Digital outputs 2ch2 5.1ch2 PCM convert3 Bitstream4,5 PCM6 Auto5,6,7 Dolby Digital 2ch downmix PCM 5.1ch PCM 2ch downmix PCM Dolby Digital 5.1ch PCM Dolby Digital Dolby Digital 2ch downmix PCM 5.
Speaker Setup 08 Note You only need to make this setting if you connected this player to your amplifier using the 5.1 channel analog outputs. • Steps 1 to 3 are the operations performed by the user (they are intended to download the software from the Internet). This setting does not affect any digital audio output. • Steps 4 to 6 are the operations performed (automatically) by the player (they are intended to update the software).
09 Chapter 9 Additional information Taking care of your player and discs Damaged and odd-shaped discs Handling discs Discs spin at high speed inside the player. If you can see that a disc is cracked, chipped, warped, or otherwise damaged, don’t risk using it in your player — you could end up damaging it. When holding discs of any type, take care not to leave fingerprints, dirt or scratches on the disc surface. Hold the disc by its edge or by the center hole and edge.
Hints on installation We want you to enjoy using this product for years to come, so please bear in mind the following points when choosing a suitable location for it: Do... • Use in a well-ventilated room. • Place on a solid, flat, level surface, such as a table, shelf or stereo rack. Don’t... • Use in a place exposed to high temperatures or humidity, including near radiators and other heat-generating appliances. • Place on a window sill or other place where the player will be exposed to direct sunlight.
09 Setting up the remote to control your TV 1 Input the manufacturer code. While holding down the TV CONTROL button, input the two digit code from the table below that corresponds to the make of your TV. For example, if you have a Pioneer TV, press and hold TV CONTROL , then press 0, 0 on the remote control. 2 Confirm that the TV is responding to the programmed code. On the remote, press the TV CONTROL button.
BD/DVD language code list 09 Language (Language code letter), Language code Japanese (ja), 1001 English (en), 0514 French (fr), 0618 German (de), 0405 Italian (it), 0920 Spanish (es), 0519 Dutch (nl), 1412 Russian (ru), 1821 Chinese (zh), 2608 Korean (ko), 1115 Greek (el), 0512 Afar (aa), 0101 Abkhazian (ab), 0102 Afrikaans (af), 0106 Amharic (am), 0113 Arabic (ar), 0118 Assamese (as), 0119 Aymara (ay), 0125 Azerbaijani (az), 0126 Bashkir (ba), 0201 Byelorussian (be), 0205 Bulgarian (bg), 0207 Bihari (bh)
09 Problem Remedy Picture freezes and the front panel and remote control buttons stop working. • Press (stop), then start playback again ( (play)). • Press the front panel STANDBY/ON button to switch the power off, then switch back on and restart playback. If the power fails to switch off, press and hold STANDBY/ON for 20 seconds until the power switches off. Then switch on again by pressing STANDBY/ON.
Problem Remedy Disc containing PC files won’t play. • Make sure the disc is compatible with this player (see Disc/content format playback compatibility on page 7). • This player is compatible with multi-border discs, but only plays the first border. • Check that the file complies to one of the supported formats, bit rates or profiles (see File compatibility on page 7). Also check that the file is not damaged.
09 Problem Remedy HDMI Control does not function. • Verify that the HDMI cable is firmly connected. • Make sure that this unit’s HDMI Control is set to On (page 41). • Make sure that the HDMI Control for the connected components is set to On. For more information, refer to the operating manual for the connected component. • This function may not work properly if you have multiple components connected to a single plasma television, AV system (amplifier or AV receiver etc.), or HD AV Converter.
Problem Remedy Cannot play or display. • Check the physical connections (hub, 100BASE-TX, or other cable quality). • Check if the file complies to the supported format, bit rate or profile (see File compatibility on page 7). Also check if the file is damaged. • If the message ‘Cannot play this format’ is displayed when you try to play PC files, check the file formats. • It takes time to capture and display a large-sized image; during this time you may have to wait to operate the player.
09 Problem Remedy On hybrid discs with BD and CD layers, the CD layer cannot be played back. • Change the Set hybrid disc playback layer to CD (page 41). When the Set hybrid disc playback layer • When the layer set to playback at Set hybrid disc playback layer is not present on an inserted hybrid disc, the BD layer is played back. is set to DVD and you insert a hybrid disc with BD and CD layers, the BD layer is played back.
DTS-HD High Resolution Audio Progressive scan video DTS-HD High Resolution Audio provides sound quality which far outpaces that of the current DVD discs with constant data rates from 1.5 Mbps to 6.0 Mbps for Blu-ray Disc. DTS-HD High Resolution Audio is capable of up to 7.1 channels of audio at a sampling frequency of 96 kHz/24 bits so the original sound is finely and faithfully reproduced with less disc space compared to DTS-HD Master Audio.
09 License [MPEG4IP] This software is based in part on Mozilla Public License 1.1 see http://www.mozilla.org/MPL/for information. [OpenSSL] OpenSSL License Copyright © 1998-2004 The OpenSSL Project. All rights reserved. Redistribution and use in source and binary forms, with or without modification, are permitted provided that the following conditions are met: 1. Redistributions of source code must retain the above copyright notice, this list of conditions and the following disclaimer. 2.
[tiff] Copyright © 1988-1997 Sam Leffler Copyright © 1991-1997 Silicon Graphics, Inc. THE SOFTWARE IS PROVIDED “AS-IS” AND WITHOUT WARRANTY OF ANY KIND, EXPRESS, IMPLIED OR OTHERWISE, INCLUDING WITHOUT LIMITATION, ANY WARRANTY OF MERCHANTABILITY OR FITNESS FOR A PARTICULAR PURPOSE.
09 The PNG Reference Library is supplied “AS IS”. The Contributing Authors and Group 42, Inc. disclaim all warranties, expressed or implied, including, without limitation, the warranties of merchantability and of fitness for any purpose. The Contributing Authors and Group 42, Inc. assume no liability for direct, indirect, incidental, special, exemplary, or consequential damages, which may result from the use of the PNG Reference Library, even if advised of the possibility of such damage.
[Vera.ttf/VeraMono.ttf] Copyright © 2003 by Bitstream, Inc. All Rights Reserved. Bitstream Vera SansBitstreamVeraSans-RomanRelease 1.10 Copyright © 2003 by Bitstream, Inc. All Rights Reserved. Bitstream Vera is a trademark of Bitstream, Inc. 09 [TinyLogin] This software is Copyright 1988 - 1994, Julianne Frances Haugh. All rights reserved. [Shadow Utilities] This software is Copyright 1988 - 1994, Julianne Frances Haugh. All rights reserved.
09 3. 4. 5. 6. 7. 8. 58 En b) You must cause any work that you distribute or publish, that in whole or in part contains or is derived from the Program or any part thereof, to be licensed as a whole at no charge to all third parties under the terms of this License.
9. The Free Software Foundation may publish revised and/or new versions of the General Public License from time to time. Such new versions will be similar in spirit to the present version, but may differ in detail to address new problems or concerns. Each version is given a distinguishing version number.
09 Preamble The licenses for most software are designed to take away your freedom to share and change it. By contrast, the GNU General Public Licenses are intended to guarantee your freedom to share and change free software – to make sure the software is free for all its users. This license, the Lesser General Public License, applies to some specially designated software packages – typically libraries – of the Free Software Foundation and other authors who decide to use it.
a) b) c) d) 3. 4. 5. 6. 7. 8. The modified work must itself be a software library. You must cause the files modified to carry prominent notices stating that you changed the files and the date of any change. You must cause the whole of the work to be licensed at no charge to all third parties under the terms of this License.
09 For an executable, the required form of the “work that uses the Library” must include any data and utility programs needed for reproducing the executable from it. However, as a special exception, the materials to be distributed need not include anything that is normally distributed (in either source or binary form) with the major components (compiler, kernel, and so on) of the operating system on which the executable runs, unless that component itself accompanies the executable.
How to Apply These Terms to Your New Libraries If you develop a new library, and you want it to be of the greatest possible use to the public, we recommend making it free software that everyone can redistribute and change. You can do so by permitting redistribution under these terms (or, alternatively, under the terms of the ordinary General Public License). To apply these terms, attach the following notices to the library.
Discover the benefits of registering your product online at http://www.pioneer.co.uk (or http://www.pioneer.eu) PIONEER CORPORATION 4-1, Meguro 1-Chome, Meguro-ku, Tokyo 153-8654, Japan PIONEER ELECTRONICS (USA) INC. P.O. BOX 1540, Long Beach, California 90801-1540, U.S.A. TEL: (800) 421-1404 PIONEER ELECTRONICS OF CANADA, INC. 300 Allstate Parkway, Markham, Ontario L3R 0P2, Canada TEL: 1-877-283-5901, 905-479-4411 PIONEER EUROPE NV Haven 1087, Keetberglaan 1, B-9120 Melsele, Belgium TEL: 03/570.05.